Iddler Body Issue
Greetings All,
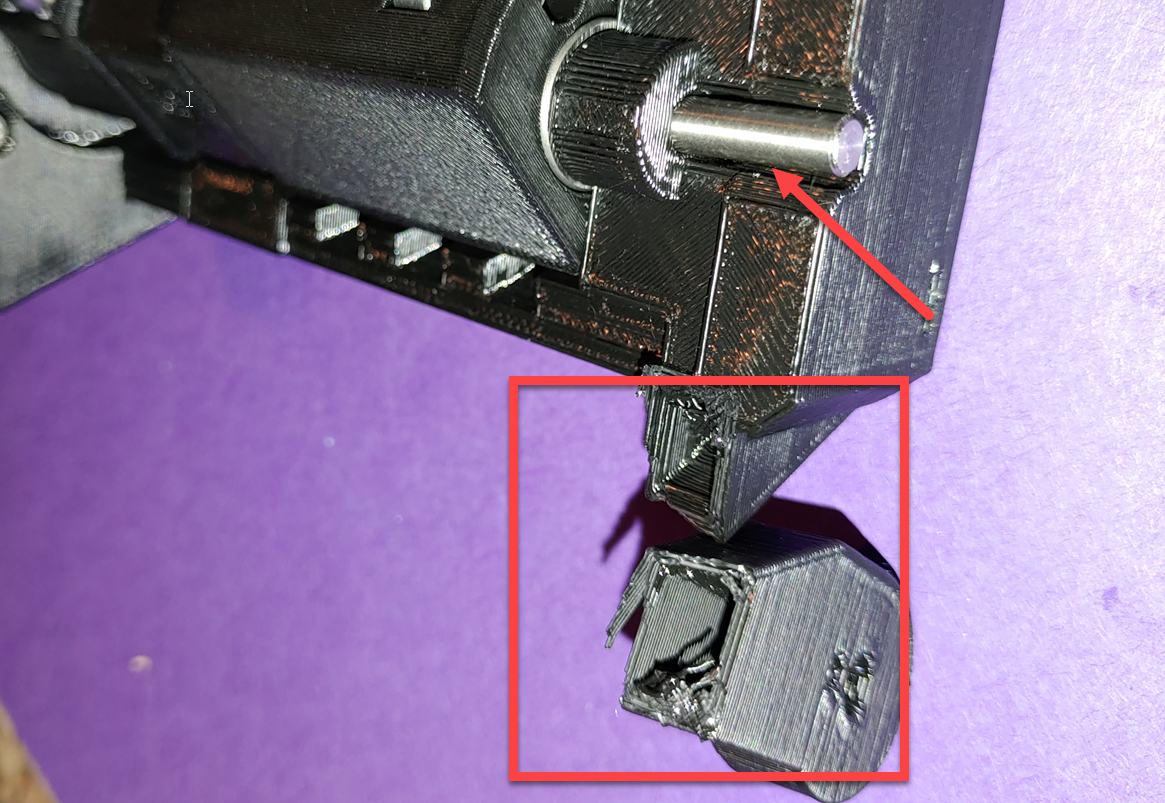
While attempting to insert the pin below, the hinge snapped with almost no force on it.
Shouldn't there be some infill for stability?
I am printing another, any tips? I saw the site stated 20% infill, I am moving up to 30 to see if it will be stronger.
RE: Iddler Body Issue
You would probably get greater strength with more perimeters
regards Joan
I try to make safe suggestions,You should understand the context and ensure you are happy that they are safe before attempting to apply my suggestions, what you do, is YOUR responsibility.Location Halifax UK
RE: Iddler Body Issue
I think you're talking about the first pin insertion into the idler body, Step 13 of the assembly? The hinge isn't involved in this step but did you accidentally press on it or something?
I can't comment on the strength and can only say it seemed to be normal and I had no issues. If you're re-printing it make sure you get the latest version from Prusa's github (a small number of the printed parts have ben rev'd), then slice it with their standard settings and carefully examine the infill - perhaps on their print farm this printed incorrectly for some reason. If it still looks relatively hollow then play with the infill setting or as @joantabb mentioned the perimeters.
Also note there is a slicer parameter called Solid Infill Threshold Area that I usually tweak when I have small joining geometries. This setting basically says if the area is below a certain threshold, instead of infill make it solid. Imagine a 5mm cube sitting flush on top of a 25mm cube. The slicer will normally continue the infill from the larger cube into the smaller cube. By adjusting this parameter you can make the interface, and subsequently the smaller cube completely solid.
If you hover over the setting it says the default is 70mm**2, but the parameter in the slicer is actually zero (and I'm not sure what that means). I typically set it to 70 when I have a model with smaller joining geometries.
Let us know how you make out.
RE: Iddler Body Issue
@steve-e3
Yes, I was holding the body and when I pressed on it bend the hinge and snapped. This was during the Iddler pin install. I tsted the other side and it snapped fairly easily. I reprinted with 25% infill 3D honeycomb. I can't break it, very solid. I don't see how it would have ever held putting in the last hinge pins for step 13. I guess I'm glad it snapped early in the process. I did forward to Prusa so they could check their print farm and check on the quality of future prints. I have the MMU2 together now, leary about installing on the printer. The only other issue was fitting the finda selector with the blade in place. The print quality was a bit rough and required sanding.
Thank you for the input!
RE: Iddler Body Issue
Please make sure the FINDA and the blade perfectly fit as intended, otherwise you may have issues later on and will need to backtrack which is no fun with the MMU2s. Its a good time to check that everything fits correctly, that filament can pass easily through to the gears, that the gears are properly aligned to the filament.
It sounds like you've taken your time and have been very careful which is excellent, that will pay off when you start testing it. I can't count how many people take shortcuts or make mods along the way then wonder why they have so many issues
Good luck!