General Calibration and Troubleshooting Checklist, this thing is a nightmare.
MMU Needs Attention
MMU Needs Attention
MMU Needs Attention
While I know all issues aren't the MMU, I've only gotten 2 multi material prints out of this thing, and I don't think all the trouble is worth having auto switching filaments (which is really its main use right now).
Anyway, what I am hoping for, does someone have a comprehensive maintenance/tuning checklist for an i3 with MMU2S I could run through to try and get this thing to start working consistently? I feel like I fiddle more than print (which I know is part of 3D printing haha)
Thanks all.
RE: General Calibration and Troubleshooting Checklist, this thing is a nightmare.
What mods, if any, have you done with the MMU? What filament are you using? When the MMU begs for attention, why did it fail?
I did several things when I built my MMU right from the start, bypassing the stock setup. I mainly did the following things differently from the original:
- Except for the PTFE tube in the extruder, I replaced ALL of it with 4mm OD x 3mm ID. This reduces drag, though I don't know by how much, and also allows for slightly more bulbous filament tips supposedly. I'm on the fence regarding the larger tips because it still need to go into extruder where the PTFE tube is roughly 1.85mm.
- I printed an "upgraded" selector which allows a magnet to be placed under the metal ball that triggers the FINDA. I'm not convinced that it is an upgrade though because the metal ball isn't measurably attracted to the magnet.
- I printed this passthrough adapter. It uses M10 fittings, which you'll need to purchase, and allows the filament to move more easily through the MMU.
- The filament sensor tower is very important to get set right. The problem with this stupid thing is that it can move when you tighten it. I printed a different filament tower, one with a screw to adjust it, but I can't find it again to link it. Here's another one that I would probably try should I need to this again.
- I used this buffer instead of the original one. I used a remixed version that uses M10 fittings.
RE: General Calibration and Troubleshooting Checklist, this thing is a nightmare.
I am with @henry-2 on 1 to 4 (I got a new steel ball from a magnet store to replace the weakly attracted stock one - makes a real difference). Regarding 5, I use the stock buffer with some enhancements ( https://www.printables.com/model/54445-ptfe-tube-mounts-for-lack-enclosure-v2 ). My MMU2 runs pretty smooth as multi material unit, even for prints with thousand tool changes and more.
As for troubleshooting:
1) Main problem for loading errors seem so be friction and obstacles in the filament path. Make sure everything is aligned in the MMU and the PTFEs are inserted the right way (chaffed side oriented the right way) and all the way in (check the little windows inside the MMU, they are there for a reason, you should see the aft PTFEs in there.) Consider bigger ID PTFEs (I use 2,5mm inside the MMU and selector to extruder and 3mm MMU to buffer and buffer to spools).
To check each slot, disconnect the PTFE from extruder and "load to nozzle", when the filament reaches the end to the PTFE just feed a bit of other filament into the to of the extruder to trigger the sensor and make the printer think loading was successful. The MMU2 should then disengage and you can judge the friction by pulling the filament, compare the 5 slots, find out where the friction is coming from if there is a difference.
2) main problem for unloading errors seem to be imperfect tips and stringing. My advice: use stock hot end and dry filament with an existing MMU2 profile in PrusaSlicer. The ramming settings usually work and messing with them or getting them to work with different filament is complex and often futile. If your are having problems with the tips check the PTFE inside the extruder make sure it's the right one (ID 1,85 and chaffed) use one of the spares that came with the MMU kit!
Use the modified selector with a steel ball with good magnet attraction, this way FINDA is more forgiving when you have a bit of stringing.
3) main problem for "MMU acts wired" seems to be not properly calibrated filament IR sensor and FINDA sensor. Take your time to calibrate those and consider LED mod to see the IR sensor state during operation, it needs to be steady!
4) main problem for "all LEDs blinking" seems to be a design flaw of the MMU logic board. ( see https://forum.prusa3d.com/forum/original-prusa-i3-mmu2s-mmu2-hardware-firmware-and-software-help/i-found-serious-design-error-in-mmu2-electronics-hardware/#post-612797 ) An external USB power source solved my problems.
If at first you don't succeed, skydiving is not for you.
Find out why this is pinned in the general section!
RE: General Calibration and Troubleshooting Checklist, this thing is a nightmare.
What mods, if any, have you done with the MMU? What filament are you using? When the MMU begs for attention, why did it fail?
I did several things when I built my MMU right from the start, bypassing the stock setup. I mainly did the following things differently from the original:
- Except for the PTFE tube in the extruder, I replaced ALL of it with 4mm OD x 3mm ID. This reduces drag, though I don't know by how much, and also allows for slightly more bulbous filament tips supposedly. I'm on the fence regarding the larger tips because it still need to go into extruder where the PTFE tube is roughly 1.85mm.
- I printed an "upgraded" selector which allows a magnet to be placed under the metal ball that triggers the FINDA. I'm not convinced that it is an upgrade though because the metal ball isn't measurably attracted to the magnet.
- I printed this passthrough adapter. It uses M10 fittings, which you'll need to purchase, and allows the filament to move more easily through the MMU.
- The filament sensor tower is very important to get set right. The problem with this stupid thing is that it can move when you tighten it. I printed a different filament tower, one with a screw to adjust it, but I can't find it again to link it. Here's another one that I would probably try should I need to this again.
- I used this buffer instead of the original one. I used a remixed version that uses M10 fittings.
I have done 3 from your list, however I am also using the stock buffer with wider printed input/outputs that have M10 fittings on them on them as Robin did.
Also to @robin's point, I do get a lot of "all lights blinking" and I will try to rectify that right away. Because that was also happening A LOT from OctoPi, and I replaced that PSU about 10 times .At this point I'm back to manually printing from SD card because it's too flaky from OctoPi
I'll try these out, but the amount of time I've spent messing with the MMU compared to the amount of multi-material print's I've pulled off is absolutely abysmal (maybe the worst product I've ever bought). Are there links to a restore to single filament version if I just don't want to deal anymore?
RE: General Calibration and Troubleshooting Checklist, this thing is a nightmare.
The proper way to do it would probably be to just redo the assembly instructions pretty much in reverse. However, I've seen a post or two where people have simply disconnected the communication cable between the two units to bypass the MMU to do single color or prints with TPU. There might also be a menu setting where you tell the printer not to use an MMU, I'm not certain. I think the biggest issue with not undoing all of the changes is that the filament sensor is in a different location, and the MMU method is more finicky.
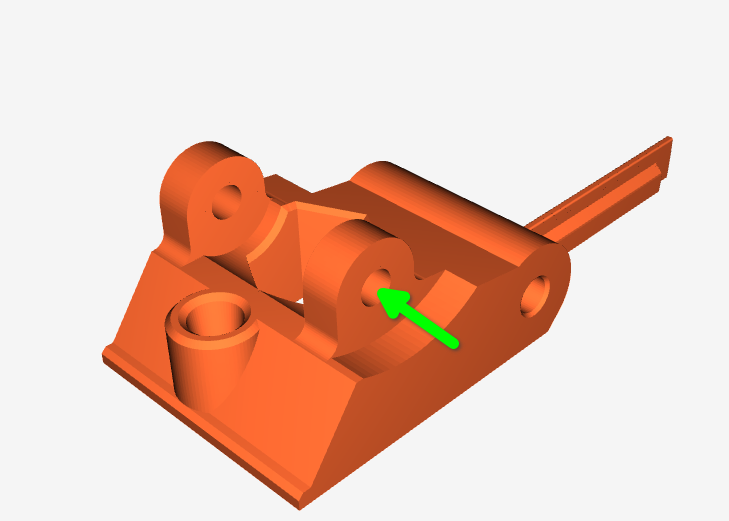
The only issue I had with the MMU that drove me absolutely crazy was an issue with the idler door. The axle that goes into the idler (see image below) worked its way loose. It was still hanging in there, but just barely. What'd happen is that the filament would feed in, and the idler would push over enough to trigger the IR sensor. That's good. But then the MMU / Extruder do this dance where it pushes the filament down into the hot end, then pulls it back out, then checks to ensure that the filament is still detected in the extruder. This ensures that the filament path isn't blocked. However, since that axle came loose, as soon as the filament started to back up, the filament sensor would get untriggered. This made the MMU assume that the filament wasn't loaded properly. The MMU would pull it out, try again, and fail again. The cycle would repeat a few times, then it'd go into an error state.
Can you describe how the MMU fails when it fails? Does it fail nearly every time it tries to change filament, or more like one out of 10 times? I typically get a failure once every 500 to 2000 changes (except with Hatchbox White PLA, then it is every 5 changes....). If you can describe how it fails and what it is doing when it fails, perhaps it'll shed some light on it that will point us in the correct direction.
RE: General Calibration and Troubleshooting Checklist, this thing is a nightmare.
The proper way to do it would probably be to just redo the assembly instructions pretty much in reverse. However, I've seen a post or two where people have simply disconnected the communication cable between the two units to bypass the MMU to do single color or prints with TPU. There might also be a menu setting where you tell the printer not to use an MMU, I'm not certain. I think the biggest issue with not undoing all of the changes is that the filament sensor is in a different location, and the MMU method is more finicky.
The only issue I had with the MMU that drove me absolutely crazy was an issue with the idler door. The axle that goes into the idler (see image below) worked its way loose. It was still hanging in there, but just barely. What'd happen is that the filament would feed in, and the idler would push over enough to trigger the IR sensor. That's good. But then the MMU / Extruder do this dance where it pushes the filament down into the hot end, then pulls it back out, then checks to ensure that the filament is still detected in the extruder. This ensures that the filament path isn't blocked. However, since that axle came loose, as soon as the filament started to back up, the filament sensor would get untriggered. This made the MMU assume that the filament wasn't loaded properly. The MMU would pull it out, try again, and fail again. The cycle would repeat a few times, then it'd go into an error state.
Can you describe how the MMU fails when it fails? Does it fail nearly every time it tries to change filament, or more like one out of 10 times? I typically get a failure once every 500 to 2000 changes (except with Hatchbox White PLA, then it is every 5 changes....). If you can describe how it fails and what it is doing when it fails, perhaps it'll shed some light on it that will point us in the correct direction.
I cannot describe how it fails. Because it seems so inconsistent.
One way is all the lights blink. Thats very common. Another is filament gets to the end and the extruder hangs in the lower left of the plate. Sometimes it goes to unload filament and it seems to spin.
Another way it fails is mid-print with "MMU Needs Attention", but I think that was based on OctoPrint, since I have been printing from SD it doesn't seem to be that.
Funny story, I printed the IR sensor adjustor mod, but printed the wrong tower. So I had a LOT of pain putting my printer back together and readjusting the IR sensor, so in that I learned not only how that mod works, but the value of it for calibration.
I will try the PTFE tubes next and then see if I cant get some multi-material prints out. Honestly though, the MMU feels like I paid $700 to alpha test a product. lul