Finally got it working!!!!
After 6 months of trial and error (on and off), I have finally managed to complete the 5 colour Benchy with handles.
I hope someone else can benefit from my findings, so here is what I did differently. Please note, my MMU2S is completely stock, no mods.
1. I used Prusament in all 5 positions. I like the consistency, finish, and accuracy of it. Besides, if it won't work with Prusa's own filament, what chance does anything else have!
2. 4 cooling moves
3. 220 degrees on all filaments
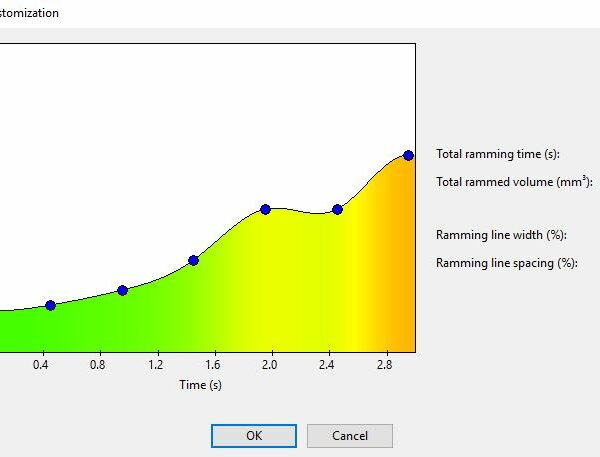
4. Ramming speed as illustrated :
5. Better PFTE tubing (more slippery, slightly larger internal diameter, and a little stiffer) between the selector and extruder.
I had 2 stoppages, once when the 2nd filament loaded for the first time (due to a bad tip left from a previous failed print), and once due to stringing from the 5th filament clogging the selector. That only happened once. Not sure how a calculated 23hr print took 30hrs though! If I charge £400 per Benchy I can make a living doing this!
I hope this helps someone.
RE: Finally got it working!!!!
...edit: PTFE, NOT PFTE!!!! Typo!
RE: Finally got it working!!!!
Where did you get this alternative tubing?
Now that I have things working well, most of my MMU2S fails are first change fails; I'm beginning to get in the habit of double-checking the tips before starting a print.
RE: Finally got it working!!!!
@apromain
I'm glad you found a solution for you. Your settings are creating thick filament tip. Bigger PTFE tube is a must in this case (for everybody who wants to try same setup).
Often linked posts:
Going small with MMU2
Real Multi Material
My prints on Instagram
RE: Finally got it working!!!!
So I am not one for posting in forums- in fact this is my very first post:-). I have been using the MK3S printer since April last year and decided that I would add the MMU2S. I have done may hours of reading and watching YouTube videos so I knew what I was potentially getting in to. The MMU 2S arrived about three two weeks ago. Assembly went well and I must have double checked everything at least 5 times (or so I thought)
I have to say this was going to be my very first attempt a MM colour printing:-).
The day came to try my first first print of the Prusa GCode lizard. I did first layer calibration on every colour and started the print. All went well for about 30mins then filaments started to get stuck, not loading or unloading properly. So I spent a couple of hours looking at the gears and found I had not aligned one of the gears exactly right(this even after checking several times:-) ). I changed out the PTFE tube from the MMU2S to the extruder for a 2.5mm ID tube Also played around with the idler setting screws on the idler body. I my case I found that using Prusa's advice of screwing the screws down to 'just under the surface of the printed part' did not work for my printer. I found I had to tighten the screws down to about 1mm below the printed part. I was well please when I re-started everything and all filaments loaded and unloaded as they should. The print completed without further interactions from myself. I then loaded up both benchy prints and they both printed out without intervention and for my final test I printed out Bob the minion which I found on Thingyverse. Sliced it with Prusa Slicer and after 40hrs of printing non-stop with no interventions from myself I have a great Bob the minion. What I then did was to mark the inside of the idler screw holes with a fine black tip marker- so that when the time comes to open up and clean things I will be able to set the screws exactly where they need to be.
In my particular case I can honestly say I am very happy with the MMU2S as it has, so far, worked fine for me
Chris
RE: Finally got it working!!!!
@c-traher
Where to buy this 2.5mm (ID) PTFE ?
Thanks

