Crappy Looking Tips ; - ;
Hi All
Apologies for the rambling post, have had a long & unsuccessful day with my MMU2S, which I have recently assembled and am now having major issues with the quality of tips
After running many tests (ramming time, unload speed, speed of first/last cooling move, temp during unload...) I can seem to reach the manual example of a good looking tip, as all are not quite pointy enough
Also:
- I am using paul-m27's python script to unload at 195°C to help reduce the likelihood of stringy tips, and this one helped heaps when my tips were too long
- I have replaced all MMU2S PTFE tubes with 3mm dia ones to help with unload blockages
- I have changed a couple of parts on MMU2S to this & this
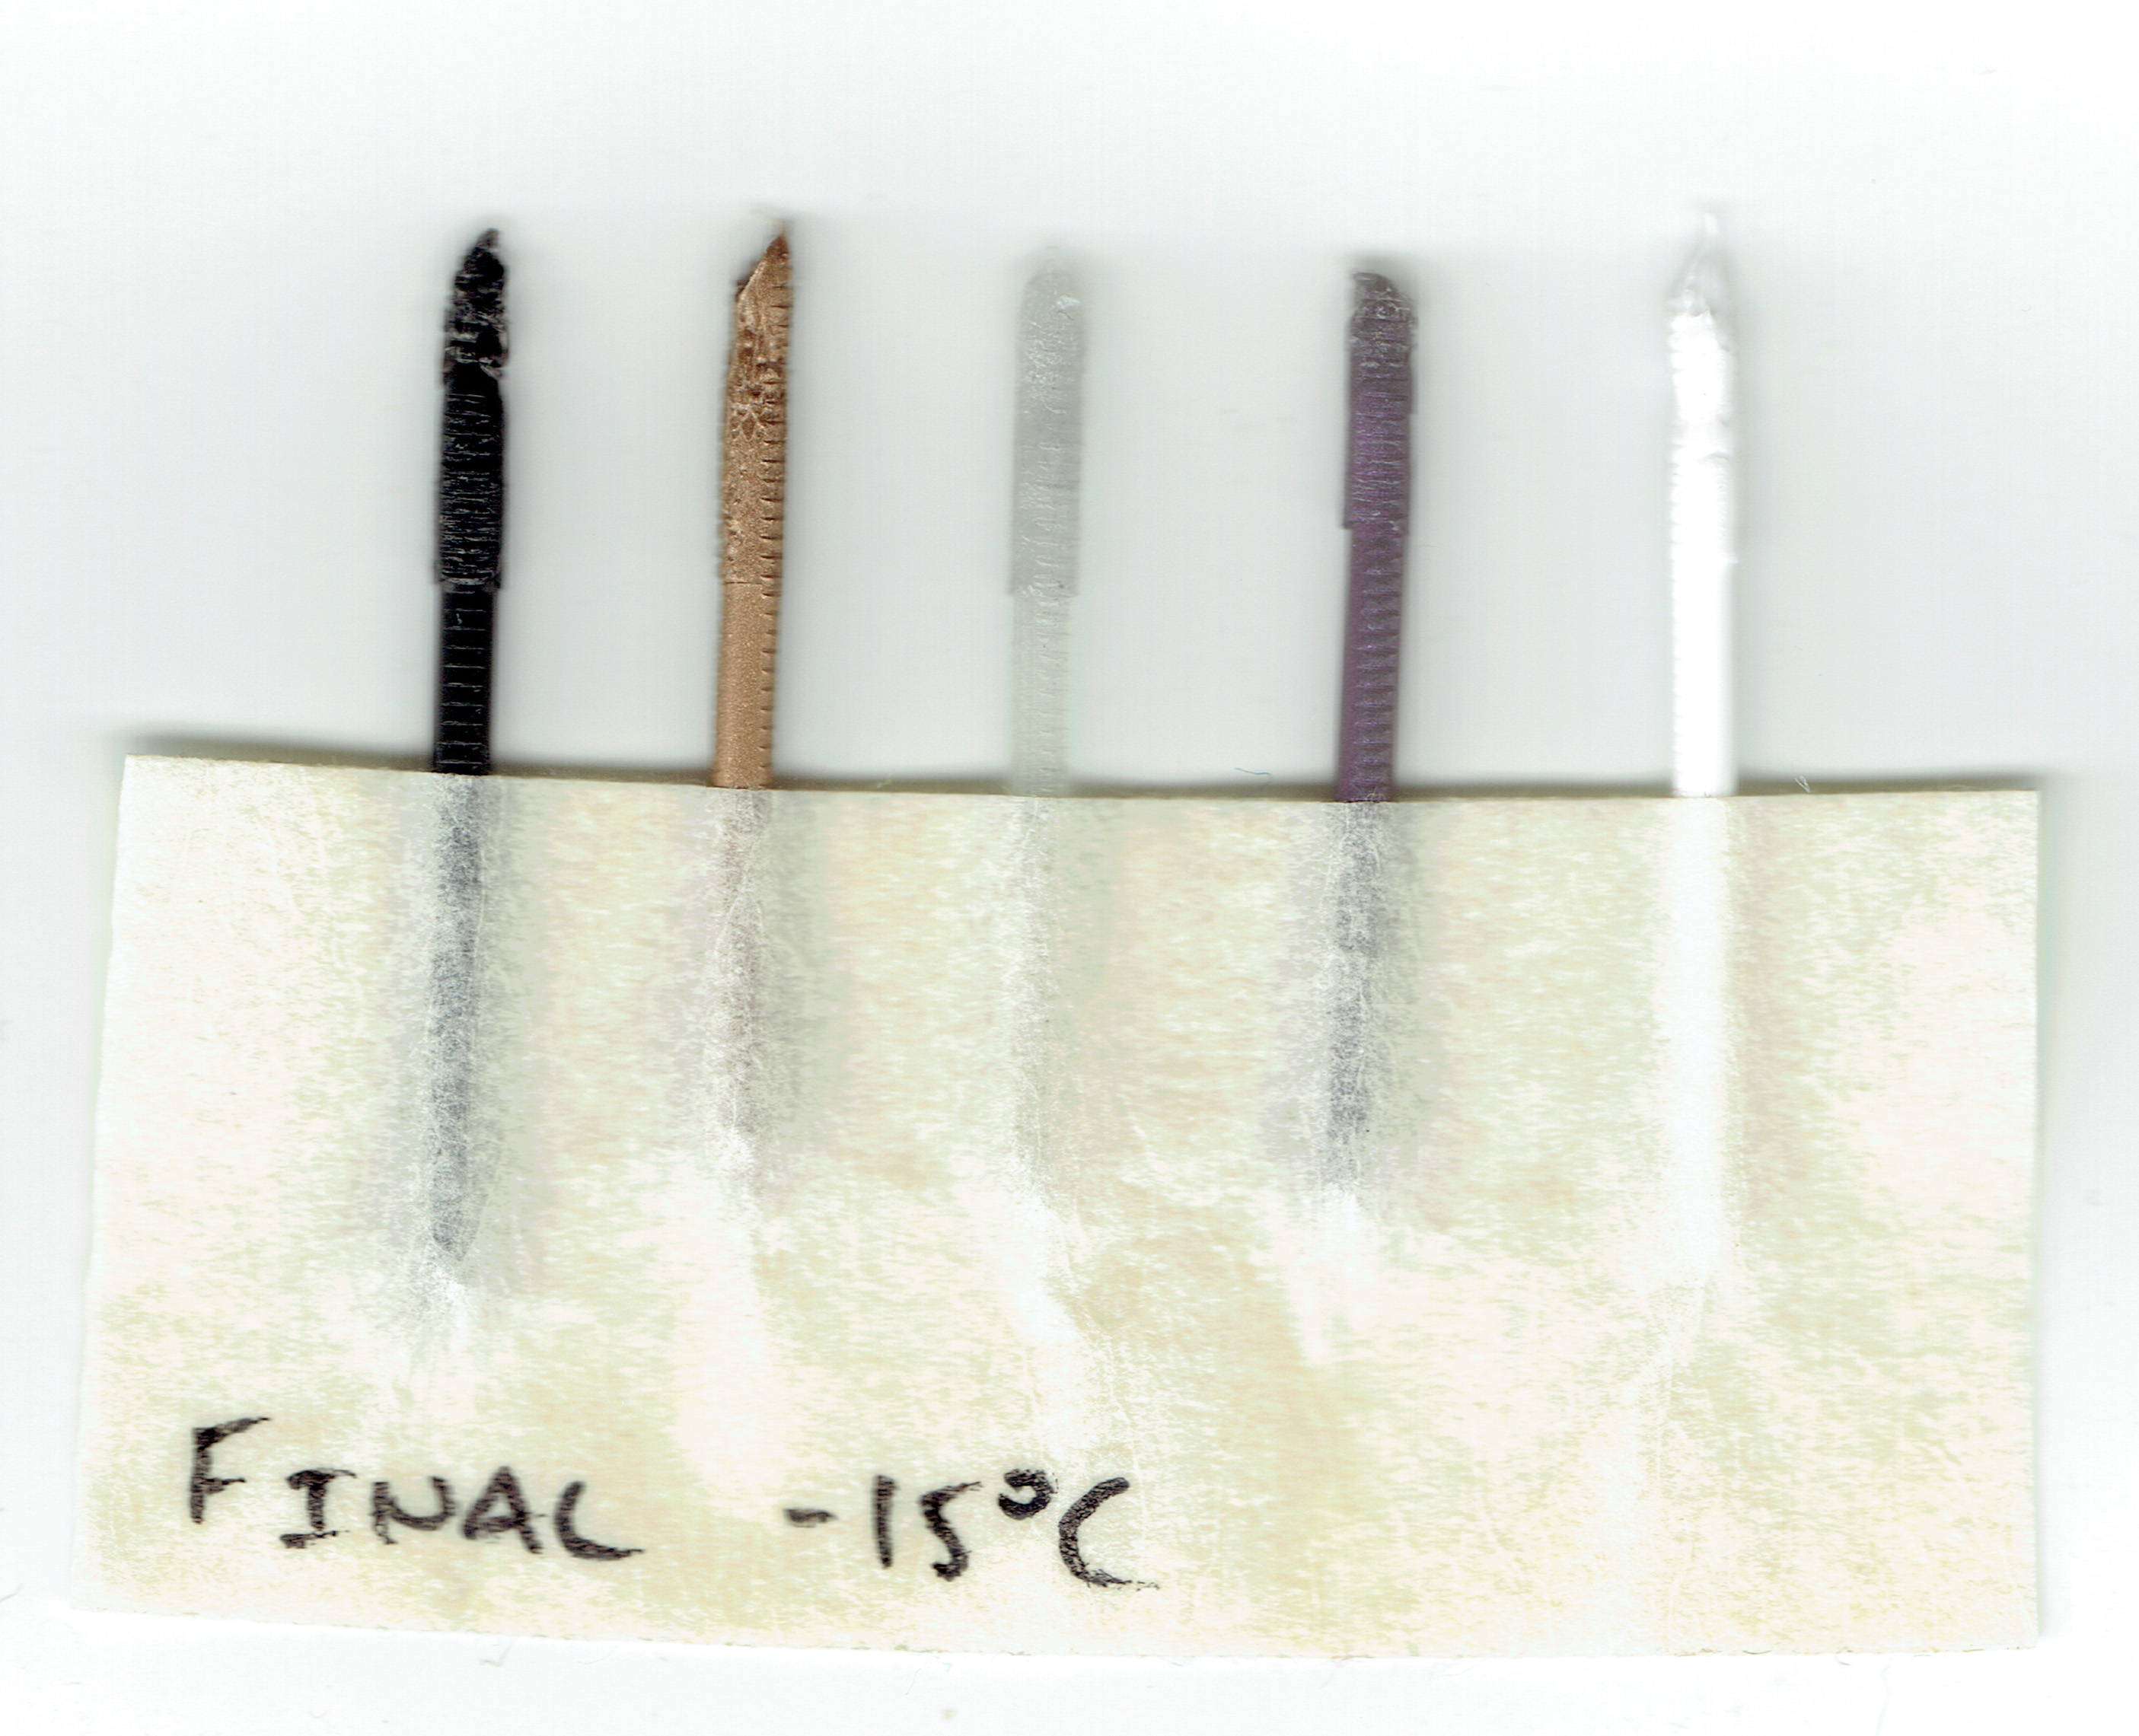
And here are some example of the tips I am getting
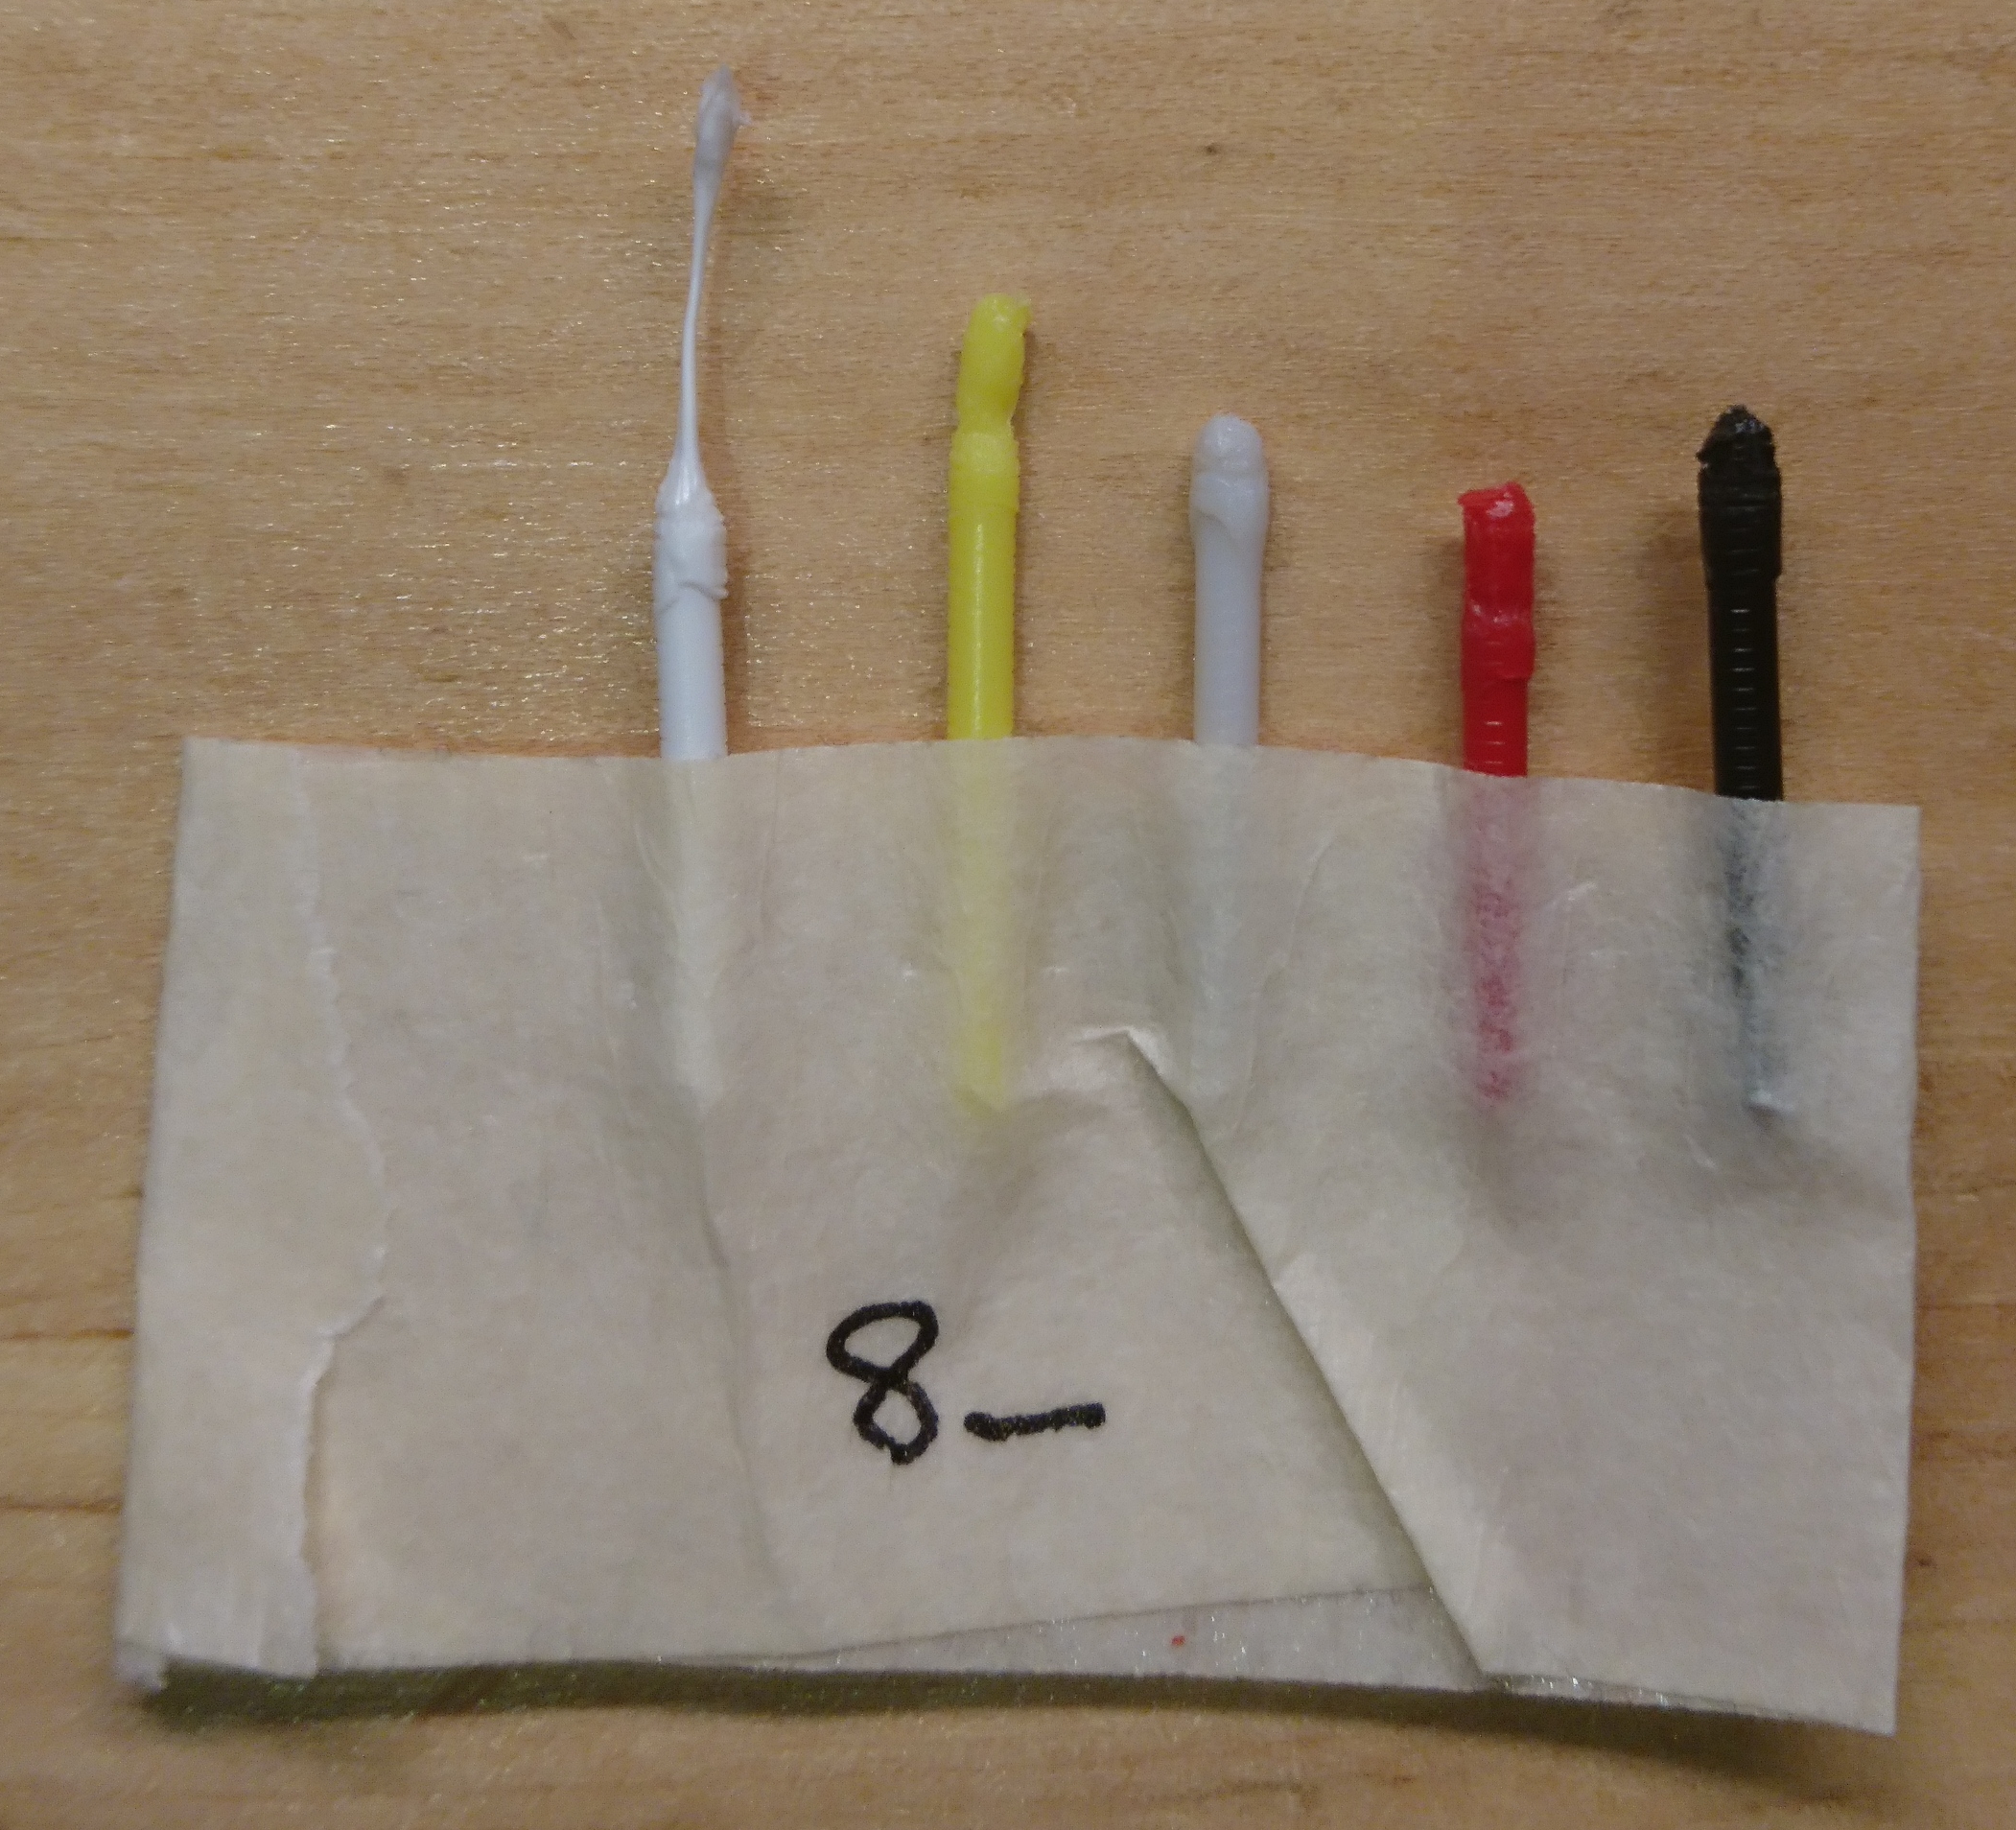
With all that said, would any of you be able to give me some advice as to what I should try next?
www.antalife.com
RE: Crappy Looking Tips ; - ;
HI,
Try adjusting the cooling moves to 4, I found that this number generally got the tips close. Then your unloading speed is quite low, mine is around 90 mm/s. Another thing is to go to one of the default profiles and work from there.
Phil
Stay safe and healthy, Phil
RE: Crappy Looking Tips ; - ;
HI,
Try adjusting the cooling moves to 4, I found that this number generally got the tips close. Then your unloading speed is quite low, mine is around 90 mm/s. Another thing is to go to one of the default profiles and work from there.
Phil
Thanks for the help!
- Have tried to increase cooling moves to 4 but tips more or less stay the same
- Hmm, I did have a high unload speed before (90mm/s) but this was before using the unload temp python script, so will try again
- And all my tests started from the default profiles
www.antalife.com
RE: Crappy Looking Tips ; - ;
It feels like you're taking a very left turn to a dead-end if you need to mod your printer so much. Usually when you get to changing slicer settings, adding custom gcode, modding the mechanical parts you're compensating for something else that is fundamentally wrong. A stock, correctly-working MK3S with a correctly built MMU2S attached with the latest firmware(s) and slicer should be able to print the Prusa test objects (using their supplied gcode) just fine.
You didn't mention the state of the MK3S that you began with. Was that working perfectly? Even after the MMU2S upgrade can you still use it in single-filament mode and print perfectly? No issues with first layer, quality or retraction?
If yes above then is the FINDA and IR sensor sensing filament correctly? Are all Bondtech gears (in the MMU2S and extruder) perfectly aligned with the filament? When you retract the filament completely out are there any unusual marks from EITHER set of bondtech gears (near the end and about 9" down)? Do you have the correct filament tension on the extruder? Have you tried replacing the nozzle with a new one? Does the filament travel freely (by hand) from the buffer, through the MMU2S and down to the nozzle? Are you using quality filament at the correct temperature that is "fresh". (Note even PLA temps vary dramatically, e.g. Matchbox is 180-210 and Prusament is 215).
I started with an MK3 that worked perfectly, and with the kit re-built the extruder to an MK3S, built the MMU2s, flashed the latest firmware for both the printer and the MMU2S and it all worked perfectly as it should afterwards and the tip of the filament is conical each time. I'm now up to 50-60 hours of multi-filament printing with at least 300 filament changes. PRUSA has printed thousands of hours in their testing with this design. In other words, the baseline is that if everything is nominal there is no need for mods, slicer tweaking, gcode, etc.
RE: Crappy Looking Tips ; - ;
@antalife
There are two sets of default profiles, non-mmu and mmu, the mmu profiles are quite different from the mk3/s profiles to account for different filaments. The only thing I've had to do with them is minor tweaking with the two aforementioned adjustments and the temperature. I have a slightly different temperature for the first layer and the following temperatures keep my tips looking good.
Phil
Stay safe and healthy, Phil
RE: Crappy Looking Tips ; - ;
@steve-e3
Originally I had the same line of though, surely a machine that has been tested for 2 months would work out of the box for most people. Turns out this is not always the case, for example if you have a look various forums you will see that the MMU2S is notoriously known as a difficult thing to get up and running, and sure for some it works straight out of the box, but this group seems to make up a smaller percentage
I see your upgrade path was MK3 -> MK3S & MMU2S. For me it was MK3 -> MK3S -> MMU2S, with the gap between MK3S & MMU2S being ~1 year. Well one of the well known issues is that the PTFE tube from the extruder to the MMU2S is a bit too tight, though this problem does not make itself clear unless you have been at the MK3S stage for quite some time. What happens is that the PTFE tube in the MK3S hotend expands over time from general wear & tear. What this means for the MMU2S is that if you have a used PTFE tube in the hotend then the filament tip diameter will be just a bit too big for the PTFE tube that runs from the hotend to the MMU2S, which eventually leads to unload failure. You have not ran into this issue as you have a relatively new hotend PTFE tube that has yet to expand, but if you look at forums one of the universal recommendations is to use a larger diameter PTFE tube from the hotend to MMU2S to counter this issue
Then you also have a bunch of other recommendations that for example make sure that the ball bearing sensor (FINDA?) always resets to the correct position with the help of a magnet, or using pneumatic connectors for the PTFE tubes that go into the MMU2S to help with path resistance and unload/load failures, or even using a Python script to lower the unload temperature to improve tip quality which Prusa seems to be aware of as all their MMU2S profiles are at least 5°C lower than the single colour equivalent
With all that said though, my MK3S worked fabulously before the upgrade, and the same can be said for single colour prints on the MMU2S. To go over each of your questions so we can get more "data points":
- If yes above then is the FINDA and IR sensor sensing filament correctly?
- Yes and yes for both. When I built up the MMU2S I did have some issues with hotend sensor but after adjustments it works fine
- Are all Bondtech gears (in the MMU2S and extruder) perfectly aligned with the filament?
- Yup, double checked this one before and after assembly
- When you retract the filament completely out are there any unusual marks from EITHER set of bondtech gears (near the end and about 9" down)?
- If it has issues with unload then filament will grind at the MMU2S end. Otherwise the only "weird" mark is the teeth from the bondtech gears
- Do you have the correct filament tension on the extruder?
- Seems so, I know what underfeeding looks like when tension is too tight and can say I am not facing this issue now
- Have you tried replacing the nozzle with a new one?
- Have not tried this one but am not sure what bearing it has on quality of tips
- Does the filament travel freely (by hand) from the buffer, through the MMU2S and down to the nozzle?
- Seems to be
- Are you using quality filament at the correct temperature that is "fresh". (Note even PLA temps vary dramatically, e.g. Matchbox is 180-210 and Prusament is 215).
- Yup all of my rolls are removed from a humidity controlled storage box, and temperature is definitely right as I run a temperature calibration tower before I use a roll
www.antalife.com
RE: Crappy Looking Tips ; - ;
@pcweber
Yea did start at the MMU2S profiles, and can see that the single colour profiles are at least 5°C higher
This one is a bit odd as Prusa are effectively telling us to print at a lower than optimal temperature to help with (unload) tips, so why not just have an extra parameter in PrusSlicer for the unload temperature instead of printing at a lower temperature for the whole print
www.antalife.com
RE: Crappy Looking Tips ; - ;
@antalife
Thanks for the details above. I was not aware of the PTFE tube expanding issue - I assume when you say it expands that you also mean the inside diameter shrinks as a result and therefore the slightly larger filament end no longer freely passes through it. Nevertheless, it sounds like a simple enough maintenance issue to replace the PTFE every so often - does replacing it not solve the problem?
So you are using PLA and unloading at 195? Out of curiosity is this in the operating range for the filament you're using? (E.g. it's way out of range for Prusament filament).
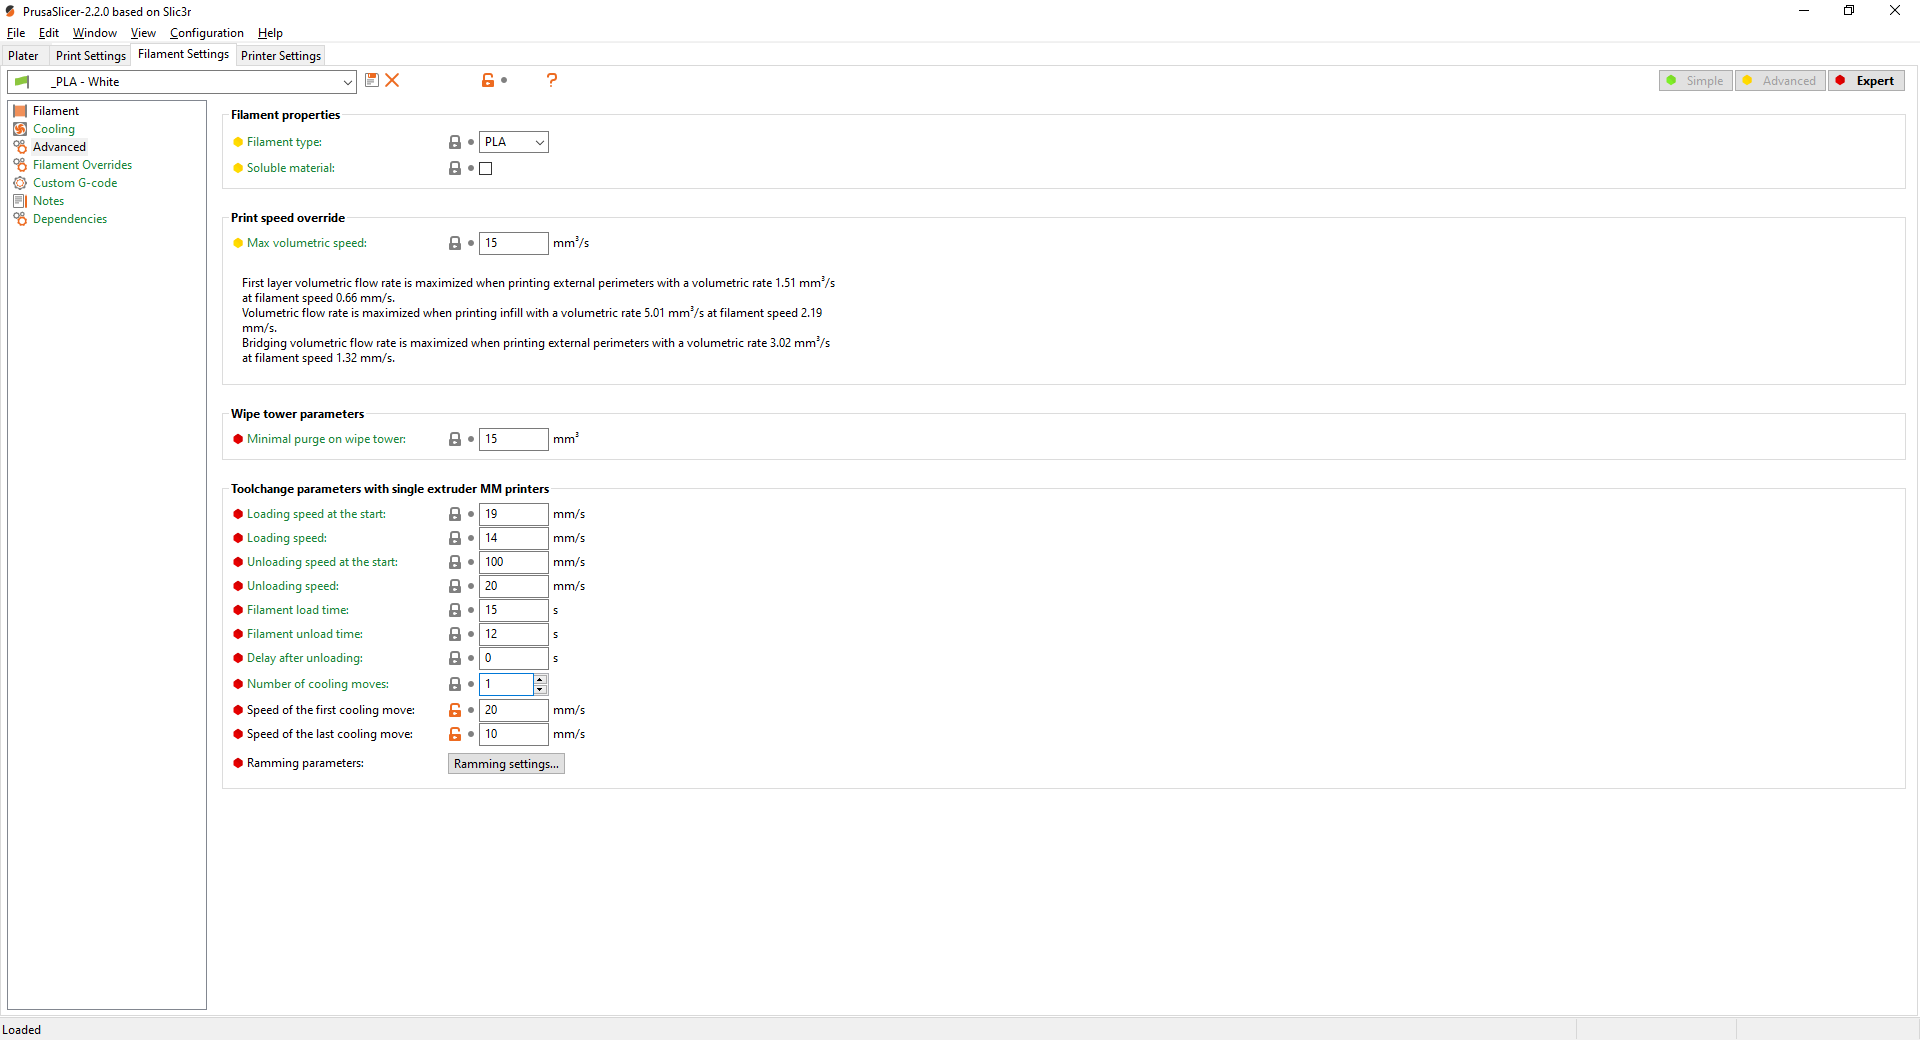
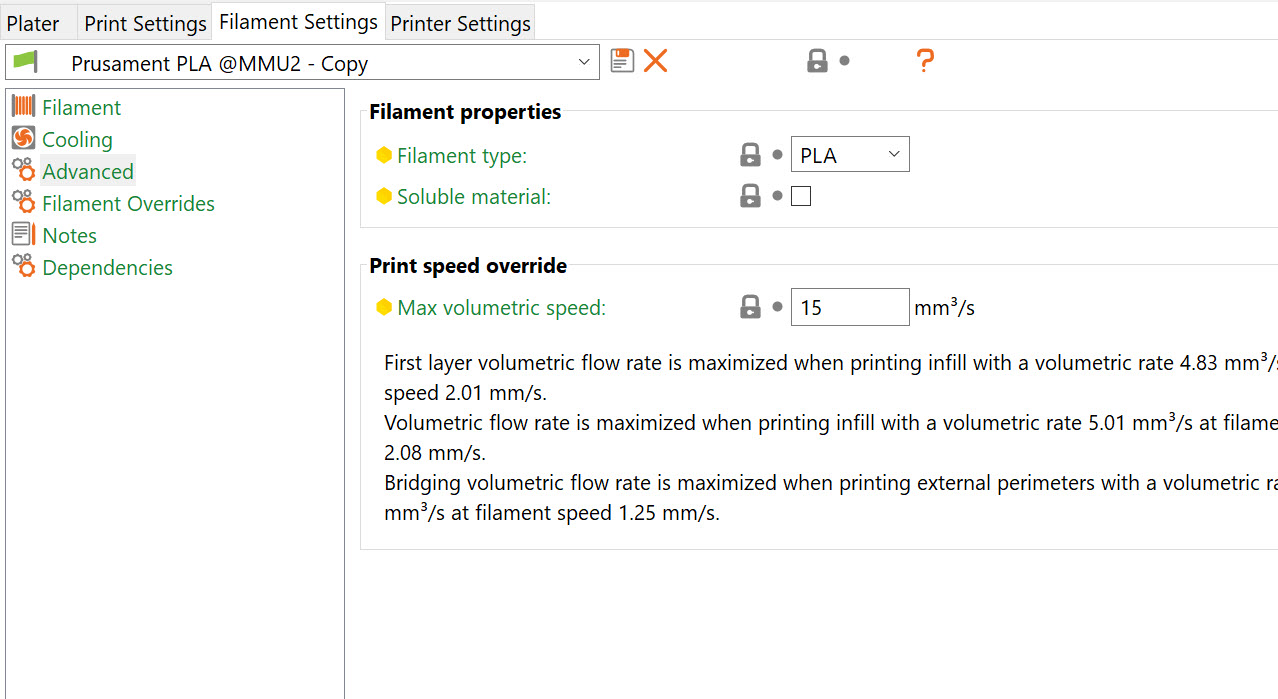
Looking at your first posting your values for Speed of First & Last cooling moves are way, way , way off from the default values. They should be 3 & 2 respectively (see pic). How did you end up with 20 & 10? These are so far from nominal that it might be very difficult to chase down what the real issue is.
My thoughts on the nozzle - if there's any buildup of material lining the nozzle it might affect the shape of the filament on retraction. I know it's a long shot but it's a cheap and easy elimination.
Regarding "...which Prusa seems to be aware of as all their MMU2S profiles are at least 5°C lower than the single colour equivalent" I'm not sure I understand that...with my PrusaSlicer 2.2.0 the filament and bed temperatures are identical between printing with MMU2S Single and MMU2S, at least for Prusament PLA. (I just sliced a model with both settings). Why is your Prusaslicer giving you different temperatures? Maybe I misunderstood.
For "...the MMU2S is notoriously known as a difficult thing to get up and running" - this is very true, there are many people with issues. However if you've followed the online assembly directions and in particular read the comments I am not surprised that so many people have issues. There are many folks working way past exhaustion into the wee hours and taking shortcuts that simply come back to bite them; this is a device that has very little tolerance for being assembled incorrectly.. These are some of my favorite actual quotes from the online MMU2S instructions:
"I tightened mine too much as I didn’t read all the way down the instructions before proceeding. I cracked it and tried to glue it, but I believe the crack was exacerbated by tightening the two tension spring screws down too far on the idler assembly. Because the screws were loose on the extruder motor shaft due to the crack, the idler was shifting off the filament and not allowing the gears to grab it sufficiently to either load or eject properly" [Using a cracked/glued part instead of printing a new one]
"M3x10 screws didnt work for me for the top two holes, I had to use M3x14 screws for them." [Didn't realize the nuts were missing so wrong screws used instead to compensate, may interfere with other parts and will again use the wrong screws later where it requires the now missing M3x14 screws]
"I flared the ptfe tubes behind the selector on all 2 parts and now it's much better. I don't understand why you insist on saying that they are flared only on the outside" [Absolutely no need to flare the PFTE tubes...modding the design before it's even working and not even knowing why, discounts the engineering behind the design]
"After some jams during assembly I also had to use superglue." [No directions anywhere ever call for gluing components together]
"The thermistor I got is a cartridge with a short “pigtail” connector" [Using after-market non-Prusa parts and complaining it doesn't have the correct connector.]
RE: Crappy Looking Tips ; - ;
@steve-e3
Thanks for helping me work through the issue!
Neither was I till I assembled my kit ;^) Also, other way around, as the PTFE tube in the hotend expands with age so does the internal diameter, making your tips larger if your Number of cooling moves is >1. You can replace it, or you can eliminate the problem all together by using a larger diameter PTFE tube from the hotend to the MMU2S. The general consensus is 2.5-3mm internal diameter is what you want
With the filament I use (3Dfillies, an Australian brand) I can print it down to 190-195°C
The filament profile of the previous post is based on: https://www.hcd.net/prusa-mmu2s/Prusa-MMU2S-Reliability-Modifications.htm
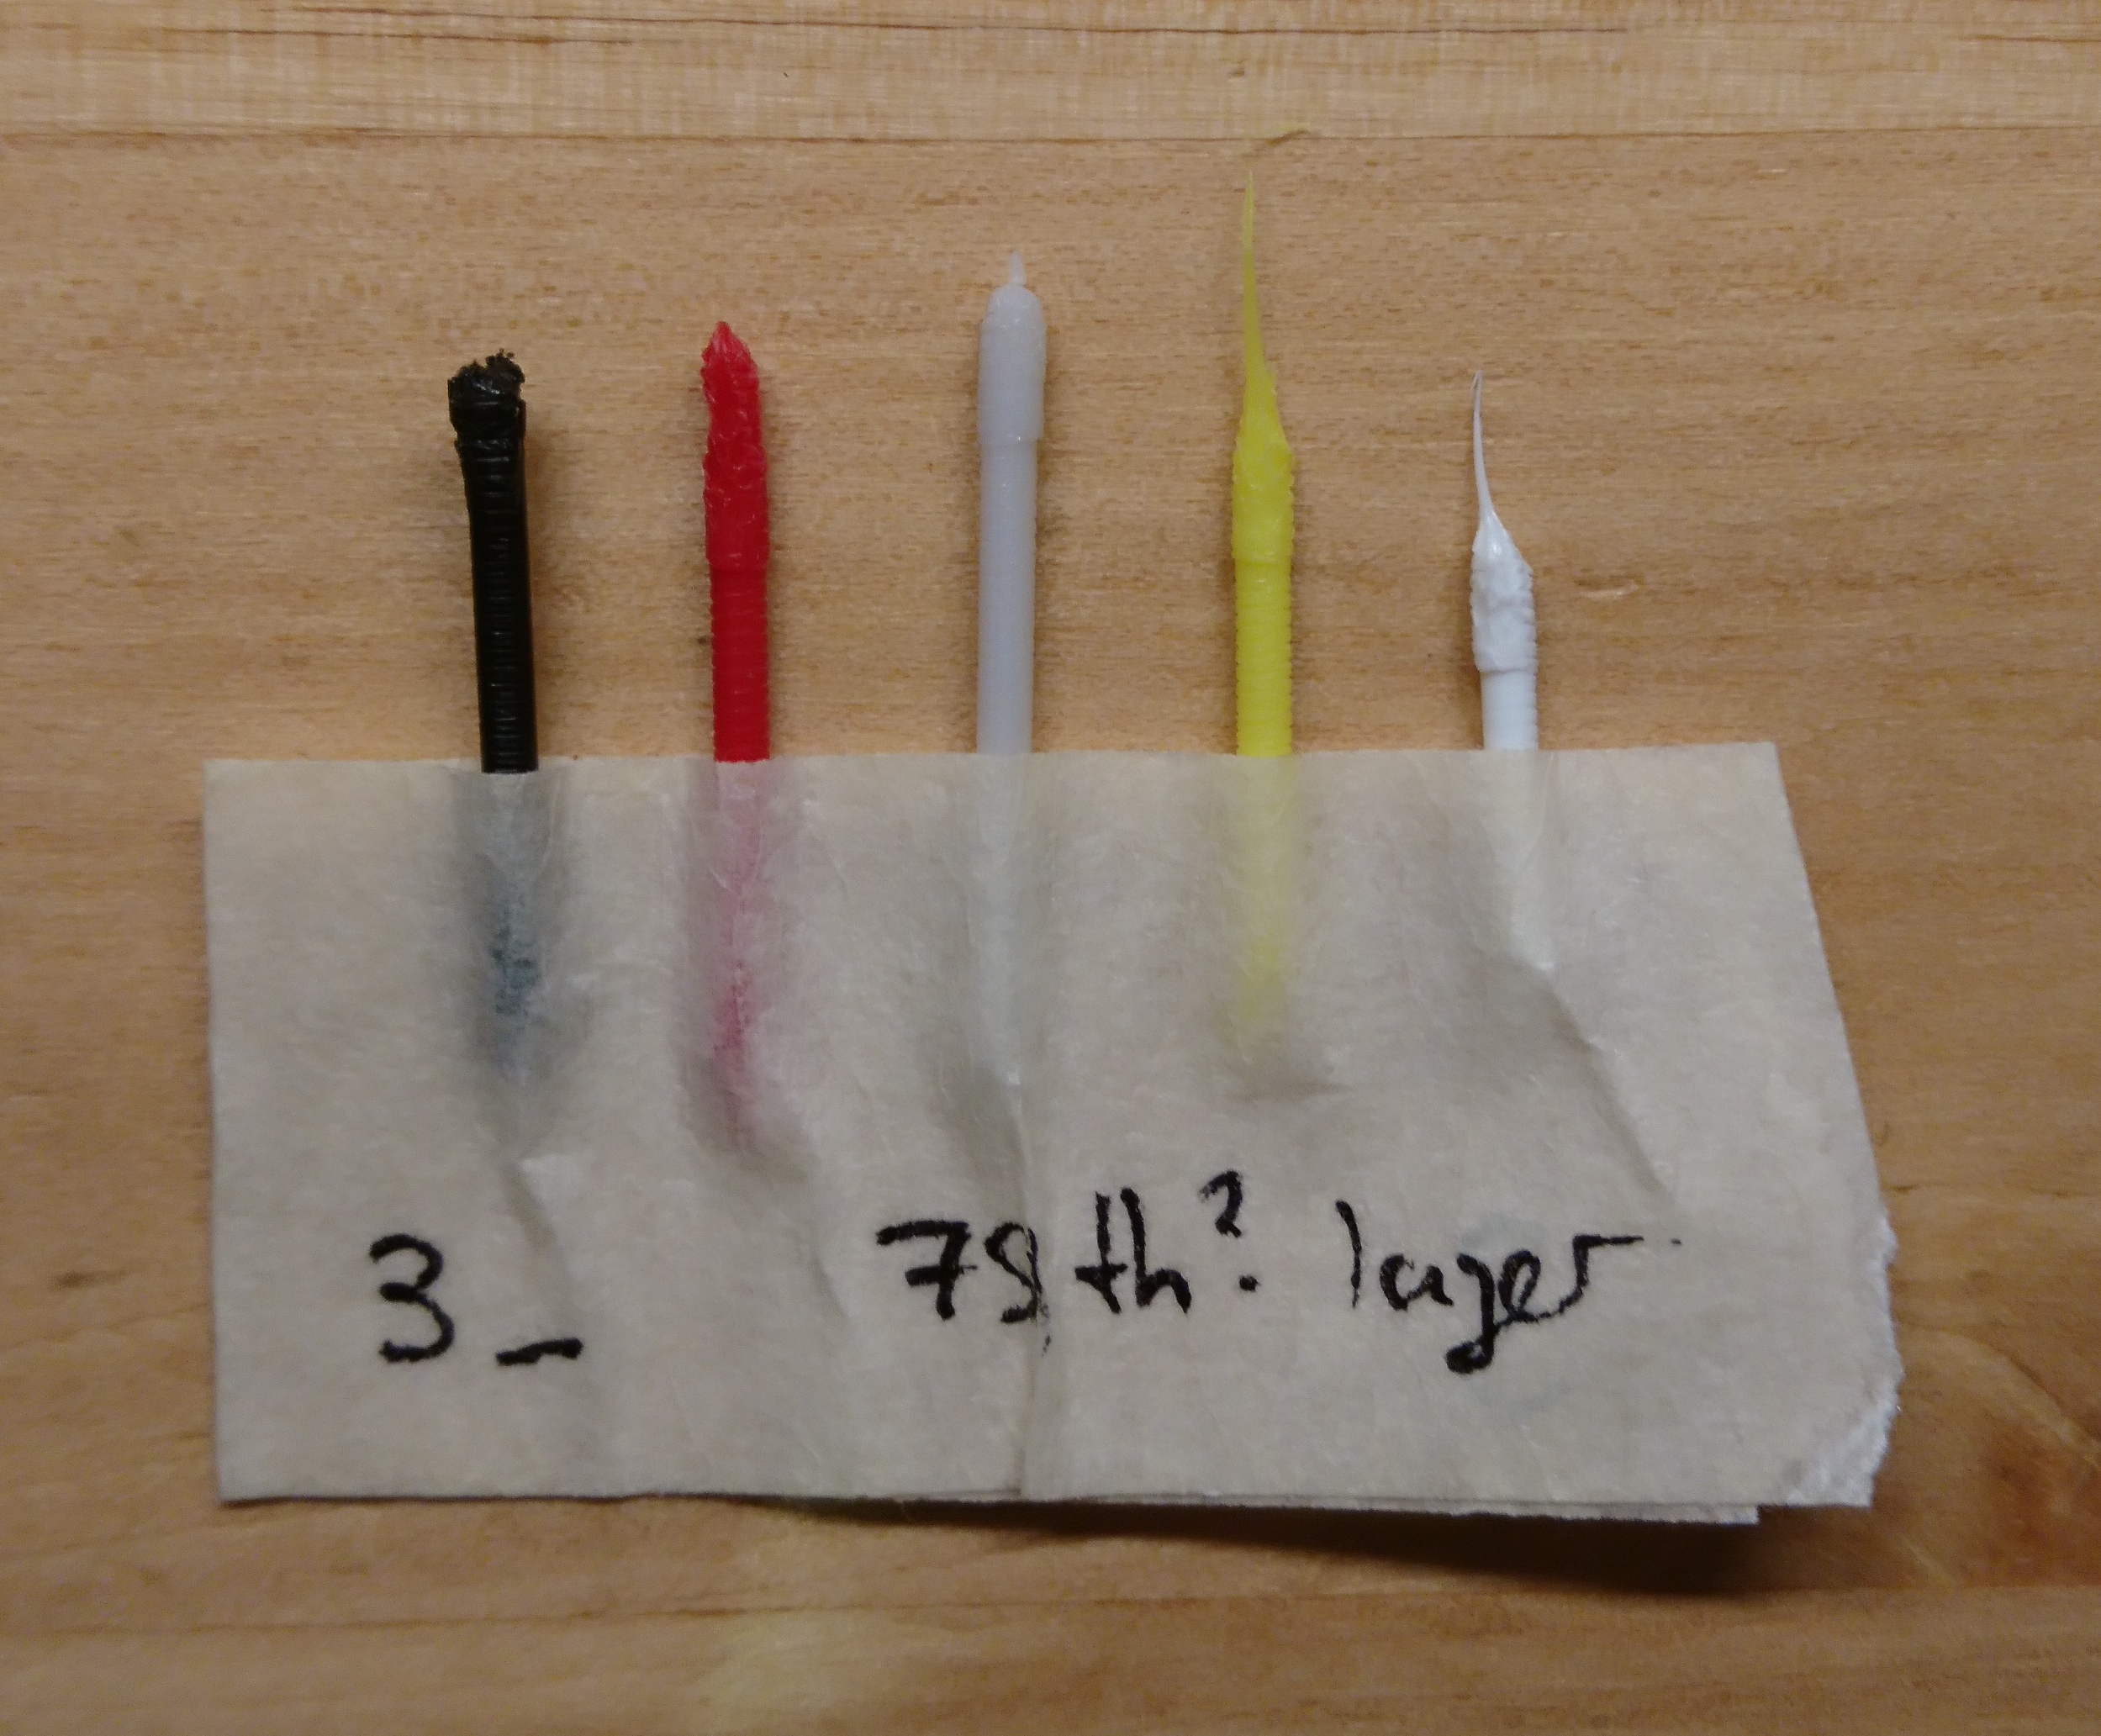
Also for the sake of completion, here is how my tips look if I use the "Generic PLA @MMU2" profile that comes with PrusaSlicer 2.2.0:
Roger that about the nozzle, will see how I go before I try and change it
Go back into PrusaSlicer 2.2.0 and change the mode to MMU (Original Prusa i3 MK3S MMU2S), then have a look at "Prusa/Generic PLA @MMU2" profile, the temperature would be 215/205°C. Now change the mode into single (Original Prusa i3 MK3S MMU2S Single), this time temperature will be 215/210°C. Note how in single mode Prusa sets temperature to +5°C of what it is in MMU mode
Do understand that this must be assembled perfectly to get reliable operation, and can say that is exactly how I assembled it
Also regarding what people say on the assembly instruction pages, yea you do see some strange comments on there, but at the same time you do see some useful advice which Prusa has been known to take into consideration for future releases
www.antalife.com
RE: Crappy Looking Tips ; - ;
My point about the online comments was in reference to "...the MMU2S is notoriously known as a difficult thing to get up and running"; if you're judging that by the forum posts then realize that every one of those people that broke a part and glued it instead of printing a new one, or that used a downloaded mod before they even had their printer working, or used a after-market part or etc. etc. etc. they are going to be on the forum the next day complaining about how the MMU2S doesn't work. And for ever person that actually posts something in the online assembly guide, there's a hundred more that did the same thing and didn't post at all. I'm not saying you can't have issues with the MMU2S even if you do everything right, but sheesh you're setting yourself up for failure if you don't baseline by building the default kit and using the default software.
I read the whole "Prusa MMU2S Reliability Modifications" - seems crazy and useless to me (BTW as I mentioned before some of those values are WAY off from default), and also saw the mods you installed which includes a significant modification to the FINDA sensor which is simply not needed. The FINDA sensor operation is critical and the stock part works perfectly and has been tested for thousands of hours by Prusa, I'm not sure why anyone would change out the Prusa-proven stock part for this weird design which appears to incorporate a magnet for some strange reason. I would get rid of that immediately (and BTW I'm sure you've seen that there are comments from some users about this mod causing failures).
Here's how I think about the MMU2S and their 3D printers in general - it has been tested for thousands of hours of printing by Prusa. The current design works. Period. If you assemble the stock device, use the stock software and firmware and then have an issue it is caused by something minor (but can take a while to figure out). It does require everything to be working correctly. The problem could be the thermistor is off a bit and it's been inadvertently printing at the wrong temp, or the set screw in the Bondtech gear is stripped (this is VERY common BTW) and it slips when reversing, or etc. but it's probably one thing that is wrong. It's a mechanical machine that is proven to work if all the parts are functioning properly.
If you have one of these issues and don't recognize it you can start going down the path of adding mods and changing slicer parameters and before you know it you've snowballed band-aid on top of band-aid. And maybe in some cases for some people that will work, at least for a while. But it doesn't address the root cause. If you start with the fact that the basic mechanical design has been proven to work with the default software settings then you be more focused on solving the one vexing issue that is causing the problem.
I've run my MK2 for 4 years now with no issues...ever. It's insanely reliable. The only parameters in the slicer I have ever changed are the filament and bed temps. I've run my MK3 for 2 years with zero change, no issues. It's insanely reliable. I've now run my Mini for 4 months, so far no issues. I've now added the MMU2S and have run it for 2 months - it worked out of the box and so far no issues. I know that's not a lot of time on the MMU2S but think about it for a second - we have the identical printer (except for your mods) and we should have identical results, with the exception of anything that might be out of adjustment, worn or not working correctly.
If it was me I would disassemble the MMU2S, rebuild it to original specs (make sure you are using the latest part designs from Prusa's Github site - some have been tweaked over time), do a reset-to-factory-default on the MK3S and completely remove all versions of Prusaslicer and re-load it, and flash the firmware in both. Assuming the extruder is functioning properly you now have a known good starting point.
Sorry - I'm sure this isn't what you want to hear but I honestly think you're chasing your tail. I think you will (or have) invest more hours chasing this than just starting over. Either way I'll keep my eyes open for other suggestions for you. Best of luck, keep us updated on this thread.
RE: Crappy Looking Tips ; - ;
@steve-e3
My man, the thing is I believe I got a big enough baseline when I started seeing the same errors that caused people to mod their MMU2S's
Did see some the comments about failures, but interestingly enough I have been able to load flexible filaments without any issues with the modded component
Sorry - I'm sure this isn't what you want to hear, but with your logic companies only need to do in-house testing before releasing products out in the open. This might work for a simple device but for a complex machine like a 3D printer (or in our case the MMU2S) I would think otherwise, there are simply too many factors that can and do effect performance. Environment, feedstock, temp sensor accuracy... All of these vary slightly for each user, and for some the variation is big enough to cause issues that require a part or two or three to be modded to improve reliability
No arguments that MK2/MK3/MINI are quality machines that require little to no intervention. The MMU2S on the other hand is not as tolerant to factors mentioned above, as shown by the countless queries on various forums
Thanks again for the help, I am really happy that your MMU2S works on stock configuration. I guess if you start seeing unload issues, now you will know what parts to mod ;^)
www.antalife.com
RE: Crappy Looking Tips ; - ;
Update time, I finally have a reliable MMU2S!!!
Here is a post from my blog that talks about what mods I had to install to get it there. The gist of it is that swapping in a larger ID PTFE tube (3mm), scrapping the stock buffer, and using PrusaSlicer 2.2.0 DRIBBLING kby antimix got me most of the way there
Can you post more pictures of your filament set up. I am liking the simplicity there, I was looking to use a gravity fed system to keep the filament organized. I’m just not sure why that heavy nut doesn’t just unwind the spool further? Why don’t the nuts just go down to the floor? Is the way they’re not dependent on the filament.
RE: Crappy Looking Tips ; - ;
@milehigh3der
My blog has a few more pictures
https://www.antalife.com/2020/07/project-prusa-i3-mk3s-mmu2s.html
And about spools unwinding, I guess the resistance of the spools is great enough to stop the M16 nut from fully unwinding them, give it a try ;^)
www.antalife.com
RE: Crappy Looking Tips ; - ;
I'm just fine-tuning my Mk3->Mk3s/MMU2S and have gotten to the point of most filaments print/retract well except for one. However I cannot find in PrusaSlicer 2.2.0 where to set Unload speed, cooling moves, etc for this filament.
How does one fine-tune for different filaments?
Advanced features
@steve-l7 you have to enable Advanced mode to see the additional settings.