RE: Simple way to print in "Real" multi-color without MMU or layer height based changes
I've been playing with the profile in v2.3.0 Beta 2 a bit and am finding the way the new release handles config imports quite frustrating.
One of the most irritating things is that it overwrites the INI file when you update the Octoprint details and wipes out most of the custom settings. It does stuff like zero out all the extrusion widths on the 'Advanced' section of the Print Settings tab and messes up the filaments on the pseudo extruders.
As it stands, for now I'm using v2.2 for Rainer's config for multicolour prints and v2.3.0 Beta 2 for everything else. It's a shame because the monotonic infill is one of the single best updates to the slicer that really helps with large format multicolour label prints.
RE: Simple way to print in "Real" multi-color without MMU or layer height based changes
Your right @morphias there is really something I don't get... We really need a full explanation of how to bring our extruder and filamments so its in all extruder! I now they did some change to be able to have config that work for other brand and its all good be me the more the merrier!
But I really don't get it... And I have to play around having all thing working as they were in previous version... I might have miss a FAQ somewhere ??. I saw a video From Thomas Sanladerer about Printer profile was interesting, but i only have a Prusa ;oP and very happy about it!
But if there's a FAQ somewhere explaining how create filaments and Extruder I am all in to learn...
RE: Simple way to print in "Real" multi-color without MMU or layer height based changes
I have tried this .ini file and can slice my model just fine. But I want to print in PETG.
When I try to add a different filament PS reverts to default again.
Do I need to change the filament settings in the ini file or is there something I missed?
If you can get your head round it just set it up from scratch, screen grab the settings for printer and print settings that relate to mmu printing then setup your usual single print setting then change the settings for the multi colour.
RE: Simple way to print in "Real" multi-color without MMU or layer height based changes
anyone tested this in 2.3.0 final?
RE: Simple way to print in "Real" multi-color without MMU or layer height based changes
anyone tested this in 2.3.0 final?
Yes, it works just the same.
Texy
RE: Simple way to print in "Real" multi-color without MMU or layer height based changes
Does anyone have trouble when doing filament change, when loading filament the extruder struggles to push the filament into the nozzle, the bondtech gears starts clicking then filament passes through ok. It’s a bit like a clog or as if the hotend temp is not hot enough.
I never have trouble with a normal loading of filament only when doing 2 or more colour printing.
RE: How to design that?
Hi all
I tried to use this approach to print a colored font. in my case I need the font to be on the very first layer, as I try to print a lid for a box vise versa (where the bottom becomes the top afterwards).
For simplified demo purpose, I just created a small sqare with 1mm height and the letter "S" with 0.2mm height (1 layer) using ThinkerCAD.
It does not seem that PrusaSlicer handles it as multi-object STL, but I can split it manually. Then I assign a different extruder to each part.
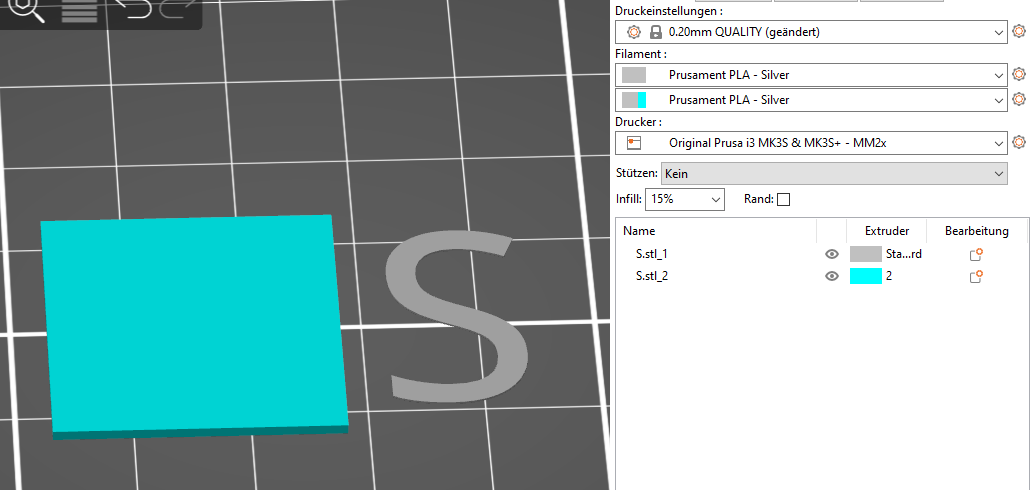
Then I moved over the S into the plate where it should be located. This already smells like troubles, it isn't a proper S as it simply overlaps.
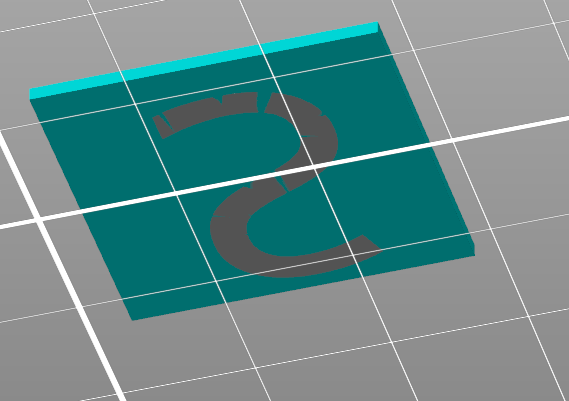
And finally when I slice it, the problem becomes visible: both objects are overlapping and it does not handle it as one part should be properly inside the other (which I understand somehow as it does not know which one should be taken in case of an overlap).

I even tried to print that and it becomes wrong as expected. As the S is the first Extruder, it first prints the S and then afterwards it just puts the square above. it does not leave out where the "S" is, so the first layer gets printed twice there and hence it warps up.
How do I design/arrange/slice it properly so that it does what I want? Thanks for help.
I can imagine that I need to leave out a gap in the square with exactly the same dimension as the text has. But that would require then that I can merge it together in the Slicer exactly at the same position, which is very tricky. Might I use a better CAD tool that can export into 3mf files?
Parts
@seeli two separate objects are sliced independenty and would print over each other, making a mess. What you need is one object with two parts. Usually you can just open (or drag&drop) two stl files at once and the slicer will ask but afaik the detection works mostly by seeing similar coordinates with different bottom? Do in your case it may ignore that and you have to do it manually:
- load one of the parts as object
- right-click the object -> add part -> load.. - and load the second part
- then you can modify their relative positions and their order (drag&drop in the object list) - the order is important when the parts overlap because you want "print settings -> advanced -> other -> clip multi-part objects to work properly" - I am never sure if the S has to be before or after the block in your case but that's easy to try and change
sign workshop...
try my sign generator to create a test object. it can create the required files to enable multicolor printing quite easily....
https://www.thingiverse.com/thing:3361994
Blog: https://schlosshan.eu
Thingiverse: https://www.thingiverse.com/rainers/collections/rainers-customizable-things
Prusaprinters: https://www.prusaprinters.org/social/6508-rainer/collections/6900
Happy printing 😉
Found the way
@seeli two separate objects are sliced independenty and would print over each other, making a mess. What you need is one object with two parts. Usually you can just open (or drag&drop) two stl files at once and the slicer will ask but afaik the detection works mostly by seeing similar coordinates with different bottom? Do in your case it may ignore that and you have to do it manually:
- load one of the parts as object
- right-click the object -> add part -> load.. - and load the second part
- then you can modify their relative positions and their order (drag&drop in the object list) - the order is important when the parts overlap because you want "print settings -> advanced -> other -> clip multi-part objects to work properly" - I am never sure if the S has to be before or after the block in your case but that's easy to try and change
Thanks for the answer. I managed to achieve what I wanted but it had to be done exactly the oposite way.
First I had to prepare the CAD design. I had to duplicate the "S" and create a hole in exactly that dimension. then I grouped that together with the square. then I put over the S into the room (in ThinkerCAD it's very easy to correctly align it).
Then I exported both objects, the sqare with the hole and the "S" itself as separate STL files.
In PrusaSlicer, I did import both together. That is important. if I only open or import first and then add second, I it puts it to a free place and I have to manually find the right position (which is tricky). but if I import both together and answer the question with yes that I want to threat it as a single object with two parts, the position do exactly match. It prints perfectly.
RE: Simple way to print in "Real" multi-color without MMU or layer height based changes
@Rainer I wanted to read your blog post how to set up multi color printing, but it looks like you removed it.
Is it still online somewhere ?
You might find these threads useful:
https://forum.prusa3d.com/forum/prusaslicer/manual-multicolor/
Cheerio,
RE: Simple way to print in "Real" multi-color without MMU or layer height based changes
You might find these threads useful:
https://forum.prusa3d.com/forum/prusaslicer/manual-multicolor/
Cheerio,
tnx!!
RE: Simple way to print in "Real" multi-color without MMU or layer height based changes
I don't know why but I can't make Customiser work. Could some kind soul post the Customizer output for a simple 2 colour sign.
RE:
I know I'm late to the party, but I found one big improvement to the process (at least for me). Set all the mmu extruders color to transparent (reset to filament color), and then in your Tool change G-code update the M117 message to
M117 change to [next_extruder] [filament_notes[next_extruder]]
Now you just need to set whatever description you want in the notes section of each filament, for example brand+color: you will obtain something similar to "change to # eSun PLA+ Red". If you already use filament notes for something else, you can define a custom variable like "filament_name=eSun Pla+ Red" and update the M117 command to
M117 change to [next_extruder] [filament_name[next_extruder]]
make sure to define the variable on each filament tho
RE: Simple way to print in "Real" multi-color without MMU or layer height based changes
Actually I use this method with some improvements myself (but not using messages in Display).I use standard mk3s+mmu2 profile, edit custom gcode for toolschange to M600.In print settings I deactivated wipe tower. The number of skirtlines around the object I set to the number of virtual extruders I use. Hight up to the last layer with colour change inside. So after every filamentchange I have a "priming line".If using different materials I always assign the less stringing first. So a 3-colored display for the mk3s f.e. may have a red silk PLA "original" (with line above) (or maybe "cloned" with line above) and cross on reset button, a silver silk PLA "PRUSA" and a black PETG-CF20 Body:

After sliceing I postprocess the gcode manualy:1. I remove first M600 (and T0), as I start the print with first filament already inserted2. I search for the next M600, remove this and the following T... I go down a few lines after the next G1 X... Y... E... line and add an M600 afterwards. So filament change is not done inside the object, but after the first segment of the following skirt line. So if you fail to remove all ooze the extruder produces on its way back after filament change, it falls into the skirt, not into the printed object.3. Repeat 2. for all M600 commands.
As I mostly use Hilbert Curve for bottom pattern and want a perfect closed surface in bottom layer, I also add "M221 S110" and "M220 S60" after first "after_layerchange", "M221 S95" after second "after_layerchange" and "M220 S100" after third "after_layerchange". With first layer a bit overextruded and first two layers printed extremly slow, the result is perfect.
With the new Revo hotend you might even go a step forward: Slice twice. First for 0.25mm nozzle, with Multi-Colour, so you could even embedd smaler text. First layer 0.2mm, second and third 0.1.Second slice for 0.8mm Nozzle, first layer 0.4mm and other layers also 0.4mm.Combine gcode for the first 3layers of slice1 and begining from second layer of slice2, instert gcode for moving hotend up, unloading filament, cool down, Pause, heat up again, load filament move back to print between the two parts of the gcode, so you can swap the nozzles between...Have not tested this yet, but there are some Yt-Videos with people doing nozzle-swap midprint
RE: Simple way to print in "Real" multi-color without MMU or layer height based changes
I know I'm late to the party, but I found one big improvement to the process (at least for me). Set all the mmu extruders color to transparent (reset to filament color), and then in your Tool change G-code update the M117 message to
M117 change to [next_extruder] [filament_notes[next_extruder]]Now you just need to set whatever description you want in the notes section of each filament, for example brand+color: you will obtain something similar to "change to # eSun PLA+ Red". If you already use filament notes for something else, you can define a custom variable like "filament_name=eSun Pla+ Red" and update the M117 command to
M117 change to [next_extruder] [filament_name[next_extruder]]make sure to define the variable on each filament tho
Nice idea but if I understand correctly you need to create a different filament settings file for each colour. Is that so?
RE:
@Oliver-Andre Nice one. I wonder if some clever bastard could create a post processing script.
RE: Simple way to print in "Real" multi-color without MMU or layer height based changes
Thought the same. But my own programming skills are limited to C64 Basic v2.0 and Simons's Basic...