[Guide] Nylock Mod for MK3 and MK3S
I noticed that no one had a guide written for doing the nylock mod with the new Prusa Leveling Guide Plugin for OctoPi, so I wrote one:
https://www.rearvuemirror.com/guides/nylock-mod-for-the-mk3s
RE: [Guide] Nylock Mod for MK3 and MK3S
Your guide is very nicely done.
I think demand for the nylock method has decrease significantly since the firmware update to include the 7x7 mesh bed leveling feature, likely explaining why it's not getting more attention. I find that removing the spring steel print surface results in variations with every print, so unless I have warping severe enough to cause problems, I'm not going to worry about it.
RE: [Guide] Nylock Mod for MK3 and MK3S
@bobstro
Thanks! I actually use this in tandem with the 7x7 mesh. My whole thing is that even though the PINDA does compensate for lower/higher areas, sometimes the bottom finish will look uneven because the print doesn't compensate. Not sure if that's clear.
RE: [Guide] Nylock Mod for MK3 and MK3S
Well done, thank you.
RE: [Guide] Nylock Mod for MK3 and MK3S
I've done the nylock mod using the Prusa Leveling Guide Plugin for Octopi.
I found that the probing is a bit inconsistent.
I run the probe a few times without adjusting anything, and get different results every time.
RE: [Guide] Nylock Mod for MK3 and MK3S
@michael-k119
I see the same thing from time to time but I think that there will always be some weird factors that can't be controlled. I think the goal is to get as leveled as possible.
RE: [Guide] Nylock Mod for MK3 and MK3S
@jakuza
I've managed to get it down to 7-14 deg of adjustment.
RE: [Guide] Nylock Mod for MK3 and MK3S
I've done the nylock mod using the Prusa Leveling Guide Plugin for Octopi.
I found that the probing is a bit inconsistent.
I run the probe a few times without adjusting anything, and get different results every time.
That's not a fault of the plugin. You'll see the same thing manually running the commands yourself on a serial terminal.
RE: [Guide] Nylock Mod for MK3 and MK3S
I am about to strip down my MK3S to fix an issue where the center of the heatbed is low and the corners are higher. The spacers are all exactly 5.51 mm. I will have to verify that the Y-carriage is flat as well. Still trying to wrap my head around why the heatbed has a dip in the middle. If the issue is with the carriage, this might be part of a solution.
BTW: I am using 7 x 7 leveling and I can see where the first layer is not adhering and where it is squished ( causing ridges ). With a little first layer height tweaking and piece of foil under the heatbed I have found a spot where it sorta works. 🙂 🙃 🙂
I will check the point before and after. I do not have Octoanything so I will have to do it manually.
Quality is the Journey, not the Destination. My limited prints->
RE: [Guide] Nylock Mod for MK3 and MK3S
I noticed that no one had a guide written for doing the nylock mod with the new Prusa Leveling Guide Plugin for OctoPi, so I wrote one:
https://www.rearvuemirror.com/guides/nylock-mod-for-the-mk3s
Thanks for this guide! Extremely well written and easy to understand. Now to get OctoPi set up....
Drinking alcohol can cause memory loss. Or worse, memory loss!
RE: [Guide] Nylock Mod for MK3 and MK3S
I noticed that no one had a guide written for doing the nylock mod with the new Prusa Leveling Guide Plugin for OctoPi, so I wrote one:
https://www.rearvuemirror.com/guides/nylock-mod-for-the-mk3s
Great guide, personally I did a few things differently and have some things to add.
First, I don't think this is needed at all for most people, however it can be fun to do and see the numbers get better, and possibly get a cleaner looking first layer
Now on to my notes:
From my testing it seems fairly important to let the bed stay preheated for a while before measuring the deviation. At least if you want the best possible numbers out of this thing. It takes a while longer for the corners to reach their steady state compared to the center which causes the difference between the corners and the center to be bigger. I personally measured a difference of about 0.1 on the worst corner just by waiting a bit longer.
However, changing the temperature to 100c had less of a difference provided I still waited a while for things to stabilize
The screws I bought sadly had a head that was a bid to thick, the stock screws should be fine for this as the distance they need to travel does not really change.
I found fine-tuning the adjustments by hand a bit tedious, so I made a simple angle finder to make it a bit easier: https://www.prusaprinters.org/prints/38914-decimal-angle-finder-quarter-circle
Do not that for very small adjustments you should generally change it a bit less than the actual difference as I personally had a tendency to over correct a bit.
If you want the best results it can be worthwhile to rerun the octoprint plugin multiple times and average things out. I personally reran things 10 times (which is very much overkill) when dialing in the final bits.
Lastly here are my results from before and after the mod (in raw values):
| First run | Point 1 | Point 2 | Point 3 | Point 4 | Point 5 | Point 6 | Point 7 | Point 8 | Point 9 |
| Run 1 | -0.13 | -0.13 | -0.27 | -0.07 | 0 | -0.1 | -0.05 | 0 | -0.1 |
| Run 2 | -0.15 | -0.14 | -0.29 | -0.06 | 0 | -0.11 | -0.06 | 0 | -0.11 |
| Run 3 | -0.14 | -0.12 | -0.27 | -0.06 | 0 | -0.1 | -0.04 | -0.02 | -0.1 |
| Run 4 | -0.14 | -0.13 | -0.28 | -0.06 | 0 | -0.11 | -0.05 | 0.01 | -0.1 |
| Run 5 | -0.15 | -0.12 | -0.28 | -0.06 | 0 | -0.11 | -0.05 | 0 | -0.1 |
| Run 6 | -0.14 | -0.16 | -0.29 | -0.08 | 0 | -0.12 | -0.07 | -0.02 | -0.12 |
| Run 7 | -0.13 | -0.13 | -0.26 | -0.05 | 0 | -0.1 | -0.03 | -0.03 | -0.08 |
| Run 8 | -0.18 | -0.15 | -0.29 | -0.08 | 0 | -0.12 | -0.07 | -0.02 | -0.1 |
| Run 9 | -0.13 | -0.12 | -0.26 | -0.06 | 0 | -0.1 | -0.05 | 0.01 | -0.09 |
| Run 10 | -0.13 | -0.13 | -0.26 | -0.06 | 0 | -0.1 | -0.05 | 0.01 | -0.1 |
| Average | -0.143333333333333 | -0.133333333333333 | -0.276666666666667 | -0.064444444444445 | 0 | -0.107777777777778 | -0.052222222222222 | -0.007777777777778 | -0.1 |
| ST | 0.015811388300842 | 0.014142135623731 | 0.012247448713916 | 0.010137937550497 | 0 | 0.008333333333333 | 0.013017082793178 | 0.014813657362193 | 0.011180339887499 |
| DIFF | 0.05 | 0.04 | 0.03 | 0.03 | 0 | 0.02 | 0.04 | 0.04 | 0.04 |
| Final Run | Point 1 | Point 2 | Point 3 | Point 4 | Point 5 | Point 6 | Point 7 | Point 8 | Point 9 |
| Run 1 | 0.01 | 0.01 | 0.01 | 0 | 0 | 0.01 | 0.01 | 0 | 0.01 |
| Run 2 | -0.01 | -0.01 | 0 | -0.02 | 0 | -0.01 | -0.01 | -0.01 | -0.02 |
| Run 3 | -0.01 | -0.01 | -0.01 | -0.02 | 0 | -0.01 | -0.01 | -0.02 | -0.01 |
| Run 4 | -0.01 | -0.02 | -0.01 | -0.02 | 0 | -0.01 | -0.01 | -0.02 | -0.01 |
| Run 5 | -0.01 | -0.02 | -0.01 | -0.02 | 0 | -0.01 | -0.01 | -0.02 | -0.01 |
| Run 6 | 0.01 | 0 | 0.01 | -0.01 | 0 | 0 | 0.01 | 0 | 0.01 |
| Run 7 | 0.01 | 0 | 0 | -0.01 | 0 | 0.01 | 0.01 | 0 | 0.01 |
| Run 8 | 0 | -0.01 | -0.01 | -0.01 | 0 | -0.01 | -0.01 | -0.02 | -0.01 |
| Run 9 | 0.01 | 0 | 0 | 0 | 0 | 0 | 0 | 0 | 0 |
| Run 10 | 0.02 | 0.01 | 0 | 0 | 0 | 0.02 | 0.02 | 0.01 | 0.02 |
| Average | 0 | -0.006666666666667 | -0.002222222222222 | -0.012222222222222 | 0 | -0.003333333333333 | -0.002222222222222 | -0.01 | -0.003333333333333 |
| STDEV | 0.01 | 0.01 | 0.008333333333333 | 0.008333333333333 | 0 | 0.008660254037844 | 0.009718253158076 | 0.01 | 0.011180339887499 |
| DIFF | 0.03 | 0.03 | 0.02 | 0.02 | 0 | 0.03 | 0.03 | 0.03 | 0.04 |
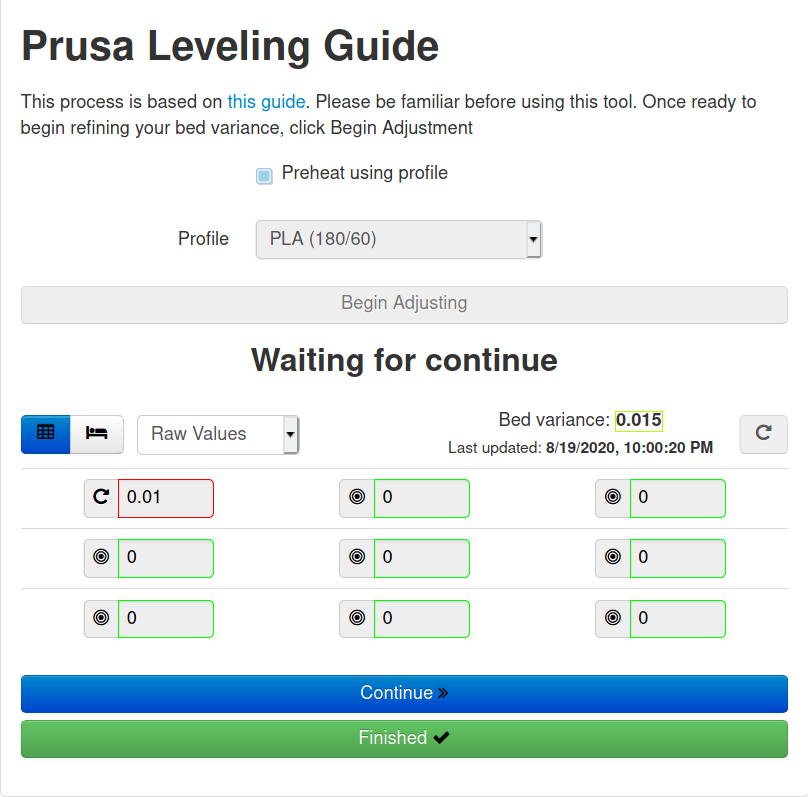
And a meaningless screenshot to brag about of my best run:
RE: [Guide] Nylock Mod for MK3 and MK3S
I found that my Y-carriage was slightly warped and essentially has a small dip in the front middle. Prusa support basically told me to just bend it back as straight as possible and ABL should compensate for the rest. I am able to get a pretty decent first layer across the entire build area, but the thing is if I'm printing a fairly large part it's fairly noticeable that the surface against the bed is just not flat. That's what has brought me now over to the Nylock mod thread.
My question is what is to prevent the 9 bed bolts from basically turning freely over time? Would it perhaps be better to do something similar to the silicone spacer mod on the mini where the squished silicone is exerting some tension against the bed? Also is the temperature resistance of nylon enough to hold up to the heated bed temps over a long period of time?
Nylock mod
Hi,
I don’t think there’s a true way to keep the bolts from shifting over time, because the bed is constantly heating and cooling over time things will change and need to be readjusted regardless of what you might use. The point of the nylock nuts instead of regular nuts is so that these changes don’t happen too quickly. As long as your bed is “leveled enough”, the mesh should be able to compensate for the small dips. I’m not sure if you’re talking about the nylon washers or the nuts but I’ve done 25+ hour prints and have not had any issues with heat. I’ve not pushed past 90C for any prints but I think the nylock nut should be able to handle the heat even if it cannot, you are able to easily swap out a nut as needed with this mod.
Nylock stability
Nylocks shouldn't really move with heat cycles unless they reach a temperature that causes creep in the nylon, the nylon gets forced into the crevices and machining marks on the thread, so it can't move without the plastic starting to melt or starting to show creep.