Experiences with split or dual part cooling fan shrouds?
I'm specifically talking about shrouds like this or like this
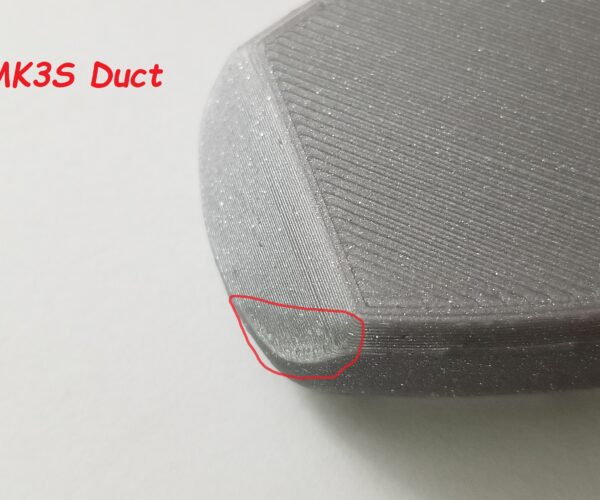
I'm pretty satisfied overall with overhangs, but the backside is a bit melted. This is especially noticeably in the lattice cube, where the back of the overhangs have a very rough, melted texture.
I've been thinking of printing a simple split fan shroud, like the second example, but I've heard that can increase stringing for PETG, due to reduced airflow. However, I'm somewhat hesitant to get the dual fan mod going, since I don't want to put in the effort to splice and solder the fan cables if it would only end up causing more problems.
Any experience with these kinds of solutions around here? Any printable fan shrouds you all can recommend?
RE: Experiences with split or dual part cooling fan shrouds?
I'm running a Skelestruder myself, which has a single fan but directs airflow on opposite sides of the nozzle. It has worked well for me so far. I get the impression I could dial back fan speed a bit if I wanted, I just haven't gotten around to testing that out to determine to what level I could reduce it.
RE: Experiences with split or dual part cooling fan shrouds?
I tried the dual fan version myself and maybe it was the fans I sourced but I actually had worse overhangs and cooling than with the stock fan shroud with single fan so I swapped it back.
Luckily its easy for me as when I rebuilt my printer I fitted connectors to most of my extruder wiring so its plug and play for me 🙂
Damn, that's the best idea I've heard in a long time. I need to set aside a couple of hours one of these weekends to take everything apart and rebuild my extruder with some fittings for the wires to make upgrades easier.
RE: Experiences with split or dual part cooling fan shrouds?
Couple of hours ? Good luck. I spent the weekend rebuilding mine. Then again it was a full geared extruder rebuild too. waited till the bearings needed maintenance so took the opportunity to do a full tear down. Redid the y axis bearings and added a better belt tensioner, redid the x axis and carriage and then the extruder including a standard e3d heatbreak lol.
RE: Experiences with split or dual part cooling fan shrouds?
Here are some examples of functioning Fan Shrouds.
https://www.thingiverse.com/RH_Dreambox/designs
Bear MK3 with Bondtech extruder
RE: Experiences with split or dual part cooling fan shrouds?
I'm currently using this https://www.prusaprinters.org/prints/12776-delta-p-fan-duct-for-bear-extruder and there is a stock Mk3s version here https://www.prusaprinters.org/prints/12775-delta-p-fan-duct-for-mk3s-extruder.
I'm happy with the printing and overhangs but the best part is being able to see the nozzle when printing.
RE: Experiences with split or dual part cooling fan shrouds?
I am also looking for a solution for accurately printing on the far side of the extruder for my MK3S, so that part of the print doesn't look like it has melted. I hope proven results can be shared.
Is the root cause of melting, on the far side of the extruder, due to the lack of cooling on the far side of the extruder? or some other factor? I am a little surprised that PRUSA hasn't addressed this issue.
I looked at several designs of ducting and settled on the @rhdreambox CS Nozzle as it had proven flow characteristics (from Fusion 360) and it directed air to the sides of the extruder. The design seemed good and the fit is perfect, but the print results are not any better than with the original duct. Would this duct work better if air was directed ahead of the extruder? Should the duct blow air from intervals of 360 degrees (such as 6 from orifices)?
The 12775 delta p duct only directs air from the sides, lacking the large duct at the front, so I would expect a deficiency in quality. Does it really perform better than the original MK3S duct?
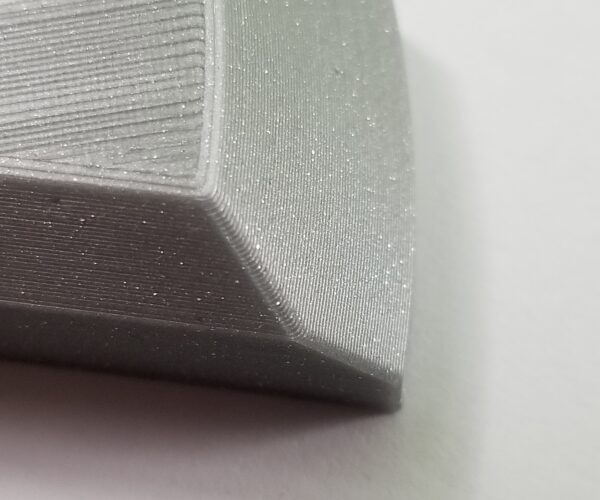
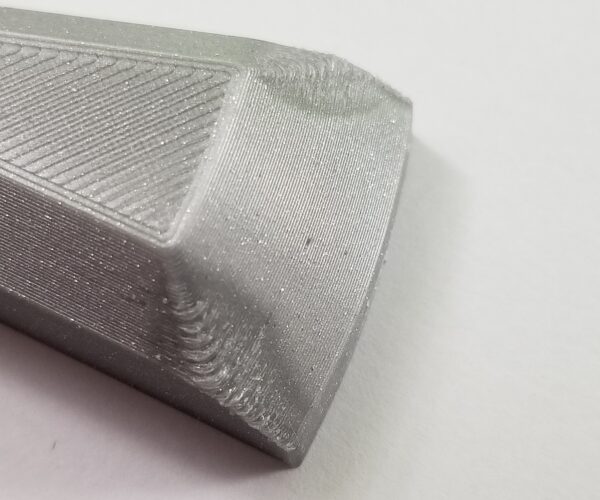
I am including 2 images of the same printed part with a 45-degree overhang, but printed with different fan ducts. The 2nd print was just a stub of the part as I only wanted to print the portion that I hoped would improve with the new duct.
I am also including the STL of the printed part, in case anyone wants to see if their duct prints the part correctly. The overhang is on the left of the object; printing with the overhang in front is cheating. My full part has an overhang on both left and right. An overhang in the rear would likely not work out well.
Prusa i3 MK4S Kit in Lack Enclosure
RE: Experiences with split or dual part cooling fan shrouds?
@t5montecarlo
I didn't mean to imply the Delta P duct was better than the original duct as far as cooling or print quality. 99% of my prints are functional prints that I design myself with the additive process of 3D printing in mind, so I don't often print overhangs more than 45 deg.
The main advantage of the Delta P duct was the ability to see the nozzle while printing. I like to keep an eye on my first layer, to make sure everything starts out smoothly and check-in on the nozzle condition periodically throughout the print to make sure it's not getting gooped up. Also, due to the extra room the duct provides, I can change nozzles without having to remove the duct.
Looking at the model of your part "lowershell-2.5-ext..." I can't see an obvious reason why you are getting those results. A few things I would look into if you are using Prusa Slicer. 1. Make sure you are not printing external perimeters first.
2. Print a temp tower to find your ideal temp settings for the filament you are using. I like this one because it provides the Gcode with changing temps. https://www.prusaprinters.org/prints/20652-temp-tower-pla-petg-abs-mmu2s-compatible .
3. Maybe slowing the print speeds will give layers a chance to cool a bit more.
4. The print imperfection you are seeing could be a "ringing" or "ghosting" effect due to the sharp corner in the model. Slowing the speed may help for this as well.
To sum up, I only like the Delta P for the visibility aspect. I cannot attest to print quality and can only say from my experience, the print quality did not degrade by using the Delta P duct.
RE: Experiences with split or dual part cooling fan shrouds?
Thanks for the reply, @brandon-r9. I will investigate the temperature tower, but I am not aware of how to assign a different temperature setting for each level of the tower using PrusaSlicer. Do you know how it is done?
I agree that looking at the first layer is important, and I do the same and have had to abort prints due to something going awry in the first layer; it is much more difficult to monitor early layers with the new duct.
I checked the PrusaSlicer project file for my LowerShell project and External Perimeters are not being printed first. I have included the project file, if you would care to have a look at the settings I am using.
lowershell 2.5 extrusions (randomseam, 100fill, det thin, det bridg, 2perimeter, 0.3efoot)
I forgot to mention that the second LowerShell print was done at 80% speed, as adjusted from the LCD panel as soon as the print started.
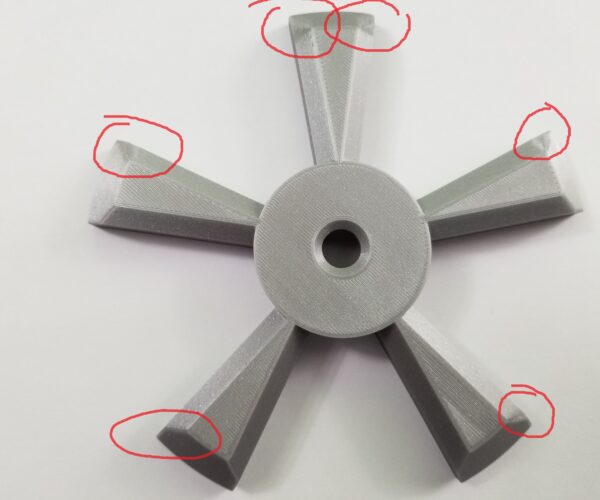
I don't think the phenomenon is ringing or ghosting, as you can see in these images of a different project. The melted overhangs are always at the rear. The first picture is taken in the same orientation as printed, but upside down.
I can't print this object as photographed as the underside of the center is cupped and functional, so it needs to be printed upside down.
Prusa i3 MK4S Kit in Lack Enclosure
RE: Experiences with split or dual part cooling fan shrouds?
I ended up printing the delta-p fan duct, and after some extensive testing with it, I wasn't impressed.
Overhangs were awful all around. PETG overhangs were blobby and messy, and even PLA overhangs had issues.
This is a benchy printed using the Delta-p duct 
RE: Experiences with split or dual part cooling fan shrouds?
@t5montecarlo
Looking at your print file I have a few suggestions they may or may not help.
1. Uncheck "Detect Thin Walls" This setting has often caused strange issues for me.
2. Uncheck "Ensure vertical shell thickness" Again, this setting has caused funny issues from time to time for me.
3. I would reduce the infill from 100% to something lower. I've read that infill over 40%-50% doesn't gain you all that much in strength.
4. Increase vertical shell "perimeters" count to 4 or more. More perimeters usually increase strength.
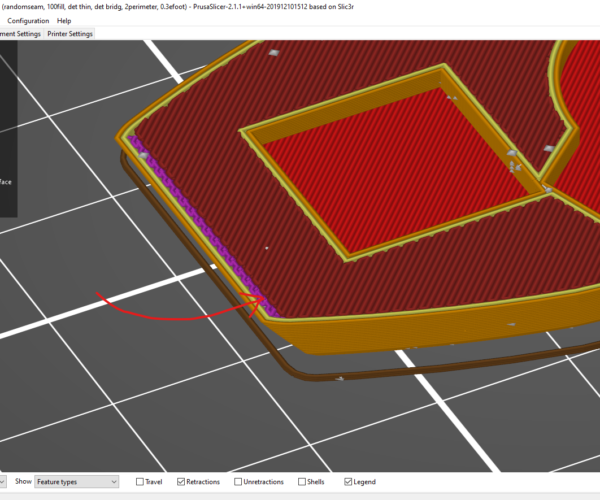
My theory to recommending these settings is in effort to reduce the amount of heat and filament being introduced into the part. Looking at your photos the imperfections look similar to sink marks in injection molded parts.
The sink marks are caused by areas in the mold that are too thick (too much plastic) so when the part cools down, it shrinks in the thick areas more than the surrounding, thinner, areas. In the case of 3d printing, we cool as we go, but only as much as our equipment can keep up with.
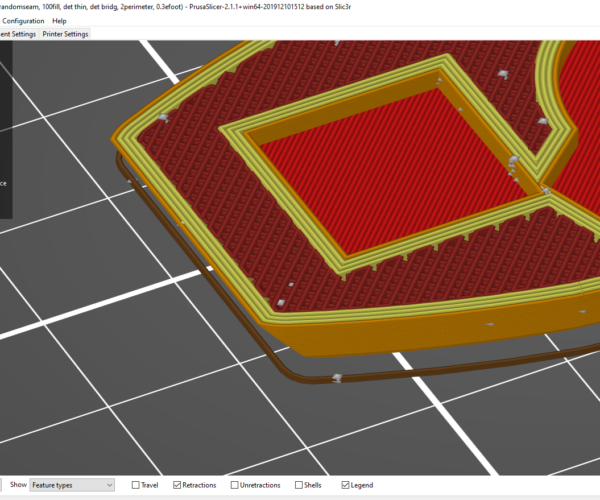
The process of "ensure vertical wall thickness" is just the hot nozzle zig-zagging at that outer edge, pouring in more heat and plastic. Shown in purple below.
If we remove the wall thickness setting and increase the perimeters we should see a similar mechanical advantage but the nozzle will be in and out faster, allowing more cooling time between adding more mass.
Long story short, I think those areas of imperfection could be sink marks caused by the plastic shrinking.
I am no expert so take this observation with a grain of salt. You know what they say about free advice...
Best!
RE: Experiences with split or dual part cooling fan shrouds?
Cooling is one of the reasons I printed a skelestruder which has a split cooling duct. It's not perfect, but better than the original PRUSA cooling.
Unfortunately, it will not fit the existing extruder but will need the complete extruder replacing.
https://www.thingiverse.com/thing:2845416
Normal people believe that if it is not broke, do not fix it. Engineers believe that if it is not broke, it does not have enough features yet.
RE: Experiences with split or dual part cooling fan shrouds?
@t5montecarlo
I printed your model in the front, back, left and right directions, and I think they were perfect.
This is a cheap PLA (Clas Ohlson, Sweden) and I used the print profile from Prusament PLA without any adjustments.
Could it be that you need to adjust the temperature to get a better result?
Bear MK3 with Bondtech extruder
RE: Experiences with split or dual part cooling fan shrouds?
@rhdreambox
Stock Prusament PLA settings have 20% infill, 2 vertical walls, ensure vertical wall thickness. Do you want to give it a go with @t5montecarlo settings? The only changes you should need to make are 100% infill and turn on detect thin walls.
I would give it shot myself but I'm currently in the middle of a print order that is going to run for a few more days.
RE: Experiences with split or dual part cooling fan shrouds?
Thank you @lp0101, @brandon-r9, @chocki, and @rhdreambox.
I reprinted the same part that @rhdreambox printed, using the default PLA Print and Filament settings (.015mm Quality), and it came out perfectly. 😎
Therefore, I agree with @brandon-r9 that the defects I experienced were due to the 100% fill. I will try again with just the 1 rear leg of the 5-legged part and see how it does.
My bad print of the 5-legged part was made with the same default PLA settings, so it will be interesting to see the result; the only difference(s) will be the fan shroud and a partial-object print.
Prusa i3 MK4S Kit in Lack Enclosure
RE: Experiences with split or dual part cooling fan shrouds?
I ended up printing the delta-p fan duct, and after some extensive testing with it, I wasn't impressed.
Overhangs were awful all around. PETG overhangs were blobby and messy, and even PLA overhangs had issues.
This is a benchy printed using the Delta-p duct
Was that Benchy printed using the gcode provided by Prusa? or your own settings?
How did Benchy print with the original shroud?
Your overhang looks like the ones I had, but when I printed the Benchy using Prusa's gcode, it came out perfectly (the first thing I printed after assembling the kit).
Prusa i3 MK4S Kit in Lack Enclosure
RE: Experiences with split or dual part cooling fan shrouds?
I will try again with just the 1 rear leg of the 5-legged part and see how it does.
My bad print of the 5-legged part was made with the same default PLA settings, so it will be interesting to see the result; the only difference(s) will be the fan shroud and a partial-object print.
I printed a portion of the worst leg of my 5-legged part, using the same default PLA settings that were used when the print originally failed, but were successful in printing my LowerShell project. This portion had the overhangs at the rear, but the melted parts are at the left and right of the rear.
The reprint was a failure and looks just like the photos I submitted earlier; the shroud did not improve the print. I am at a loss as to why the print is a failure; perhaps I need to redesign the ends of the legs on my project?
turntable base (stub).stl
Prusa i3 MK4S Kit in Lack Enclosure
RE: Experiences with split or dual part cooling fan shrouds?
It is just like @brandon-r9 mentions that the parts does not get stronger with 100% infill. It's just a waste of material and time.
Here is an interesting video from CNC Kitchen.
Bear MK3 with Bondtech extruder
RE: Experiences with split or dual part cooling fan shrouds?
I ended up printing the delta-p fan duct, and after some extensive testing with it, I wasn't impressed.
Overhangs were awful all around. PETG overhangs were blobby and messy, and even PLA overhangs had issues.
This is a benchy printed using the Delta-p duct
Was that Benchy printed using the gcode provided by Prusa? or your own settings?
How did Benchy print with the original shroud?
Your overhang looks like the ones I had, but when I printed the Benchy using Prusa's gcode, it came out perfectly (the first thing I printed after assembling the kit).
This Benchy was printed using my own settings. I tried it in several orientations, to see if the delta-p duct prefers overhangs on the front, sides, or back, but there were only insignificant differences between them. When printed with the stock duct, the bow looks perfect. This is in PLA, with 100% fan speed.
