Understanding "support" features in PrusaControl?
Total newbie here and I can't seem to find this information. There are three different options for "supports" in PrusaControl: "None", "Only from build plate", and "Everywhere". Can someone explain to me the differences between these options? Also, what do the colors mean once the g-code renders? I assume the orange is where it will put down a line of filament. Are the green and white lines the supports? The green and the orange are never on the same line in the g-code, is this supposed to happen? Final question. Once it renders, PrusaControl displays the estimated print time and the "filament". Is the filament quantity displayed in meters? Filament is sold by mass, not by length, so I'm confused.
Re: Understanding "support" features in PrusaControl?
Hey there. I believe I can answer all of these for you.
Supports
None, will turn off all supports. You should be able to see that in the gcode by regenerating it and looking through the gcode preview slider on the right hand side in Prusa Control.
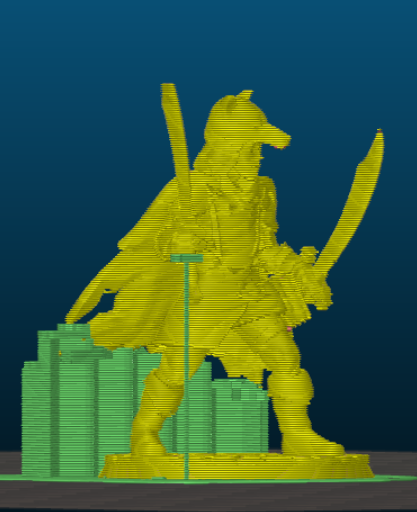
Only from build plate, will generate support materials up to the model, from the base plate only. If there is an overhang where a lower area of the model gets in the way between that point and the build plate, there will not be any supports to help it out. Below is a good example. You can see that there are overhangs in the where the other sword is, the wolf hood, and around the legs, that I feel need support. If you choose build plate only though, the base plate of the model stops supports from being generated for these areas.
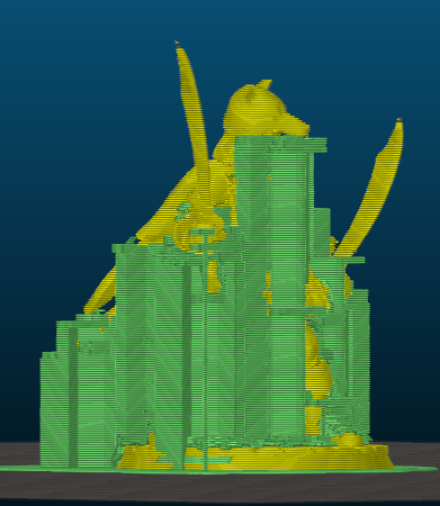
Everywhere while generate support on top of the model itself in order to support other areas of the model. Below is an image of the same model, but with supports generating everywhere in order to support the above areas mentioned earlier.
I will say that this screen snips are from Slic3rPE, just so that I can demonstrate easier to you the differences with this slicer's gcode preview feature, but the support categories are the same in Prusa Control as well.
G-code Filament Color Preview
The white is what is referred to as a skirt. It is basically a primer line for your nozzle. I personally print one around every model that I print.
The green is support, and yes it is ok for the green and orange to not be on the same line.
The orange is is the model itself.
The gcode preview is really showing you the path that your printhead is going to follow to lay down the filament, so they aren't going to touch in the gcode preview, because your printhead is going to space itself accordingly to allow for the lines to touch and overlap only slightly.
As far as the estimated filament use goes, I do believe that it is measuring that in terms of meters. I thing it's kind of a why do buns come in packages of eight for hotdogs, but weenies come in packages of ten. Nobody ever really consulted about it when the standards were set, so here we are. You could determine the length of your filament if you snipped a piece off and got it's displacement for that specific length. You should then be able to get a mass/meter ratio going to determine the mass you'll be using if you want to.
Also, I don't know if I need to state this or not, but the model in the example is from HeroForge, and paid for by me as a downloadable .stl. It's completely their design. Just throwing that in there to avoid any issues.