Printer crashes into bed upon xyz calibration
I recently brought the Prusa I3 kit and built it with no problems. I was looking forward to an easy calibration and a first print but I have had nothing but issues when it came to calibrating the printer. It passed the self test with no problems but it didn't like the xyz calibration.
When I first ran the xyz calibration the printer head went up and I made sure it hit the top of the 3d printed parts, and the z motors clicked, (like in the instruction video) and then it comes straight down to measure the points. But my printer come straight down and hits the bed, then it homed x and created a huge scratch in the bed. I had put the paper under the nozzle and so the damage was kind of lessened but I had immediately powered off the printer anyway.
I looked in the manual but I couldn't find what to do if I had this issue and no one else seemed to have it. I checked that the z metal frame wasn't touching the table, I adjusted the hight of the PINDA probe and I upgraded the software to the latest version. However, the same problem persisted when I did so. Other times when I ran the xyz calibration, when the printer comes down from levelling the z axis, it didn't hit the paper as hard but scratched the surface and pulled the paper tight so that I could not move it. (This is the outside scratches in the photos). I really have no clue as to what to do to solve this issue.

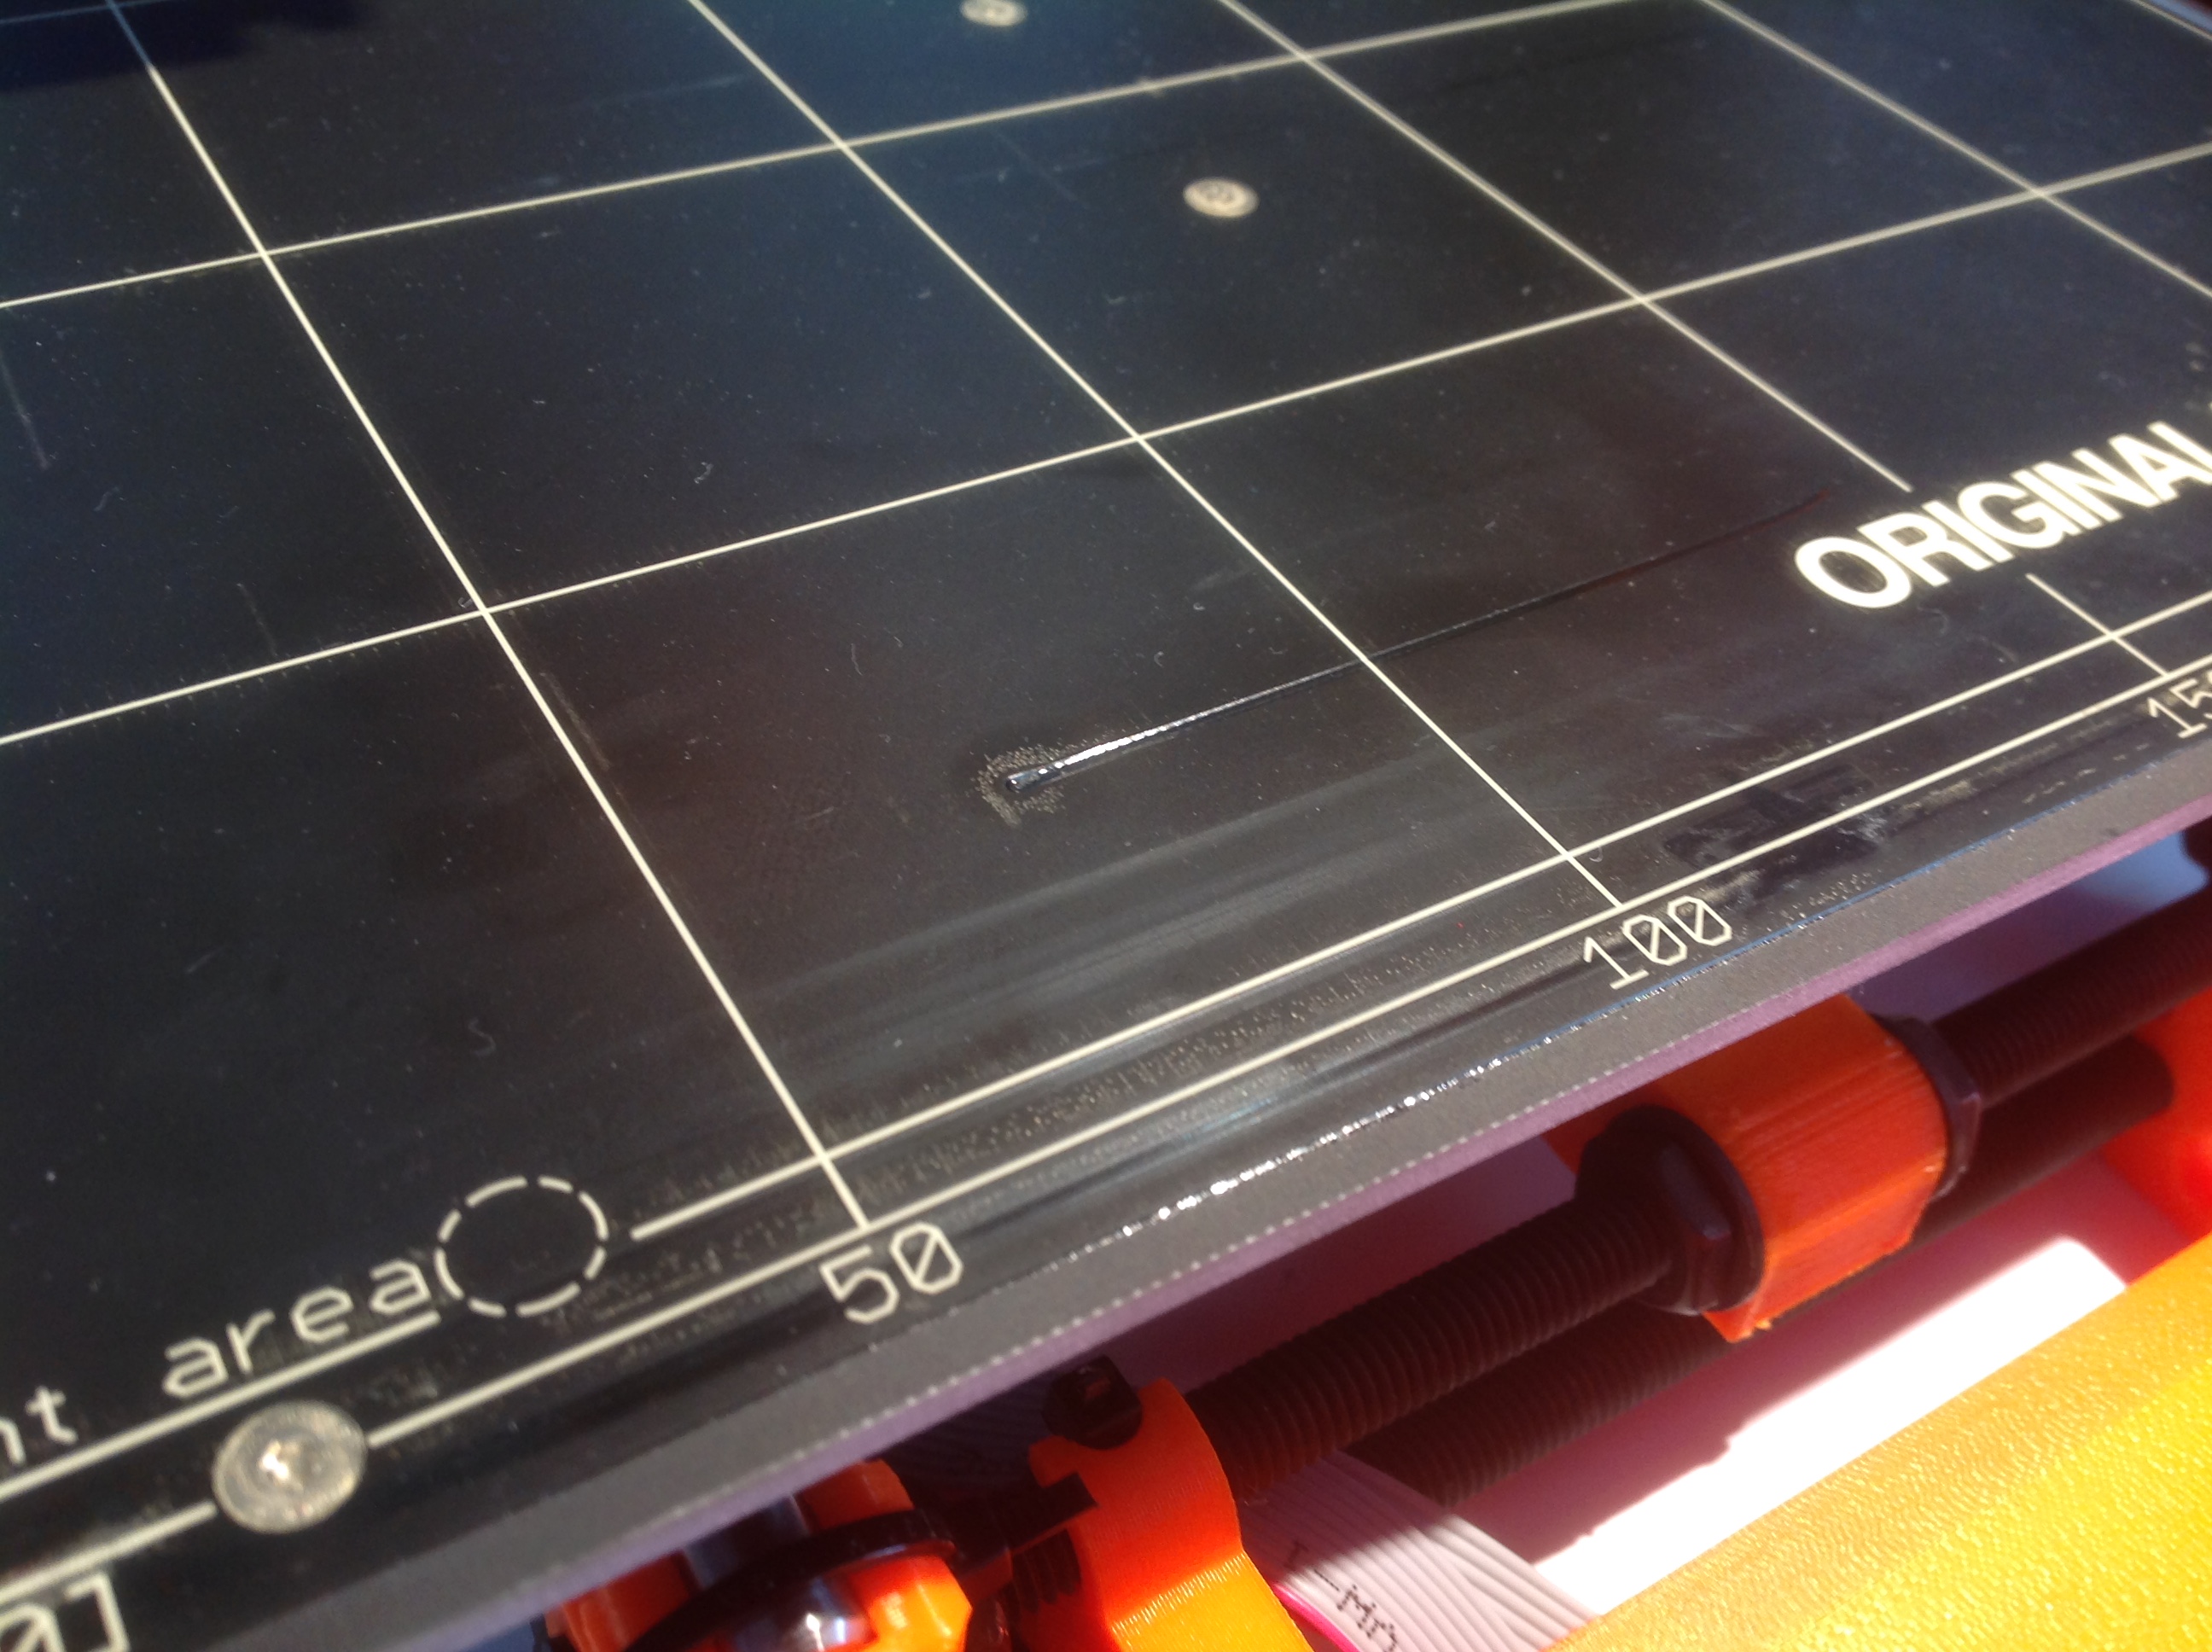
The line in the middle of the bed is from coming straight down into the bed from levelling the x axis using the latest firmware.
I would really like to know if this issue is fixable. If you have any ideas on how to fix the problem I would love to hear them please. Also, do you guys think the scratches will degrade print quality? I hope not, but I could replace the PEI sheet if does I guess. I really hope to fix this issue.
Re: Printer crashes into bed upon xyz calibration
During an XYZ calibration, the printer searches for the calibration points on the bed. The instructions say to keep a piece of paper under the head while it is doing this and to stop the calibration if the paper starts to move. This prevents the nozzle from damaging the surface if the printer does not find the calibration points.
It sounds to me like your PINDA sensor (the thing that detects the calibration points) is too high - relative to the nozzle - to detect the points, so it keeps lowering the Z height until it can detect the point. If you are set too high (more than 1mm above the nozzle, this will happen. Try lowering the PINDA sensor to be about 0.6mm higher than the nozzle (about the thickness of a credit card.) and try again.
Here is my starter advice for getting your printer going well, and avoiding some of the common frustration inducing issues.
1) Run the Self Test from the menu. Make sure everything is connected correctly.
2) Make sure PINDA is above nozzle tip by <1mm but above the nozzle. About 0.6mm is a good starting point, which is about the thickness of a credit card. Place a sheet of paper on the bed, and run the XYZ Calibration from the menu. Stay with the machine, and watch it. As it hunts for the calibration points, watch if the paper moves. If it does, STOP THE PRINTER. That means the nozzle is dragging and the PINDA sensor is a bit too high, lower it and try again, but make sure it is still higher than the nozzle tip. Repeat until you have a good XYZ Calibration. (Note the instructions on the XYZ calibration, and make sure the nozzle tip is clean.)
3) Set your Live Adjust Z roughly correct.
a) Set Live adjust Z = 0.00. (XYZ Cal does this).
b) Do a Calibrate Z. (Head must be clean of drips and lumps).
c) Do a Home. This leaves the head at Z=0.15mm
d) Use Setting -> Move Axis X and Y to get in the approx center of the print space. DONT TOUCH Z.
e) Put a piece of printer paper under the head. Printer paper is approx 0.1mm
f) Wiggle the paper while adjusting "Live Adjust Z" (in settings) until the paper just starts to drag on the paper.
g) Back off a bit (50) on the “Live Adjust Z"
4) Load some filament.
a) Make sure the tension screws are about 14mm from the body with no filament in the extruder. (This is looser than is intuitive for most people. Too tight or too loose will cause issues.)
b) Heat the extruder. You can do this with pre-heat or settings->temperature.
c) Use Load Filament from the menu. Continue until you have a nice thin strand coming from the extruder.
d) Cool it back down.
5) Make sure the bed is very clean.
a) Wipe with as pure an isopropyl alcohol (IPA) as you can find. The little toweletts are not enough in my opinion. Use (and re-use) a paper towel and a good squirt of IPA.
b) (If really dirty, you can use Windex followed by Acetone followed by IPA, but that should only happen if you had used glue stick or other things on the bed and want to really clean it off). I do this if I am changing materials.
6) Get your Live Adjust Z dialed in real well.
a) Print using "Calibration_surface_PLA_75x75@200um_v4.gcode" found in Jeff's "Life Adjust My Way" Thread (Read through page 7 or so till you see the .v4 code. Look at the pictures.)
http://shop.prusa3d.com/forum/prusa-i3-kit-building-calibrating-first-print-main-f6/life-adjust-z-my-way-t2981-s150.html
b) Repeat until you have a nice test print - all stuck together and one nice clean sheet.
7) Do the PID calibrations for the bed and the extruder from the calibration menu.
8) Print a few of the included gcode files. Start with the Prusa logo. The gears are a great test and fun thing to have.
9) Start with a few things on Thingiverse that are easy. Learn how to use the slicer of your choice (I like Slic3r, but there are many options and opinions and all have pros and cons). Start with things that don’t need supports. Trust me, supports should come in after you have good confidence in your printer and yourself.
10) Start designing your own things. Learn supports settings. Try different filament types.
BUT THE MOST IMPORTANT ADVICE: Don’t get frustrated. You WILL run into problems. Search this forum. Read. If you can’t find your answer in 10-15 minutes, post a question. This is a very supportive group that will likely get you going again. If you solve the problem, assume someone else will run into that problem as well, and follow up your question with the answer. There are many people who read these and don’t post, and your solution could help them.
Any advices given are offered in good faith. It is your responsibility to ensure that by following my advice you do not suffer or cause injury, damage or loss. If you solve your problem, please post the solution…
Re: Printer crashes into bed upon xyz calibration
Also, that looks too far back for it to be searching. Is it possible that you put the bed chassis on wrong way around?
Specifically steps 13 and 26 found here:
http://manual.prusa3d.com/Guide/2.+Y-axis+assembly/298
Any advices given are offered in good faith. It is your responsibility to ensure that by following my advice you do not suffer or cause injury, damage or loss. If you solve your problem, please post the solution…