How to be ready when kit arrives
OK, I ordered my MK2 kit a couple weeks ago and I'm waiting patiently for it to arrive. What can I do to prepare so that I don't waste any unnecessary time when it gets here? I have a space cleared out in the basement and a low, sturdy table under a window. I will install a smoke detector nearby. I have calipers to measure parts. Is there anything else that you wished you had purchased or prepared ahead of time? Any advice is appreciated. Thanks in advance.
Edit: Thanks for the advice! So far...
IPA cleaner
Tweezers
Light colored filament (Check! It's shipping with silver PLA)
Blue tape
Painter's spatula, round corners
PE slic3r/cura edition - configure it to raise the print head after the print is complete.
2.5mm nut driver (doesn't it come with all tools?)
Feeler gauge
Read the manual
Re: How to be ready when kit arrives
Bruce
Read the assembly manual.
Read the assembly manual.
Read the assembly manual.
Read the assembly manual.
Read the assembly manual.
Read the assembly manual.
Read the assembly manual.
Read the assembly manual.
Read the assembly manual.
...
You should then be able to build the machine properly when it arrives. But don't rush. If in doubt, consult the assembly manual. Then, if you are still in doubt, ask here.
Peter
Please note: I do not have any affiliation with Prusa Research. Any advices given are offered in good faith. It is your responsibility to ensure that by following my advice you do not suffer or cause injury, damage…
Re: How to be ready when kit arrives
Nice workplace 🙂
Do not forget the small things, like IPA cleaner, some pinzeta/tweezers, some spatula/scraper and finally some light, to see what you are printing.
For the build itself, everything is included and described in the manual. I recommand to use the online version, the pictures are larger, it helps.
I do not know what is the temperature in the basement, but especially for ABS higher and stable temperature will be fine. Working in 10°C will not be the best choice.
Milos.
Re: How to be ready when kit arrives
If you did not already get a light colored PLA filament, it would be helpful to have some around. I have white and silver and it is much easier to troubleshoot issue vs. using black. Your filament should be from a vendor such has Hatchbox that other on this forum use.
Also, pick up some PETG or ABS filament so you can print out the PINDA protector and spare parts. If you are getting a factory built unit, you may want to print the part that attaches to the Y-belt. Also, they factory built unit does not come with tools, make sure you have the correct hex sizes.
Re: How to be ready when kit arrives
You may which to get some blue tape before you do the first mesh level. Some operations can cause the print head to crash into the build plate ( always run the autohome before try the mesh level or calibrate routines). Just as a precaution, I covered my bed with blue tape until I was comfortable with operating the MK2.
Get a rounded print removal tool ( painters spatula ). No tool with sharp 90 degree edges should be used as the heating traces on the MK2 are on the top, not the bottom.
Download the PE slic3r/cura edition and configure it to raise the print head after the print is complete.
Consider getting a raspberry pi running OctoPrint and configure it with MK2 specific GCODE. Get your network setup so you access OctoPrint when away from home.
Re: How to be ready when kit arrives
a feeler gauge would be helpful, so you can better align the z-distance between nozzle and pinda-probe.
the description of aligning the probe height in the manual has it's weakness.
it's recommended here somewhere that this height should be 1mm (pinda 1mm higher than the tip of the nozzle).
after i set the heigth here definite to 1mm, all the meshbed levelling and calibration procedures went perfect.
but a very important thing you need to have is: .... some patience !
🙄
i know that this is a tough advice when you wait a month or more for the delivery of the kit, but take you time.
it's better to check things twice and build the kit thoroughly. no need to hurry up.
a loose washer, or a rod that didn't sit exactly in the frame, might cause you problems later on.
dem inscheniör is' nix zu schwör...
Re: How to be ready when kit arrives
a 2.5mm hex wrench with screwdriver-like handle is a MUST for the assembly.
Also buy some IPA as suggested.
Re: How to be ready when kit arrives
Nice workplace 🙂
Do not forget the small things, like IPA cleaner, some pinzeta/tweezers, some spatula/scraper and finally some light, to see what you are printing.
For the build itself, everything is included and described in the manual. I recommand to use the online version, the pictures are larger, it helps.
I do not know what is the temperature in the basement, but especially for ABS higher and stable temperature will be fine. Working in 10°C will not be the best choice.
Milos.
Thanks. I think it's maybe a little warmer - like 13-15 C - but very stable. I will avoid ABS for a while as a) this is my first printer and b) don't want to mess with the fumes just yet. I'm planning to make a hood or enclosure somewhere down the line.
Re: How to be ready when kit arrives
You may which to get some blue tape before you do the first mesh level. Some operations can cause the print head to crash into the build plate ( always run the autohome before try the mesh level or calibrate routines). Just as a precaution, I covered my bed with blue tape until I was comfortable with operating the MK2.
Get a rounded print removal tool ( painters spatula ). No tool with sharp 90 degree edges should be used as the heating traces on the MK2 are on the top, not the bottom.
Download the PE slic3r/cura edition and configure it to raise the print head after the print is complete.
Consider getting a raspberry pi running OctoPrint and configure it with MK2 specific GCODE. Get your network setup so you access OctoPrint when away from home.
Hmmmm. I have a spare RPi. Was thinking this was a luxury, but might as well get it set up in advance.
Re: How to be ready when kit arrives
Edit: Thanks for the advice! So far...
2.5mm nut driver (doesn't it come with all tools?)
...
yes, but there are a lot of screws. it's a pita with the standard hex wrench, a 2.5mm bit and a screw-driver like handle makes your live much easier.
😉
dem inscheniör is' nix zu schwör...
Re: How to be ready when kit arrives
Other random to dos:
-Get the $5 plastic enclosure, just any case you need it for pets / drafts / ABS printing (Ikea or Bella brand)
-Acupuncture needs to clear the nozzle
-Read up on the Atomic cleaning method if plan to switch from PLA filament
-Get a good task light with a flexible neck, I like the ikea LED lights
-Print the pinda level guide
-Acetone so you can fuse together any parts that my break off (ex. PINDA holder)
Re: How to be ready when kit arrives
Thanks. I think it's maybe a little warmer - like 13-15 C - but very stable.
You're going to need to warm the room up. 13-15 C is flirting with the MINTEMP range set in the firmware.
Re: How to be ready when kit arrives
If you get the tupperware that will go over the MK2, then heating of the bed raises the ambient temp to 70-80F which can help with the min temp.
If you go with the tupperware, you will want to print a spool holder of some sort.
Re: How to be ready when kit arrives
One thing I'm doing to get ready..
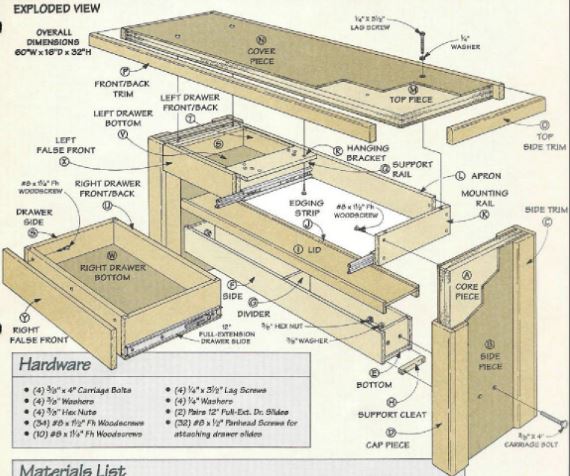
Building a very heavy table for the printer to sit on
I'm resizing this Lathe Stand for the Prusa, making the stand deeper and not so wide.
This table is made using 3/4 " MDF
Over this table I will place a shelf for filaments and perhaps a spool holder.
I want to install under cabinet Halogen lights on the shelf for warmth and task lighting.
Re: How to be ready when kit arrives
seems that you've planned to let the prusa printer do it's job at your workshop or garage.
so it might be a good idea to set up one or two raspberrypi's with usb cameras to stream what happens at your printer inside your home network.
😯
you can find small camera holders at thingiverse, so you can mount a little endoscope* cam near the fan at the hotend, to observe what's going on at the nozzle.
by the way: it's very interesting to watch the the hotend of the i3/MK2 while printing.
💡
*) i recommend a 5.5mm camera.
dem inscheniör is' nix zu schwör...

