Chair Model -- OBJ -> STP -> STL Error
Hey Guys,
I've got an interesting one, and I think I'm playing a little above my pay grade.
My cousin is in design school, and she's designed this chair:
I got the files originally in an OBJ format, which I used the MakeXYZ tool to convert to an STL. I ended up with an STL, but it has a 'geometric issue' in the back of the chair. I'm having trouble attaching more than 4 pictures/files at the same time, so I'll end up commenting on this post to make sure I'm clear exactly what I'm asking.
Here's the interesting part. I thought that perhaps the MakeXYZ tool was converting incorrectly, so I pulled out Solidworks and converted to a STP/STEP file, to be later converted to STL with Fusion360. I tried both versions of the STEP file (I think it's AP203 & AP213), and then to an STL with Fusion360.
Even after using a different conversion process, I still end up with the exact same geometric issue on the back of the chair.
I've attached pictures of the models to show the chair pictures rendered as it should be, as well as a photo of the Slic3r incorrectly interpreting the back wall of the chair back.
It's worth noting that Slic3r shows that there are errors in the model and that it addressed them. Specifically, the little yellow triangle says "Auto-repaired (333 errors)," and hovering over that messages shows: "0 degenerative faces, 0 edges fixed, 0 facets removed, 180 facets added, 153 facets reversed, 0 backwards edges"
I'm wondering if a part of the community can tell me what's going on here, or advise on how to best change/convert the model. I'm not used to dealing with design issues, and I'm kind of at a loss. The next post will have a zip file with the models included.
Thanks for the future advice!
Re: Chair Model -- OBJ -> STP -> STL Error
Here is the post with zip file including models.
Purple model picture is in Fusion 360.
I have a printed model of this already; the inaccurate geometry is maintained and I can provide pictures for the curious. Surely not an easy print but the MK2S took care of it!.
Re: Chair Model -- OBJ -> STP -> STL Error
I tried a few things.
1) Load .obj file straight into Slic3r (it now loads .obj). Same artifacts.
2) Load .stl file into Slic3r. Same artifacts.
3) Load .obj file in MeshMixer. NO ARTIFACTS.
a) Analysis -> Inspector -> Autorepair All Artifacts
b) Exported as AMF, OBJ, and STL
4) Loaded "fixed" AMF file. No artifacts.
5) Loaded "fixed" OBJ file. No artifacts.
6) Loaded "fixed" STL file. No artifacts.
Here are those files:
Good luck.
Any advices given are offered in good faith. It is your responsibility to ensure that by following my advice you do not suffer or cause injury, damage or loss. If you solve your problem, please post the solution…
Re: Chair Model -- OBJ -> STP -> STL Error
I tried a few things.
...
3) Load .obj file in MeshMixer. NO ARTIFACTS.
a) Analysis -> Inspector -> Autorepair All Artifacts
...
Good luck.
Aaron, thanks for the quick response. I pretty quickly marked your answer as "best answer" but un-marked it once I realized that the issue wasn't yet solved--at least I'm not sure the root issue is, yet.
I'd never heard of or used MeshMixer but that's exactly what I needed.
Turns out the automatic 'analysis' actually did leave an artifact! It was almost like a bubble on the backside of the chair, but so much better than the original artifact. I flattened that with the MeshMixer tool and almost printed as it came out.
Then I looked a little closer at the layers...
After a lot of massaging, this is what I've come out with. I thought the model was perfect and ready to go, but I did two things: I added some cones with MM to be the chair seat 'pad' supports, and then I sliced it big (almost the entire volume of the MK2S build volume).
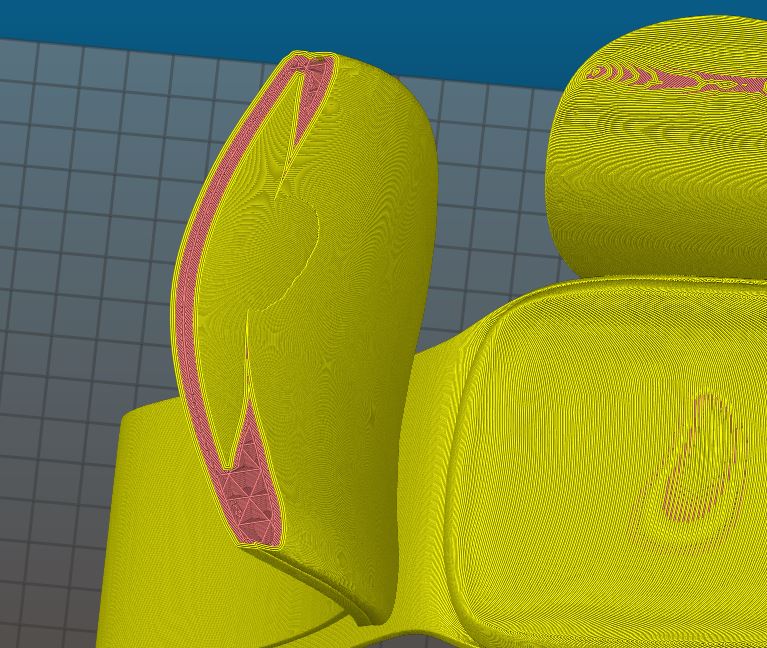
When previewing, I end up with this in the chair back:
The thing is, this hole doesn't show up in the previewed model. The preview model looks nice. The hole shows up once I slice it (with infill, support material, etc).
I've tried all the tools I can find in MeshMixer to see how this gap will respond. As best as I can figure out... it seems that the issue lies somewhere in between the seat back 'cushion' and the seat back itself. Looks like that's where the original artifact came from too.
Thanks for helping me reach beyond my pay grade! 😆 And really, I appreciate the help. I have no clue how to solve an issue like this. I'm trying to do as much investigation up front before giving this print a go because I'm printing it physically as big as possible, and I won't have time to try again.
Re: Chair Model -- OBJ -> STP -> STL Error
Yeah, I was not looking closely (I have my own projects to work on) and thought that it had solved the issue. It sounds like it just pealed the first layer of the onion. (Everyone loves parfait).
I don't have time to play with it now, but you might want to try meshlab. It does bring in this model clean, and has a whole host of repair functions.
Any advices given are offered in good faith. It is your responsibility to ensure that by following my advice you do not suffer or cause injury, damage or loss. If you solve your problem, please post the solution…
Re: Chair Model -- OBJ -> STP -> STL Error
Yeah, I was not looking closely (I have my own projects to work on) and thought that it had solved the issue. It sounds like it just pealed the first layer of the onion. (Everyone loves parfait).
I don't have time to play with it now, but you might want to try meshlab. It does bring in this model clean, and has a whole host of repair functions.
Screen Shot 2017-09-10 at 8.26.48 AM.png
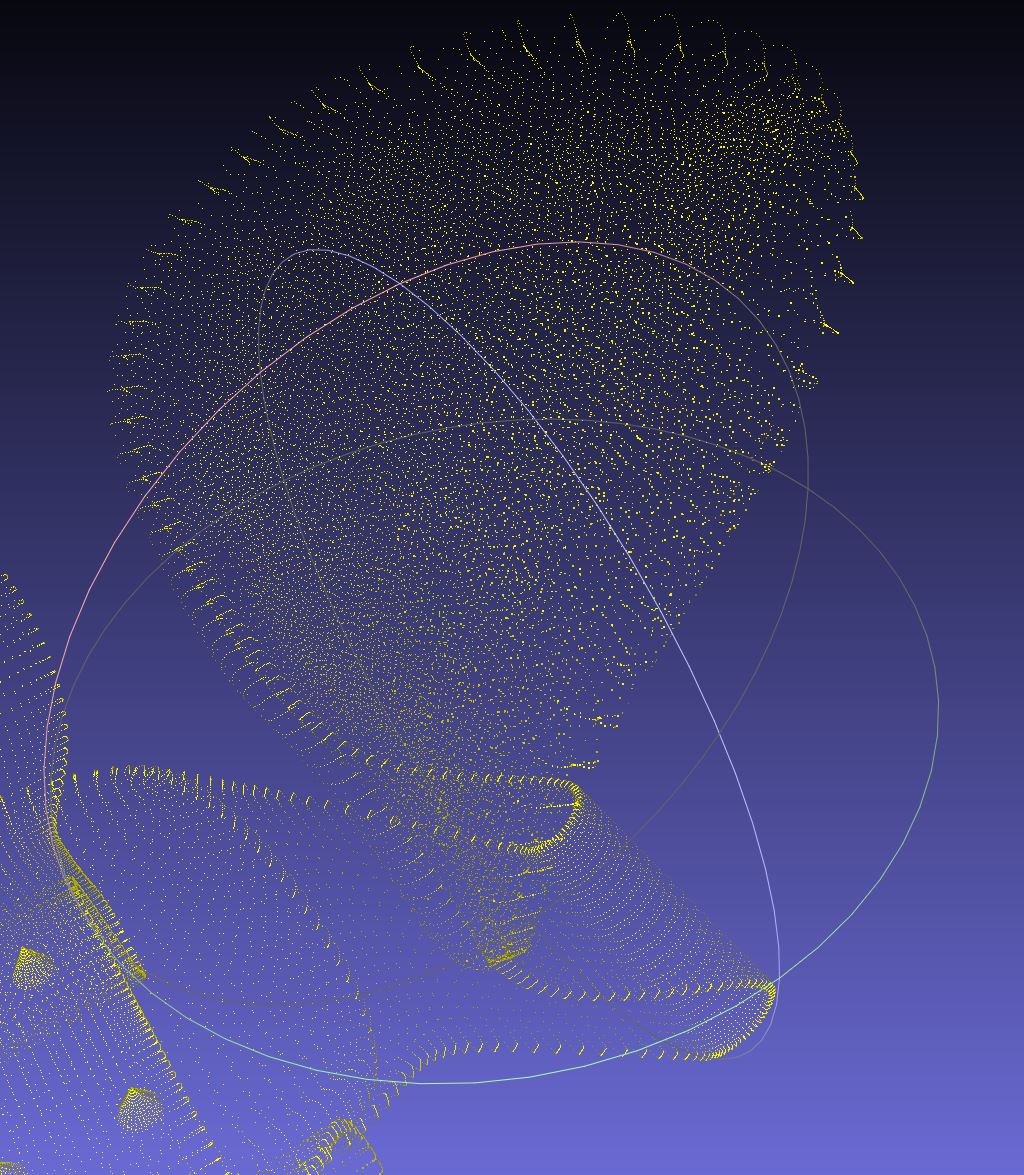
Aaron, thanks for another quick, helpful response. MeshLab is new to me and it is powerful. Very well done program. I ran the STL through the cleaning algo's and it's nice:
What a beautiful point cloud.
I can see that there's points inside the chair back...
Yeah, here's the deal. I'm nearly convinced the issue lies with the way Slic3r is interpreting the point cloud.
I almost included the STL again, but why? Changes have been so minimal that I don't think there's a reason. I poked around Slic3r, and I ended up checking "Detect thin walls" under Layers and Perimeters. This is where that got us:
That is plastic covering that hole, and the 'cover' extends over the entire area of the whole. I'm not sure why the plastic cover is separate path for the extruder. That is some seriously thin plastic. I don't think I'm willing to commit to a full-size 24+ print with that little baby layer of plastic as our solution.
At this point, I'm wondering if there's a way to do some sort of 'depth check' on the point cloud STL that would delete points under a certain depth. There is a point cloud accurately representing surface of the back of the chair. That's what we're seeing when we open of MeshMixer and MeshLab. Changing the points inside the back of the chair seems like the best way to manipulate the way that Slic3r interprets the cloud.
Let me know if you guys have any thoughts. I didn't see an option in MeshLab that looked like or did what I'm thinking of.
I suppose I'm simultaneously interested in a way to get Slic3r to ignore internal surfaces.


