Raspberry Pi Zero External Mount Frame
Hi Everyone,
I'm on Christmas break and a few hours of spare time so I thought I would create my version of an external mount made just for this purpose.
I don't have my MK3 yet so I am only going by the printed parts STEP FILES that were released to generate this Solidworks 2013 model for now.
It's not done yet but I wanted to put it out there for comments. I planned on using Scotch #665 DOUBLE SIDE TAPE because it is very thin and sticky to mount the frame to the Einsy enclosure but that could change. I want to have some sort of a simple protective cover to better protect from ESD shocks. I designed it .25" thick so as to have better USB cord end clearance if you need to plug into the board to modify anything in the Pi firmware. Maybe you will just need to unplug the Pi Zero bd. from the Einsy to do that (safer).
There is a 14 pin FM header on the Einsy board and a few longer .35" male header pins on the Pi Zero to plug in. DO NOT USE THE PICTURES PINOUT FOR CONNECTION INFORMATION AS IT MAY NOT YET BE CORRECT!
UPDATE: 12/27/2017
I have made some changes and included a nut retainer to screw the frame thru the vent grill to hold it in place. There are two flat head #4-40 x 5/16" long screws and two #4-40 hex nuts. The hex nuts are pressed into the round nut holders. The double stick tape did not hold well enough to use. When I created the cover and the nut retainer I must have used a different plane to start the part design. When saved to .stl they come in on the wrong surface but because I have Simply3D I can flip the parts to the surface needed to print. I'm not sure about other packages doing the same.
I will try to print these over the break to check them out for fitment to one another. Then out to Thingiverse a bit later.
Happy Printing!
BB1
MK3 Kit, Designed, built 4x4 CNC Plasma Cutting Table, Motorcycles Bigdogbro's Adventures
http://www.youtube.com/channel/UC5djrxBeeOKB9_6rHnn6G8A
Re: Raspberry Pi Zero External Mount Frame
Looks like it's shaping up to be a winner. I was thinking about doing the same thing.
If you had a couple of little retainer clips that slipped through the slots in the einsy case and slid down it would be enough to retain it without adhesives. Once the pi is plugged in it will prevent it from sliding up and releasing the clips.
Re: Raspberry Pi Zero External Mount Frame
Shouldnt the case say 3.142?
Re: Raspberry Pi Zero External Mount Frame
What's the interface between Einsy and Raspberry - is it I2C or SPI?
External case looks good. Maybe couple L-shaped clips to slide under the grill/vents and a single screw from inside on the top part of the case to the Einsy case to fix it securely.
Re: Raspberry Pi Zero External Mount Frame
What's the interface between Einsy and Raspberry - is it I2C or SPI?
RS-232 rx/tx at 3.3v levels plus 2 GPIOs.
Re: Raspberry Pi Zero External Mount Frame
I am not sure if mounting the Pi Zero on the outside will interfere with the stepper motor or anything else....comments, pictures and dimensions are welcomed.
The overall thickness from the Einsy rear enclosure outside surface is .460 inches. The Pi Zero frame sits back 1.6 inches from the front enclosure face so I'm not sure the stepper motor will be in the way.
MK3 Kit, Designed, built 4x4 CNC Plasma Cutting Table, Motorcycles Bigdogbro's Adventures
http://www.youtube.com/channel/UC5djrxBeeOKB9_6rHnn6G8A
Re: Raspberry Pi Zero External Mount Frame
I am not sure if mounting the Pi Zero on the outside will interfere with the stepper motor or anything else....comments, pictures and dimensions are welcomed.
I haven't taken dimensions but here's a photo of the Pi0W mounted inside of the holder. I don't think that it should block anything if it's sticking out.

I'm going to try to edit the SCAD to remove a portion of the case, since my camera cable keeps on popping out and I'm getting pissed off at it.
Re: Raspberry Pi Zero External Mount Frame
Thanks!
Looks good, should not be any problems that I can see baring any non-conforming modeled part issues from MK3 Github. Sent you a PM.
MK3 Kit, Designed, built 4x4 CNC Plasma Cutting Table, Motorcycles Bigdogbro's Adventures
http://www.youtube.com/channel/UC5djrxBeeOKB9_6rHnn6G8A
Re: Raspberry Pi Zero External Mount Frame
I just took a 2nd look at this CAD you have. The header to plug the pins into is actually on the front side of the Einsy (with holes in the board for the longer pins to go through), so it doesn't stick out at all like you have in your CAD. When I finish printing and have to take apart my Einsy, I'll take a photo.
Re: Raspberry Pi Zero External Mount Frame
Yep,
The Einsy has a (no solder) pass thru header which allows pins to connect into it from the rear side of the board. The black connector on the back side of the Einsy board in my CAD is a long pin header that is just plugged into the pass thru connector. If you cannot find a long pin header like that then you can just use LONGER pins in the Pi Zero board or a few different type to stack up to the correct height. Samtec makes a part that could work if you can find one, P/N ESQ-107-14-T-D. Mouser?
Digikey has these that you could make work. The "14" is the overall stack height that is important.
Double row x 8 pin (16 pins total): Cut off the extra two end pins: (Recommended)
https://www.digikey.com/products/en?mpart=ESQ-108-14-G-D&v=612
Single row 5 pin:
https://www.digikey.com/products/en?mpart=ESQ-105-14-G-S&v=612
Or this 8 pin single row and cut it off one pin end to make it a 7 pin and place two side by side.
https://www.digikey.com/products/en?mpart=ESQ-108-14-G-S&v=612
BB1
MK3 Kit, Designed, built 4x4 CNC Plasma Cutting Table, Motorcycles Bigdogbro's Adventures
http://www.youtube.com/channel/UC5djrxBeeOKB9_6rHnn6G8A
Re: Raspberry Pi Zero External Mount Frame
Posted the updated design to Thingiverse:
https://www.thingiverse.com/thing:2749871
MK3 Kit, Designed, built 4x4 CNC Plasma Cutting Table, Motorcycles Bigdogbro's Adventures
http://www.youtube.com/channel/UC5djrxBeeOKB9_6rHnn6G8A
Re: Raspberry Pi Zero External Mount Frame
Has anyone actually done this yet? Was wondering how it turned out lol. Lots of talk, and cad drawings, but no pictures of the final work so I assume no?
Re: Raspberry Pi Zero External Mount Frame
I just cut some of the stripes from the Einsy-Case and put my Pi through the hole.
Works perfect
Re: Raspberry Pi Zero External Mount Frame
Got some pictures to share? 😀
Re: Raspberry Pi Zero External Mount Frame
I would love to see how it looks the way you mounted it 🙂
Re: Raspberry Pi Zero External Mount Frame
Just finished this setup last night, very happy. I have only done some movement tests with the RPI no print tests yet. Note it takes about a minute for IP address of the printer was displayed on the front LCD.
I had to create my own screw blocks for the M3N nuts, the ones in the STL files were to large. I was able use the M3x14b screw in the spare parts bag (used in section 7 step 13 to attach heat bed to standoffs), as wells as the extra M3N nuts. My only issue was that the screws are a bit long and barely touch the controller board. I covered the backs of the screw blocks with electrical tape just in case so as to not short any of the contacts on the bottom EINSY board.
The extra space from the external bracket does allow for attaching a heatsink to the RPI, leaving the option to try overclocking.

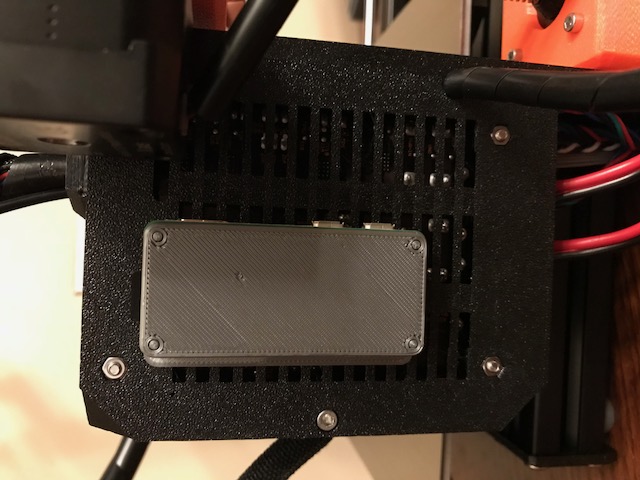
No Movement issues, plenty of clearance. Need to try with the OTG adapter installed.
Printed with the PLA that came with the printer.
Re: Raspberry Pi Zero External Mount Frame
Looks very nice, I like this approach.
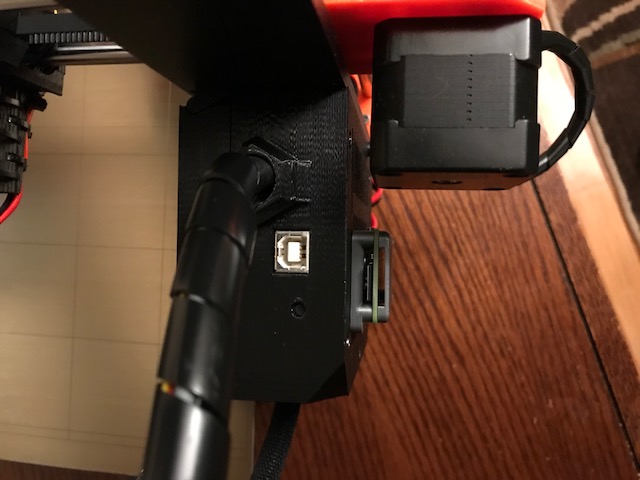
So the USB port is free to be used as well (attach external cam).
I'l try it this week-end, thanks!
Simon
Re: Raspberry Pi Zero External Mount Frame
Just finished this setup last night, very happy. I have only done some movement tests with the RPI no print tests yet. Note it takes about a minute for IP address of the printer was displayed on the front LCD.
I had to create my own screw blocks for the M3N nuts, the ones in the STL files were to large. I was able use the M3x14b screw in the spare parts bag (used in section 7 step 13 to attach heat bed to standoffs), as wells as the extra M3N nuts. My only issue was that the screws are a bit long and barely touch the controller board. I covered the backs of the screw blocks with electrical tape just in case so as to not short any of the contacts on the bottom EINSY board.
The extra space from the external bracket does allow for attaching a heatsink to the RPI, leaving the option to try overclocking.
Ext_Port.jpeg
RPI_w_Case.jpeg
No Movement issues, plenty of clearance. Need to try with the OTG adapter installed.
TopView.jpeg
Printed with the PLA that came with the printer.
Please share the files for the redesigned M3 nut holders? I am hung up on this install not because of this mistake 🙁
Re: Raspberry Pi Zero External Mount Frame
Hi,
I like very much the idea of mounting the raspi zero w outside the box. To mount inside is needed to take out the board , refit the cables , cables holders, etc. But I don’t like the idea of the screws that can be tricky to be placed and can touch the board with the nuts. Since the raspi is fixed by the sockets a simple 3D printed snap over the case secured in the openings of the case can not be enough ?
Re: Raspberry Pi Zero External Mount Frame
This is the redesigned screw blocks for the M3N nuts jeffrey.s7 was asking for. This was my first attempt a building a model in tinkercad. The fit is very tight, so use the trick of compressing the nuts into the blocks using another screw first.

The screws touching the board was a concern of mine, have not had any issues with the electrical tape in place to protect the board. I wrapped the screw blocks loosely with the electrical tape twice with a hole cut where the screw can still go through. mainly just concerned with the end of the screw touching the board. At some point i will just buy the correct screws they need to be maybe 3-4 mm or so shorter. have been running the printer at least 30-40 hours without issue.