Mk3 Kit Built!
I finally got two prints out of the Mk3 after building.
Few comments based on my experience:
The kit is super well organised with very good instructions. Kudos! I had misjudged the complexity of the build (I have never used any 3d printer before) but the instructions are well done.
The most complex build was the extruder (z-axis) and I had had multiple issues with it
1. The motor alignment with the hot ends intake plastic port did not align well (I had to tear down the whole thing again after the first build). I kept looking at the images on the website and I thought I did it as precisely as I could but somehow it wasn't clear (May be a small animated gif or embedded video to confirm it during the build will help). When I tried to fix it without removing it from z-axis, I ended up pulling the cable of print fan . So I had to wait for a week to get the part
2. The Z-axis locknut was very tight and it took multiple tries to get it to move smoothly. This caused multiple calibration failure because one of the motor will not work
3. I didn't realize how sensitive the pinda probe placement is. In Mk3, even releasing the M3 nut securing it, the Pinda probe holder is very tight making smaller adjustment impossible. It was an exercise of frustration to move it slightly up or down.
4. Finally the first layer adjustment was not clear because after xyz calibration I was expecting it to print without any problem and it turned out that the whole thing was too high and the lines the printer tried to draw basically will not stick to the print surface and it will just float around. Re-adjusting the PINDA probe and trying to get the xyz calibration to pass took its time.
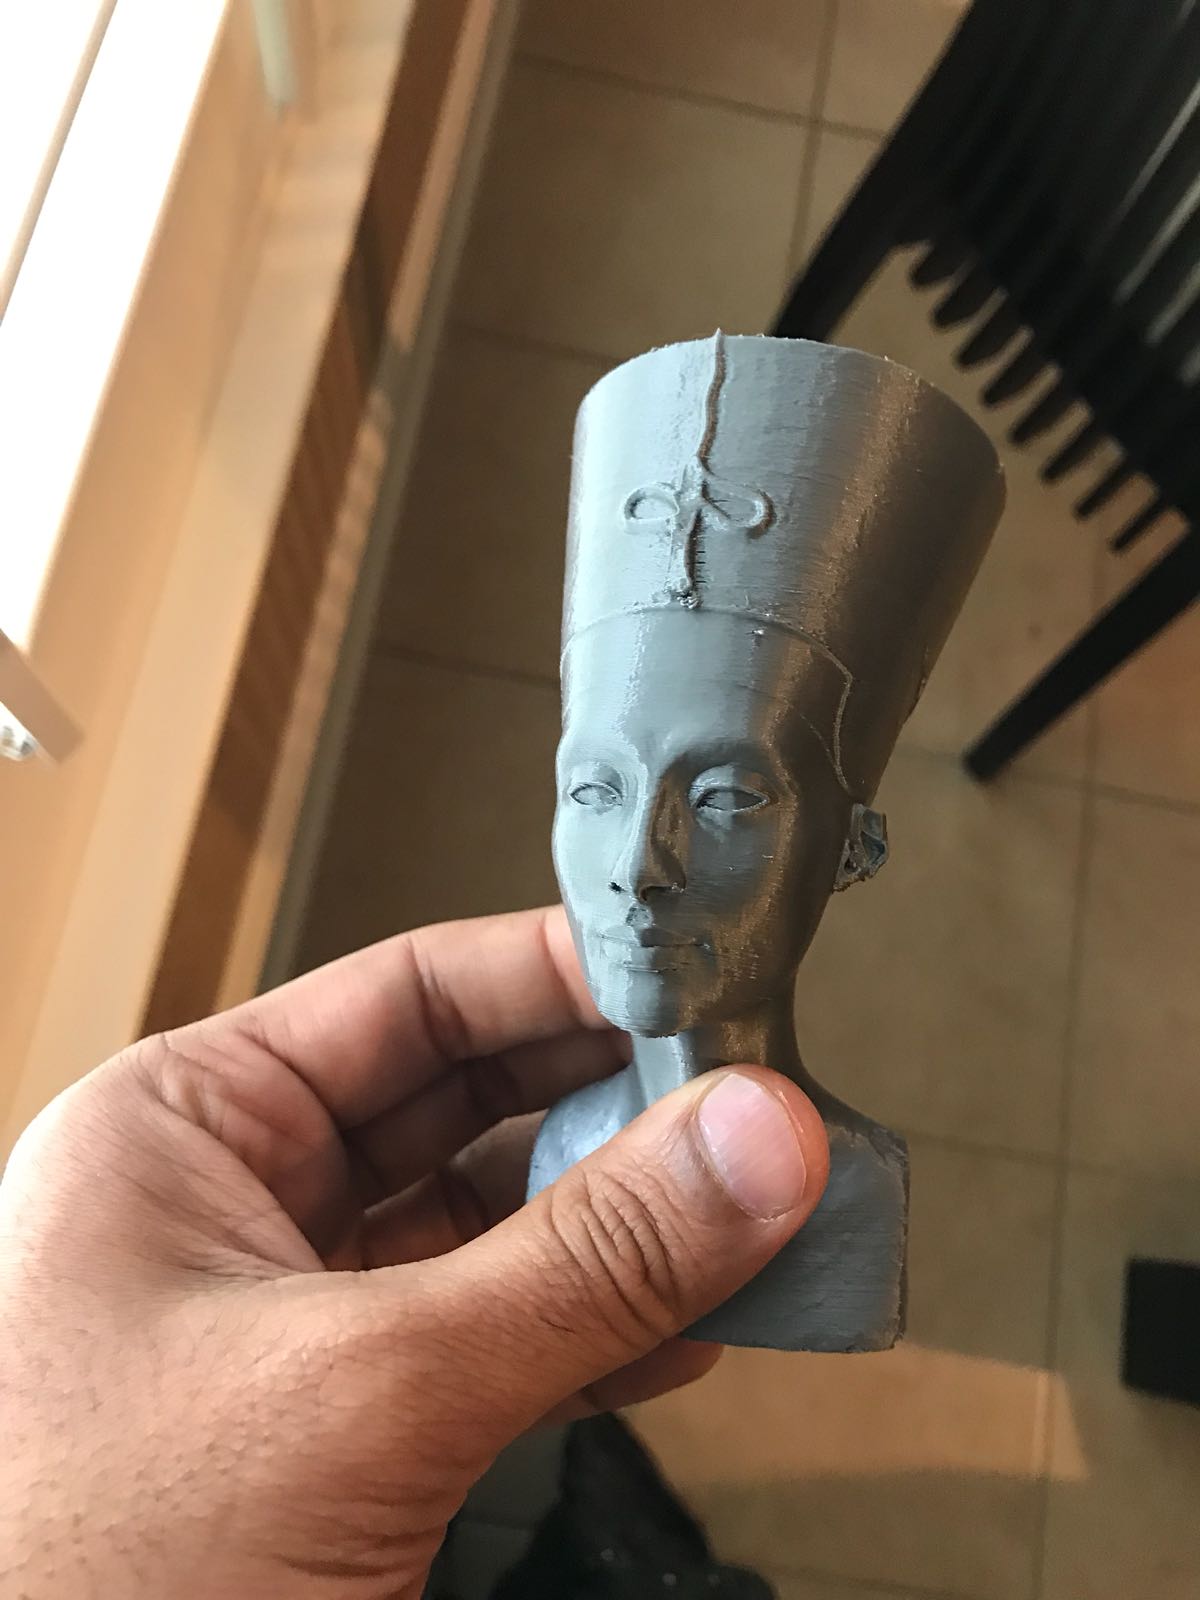
HOWEVER, I have to say, I am super impressed with the whole setup and I printed the PRUSA logo first and then went to town with nefertiti bust. I read about firmware stuff with Mk3 but it seems to be solid here.
It makes it all worth it! Thank you 🙂
Re: Mk3 Kit Built!
Congrats!!!
The issue with us grumpy ones... Is we really want a "mold free injection molding machine"... 😉
The bulk of the quality is there, but this printer has issues that other printers don't... They quality can/could/should be *BETTER*. It's not that it's not already great quality, but it can/could/should be BETTER!
Hi, I'm Sean. I used to work on CNC machines.
I try to not make mistakes, but the decision is YOURS.
Please feel free to donate to my filament/maintance fund.
Re: Mk3 Kit Built!
There are some aspects about that print that I wouldn't be satisfied with... I see some exterior perimeter gaps in the head piece.
Re: Mk3 Kit Built!
Hi, Can you give me a bit more info on what you mean by that perimeter gap? I have been printing continuously so far and it seems to hitting it out of the park imo 🙂 so I would certainly would love to now what can be improved! I also need to try out PETG filament and see how that one works,
Re: Mk3 Kit Built!
Maybe a small retraction problem?
Re: Mk3 Kit Built!
Thank you! I see now. Any tips on what I should be adjusting.
I am also seeing issues on the bottom layer (My live adjust Z value is -0.9mm . so may be I should adjust the PINDA probe .. but that is so hard to do minute movement.. the holder is way too tight and I dont want to snap things off it). I am not sure if that is causing this issue. Other portions look fine but the bottom layer seems to be weird. This model was sliced using prusa control with default setting set for I3 Mk3.
Re: Mk3 Kit Built!
I would experiment with the retraction settings. try to lessen it a small amount as far as distance is concerned. It could also be speed related. try speed before retraction.
As to the images that you shared is the bed leveled really well? It looks like un eveness to me.
Re: Mk3 Kit Built!
Thanks. I only ran the wizard and it completed fine. I will try this again and redo this.
Re: Mk3 Kit Built!
I'm new also and only got two prints out of my MK3 before running into more issues. For the PINDA probe I've thought about it and will be using the following method to adjust it if I need to.
First mark the current location of the probe before moving it. You're right, 1mm isn't much to move it. I would loosen the screw on the probe and gently with a small flat head screwdriver spread the gap to allow the probe to move up.
I would mark on a piece of paper near by what 1mm would look like. Move the probe up and release tension on the mount. Tighten the screws and you're ready for verifying again.
Two things I think I'm going to add to this list now that I wrote them down. First before starting zero the Z measurement. The second would be instead of eye balling the 1mm put two zip ties under the probe instead of one.
I just finished my final calibrations and printed my first Adalinda. My Z settings are at -.985 right now so I may have to adjust my probe next.
Re: Mk3 Kit Built!
Thank you David. I redid the calibration (my live Z is at - 0.8) . I will do another build and check if it helps with the first layer.
Other than that, it seems to be pretty solid (I did the gear model and it came out very well - The gears rotate smoothly etc).
Re: Mk3 Kit Built!
First mark the current location of the probe before moving it. You're right, 1mm isn't much to move it. I would loosen the screw on the probe and gently with a small flat head screwdriver spread the gap to allow the probe to move up.
I would mark on a piece of paper near by what 1mm would look like. Move the probe up and release tension on the mount. Tighten the screws and you're ready for verifying again.
Two things I think I'm going to add to this list now that I wrote them down. First before starting zero the Z measurement. The second would be instead of eye balling the 1mm put two zip ties under the probe instead of one.
Pinda probe holder is threaded. 1 revolution = 1mm. No need to pry on it with a screwdriver. For me, I set the nozzle so it just contacts the bed and then adjust the Pinda probe to 1mm above the bed with a feeler gauge. I find this is a good starting place and then adjust z offset from there.
Re: Mk3 Kit Built!
With the rigidness of the cable I wouldn't think you could turn the probe 360 degrees.
Re: Mk3 Kit Built!
Yes, Given how tight the probe is on the holder, even with a plier, it is hard to turn (at least with any amount of control) and I felt the plier itself could damage the probe.