Re: Many answers from Jo himself
Nope, there's no trick. There's a slit in the middle that coils around its self to hold everything tightly. Just open it up with your hand and put it around the wires.
I don't think you're talking about the same thing here. The mesh braid I (and possibly others) know is a braided textile tube without any slits which expands when pulled over the wires, it looks like this:

Does anyone know where to get a "mostly" Black mesh with a accent of the "Prusa Orange" Dayglow Saftey Orange expandable braided mesh loom?
Looked all over, and could not locate a source in small quantities or at a reasonable inexpensive price, let alone very many samples or sizes to choose from.
Re: Many answers from Jo himself
Looking on Amazon, I found these side-opening sleeves:
They look good because they're side-opening for easy replacements of the existing cable wrap. I see that there are also versions with hook-and-loop side slit as well as versions without side opening.
Thoughts/experience on which to prefer?
That's exactly what I was recommending. Sorry that I didn't describe it properly, my mind is mush this Monday.
Re: Many answers from Jo himself
I hate spiral wrap. So i used braided sleeving from the outset. Getting the plugs through was interesting..
I kept the nylon support filament. And the standard printed fittings.
I added a pad with a tongue to the back of the X motor. To support the top end of the braid that i used on the X wiring...
At the entry end, of the braiding. I managed to turn the loose ends of the braid. Inside of the braided tube for about 50 to 75mm. This allowed me to create a longer strain relief area where the wiring loom leaves the x axis, Y axis, and extruder , to reduce the bending moment at the back of these items.
What i did was to cut a length of braiding longer than needed. Press on one end (longtitudinally) this causes the braiding to shorten and expand in diameter
Whilst expanded I turned the loose end of the braiding inside to tidy that end up.
I took a length of thread and tied it around the cable bundlethen i slid the connectors back and forward with the smallest connectors towards the back of the bundle. And the larger connectors towards the front. Knotting the thread to keep the connectors close to the wire bundle... i then threaded the end through the middle of the braid tube in order to pull the connectors through the braiding. Pulling on the thread and pushing on the end of the braid. Caused the braid to expand and swallow the connectors and cables.
When all of the cables were through the braiding... i untied the thread to release the connectors. And then fastened the cable bundles in place with cable ties as per the normal build process.
When the braid was stretched back along the cables. the braiding pulled the wires close together tidily. When the cables got to the electronics box. I fastened the loose ends of the braiding into the cable management of the electronics box to make them tidy too.
Where i over estimated the length of the braiding. I cut the excess off the electronics box end.
This sounds complicated. But it is reasonably simple in actuality.
I hope this makes sense. Regards Joan
I try to make safe suggestions,You should understand the context and ensure you are happy that they are safe before attempting to apply my suggestions, what you do, is YOUR responsibility.Location Halifax UK
Re: Many answers from Jo himself
Is there a trick how to get all the cables and the connectors through the mesh tube?
And one has to use a heat shrink tube at the end of a mesh tub so it does not break loose/destroy itself, right?
When I put together the kit I actually changed to mesh tube for heatbed and X motor, the way to do it is using a lighter after you cut it to melt the threads together before getting the cables in (like with paracord or similar.) There was no good way to fix it to the X motor so I only used zip ties there.
I did not have a large enough mesh for the X carrage so that is still stock.
The one I got was from ebay called "3~25mm Black Expandable Braided DENSE PET Sleeving Cable 3 weave" ( I forgot what size now I have.)
It's obviously not the best quality but works ok, curious to know what the official new ones will be and if there will be available to us who got the old spiral wrap for free (the cost for Prusa must be way lower than shipping.)
I would think it would be cheaper for Prusa to just give a credit.. I bought 50' of the 1/4" dia for ~$6 delivered on Amazon and 25' of the 1/2" dia for $8. I don't know what I'm going to do with the leftover, maybe toss it up on CL.
Re: Many answers from Jo himself
I understand, that I have to replace the spiral nylon wrap with braided nylon mesh (don't like it anyway:) ).
Is the 3mm nylon filament support removed as well, so only wires are left?
Have a look at my models on Printables.com 😉
Re: Many answers from Jo himself
If you're in the US, I ran across this braided stuff at Advance Auto Parts, in case anyone is near that. 🙂 Not sure if it fits the bill of what we're looking for, but I'll find out soon.
I like to use that mesh stuff in wiring mobile radio transmitters. Keeps the 12v pairs nice and neat. If it's in an engine compartment role, there's flexible conduit there too. Instead of heatshrinking the end, I slightly burn the end to "cauterize" it with a mini-torch/portasol. Seems to work ok, but heatshrinking might make it look a lot nicer.
That said, I'm crazy enough to be a rolling 3D printing lab. 😛 :ugeek:
Re: Many answers from Jo himself
the Y axis spiral wrap can snag cables and they switched to a braided cable sleeve, together with the new bed holder; they're saying "The easiest remedy is to remove the spiral wrap and nylon filament from the heatbed wires, which completely prevents this from happening."
I was dubious of this one at first, but it wasn't snagging cables that was my problem. It was more of a pinching/binding of the spiral wrap itself on mine. I tested the movement by hand quite a bit. As the bed reached about ~70% toward the back, the wrap pinched in on itself and got stiff, providing a very noticeable resistance in the bed movement. This might have settled in over time, as I definitely didn't notice it after the build. Just an FYI in case you were putting this in the "I might get to that later maybe" category.
Re: Many answers from Jo himself
If we switch t braiding over spiral wrap, how would this work with the new hotbed cover? I thought that designed to clamp onto the end of the spiral wrap so would need to be rethought.
Re: Many answers from Jo himself
If we switch t braiding over spiral wrap, how would this work with the new hotbed cover? I thought that designed to clamp onto the end of the spiral wrap so would need to be rethought.
I built and installed the new hotbed cover. I believe it would work just fine with braided wrap. That cover clamps down quite tightly on the wires, and any (relatively thin) cover over it would be well gripped.
Re: Many answers from Jo himself
Does anyone know if the new Mk3 heat bed cover will work on the Mks. I was thinking of trying it along with the braided cable wrap mentioned in this thread since I have to replace my bed thermistor due to pinching. Thank you.
Re: Many answers from Jo himself
I installed braided loom on both the heatbed and print carriage assembly from the start when I got mine in December. Attached are some pics in case anyone wants to see how I terminated them and how it turned out. Interestingly, my bed thermister wires failed after about 10 hours, even with this loom and taking extra care to leave slack - I had the exact same failure on my MK2. The failure exhibited as bed mintemp errors. The thermister wire gauge is just to small IMO to stand up to the constant movement stresses. On both printers I ended up splicing 22 gauge wire from just before where the wire is tie-wrapped to the bed / nylon interface to just after where it's tie-off at the controller case. I was using the original headbed cover, as the newly designed cover came after my assembly. I do hope between the new cover and loom that the thin (28ga?) thermister wires last longer for everyone.
Re: Many answers from Jo himself
for anyone who hasn't purchased the self closing wrap on amazon. I have a bunch (asked the company for samples and they sent me 10' lengths)
so for the cost of postage paypalled I'll mail you some. pm me and i'll try to change the post when i have 5 people.
I'm also printing Polycarbonate part cooling fan shrouds since my abs one started drooping after printing polycarbonate. let me know if you want one.
here's the thread on that:
https://shop.prusa3d.com/forum/original-prusa-i3-mk3-f30/drooping-fan-shield-t13911-s10.html
Chris, I'm too new to send PMs. I'm interested in the braid, and more so in the PC fan shroud (nice job). Can you send me PM?
Re: Many answers from Jo himself
I added a pad with a tongue to the back of the X motor. To support the top end of the braid that i used on the X wiring...
At the entry end, of the braiding. I managed to turn the loose ends of the braid. Inside of the braided tube for about 50 to 75mm. This allowed me to create a longer strain relief area where the wiring loom leaves the x axis, Y axis, and extruder , to reduce the bending moment at the back of these items.
any chance of a picture of this tongue? my x motor braided loom just hangs there now. not a big deal but i'd like it to look nicer
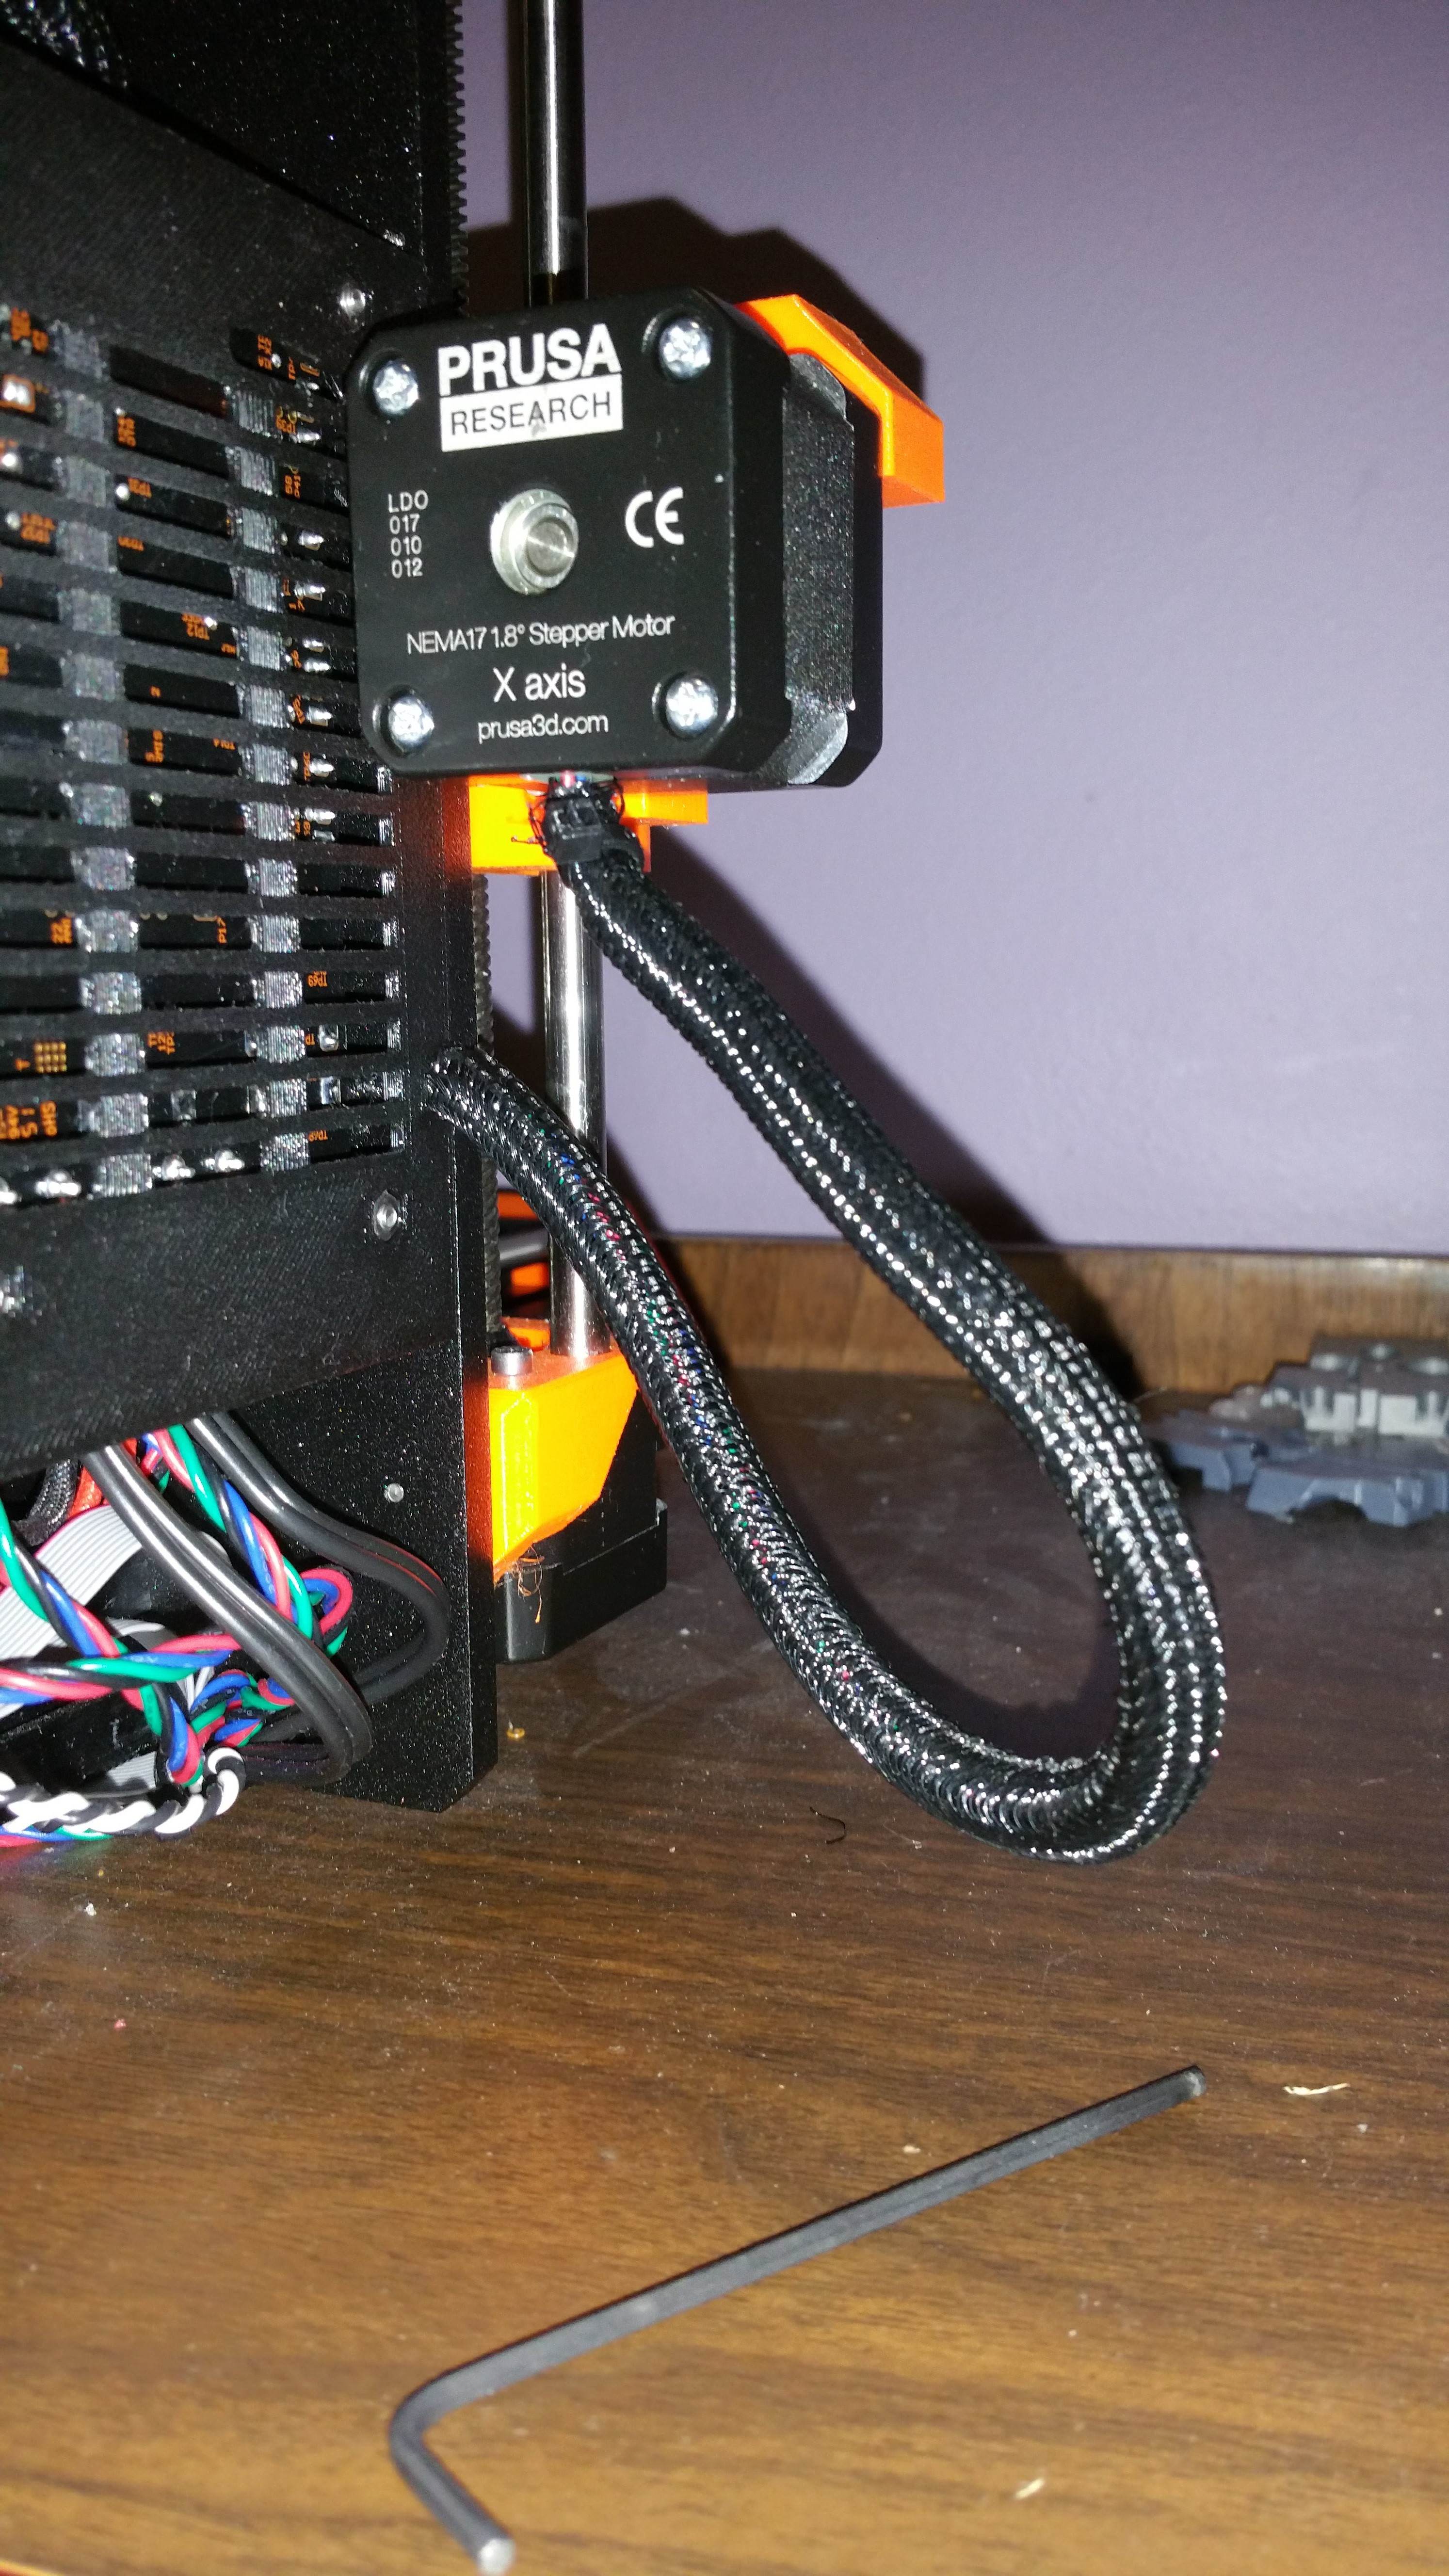
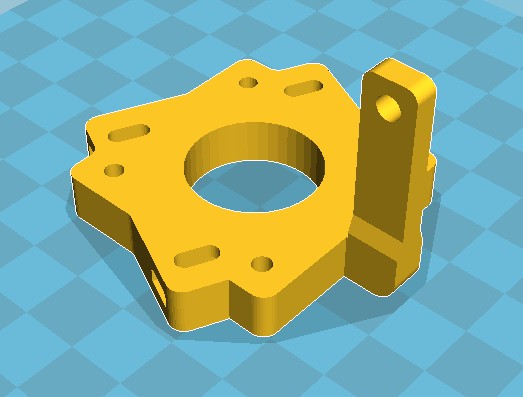
Re: Many answers from Jo himself
I am using the X-Axis tensioner, so made an addition to it to hold the braid...
Re: Many answers from Jo himself
for some reason my pm to you is sitting in my outbox. So pm me your address please
If
Re: Many answers from Jo himself
for some reason my pm to you is sitting in my outbox. So pm me your address please
If
A Pm will sit in your outbox until the recipient reads it.
Re: Many answers from Jo himself
Done! 🙂 Sorry about that. My Office365 was all borked for both home and work for past few days.
--Casey Benefield
for some reason my pm to you is sitting in my outbox. So pm me your address please
If