First layer issues (pre-assembled printer)
First layer issues (pre-assembled printer)
My first layer issues are as of right now the right side of bed is too high/ left side too low and I can’t seem to do anything to fix it.
I purchased the prebuilt MK3 and over the weekend printed the herringbone gear and dragon just fine. I then updated the firmware to the Firmware 3.1.2.. This is my first 3D printer, although I am a mechanical engineer that has a few years of CNC experience, 3D cad experience and cutting programs, my experience offers me no help in this new 3D printing world.
After updating the new firmware I ran an XYZ calibration. Not sure if I was supposed to do that. Everything passed and it said it was perpendicular (which it should be since it was the prebuilt kit). I then ran the first layer calibration several times and setting the calibration - Bed level correction, but I am unable to get a solid first layer print across the bed. The left side is too low and the right side is too high. Even setting the bed level correction at Left: +50, Right: -50 does nothing to fix this.
If I set the left side of the bed to print perfectly then the right side comes out wavy, or I can set the right side of the bed to print perfectly but then the left side is too far away and the lines don't adhere to one another.
I did lift the printer out of the box as described in the instruction book, which I read completely before taking the printer out of the box. The printer is also sitting on a flat desk. Since I didn't run a complete bed leveling check before upgrading to the new firmware I don't know if it was fine before the firmware or if this is a firmware issue.
What should I do next? This is very frustrating since I must have spent 7-8 hours messing with this over the weekend.
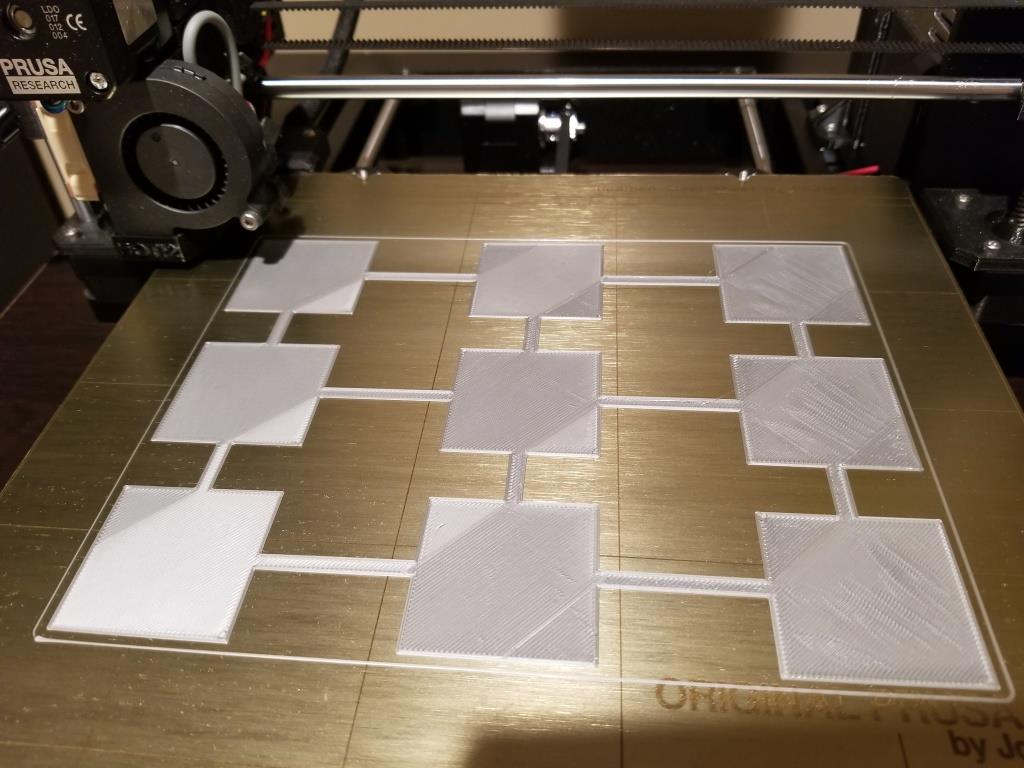
I attached a test print that I must have printed out 7 times, either the left was perfect or the right was. This one was with the left side that turned out nice but the right is too close.
Re: First layer issues (pre-assembled printer)
As you printed the Z test pattern, what thickness did you measure for the nine fields? I just printed my own pattern (time optimized!) and got 0.09 mm too thick front right. I did not yet try to optimize it. I corrected the bed levling for my MK2S (worked perfectly, but that was half a year ago), but did not try for the MK3 yet. Maybe there's still a bug in the firmware...
- Martin
- Martin
Re: First layer issues (pre-assembled printer)
As you printed the Z test pattern, what thickness did you measure for the nine fields? I just printed my own pattern (time optimized!) and got 0.09 mm too thick front right. I did not yet try to optimize it. I corrected the bed levling for my MK2S (worked perfectly, but that was half a year ago), but did not try for the MK3 yet. Maybe there's still a bug in the firmware...
For the 9 fields I got, going from back left to front right
Back
Left Middle right
.22mm .18/.15mm .13mm
.22mm .18/.16mm .14mm
.21mm .15mm .12mm
Front
How did you level your bed I don't think the bed level correction does anything at all. Is it enabled? How do I tell this?
Re: First layer issues (pre-assembled printer)
Just tried it with my MK3: (sorry, double post, but two separate threads):
Corrections all 0:
0.25 (0.27) 0.25
0.2 0.19 0.2
0.2 0.21 0.26
Correction right -50 um:
0.24 0.21 0.27
0.22 0.22 0.23
0.23 0.25 0.25
I'd say the correction does not work.
With the MK2S, the effect of the corrections were significant. IMO this is a bug of the MK3 firmware. Pretty much looks like correction is disabled.
In your case, I wouldn't waste too much time on this. Unless you print objects that fill the entire plate, you should be fine. Just increase the Z height by a tiny amount.
- Martin
Re: First layer issues (pre-assembled printer)
Hi, I also got my (pre-assembled MK3) last week and have similar issues with it.
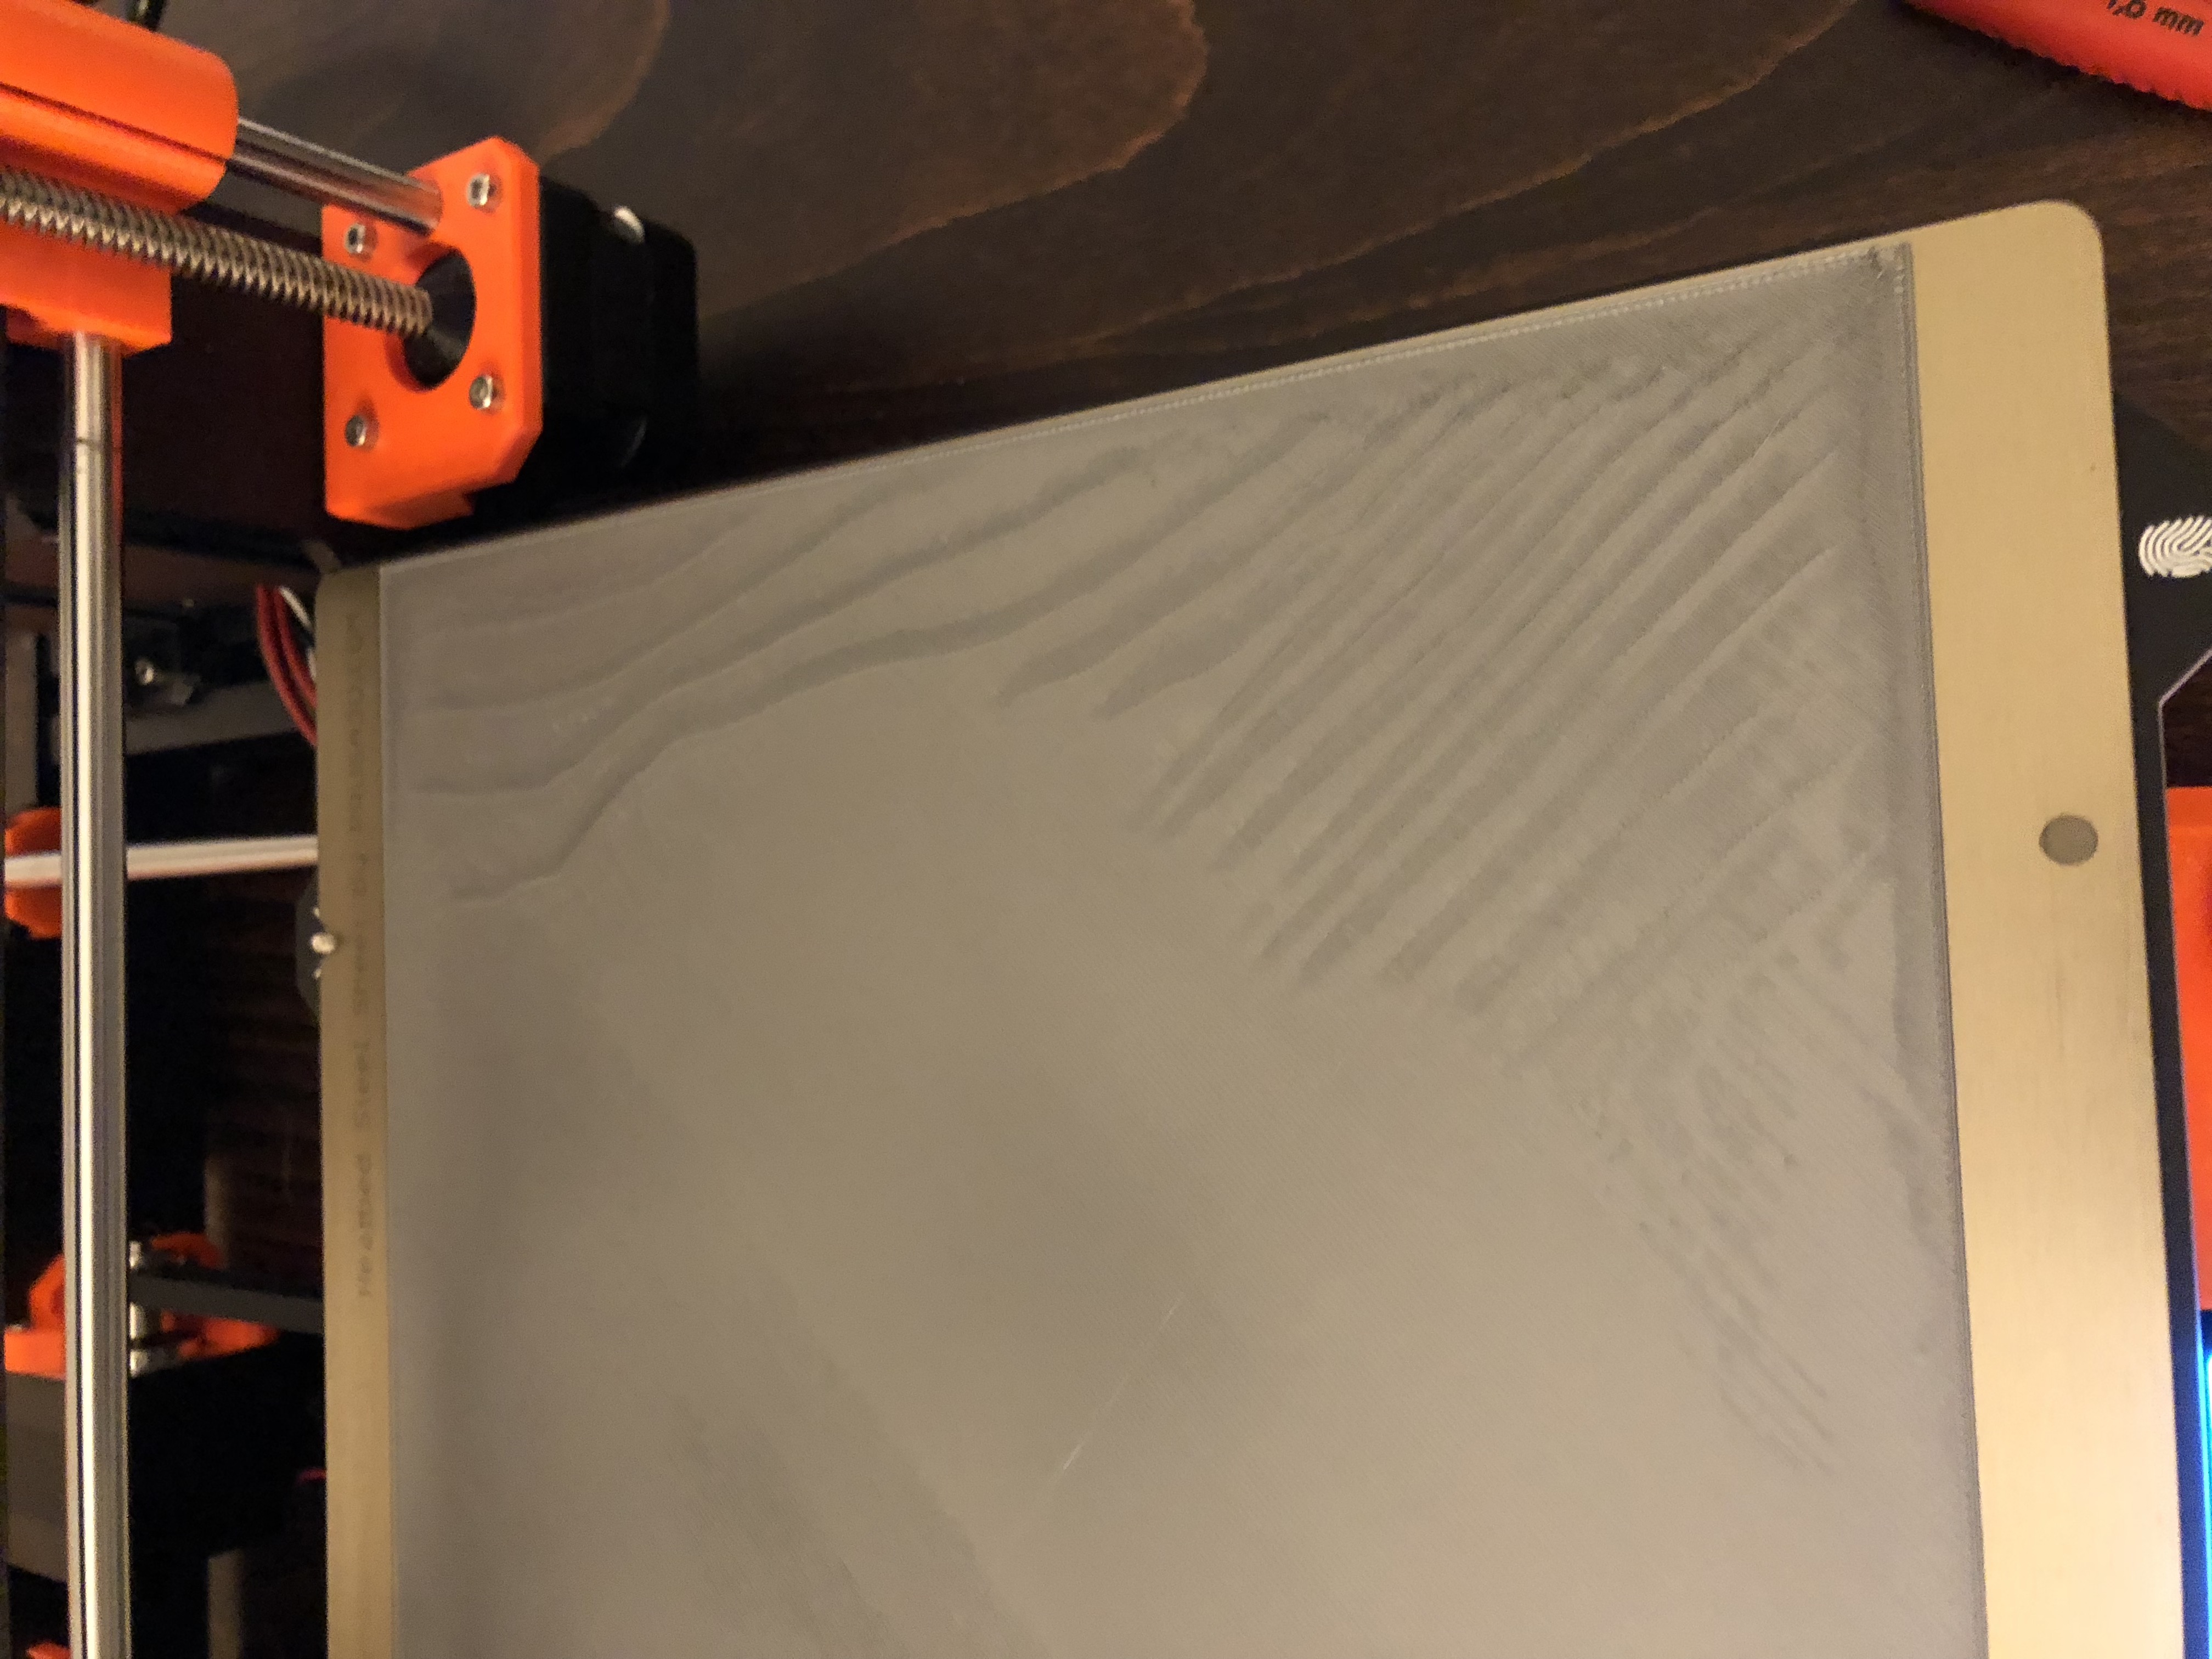
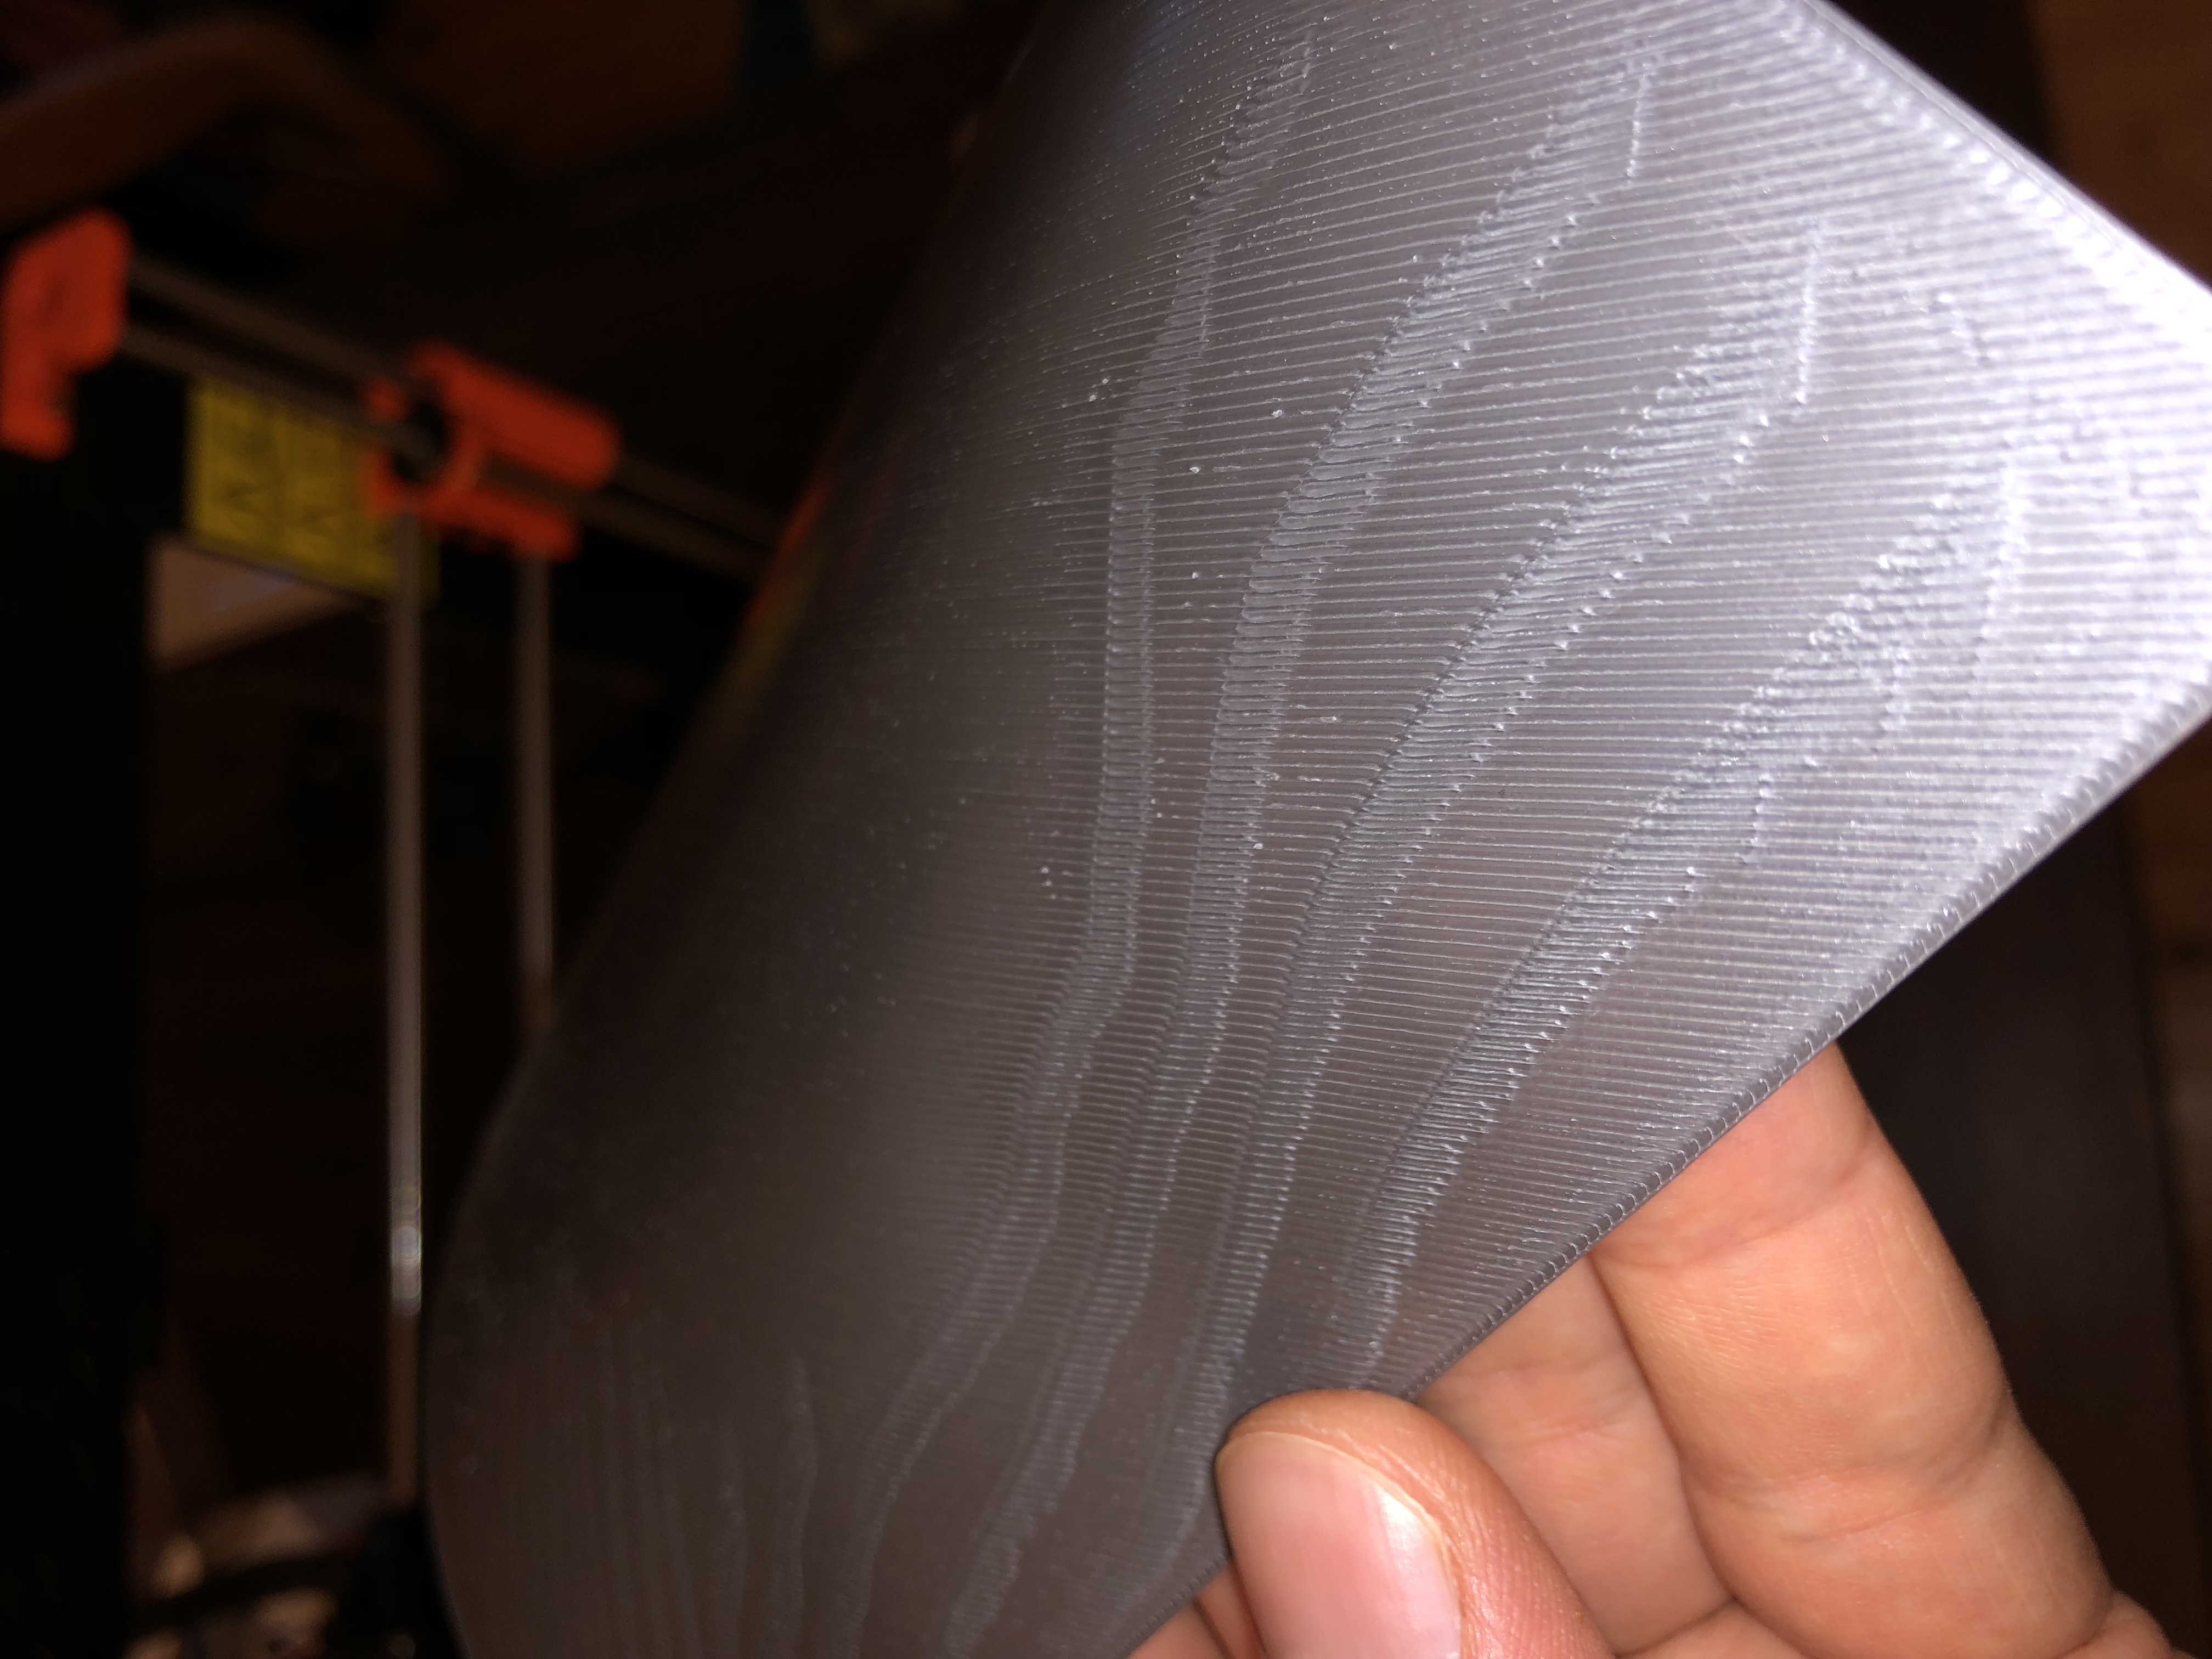
The first layer looks terrible especially on the right side of the bed. For me it looks like vibration artifacts, because the printer is vibrating like crazy especially on the affected side. The overall print quality is really bad because of this, even with the provided models from the SD card. Actually I didn't expect such problems with a pre-assembled tested Prusa MK3, I am very disappointed.
Re: First layer issues (pre-assembled printer)
Although you should not have needed to do a calibration with an assembled printer, shipping may have knocked out the calibration. Have you performed an XYX Calibration yet to see if that corrects things?
Re: First layer issues (pre-assembled printer)
I did XYZ calibration, PID tuning, and PINDA probe calibration / temp. calibration.
I took the advice of letting the bed heat up before running first layer calibration and I can get a decent first layer in the middle which is repeatable. I still have an offset with the left being low and the right side being higher. The bed level correction still doesn't do squat. :+(. I thought I was crazy that it wasn't doing anything so I'm glad to hear that others are reporting it too.
I also leveled the surface the printer sits on with a machinist level so I know it's sitting on a level surface now.
Re: First layer issues (pre-assembled printer)
These waves can come from that the nozzle is a bit close to the bed. Try to move the nozzle slightly up up bit (less negative) with live-z function.
Take a look at this thread
https://shop.prusa3d.com/forum/prusa-i3-kit-building-calibrating-first-print-main-f6/life-adjust-z-my-way-t2981.html#p22992
---
Gert
Re: First layer issues (pre-assembled printer)
I also re-run the calibration, but the results are the same. Regarding the z height, I tried to get this as good as possible. But if I lift the nozzle more, then the filament doesn't stick to the bed anymore.
Re: First layer issues (pre-assembled printer)
The first layer looks terrible especially on the right side of the bed. For me it looks like vibration artifacts, because the printer is vibrating like crazy especially on the affected side. The overall print quality is really bad because of this, even with the provided models from the SD card. Actually I didn't expect such problems with a pre-assembled tested Prusa MK3, I am very disappointed.
I had the same issue when printing a large area. The banding was impossible to adjust with Z level.
I also saw that the filament did not stuck to the bed so I rubbed the bed with isopropanol (99%) while printing.
The banding disappeared immediately where I rubbed.
Before printing, I had cleaned the surface, but not good enough.
So clean the bed properly and the problem will disappear. 💡
Bear MK3 with Bondtech extruder