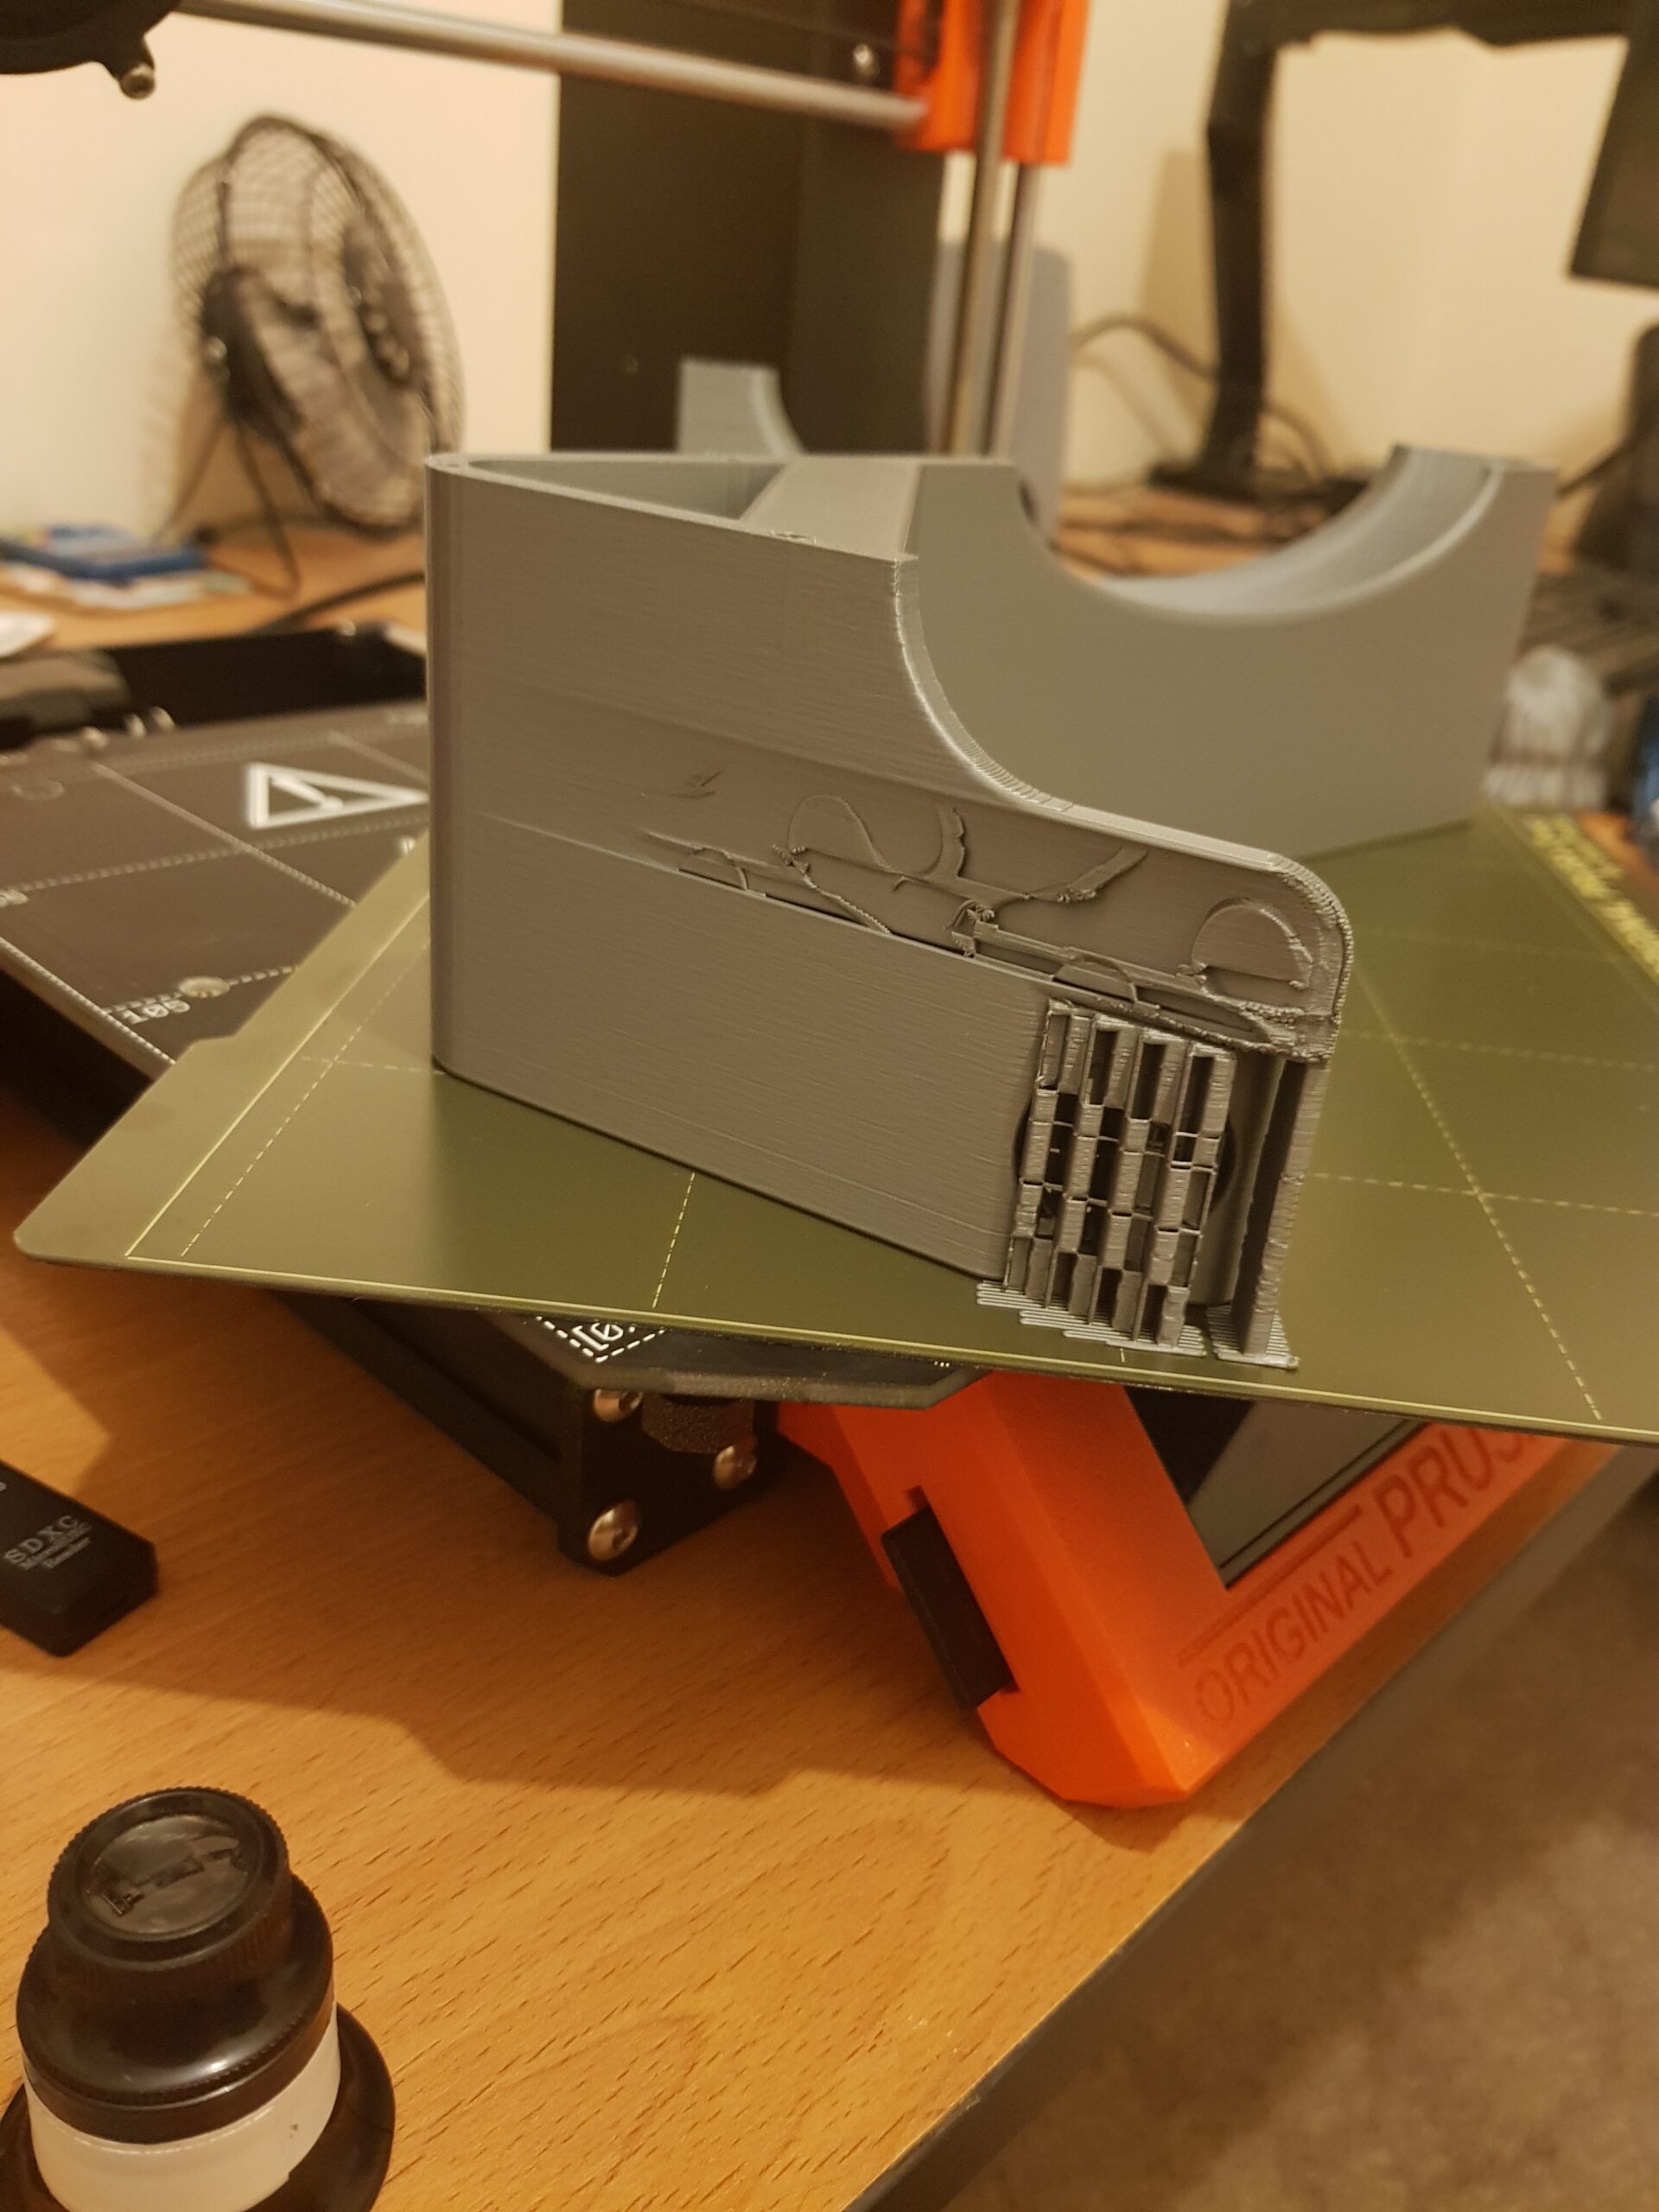
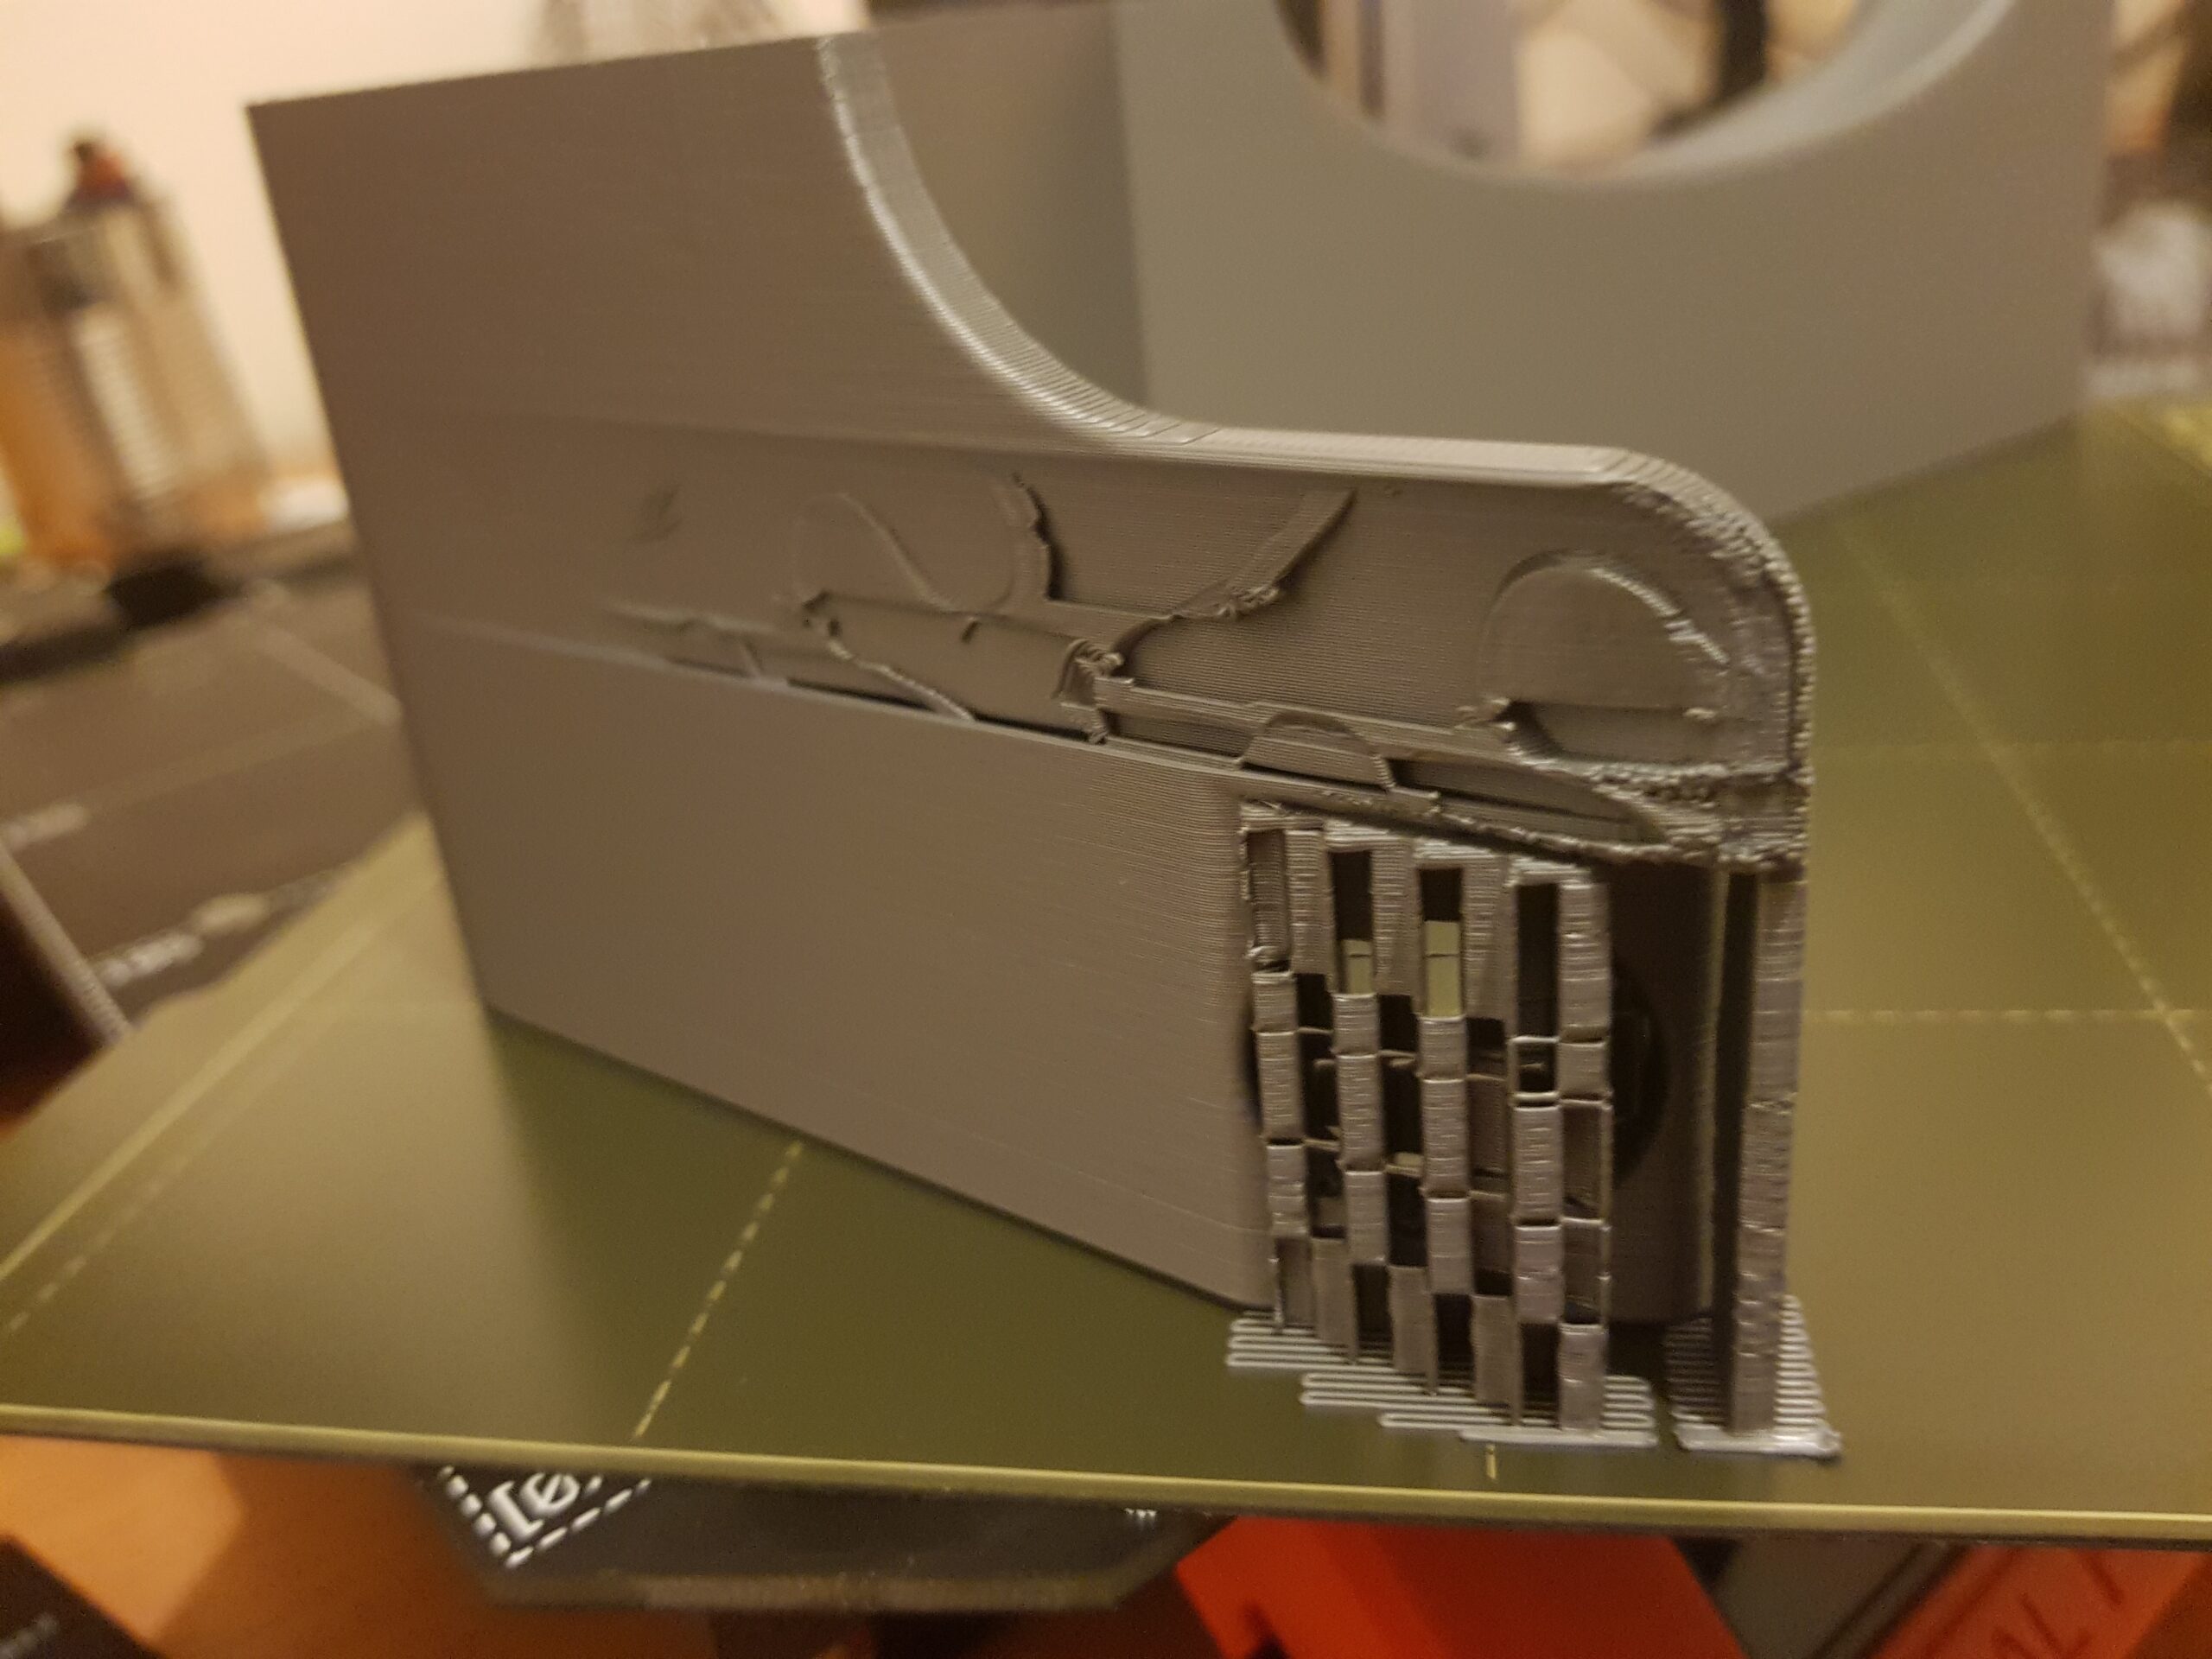
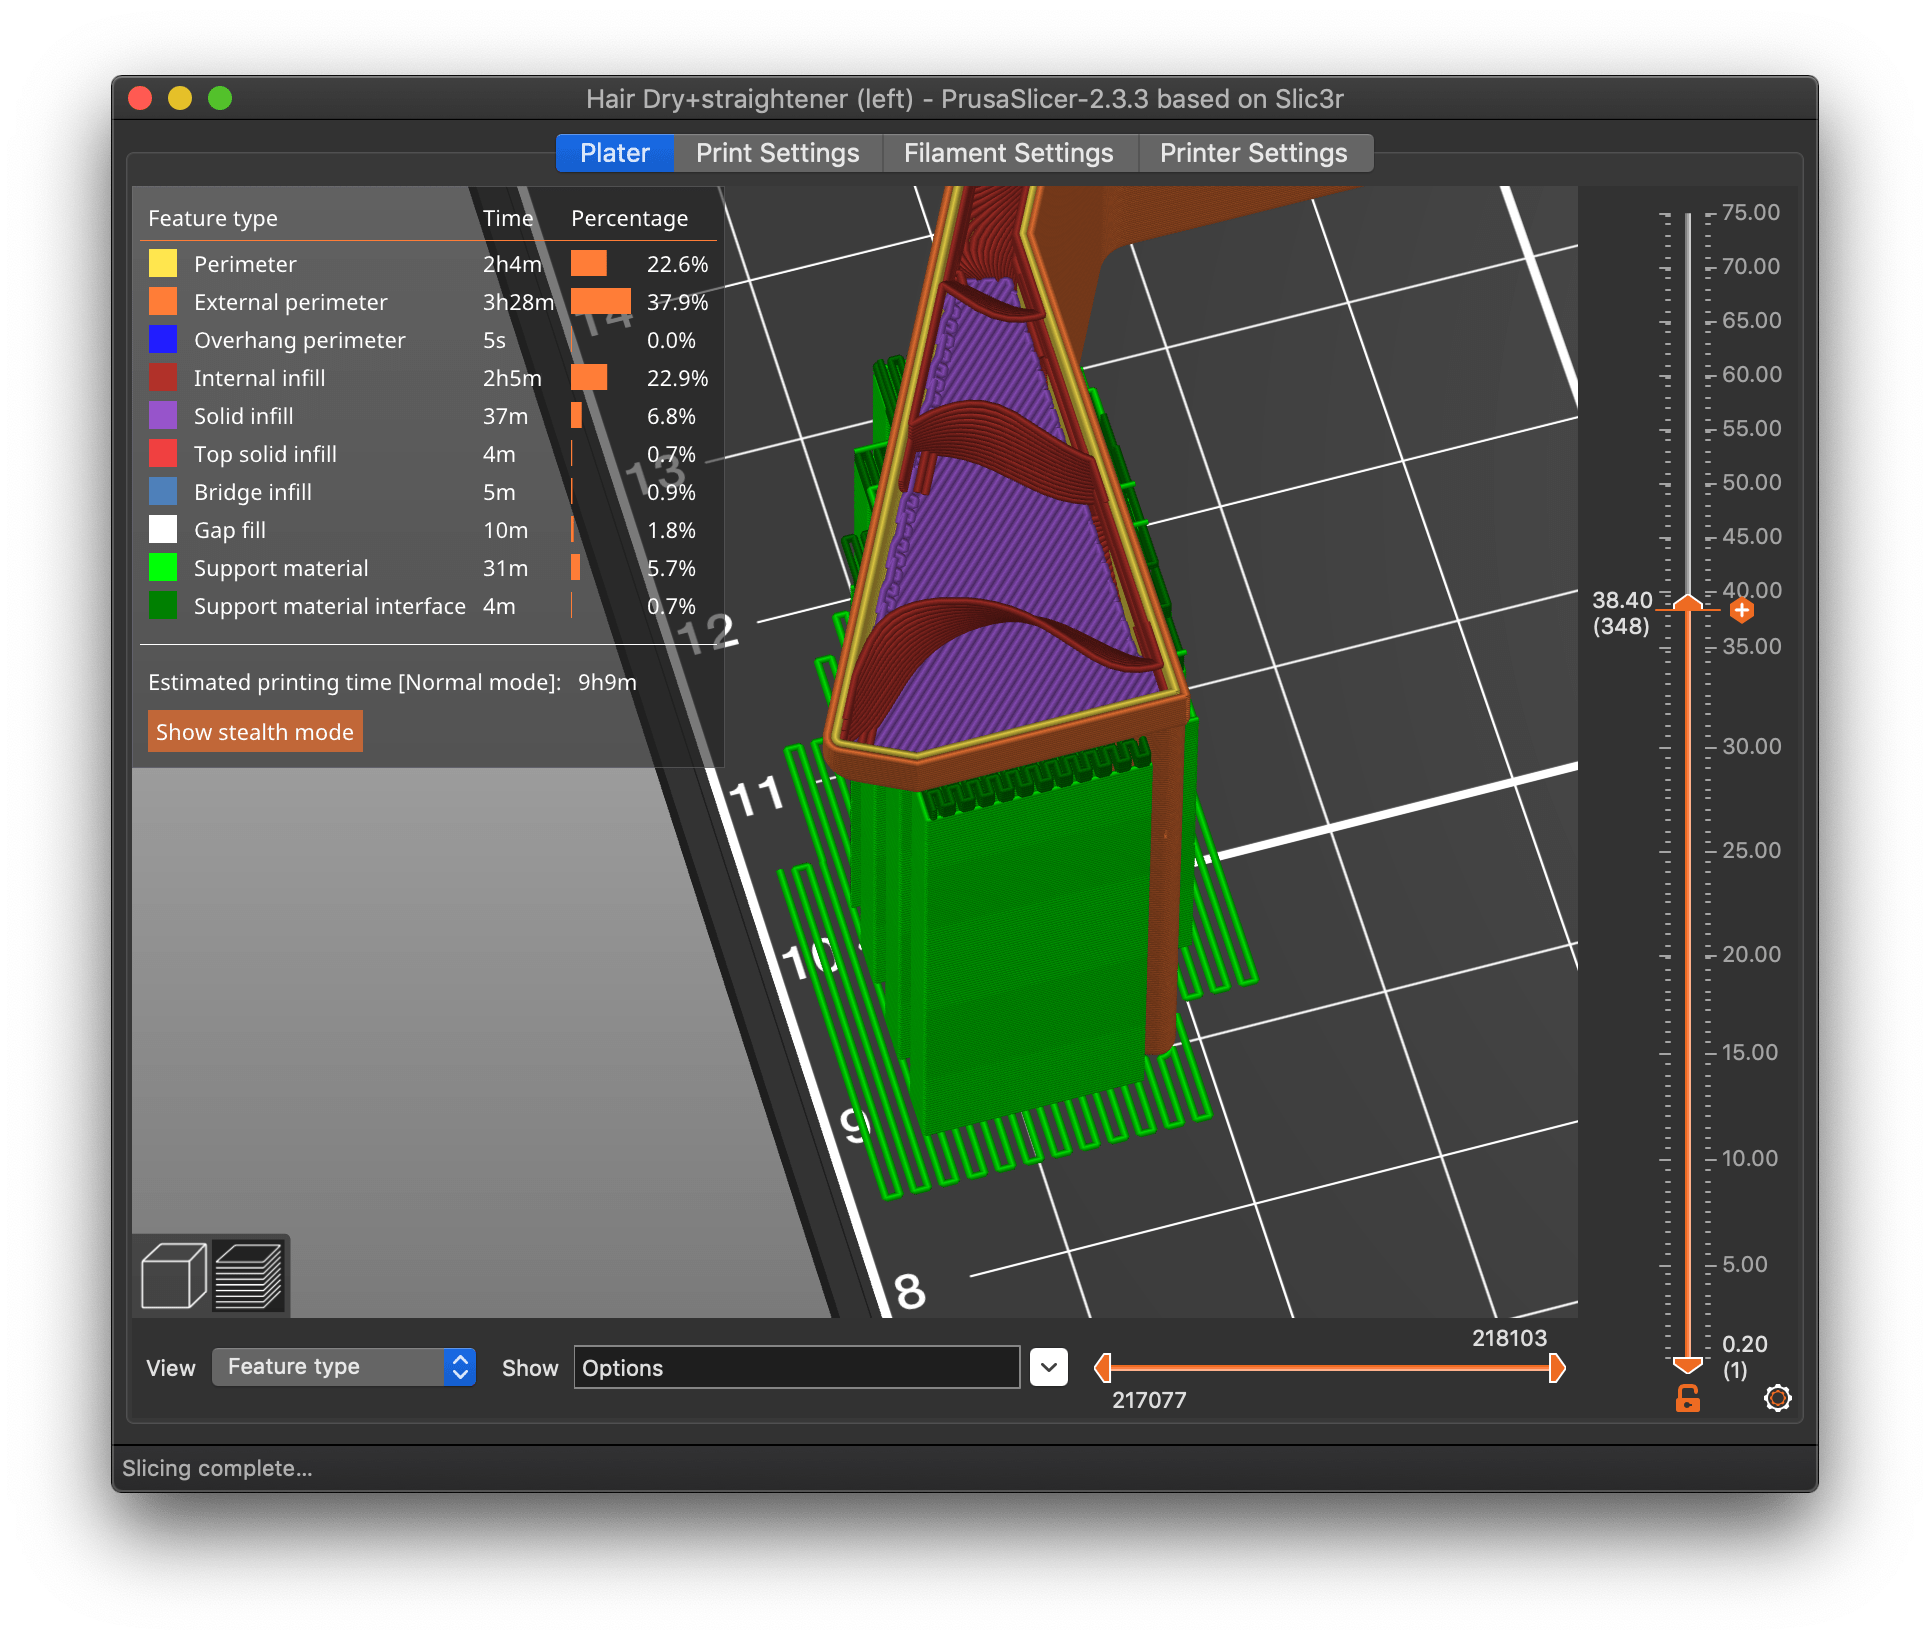
Why did this part fail?
This part failed as you can see below in this very specific spot/section.
The wall looks like it has shifted by an offset angle originating at the corner. It is not shifted or failed anywhere else in the model. It then recovered and carried on as normal above this spot.
The print head goes from the left corner towards the overhang, which makes it a bit stranger IMO as there is no reason for the offset near the left corner. We can see the infill though the wall so that is odd too as it shows that the print head can reach where it is meant to!
G-code here:
https://drive.google.com/file/d/1Xxd3V_ttnc7Q9JLO_UB24oS_ERgECgfQ/view?usp=sharing
Any thoughts appreciated!

Please zip a .3mf project file and post it here, that way we can check the settings.
Cheerio,
3mf file
Hi
please see .3mf file here:
https://drive.google.com/file/d/1Y67zgLf-rZdkIQ_xReaQgk-cd0OaHhTO/view?usp=sharing
Thanks for taking a look any help is appreciated!
Regards
Sorry, I don't use Google drive.
Please zip it and post it here.
Cheerio,
Part size exceeds print area or is positioned incorrectly
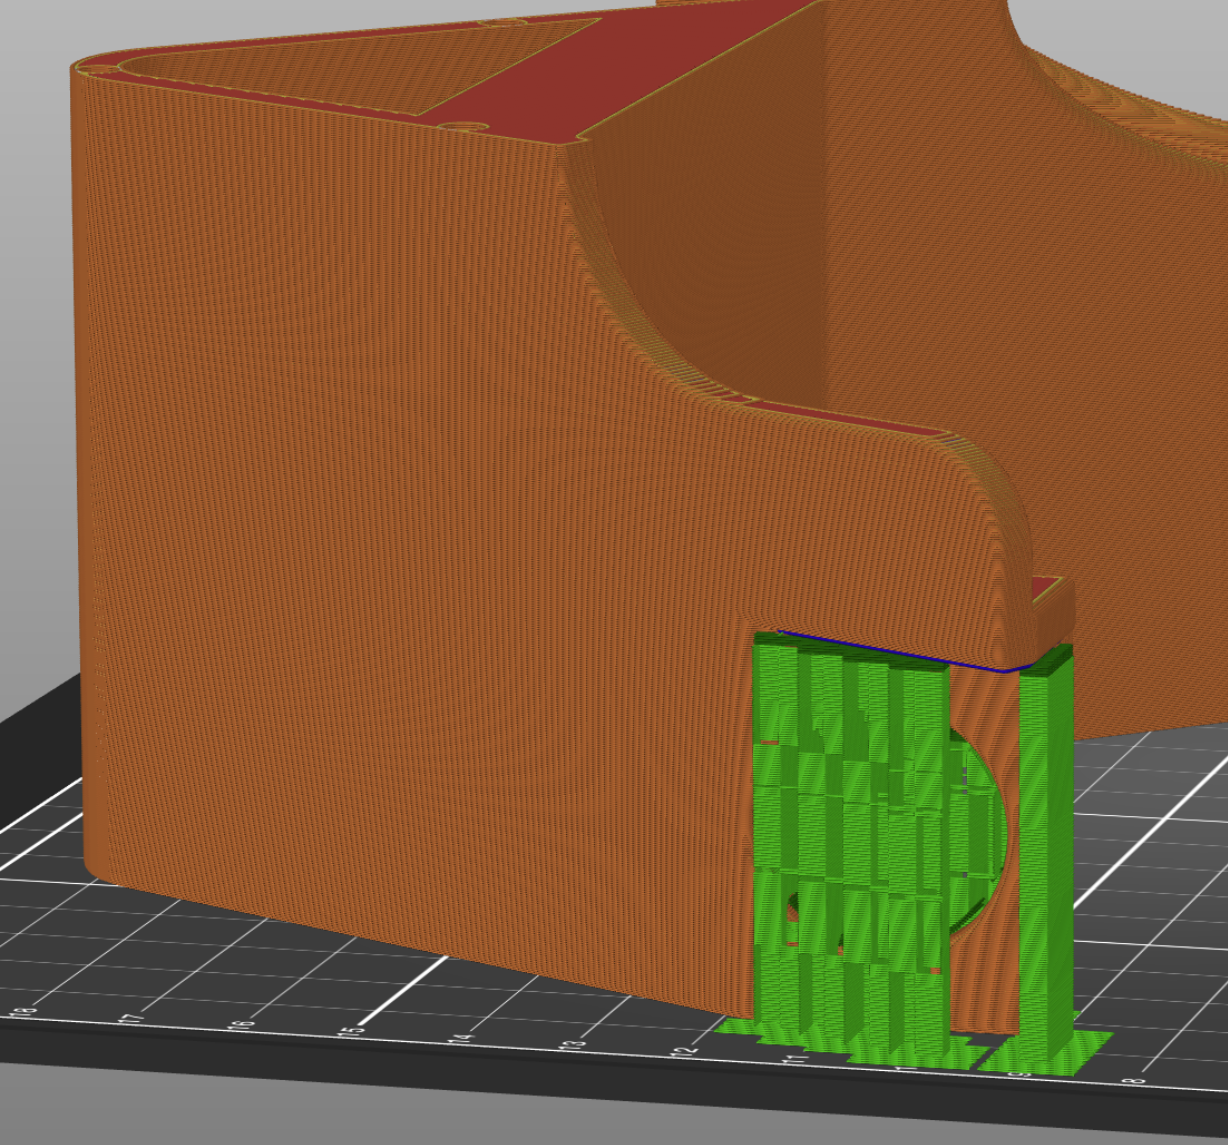
That is a gcode file. Ideally, save your current 3MF project file, zip it up, and attach it to a reply here so we can see your part & settings and give better recommendations. Looking at the gcode, it appears you've placed a part that slightly exceeds the bed size, so the left part is being cut off. Using supports with the corresponding extra bed area required is aggravating the problem. If you upload the 3MF project file, this should be easy to confirm (which is why we ask to see that and not the STL or gcode files).
Wall missing above supports
Looking at your pics, the part does seem to be on the bed, but that wall above the support is missing and the infill is showing through. Odd because the wall looks fine in the gcode preview. Doubly odd because only part of the wall is missing and it's at an angle. Do you have any issues printing at the extremes on your bed? Does X & Y axis testing pass?
Here is the 3mf
@bobstro
Perfectly right, the supports is outside the print area
Prusa i3 MK3S+ FW 3.11.0 (kit dec -20), PrusaSlicer 2.6.1+win64, Fusion 360, Windows 10
Looks like it's clipping on the left
Ah, that makes sense. The part is 248.8mm wide. The support adds more width. The left-most wall is being clipped off and the perimeter extrusions are failing above the supports where it juts out.
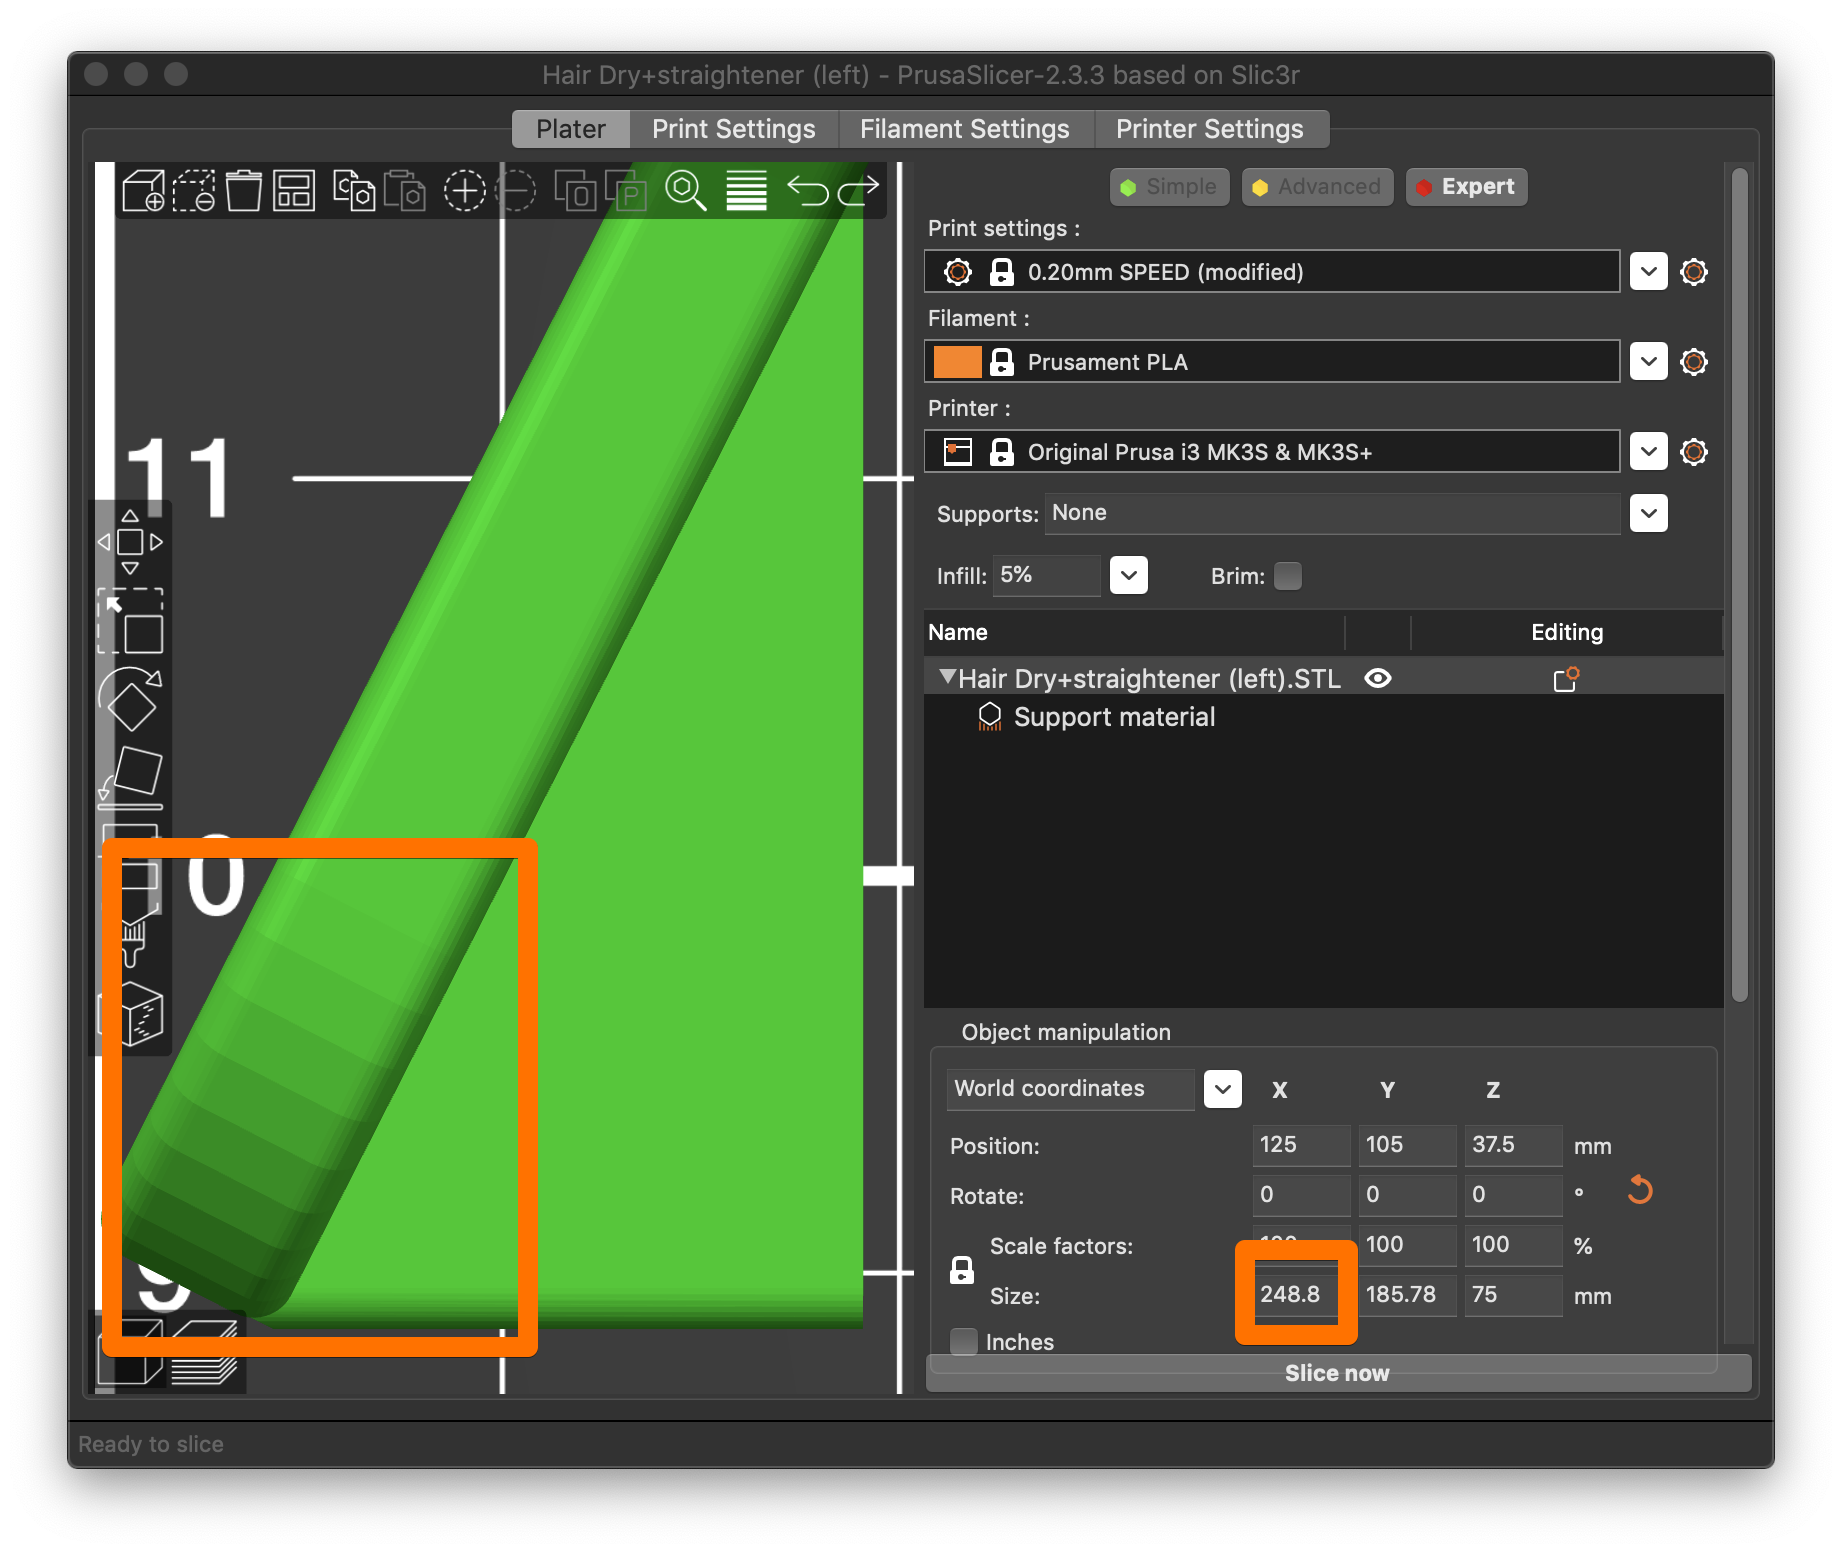
Although the gcode looks OK, the nozzle can't be moved that far left. There's nothing for the perimeters to anchor to, so they fail and fall away. The infill is partially exposed.
RE: Why did this part fail?
@bobstro
There is Paint on "Block" supports under the outermost part of overhang
Prusa i3 MK3S+ FW 3.11.0 (kit dec -20), PrusaSlicer 2.6.1+win64, Fusion 360, Windows 10
This is why I like to see 3MF files!
There is Paint on "Block" supports under the outermost part of overhang
Yet another good reason for insisting on seeing 3MF project files over gcode! So are supports blocked under part? If that's the part that fell away, then the X positioning is less important and it's just a question of getting support where they're needed.
So are supports blocked under part?
Yes, both paint on and paint block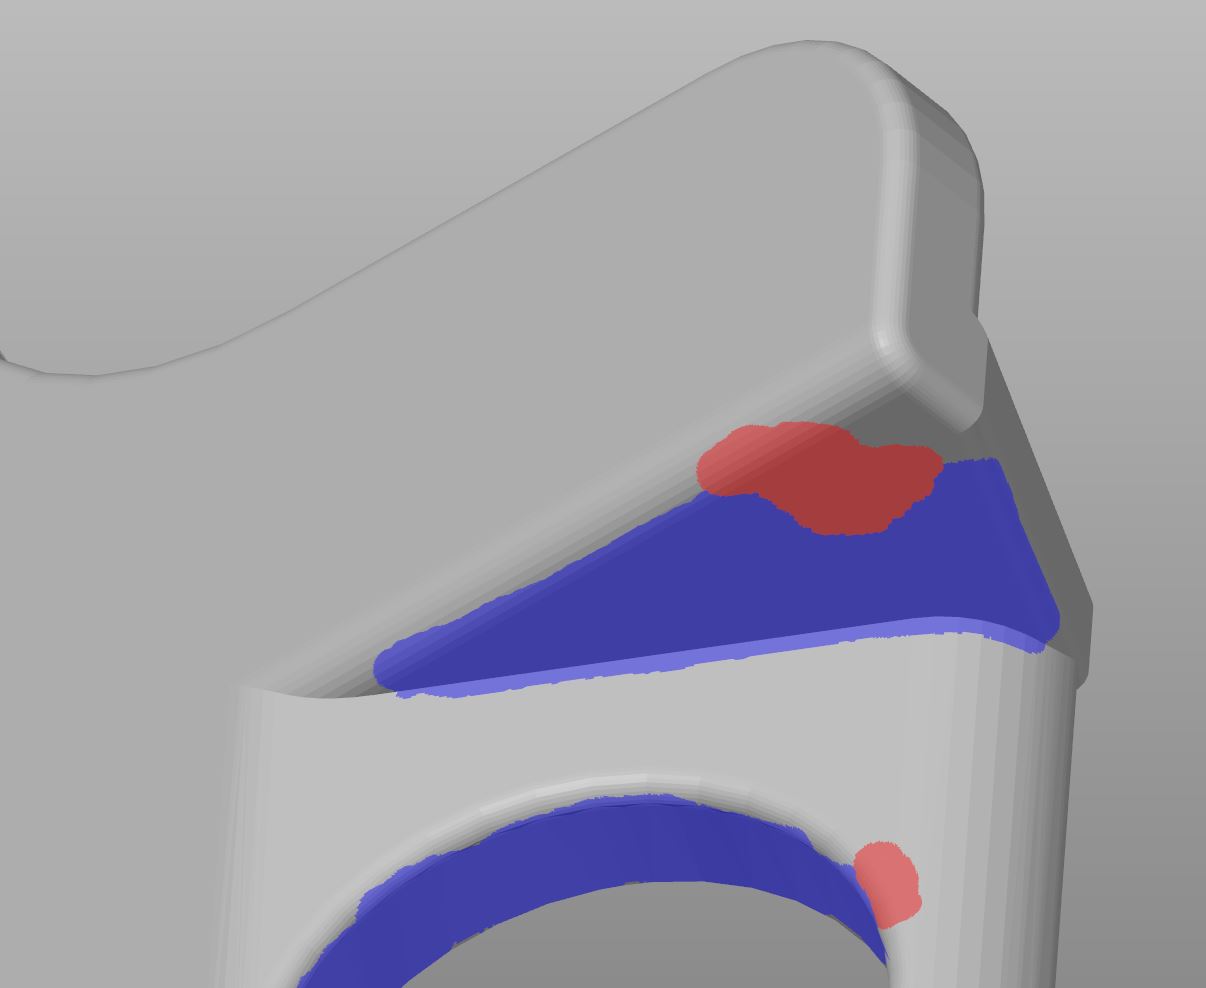
If bed size is extended to X252 and move origin X1 and playing with paint on support the part is printable.
BUT, I don't know if it's possible to increase bed size 2mm, haven't tried it..
Prusa i3 MK3S+ FW 3.11.0 (kit dec -20), PrusaSlicer 2.6.1+win64, Fusion 360, Windows 10
title
Hello
Thank you all for the replies.
I was in a rush yesterday, I should have stated the project file is NOT the original because it was not saved. The G-Code is the original G-Code, when I re-made the project file I did it as close to the original as I could but I would suggest you use the G-Code in the G-Code viewer!
I had to add support blockers because otherwise it was outside of the print area, I thought I fixed it but like I say I was rushing yesterday and the G-Code is the king not the project file as that is what is actually processed by the printer.
Please note I dont think even if some supports were outside of the print area it would cause the shown defect, which is a smooth inward bevel of the perimeter to the point where even the infill can be seen. The print head can get there because its on the same plane as the rest of the wall and the infill is shown to be at the right position.
Note the wall defect is a smooth transition to an (angular) offset - and then a smooth transition back to its correct location. Also the print head prints from the corner without overhang and prints to the corner with overhang, which is strange because there should not be any support/overhang issues at the corner away from the overhang but there is a clear (angular) offset there!
When I get home tonight I will zip and re-attach the project and G-code files though like i said the original project file was never saved.
Many thanks!
bed size
So are supports blocked under part?
Yes, both paint on and paint block
If bed size is extended to X252 and move origin X1 and playing with paint on support the part is printable.
BUT, I don't know if it's possible to increase bed size 2mm, haven't tried it..
Increase the "bed size"? I thought the bed size is fixed.
--------------------
Chuck H
3D Printer Review Blog
RE: Even Worse
@muzz
G-code is even worse then the project-file considering support.
The cause of print failure is lack of support, and the part is too big for Prusa I3 standard size with standard setting.
There is a possibility to model your own support

Reason for edit, forgot the picture
Prusa i3 MK3S+ FW 3.11.0 (kit dec -20), PrusaSlicer 2.6.1+win64, Fusion 360, Windows 10
RE: Y215
Posted by: @ringarn67
If bed size is extended to X252 and move origin X1 and playing with paint on support the part is printable.
BUT, I don't know if it's possible to increase bed size 2mm, haven't tried it..
Increase the "bed size"? I thought the bed size is fixed.
Yes, no problem, just pull a little, or pretty hard actually, in either direction. It is much easier with bed heated to over 110° 😉
No, just kidding, of course the bed size is fixed, physically, and there is no problem to extend the bed size in PrusaSlicer, in Printer Settings, General, Bed shape, and adjust origin accordingly.
Prusa original start g-code print prime line at Y-3.
So if bed size is set to Y213 and origin adjusted Y3 you can print parts that are 213mm in Y.
My printer can manually go from 0,4 to 254,4 in X that means I can print parts that are 254 wide, and from -4 to 212 in Y, 216 totally.
So, the printer can MOVE 216 in Y and 254,4 mm in X.
Probably more in all directions if you pronterface, with the knob it goes in 1mm steps
Now to the sheet, there we have a problem, my textured sheet is 252mm and my PEI sheet is 254 in X. But with a bigger sheet... 👍
My numbers is probably different from other's
This part is 214,9 in Y, 10 in X, it goes from Y-3 to Y212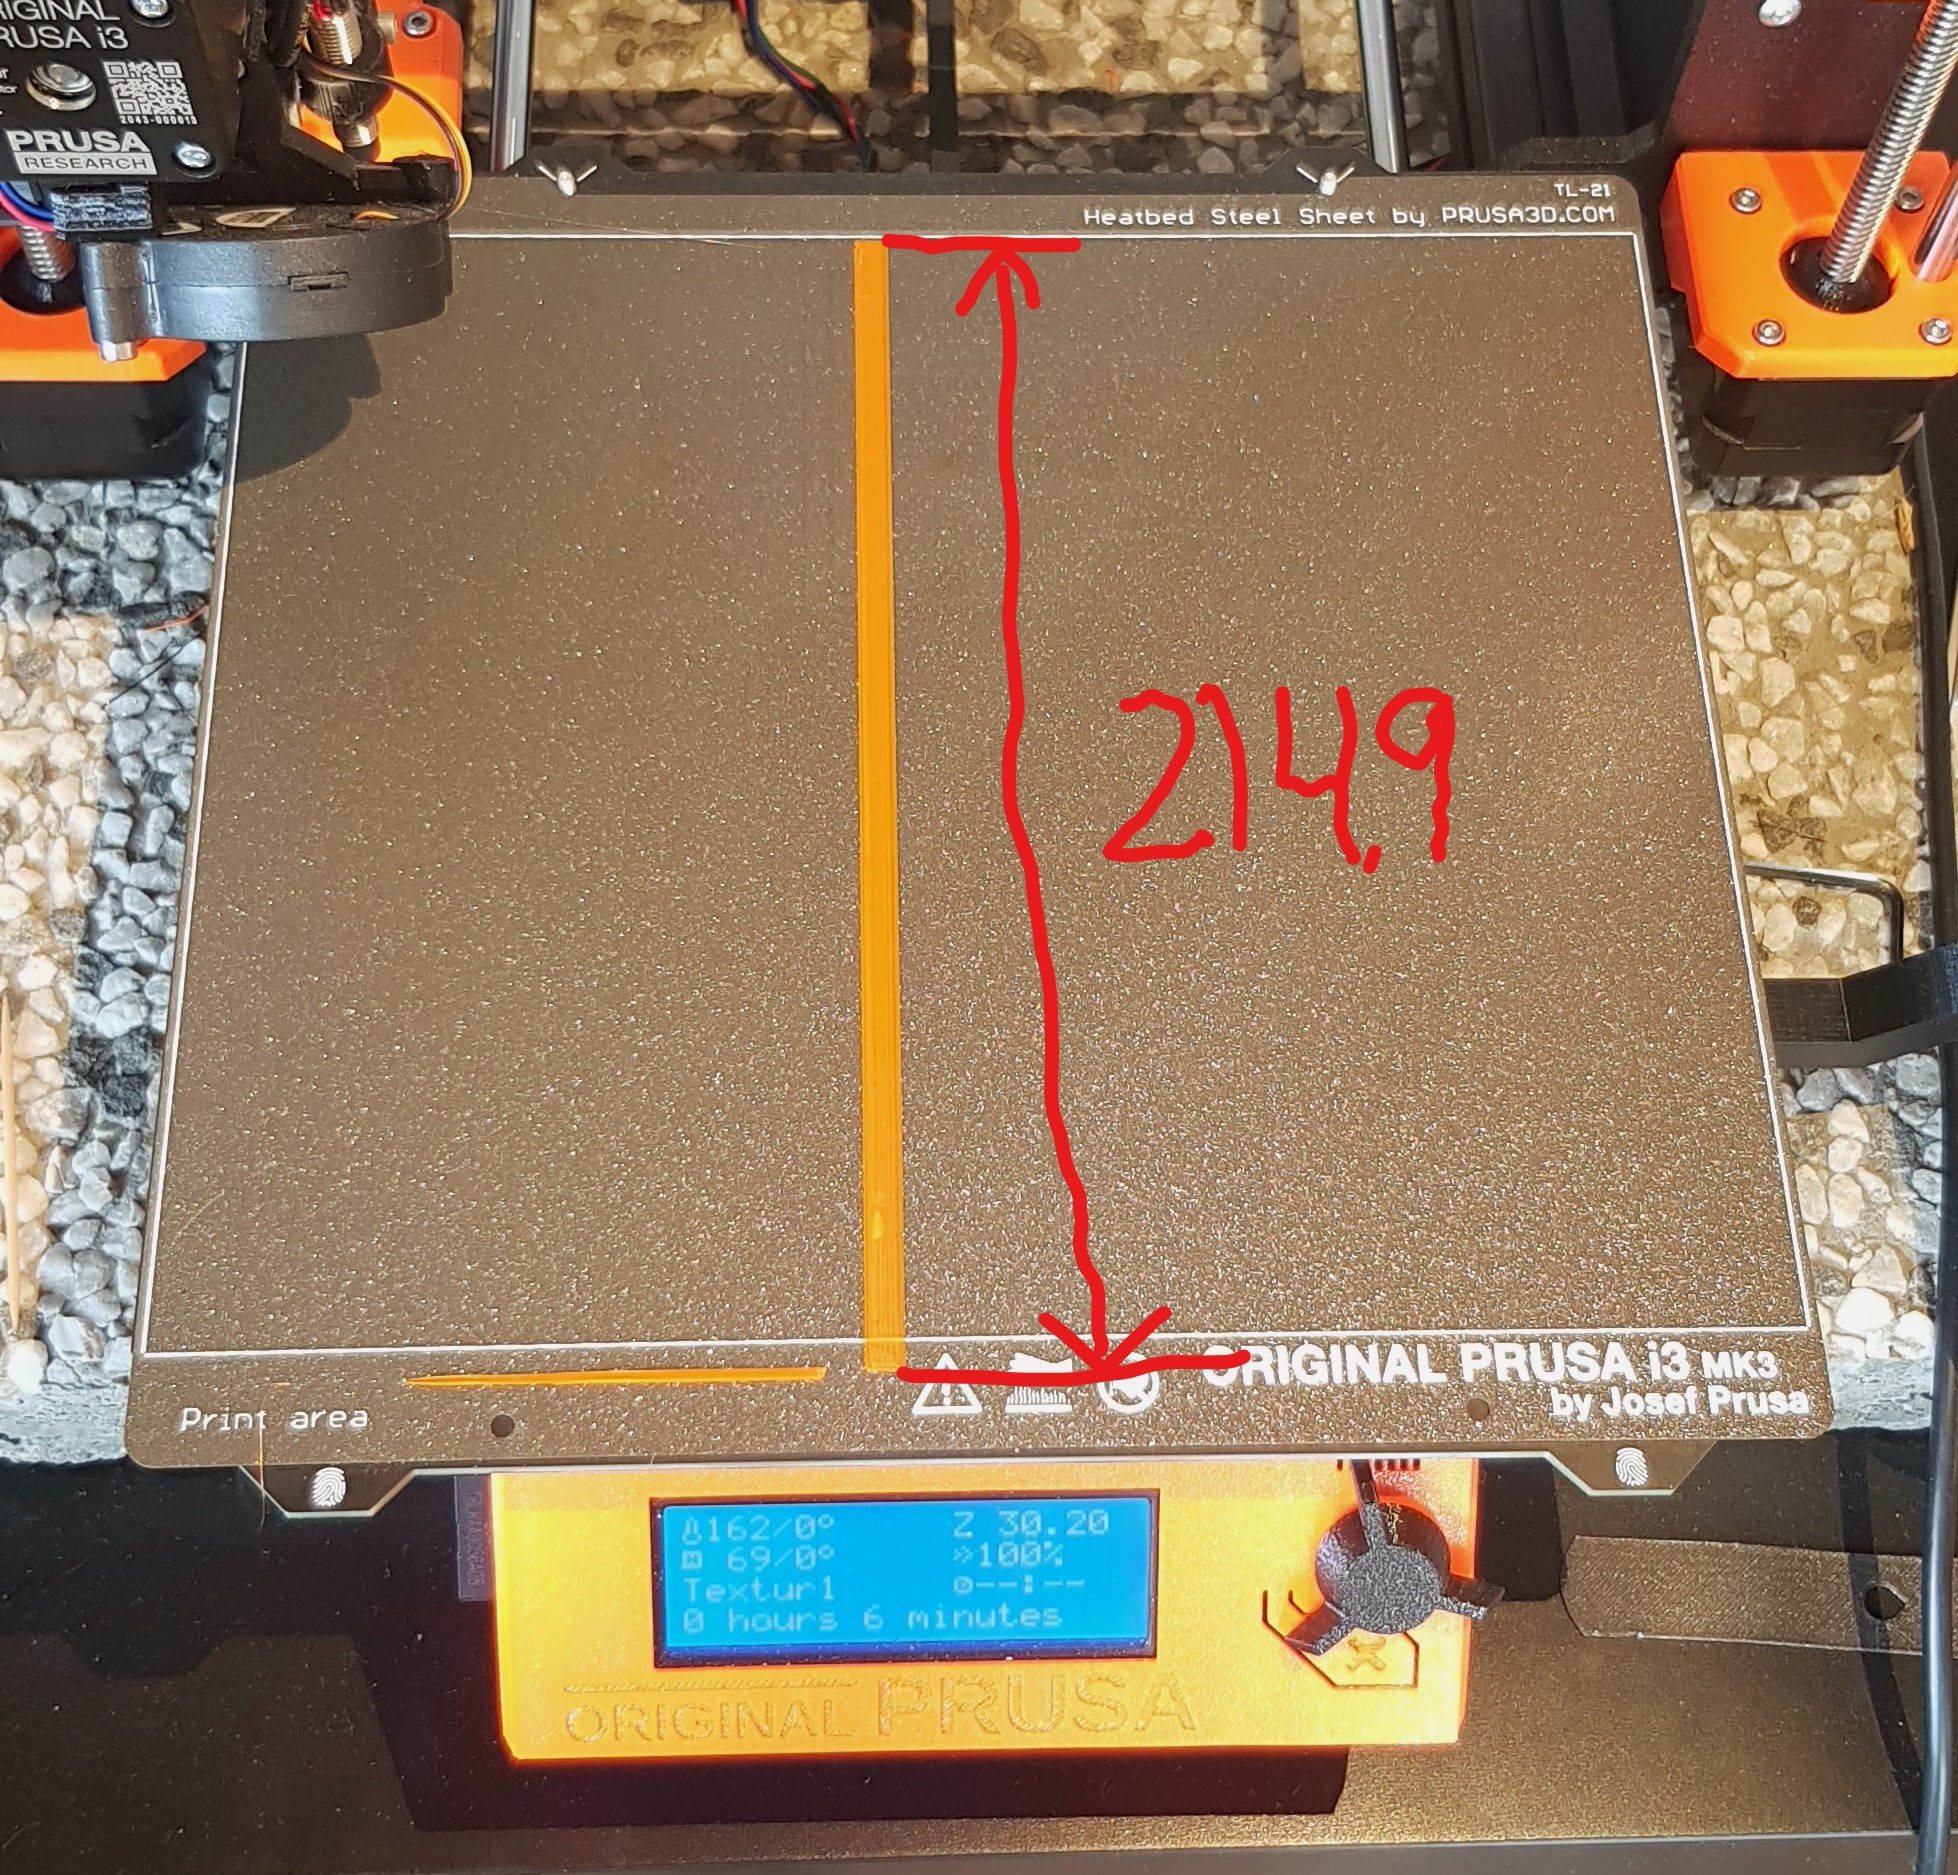
I attached the file I used, changes I made:
Increased Y bed size to 215
Adjusted Origin Y3
Infill to 90° for quicker print
(Yes, bed heating problems, of course I know, and I understand. Yes, and Prime Line)
Prusa i3 MK3S+ FW 3.11.0 (kit dec -20), PrusaSlicer 2.6.1+win64, Fusion 360, Windows 10
Maybe this would work
@muzz
I have done some testing with a cutdown part, with your file as a starting point.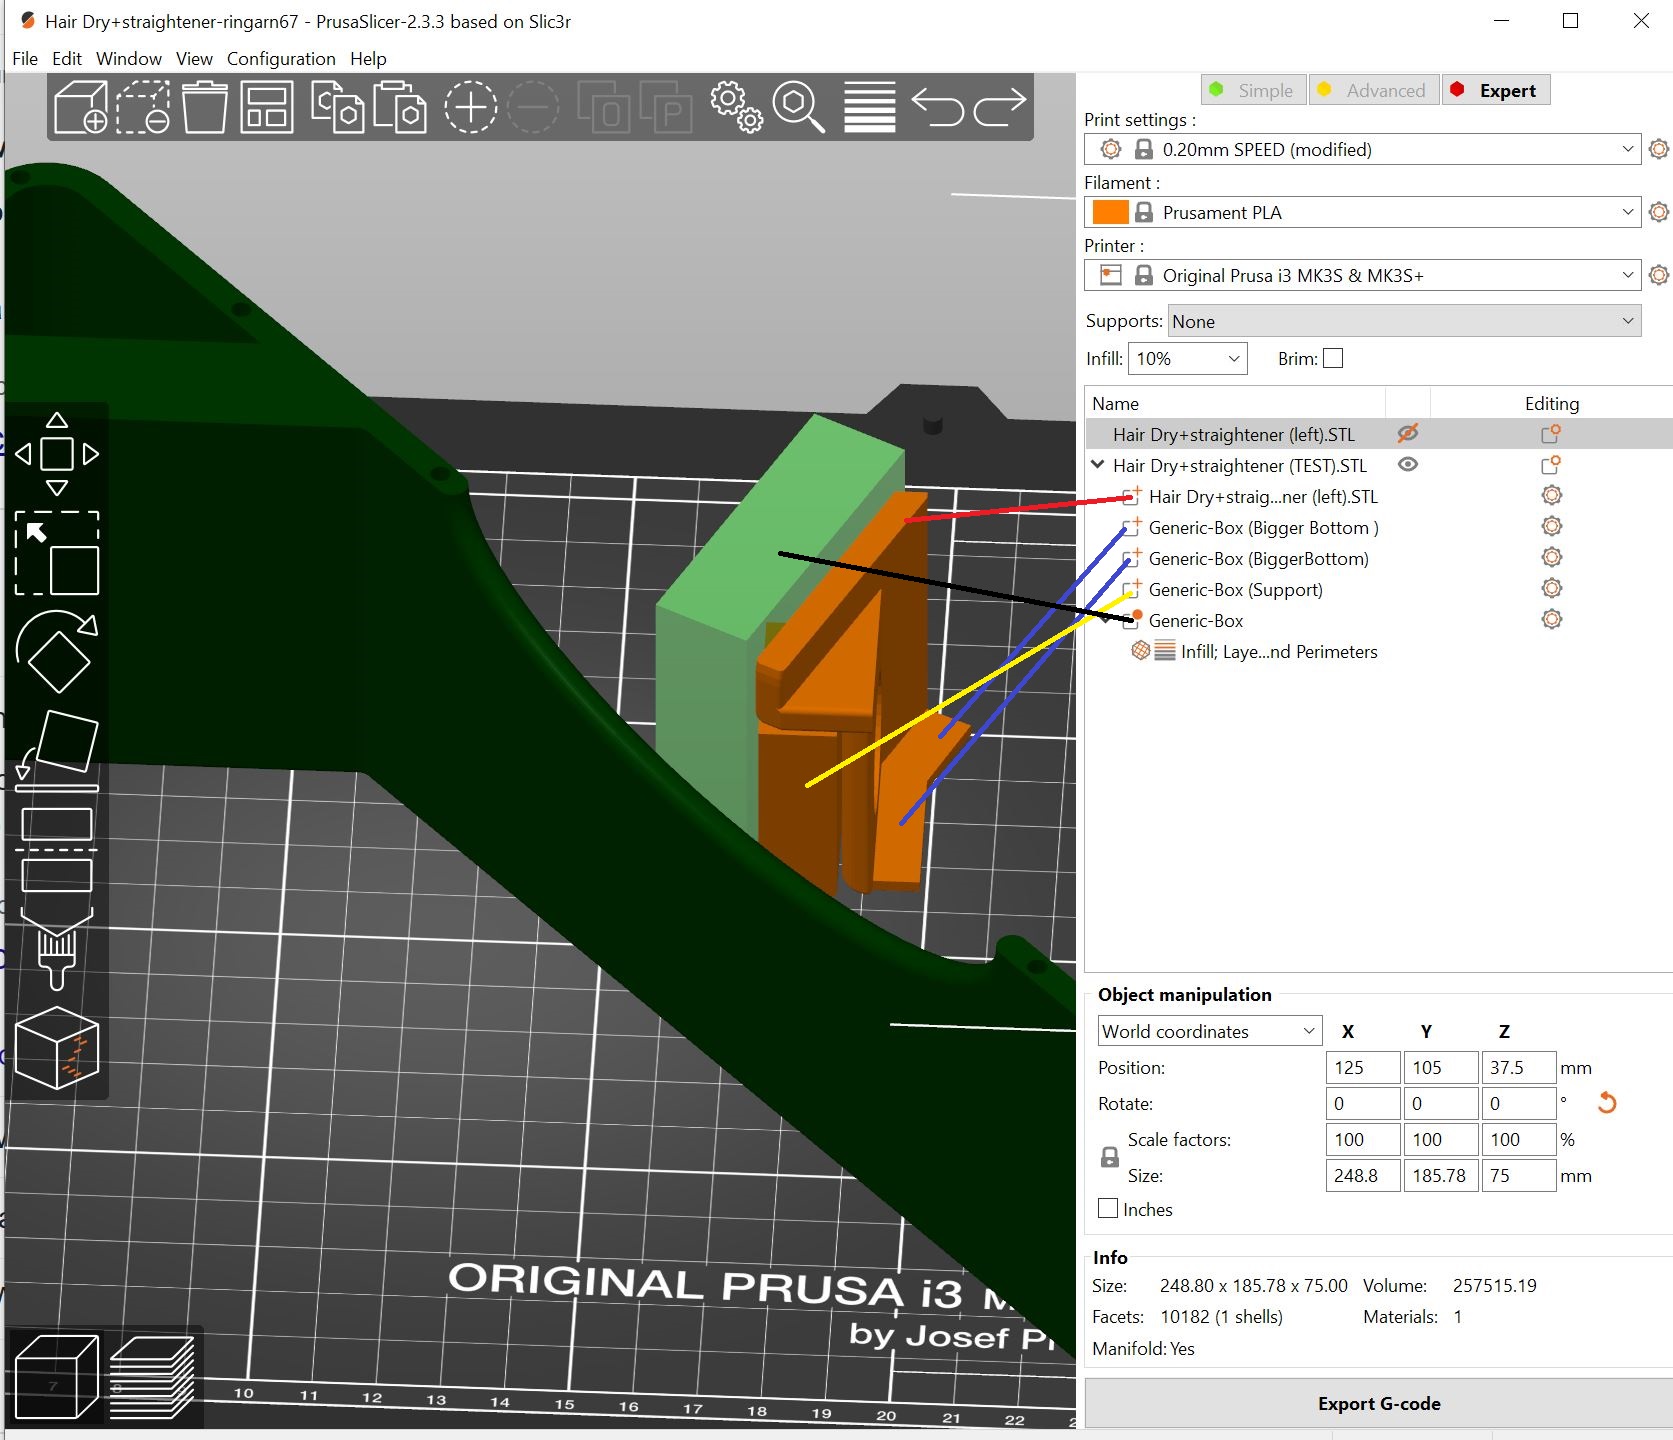
Red Line: A cutdown copy of the stl for faster print
Blue Lines: Added two Boxes to increase test parts adhesion, it tipped twice before I added them
Yellow Line: Added Box for support (Yellow color on white background was a bad decision)
Black Line: Added a Modifier for smaller support part, can very well be excluded
I printed it and it looked like this
And the underside of overhang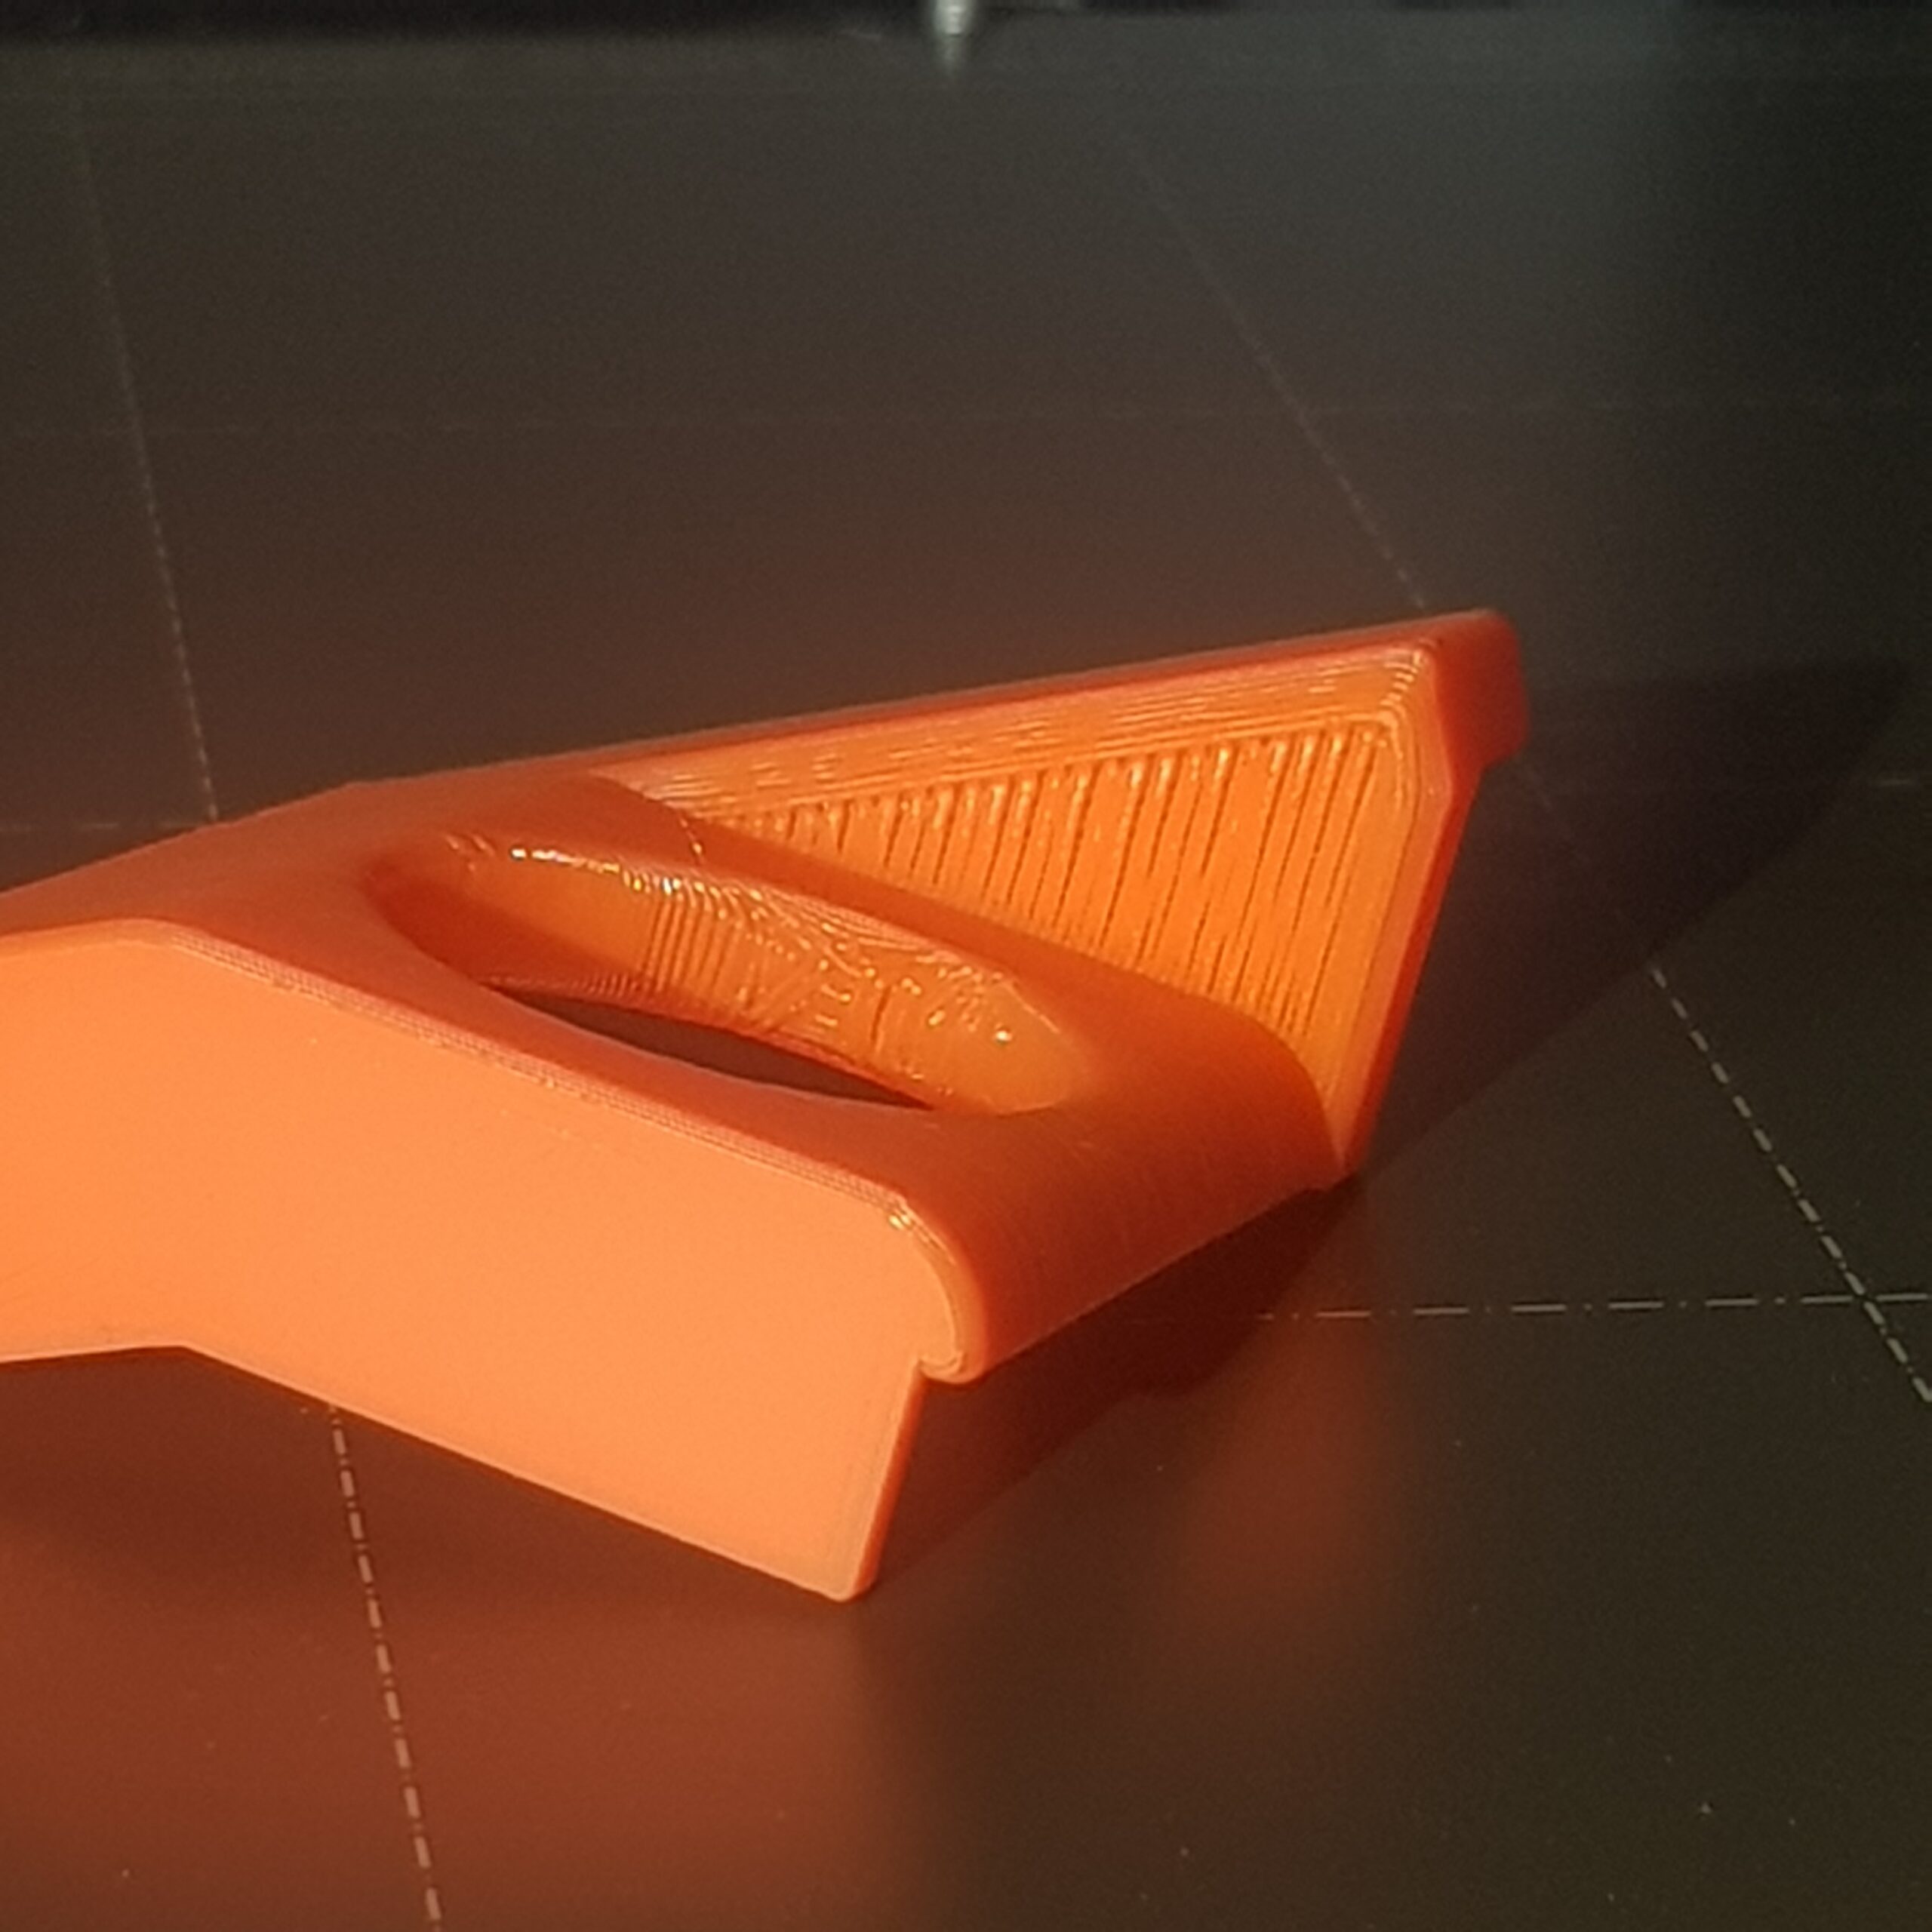
I am sure the height of support part can be increased for better underside of the overhang.
I increased infill to 10%, I don't know, but I think it will do good to the cost of very little print time.
Better safe then sorry on such a big part 👍
Prusa i3 MK3S+ FW 3.11.0 (kit dec -20), PrusaSlicer 2.6.1+win64, Fusion 360, Windows 10
Is it possible to redesign the part so that the overhang rises at 45 degrees instead of horizontally?
This would eliminate the need for support...
Cheerio,
the error
Hello,
Thank you all for you replies.
I dont believe the overhang has anything to do with the problem - just how the FIRMWARE limited the print head movement.
I think the issue is that the piece was over the edge of the print area [which is strange because at the time the slicer did not provide this as a warning (this is why I reduced the amount of supports initially but then the error went away so thought I was all good)].
Basically I think happened is that a bit of the model went over the print edge, the printer moved the Y-coordinate back onto the print bed for one of the points, this effectively added an offset angle to these lines. This explains why I have a angular offset from the fixed corner which has all the support going to the overhang.
See below
Left image - model as intended, pink = print head travel, blue dot = destination coordinate
Middle - Printer firmware adjusted to place on the print bed (red vertical line)
Right - Shows how the y-offset becomes an angular offset between the two points

@muzz
Try this to test your theory.
It is a slice of the biggest part.
Prusa i3 MK3S+ FW 3.11.0 (kit dec -20), PrusaSlicer 2.6.1+win64, Fusion 360, Windows 10