RE: Vase Mode with PETG Delaminates?
@swiss_cheese
That aside, 0 Top and infill, 2-4 perimeter would make it more rigid and better layer adhesion, further, similar to this, no?
RE: Vase Mode with PETG Delaminates?
@asraff
If I were designing this item I would use a bare minimum 1.5mm wall thickness and I would try to print it with 2 perimeters adjusting the extrusion widths of the external perimeters and perimeters to something like 0.39 each, this should offer a strong but only slightly flexible container however you may need to adjust the model in the hinge area to accommodate the thicker wall.
Regards
Swiss_Cheese
The Filament Whisperer
RE: Vase Mode with PETG Delaminates?
@swiss_cheese
It is made via openscad script, so the screw hole hinge can be adjusted there. At 1.5mm, that's equivalent of 3 perimeters with around 0.45mm. Thank you for your feedback on trying out with vase mode as well
RE: Vase Mode with PETG Delaminates?
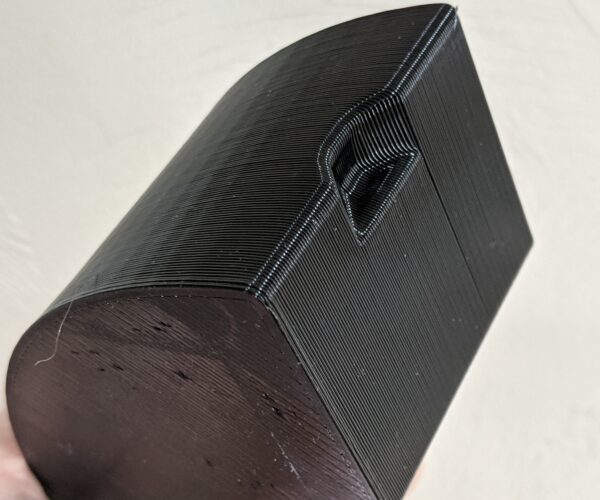
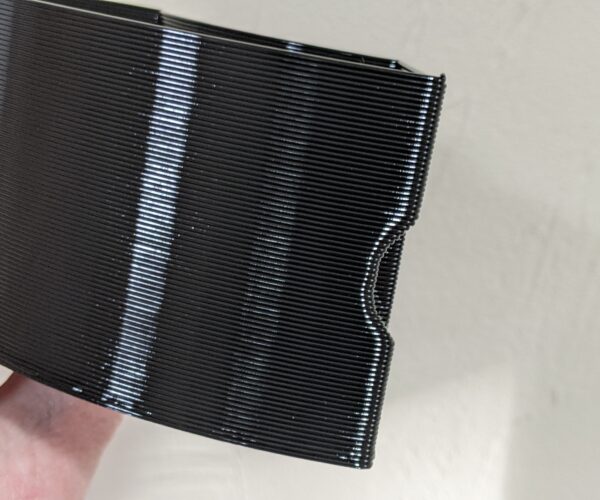
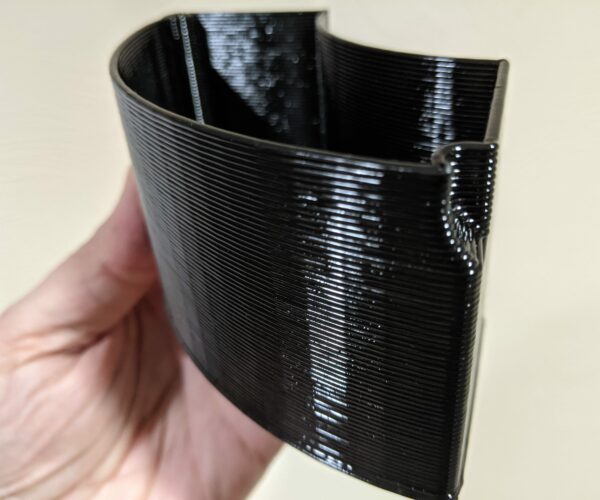
I find vase mode for functional parts really calls for going big. I adjusted the OpenSCAD parameters for this drawer to fit my plentiful supply of Overture spools, then printed this with some leftover StrongHero (cheap) PETG at 235C, 0 cooling, 0.5mm layer heights, and 1.5mm perimeter widths with a 1mm nozzle on my Sidewinder. It came out quite nicely for a toolbox part. There's an unfortunate layer misalignment at the top of the finger notch, but it's on an inside surface.
Print time is roughly 45m. The print is quite strong, but still a bit flexy. I wouldn't have any qualms about filling it with screws from a print perspective. I can't vouch for the mechanical hinge design. I definitely need to tweak the OpenSCAD parameters to enlarge the screw hole size or spend some time tapping.
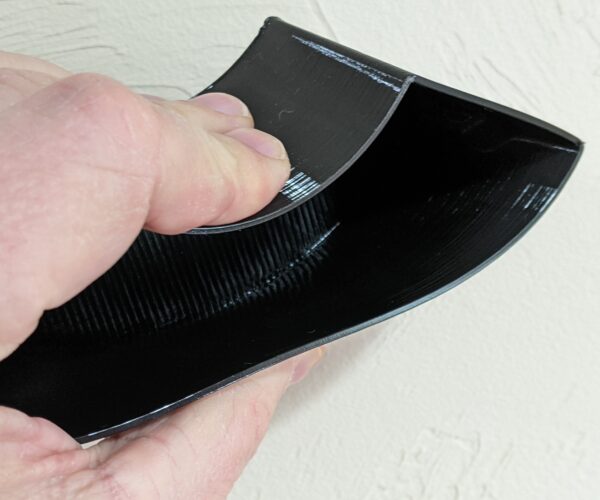
I can bend the walls together without any cracking or permanent deformation. It's as strong as any store-bought insert I've used. Watertightness was not a goal, but it holds up well with minor seepage.
I rather like this design.
and miscellaneous other tech projects
He is intelligent, but not experienced. His pattern indicates two dimensional thinking. -- Spock in Star Trek: The Wrath of Khan Unfortunately,…
RE: Vase Mode with PETG Delaminates?
Results are also pleasing at "full chonk" with 0.8mm layer height in vase mode, at least in the eye of this beholder. Part strength is still excellent. Print time 37m.
and miscellaneous other tech projects
He is intelligent, but not experienced. His pattern indicates two dimensional thinking. -- Spock in Star Trek: The Wrath of Khan Unfortunately,…
RE: Vase Mode with PETG Delaminates?
@bobstro
Whoa, that look superb. Regarding the screw mounting points, try to take a look at "screw parameters>ScrewSlot" section. There's an extra setting in prusaslicer that you need to adjust for the hole to retain/grab the screw later. There's a bit of compliant in the screw mounting point there so when screwing in, the walls won't delaminate very easily. Reducing the said parameter in the comments there, will have the screw mounting hole became solid/rigid. "Hack" the minimum tolerance.
What is the weight for the printed object above?
I'm glad you loved the design, try out different screw/tab/finger notch position/parameters that suits your taste.
I'm thinking to try to print another with default external parameter of 0.45mm setting, fan off, with 230>255c, and if that still delaminates so easily, I think I'm going to try out dehydrating my filaments, then try with 230>240c.
RE: Vase Mode with PETG Delaminates?
[...] Whoa, that look superb. Regarding the screw mounting points, try to take a look at "screw parameters>ScrewSlot" section. There's an extra setting in prusaslicer that you need to adjust for the hole to retain/grab the screw later. There's a bit of compliant in the screw mounting point there so when screwing in, the walls won't delaminate very easily. Reducing the said parameter in the comments there, will have the screw mounting hole became solid/rigid. "Hack" the minimum tolerance.
I don't know if I'll really want to use these, but I am enjoying this design. I've tweaked the screw offset and other settings for a larger screw size. I'm curious how well a screw will stay in place with repeated use. The print itself is quite well thought out though, and the ability to turn on and off features by tweaking OpenSCAD parameters is quite nice.
What is the weight for the printed object above?
The variation I'm currently printing weights in at 51.61g. The design is very frugal with filament, yet very strong.
I'm glad you loved the design, try out different screw/tab/finger notch position/parameters that suits your taste.
Definitely. I struggle with OpenSCAD, but it's great to see someone master it.
I'm thinking to try to print another with default external parameter of 0.45mm setting, fan off, with 230>255c, and if that still delaminates so easily, I think I'm going to try out dehydrating my filaments, then try with 230>240c.
A small nozzle is probably going to produce relatively fragile walls due to lack of surface area for inter-layer adhesion. You can generally go up to 200% with your extrusion widths (the "B" nozzle dimension) with E3D nozzles, so try 0.6mm or even wider. PrusaSlicer does limit you to the size of your nozzle for height, but within that, as long as you maintain a roughly 1:1.5 layer height to extrusion width ratio, results should be good.
Do try larger nozzles sometime. The 1mm nozzle is a lot of fun and I'm contemplating mounting a 1.2mm to see how far I can get with this print. Good stuff.
and miscellaneous other tech projects
He is intelligent, but not experienced. His pattern indicates two dimensional thinking. -- Spock in Star Trek: The Wrath of Khan Unfortunately,…
RE: Vase Mode with PETG Delaminates?
The print itself is quite well thought out though, and the ability to turn on and off features by tweaking OpenSCAD parameters is quite nice.
@bobstro, It's actually thanks to the latest openscad software version that has the parameter sections in the right hand side of the software.
The variation I'm currently printing weights in at 51.61g. The design is very frugal with filament, yet very strong.
Yeah, been thinking a while to do such object that uses little material as possible yet similar feature. I tried a print preview only with 3 perimeters, estimated was around 31 gram as opposed to vase mode only around 16 grams
Definitely. I struggle with OpenSCAD, but it's great to see someone master it.
Thank you for the compliment, but I don't think the script are well optimized for better debugging. I'm not very good in programing
A small nozzle is probably going to produce relatively fragile walls due to lack of surface area for inter-layer adhesion. You can generally go up to 200% with your extrusion widths (the "B" nozzle dimension) with E3D nozzles, so try 0.6mm or even wider. PrusaSlicer does limit you to the size of your nozzle for height, but within that, as long as you maintain a roughly 1:1.5 layer height to extrusion width ratio, results should be good.
Do try larger nozzles sometime. The 1mm nozzle is a lot of fun and I'm contemplating mounting a 1.2mm to see how far I can get with this print. Good stuff.
I actually do have a generic set of different nozzle sizes from 0.25mm to 0.6mm that I have for at least 2 years now, I mean generic, they're not from trianglelabs. I seldom print something for myself as I may get carried away and waste more of my resources to printing more just to test things out. I always prints at 0.2mm layer height.
I'm a bit confused a little bit with the 1:1.5 layer height to extrusion width. My previous prints were with 0.2mm layer with 0.6mm external perimeter, 0.45mm extrusion width (only for bottom layers). I think this is also a correct settings?
A 0.2 layer:0.6 extrusion = 1:3?
If 1:1.5 = 0.2 layer:0.35 extrusion?
At default setting, 0.2 layer:0.45 extrusion = 1:2.25?
I'm being careful with multiplier representation as I perceived 1.0x = 100%, 1.5x = 150%;not 250%. Unless specifically states that "added by 100%/1.5x"
RE: Vase Mode with PETG Delaminates?
The variation I'm currently printing weights in at 51.61g. The design is very frugal with filament, yet very strong.
Yeah, been thinking a while to do such object that uses little material as possible yet similar feature. I tried a print preview only with 3 perimeters, estimated was around 31 gram as opposed to vase mode only around 16 grams
I'm using much thicker walls, so it makes sense a single perimeter weighs so much more. I'll re-slice with the same wall thicknesses to give a more apples-to-apples comparison.
Thank you for the compliment, but I don't think the script are well optimized for better debugging. I'm not very good in programing.
I like the way you've made the screw hole printable in vase mode. Very clever... and educational. Thanks for sharing it!
I actually do have a generic set of different nozzle sizes from 0.25mm to 0.6mm that I have for at least 2 years now, I mean generic, they're not from trianglelabs. I seldom print something for myself as I may get carried away and waste more of my resources to printing more just to test things out. I always prints at 0.2mm layer height.
Watch out for the very cheap nozzles. If the "B" dimension for the shoulder around the opening is not sized correctly, it will be hard to get good extrusion widths of any width. Triangle lab and Mellow seem to be decent clones. I do like P3-d's coated Apollo nozzles.
I'm a bit confused a little bit with the 1:1.5 layer height to extrusion width.
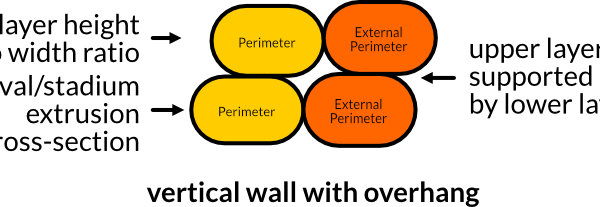
Sorry, I wasn't clear. You want your height lower than width for good inter-layer adhesion. You want an oval/stadium extrusion cross-section. This is particularly important for overhangs.
A width of at least 1.5X height works well. Height is limited to nozzle size in PrusaSlicer.
and miscellaneous other tech projects
He is intelligent, but not experienced. His pattern indicates two dimensional thinking. -- Spock in Star Trek: The Wrath of Khan Unfortunately,…
RE: Vase Mode with PETG Delaminates?
@asraff -- Can you elaborate on what you had in mind for the hinge screw? I'm thinking self-tapping screws will loosen up as the drawer is swiveled. A very long bolt would work with a large enough hole.
1mm layer height seems to be a bit too high. The vase mode extrusions above the finger notch become too heavy and sag. I could experiment with different layer heights in that section, or adding a bit of cooling, but the uniform 3D printed lines look quite nice and I wouldn't want to disrupt the pattern.
Definitely try drying your PETG. PETG is very prone to absorbing moisture and it can really screw up finish and print strength.
and miscellaneous other tech projects
He is intelligent, but not experienced. His pattern indicates two dimensional thinking. -- Spock in Star Trek: The Wrath of Khan Unfortunately,…
RE: Vase Mode with PETG Delaminates?
@bobstro & @asraff
I'm seeing the use a long through bolt style of screw 2.5mm -3mm machine style screw and I think if you added a feature much like your top hinge area to the bottom with a hole all the way through you could mitigate the chances of the screw causing a problem with wear. much like the original design, I would still do this with a 1.5 wall thickness 2 perimeters at 0.39 however if your hell bent on vase mode, It's my opinion that you have produced a good design. and I think you can continue with this style using a though bolt or some variation of it.
BTW, Bob I do enjoy the look you produced.
enjoy
Swiss_Cheese
The Filament Whisperer
RE: Vase Mode with PETG Delaminates?
I did a quick test to see how extreme I could print this with a 1mm nozzle. Here's the result in PETG printed in vase mode at 1mm layer height a single 2mm wide perimeter. I moved the finger notch up to the top to avoid the overhang issue, though I'm sure the design can be tweaked to reduce the top angle instead. Print time is 42m @ 58.35g.
It's definitely not as bendy with 2mm thick walls. This is as far as I can pinch the walls together.
I think the added thickness starts to work against you if you want any flex. The walls do groan and creak a bit under stress. Inter-layer adhesion is still very good with no delamination.
I'm a fan of vase mode for speed of printing, and for transparency. I may try these in clear PETG next. It definitely has some limitations, but @asraff's design overcomes them for this particular print. For those cases where vase mode simply won't work, I have done prints with normal perimeters on threaded parts and a single, wide extrusion for clear body parts. It works reasonably well until you get to very tall prints. This "pseudo vase" mode gives a good balance in some scenarios.
and miscellaneous other tech projects
He is intelligent, but not experienced. His pattern indicates two dimensional thinking. -- Spock in Star Trek: The Wrath of Khan Unfortunately,…
RE: Vase Mode with PETG Delaminates?
@asraff -- Can you elaborate on what you had in mind for the hinge screw? I'm thinking self-tapping screws will loosen up as the drawer is swiveled. A very long bolt would work with a large enough hole.
1mm layer height seems to be a bit too high. The vase mode extrusions above the finger notch become too heavy and sag. I could experiment with different layer heights in that section, or adding a bit of cooling, but the uniform 3D printed lines look quite nice and I wouldn't want to disrupt the pattern.
Definitely try drying your PETG. PETG is very prone to absorbing moisture and it can really screw up finish and print strength.
Usually we have 2-3 ways of mounting the screws on the said object of holder as "HD" and swivel "SV"; in this case HD = Spool Holder, SV = this Box:
- Screw hole bit larger on HD, but smaller on SV, when screwing in, the screw will tap itself into the SV.
- Same as #1 above but other way around.
- Screw hole smaller on HD, smaller on SV, but the screw will go all the way through HD. This design is a through hole screw design that offers best stability as explained by @swiss_cheese above
What I had in mind about the "ScrewSlot" is to take advantage of "minimum tolerance" before the the parts started to fuse to each other. In my case, even as low as 0.1mm gap on the screw slot there, the gap still wouldn't fuse. Try keying in like "0.01" manually in the script section, left hand side for the "ScrewSlot" as its gap, then adjust the following to be 10% or 49% at most in prusaslicer
With both parameters has been reduced, I believe the screw slot gap there will fuse each other forming into a rigid screw mounting hole.
@swiss_cheese, @bobstro
I already thought that through, the script has 3 mounting screw variation; top, bottom, through. That can be chosen with a drop down menu in openscad Customizer section. If you don't see this Customizer section, please download the latest openscad version as this script's setting utilizes heavily on the Customizer section of openscad.
I did a quick test to see how extreme I could print this with a 1mm nozzle. Here's the result in PETG printed in vase mode at 1mm layer height a single 2mm wide perimeter. I moved the finger notch up to the top to avoid the overhang issue, though I'm sure the design can be tweaked to reduce the top angle instead. Print time is 42m @ 58.35g.
Try adjusting "Indent Pulltab Parameters>SQCubeZ", this will increase/decrease the angle. While "SQCylOffX" and "SQCylOffX2" will determine how deep the finger notch you want. "Parameters>PullType" is the style that you prefer, a pull tab or finger notch like the one you printed recently.
I'm a fan of vase mode for speed of printing, and for transparency. I may try these in clear PETG next. It definitely has some limitations, but @asraff's design overcomes them for this particular print. For those cases where vase mode simply won't work, I have done prints with normal perimeters on threaded parts and a single, wide extrusion for clear body parts. It works reasonably well until you get to very tall prints. This "pseudo vase" mode gives a good balance in some scenarios.
I already thought of how to design such item,a screw cap styled container with everything in vase mode. But won't be in openscad script
P.s: I've updated the script to include some extra comments only on "Indent Pulltab Parameters" section for now
P.p.s: I've found the following request in github, I believe this will also take vase mode printing to another level if this really going to be implemented. Not sure if they understand what he wanted to say, but from my own perspective, with this method, we can print a friction fit vase mode box with just a single model; 1 printed with inside the shell position, another printed with outside the shell position.
Would you like to try out a vase mode screw cap container @bobstro?
RE: Vase Mode with PETG Delaminates?
I've printed one last time, with the filament dehydrated with 70c over 12 hours, probably 15-17 hours of dehydrating. Print settings are:
- 230>250/85>90c
- 0.60mm external perimeter
- everything else are default/stock settings
The results were, there are no shrinkage at first 5mm when spiral vase started, the finishing of the print, looked like it was printed at 215c, not as rough as before dehydrating it. Strength wise, I think it is similar to before I dehydrate the filament, the one printed with 0.60mm with 240c.
In conclusion, I believe it is better to have this printed with at least 3 perimeters just like any other generic designs out there.
