Small Footprints Great -- Large not so much
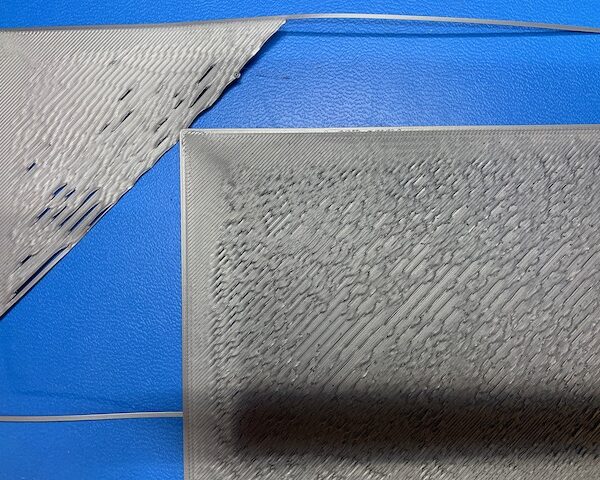
I've been able to make half-a-dozen good prints with my new printer so far. But, now I've hit a dead-end. I'm trying to do a print that has a large first layer surface area. When I am trying to run this print, the first three-quarters of an inch/20mm is fine all the way around. But, during the longer spans, I get lifting of the lines. I've tried many z-axis adjustments, bed heat, nozzle temp, etc., but with no luck. I got it to work one time but lost power half way through the run and had to start over. When I did, with the same settings, I had the problem again.
I think I've hit my first major frustration with the tech and would appreciate any help.
P. Todd Decker
RE: Small Footprints Great -- Large not so much
Hi P.T.
I personally have not seen a blue print sheet from Prusa before; is this is a Prusa sheet? This first layer is most certainly a mess.
I don´t know what exactly you have done so far to fix the issue. Here´s how I´d proceed if it were my printer:
Reset the printer to factory values.
Install latest firmware.
Install latest version of PrusaSlicr.
Do a full, thorough clean of the print sheet. If it is a Prusa smooth PEI sheet, I´d clean it with alcohol first, then with hot water and dish detergent, then give it a very serious rubbing with kitchen paper towel.
Do a thorough cleaning of the underside of the nozzle.
Chose quality filament simple to print like PLA or PETG with standard settings provided by PrusaSlicr.
Run full initial setup of the printer, as explained by Josef at , taking care of a proper alignment of the X axis.
But: Whatever crap comes out of the first layer Z calibration with that miniature square, during the initial setup, I´d accept and proceed with Jeff Jordan´s method of calibrating Z. Calibration will take time and my typical mistake is to assume something and act on it. So now if I assume the nozzle is too high, I raise it even higher to validate my assumption instead of immediately lowering it. Calibration needs to be done for each different sheet and I personally would recommend to cross-check calibration if the sheet is turned upside-down.
Once the basic Z calibration won´t get better but there are still minor changes of the first layer over a certain area of the square (e.g. getting worse over to the right side, getting worse towards the front left or else) I´d look into Bed Level Correction.
Cheers
Chris
I try to give answers to the best of my ability, but I am not a 3D printing pro by any means, and anything you do you do at your own risk. BTW: I have no food for…
RE: Small Footprints Great -- Large not so much
@just3d
Thank you. The blue is the anti-static pad on my electronics workbench. Thank you for your suggestions. I have previously done the steps you suggested. My test prints of the small patch using the z-calibration and first layer test built into the printer were perfect. The artifacts only seem to appear on large volume flat surfaces. I think I finally got a good first layer by slowing down the first layer print speed and increasing its width. I still saw some tendency for a line to lift once always away from the outside rim but the next pass would correct it. The print is running now so we will see how it works out and I’ll attach pics
RE: Small Footprints Great -- Large not so much
Here are images of the successful print. You can still see how everything is fine about a centimeter into the print and then as the run becomes longer it starts to break apart. Hence problems develop on prints wider than 2 to 3 centimeters.
I was able to get to where I could do a successful print by adjusting the following Print Settings in PrusaSlicer:
- Layers and perimeters -> First layer height: 125%
- Skirt and Brim -> Brim width: 2mm
- Speed -> First layer speed: 15 mm/s
- Advanced -> First Layer: 120%
RE: Small Footprints Great -- Large not so much
How to calibrate.
Clean bed with dish soap(2 times), start to high, and then lower in every try, then you should see how it gets better.
if you extrude by hand, and look at the extruder, how does the filament look like, is it straight coming out, without air bubbles, is it thick enough,
clean the extruder by doing a few pull outs, and do a higher temperature en extrude filament to clean out the nozzle .
Also check the springs of the extruder if they are strong enough, because you are using more filament in your settings, maybe it is slipping more.


