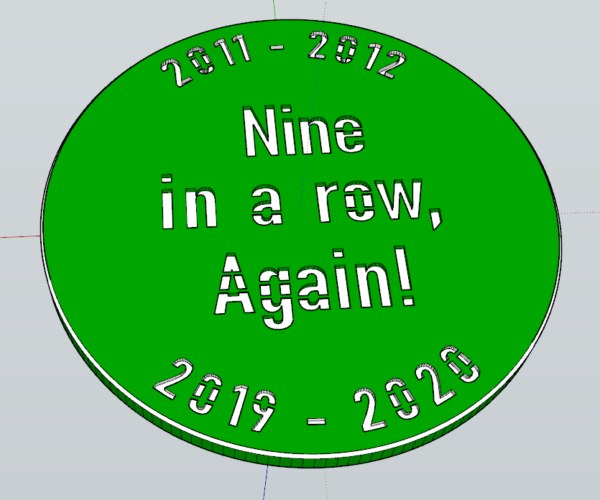
Small details not sticking to plate
We are using our Mk3S (from a kit we built) with the powder coated sheet (cleaned with 90% alcohol each time) to print some coasters.
We are having issues getting the "inside portions" of letters and numbers to stick properly (The middle of e, A, o, g, 8, etc.) and we are wondering if anyone has any tips?
RE: Small details not sticking to plate
Have you tried washing the buildplate instead of using IPA? 
Joan
I try to make safe suggestions,You should understand the context and ensure you are happy that they are safe before attempting to apply my suggestions, what you do, is YOUR responsibility.Location Halifax UK
RE: Small details not sticking to plate
We are using our Mk3S (from a kit we built) with the powder coated sheet (cleaned with 90% alcohol each time) to print some coasters.
We are having issues getting the "inside portions" of letters and numbers to stick properly (The middle of e, A, o, g, 8, etc.) and we are wondering if anyone has any tips?
Another important factor for good adhesion is an optimal Z-first layer adjustment.
https://help.prusa3d.com/en/article/first-layer-calibration_112364
Statt zu klagen, dass wir nicht alles haben, was wir wollen, sollten wir lieber dankbar sein, dass wir nicht alles bekommen, was wir verdienen.
RE: Small details not sticking to plate
Of course you do realize that the 'inside portions' of text will not remain as part of your print unless you have something below them to support them, correct?
RE: Small details not sticking to plate
Try what joantabb mentioned, then make sure that your first layer height Is good as karl-herbert mentioned, and try Slowing down the first layer a bit, possibly even the first several layers until you get past the small bits and are ready for what looks like your color change. I would look to see if elephant foot compensation is on and if it is I would consider turning it off (off being Zero) since it's job is to make the first layers outer perimeter smaller and that can sometimes effect layer adhesion on small parts and tiny areas, you didn't mention what type of filament you were using but some filament types don't stick as well as others on the textured sheets.
Good Luck
The Filament Whisperer
RE: Small details not sticking to plate
We have success! Thanks everyone for your helpful tips and quick replies! 😀
@joantabb - We gave the bed a good scrub!
@karl-herbert - Bumped up our Z offset (also going to try jeffjordan's method it looks a lot more reliable!)
@jsw - We did a test piece and it printed fine but in hind sight I think we just got lucky! Your comment gave us the idea to add in some custom supports that we cut off after!
@dan-p12 - We got it working before I saw your comment but you have some great tips we will definitely try them out if we have more issues and remember them for next time!
We are so grateful for such a awesome community! 🙂
Here are the custom supports if anyone is interested:
- 0.018" across
- 2 layers deep so they don't stick to the second colour and can be cut off after
RE: Small details not sticking to plate
Tip for future parts with lots of features starting from the first layer if you have the ability to modify your models.
If I'm making a part that has a lot of small features, say a bunch of holes starting from the first layer I will fill those features with a .2mm height "plug" this makes the first layer one solid layer. (match whatever first layer height you are printing in). After the print is finished I will go back with a hobby knife or drill bit and clean out the holes / features. One layer is easy to remove, but having a solid first layer gives your print a much better chance of success. Plus the bond between the filament layers is much better than the filament and print bed.
Hope this makes sense.

