Printing a standing pipe
I am trying to print a simple standing empty pipe(a flute). At some point of the print, the pressure of the nozzle un-sticks the print from the bed sheet. I am then obliged to stop and start again, since I don't see a way to recover from it. The first layer test looks fine. I tried even to put some glue on the bed sheet before printing. Even adding support at the base does not help. How can I solve this problem?
Many Thanks
Best Answer by JoanTabb:
this is a comparatively tall print with a very narrow first layer.
You have Elephants Foot Compensation enabled, which reduces the width of the first layer,
within the Brim Settings you have a gap of 0.1mm which weakens the bond between the whistle and the brim.
the internal support patch is one layer thick and is detached from the model, adds no benefit
in the project file below, I have
reduced Elephants foot to 0.0mm
Reduced Brim separation gap to 0mm
Enlarged the Brim
increased the first layer height to 0.3mm to get a better squish and more support from the Brim, Increased the first layer extrusion width to get a better bond to the build plate.
Revised the Supports to only support the wider body a short distance up the Flute Body and
Increased the build plate temperature to 70C to aid bond strength. There is scope to add an internal brim, but that may be difficult to remove!
looking at your build plate with the first layer test prints, the middle of the build plate seems messy.
I suspect this is Gluestick.
I am not a fan of gluestick for anythng other than reducing the bond strength of PETG and TPU, to the build plate (It's an adhesion reducing barrier preparation)
I give my build plate a really good clean with a new sponge, hot water and a little dish soap, rubbing the solution into the build plate surface, really well, to remove contamination, rinse well with HOT Water, and Dry Immediately, with a plain paper towel.
Good luck with your efforts
regards Joan
RE: Printing a standing pipe
a picture of your first layer would help,
which build plate are you using,
which filament?
what temperatures?
What height was the model becoming detached?
can you save a project file, which will show your settings and model configuration.
you will need to ZIP compress the file before you can add the Zipfile to the post
regards Joan
I try to make safe suggestions,You should understand the context and ensure you are happy that they are safe before attempting to apply my suggestions, what you do, is YOUR responsibility.Location Halifax UK
RE: Printing a standing pipe
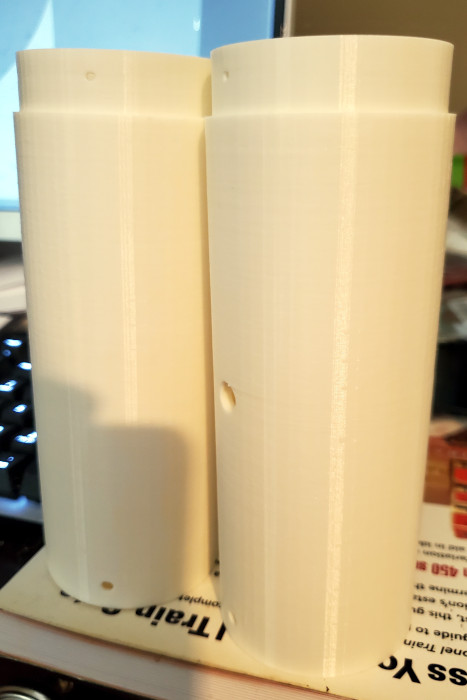
I am using PLA. The temperature is 60/215. The print starts to fail at a height of about 12 cm.
first_layer image.
Many Thanks
RE: Printing a standing pipe
this is a comparatively tall print with a very narrow first layer.
You have Elephants Foot Compensation enabled, which reduces the width of the first layer,
within the Brim Settings you have a gap of 0.1mm which weakens the bond between the whistle and the brim.
the internal support patch is one layer thick and is detached from the model, adds no benefit
in the project file below, I have
reduced Elephants foot to 0.0mm
Reduced Brim separation gap to 0mm
Enlarged the Brim
increased the first layer height to 0.3mm to get a better squish and more support from the Brim, Increased the first layer extrusion width to get a better bond to the build plate.
Revised the Supports to only support the wider body a short distance up the Flute Body and
Increased the build plate temperature to 70C to aid bond strength. There is scope to add an internal brim, but that may be difficult to remove!
looking at your build plate with the first layer test prints, the middle of the build plate seems messy.
I suspect this is Gluestick.
I am not a fan of gluestick for anythng other than reducing the bond strength of PETG and TPU, to the build plate (It's an adhesion reducing barrier preparation)
I give my build plate a really good clean with a new sponge, hot water and a little dish soap, rubbing the solution into the build plate surface, really well, to remove contamination, rinse well with HOT Water, and Dry Immediately, with a plain paper towel.
Good luck with your efforts
regards Joan
I try to make safe suggestions,You should understand the context and ensure you are happy that they are safe before attempting to apply my suggestions, what you do, is YOUR responsibility.Location Halifax UK
Thre is only a very small area in contact with the build plate, it isn't enough to hold the part in place on a moving print bed.
Try inverting the part, print it other end up where there is more than twice the contact area and overhangs will be reduced.
Elephant's foot compensation is set at 0.25mm, this reduces the contact area too, I suggest you set it to 0 and accept that you may have to sand away a slight lip post printing. If it still doesn't stick, add a small brim.
Your print-sheet was dirty before you added far too much glue stick. Clean it with dishwashing soap (Dawn/Fairy) and plenty of HOT water, dry with a fresh paper towel and handle by the edges only.
It *can* be done; see pic:

Cheerio,
RE: Printing a standing pipe
Another option to consider for tall thin parts is to add sacrificial supports that help stabilize the print but then can be simply broken off. I usually model either an open cone around the tube or 3 or 4 cone segments.
Formerly known on this forum as @fuchsr -- https://foxrun3d.com/
RE: Printing a standing pipe
@brakovic
You've received a lot of good advise from the knowledgeable folks here, I had a bit I wanted to offer as well.
I printed this part without changing much. I changed the extrusion width for perimeters and external perimeters to 0.52, changed the print speed to 20mm/s for all applicable features and added an internal brim of 9mm combined with a Skirt of 132 layers to support the rim. In order to see how it would fair, and you are correct it began to fail (wobble) around 113mm, as suspected, regardless of brims and slowing the print speed (Print time 4h 33m & 27.95g of filament).
Given the result I added a support constructed in PrusaSlicer using parts and negative Volumes. After adding the support I was able to increase the Print speeds for the applicable features into the 25 and 33.5mm/s range achieving a much more satisfactory result in (4h 28m & 32.88g of filament). As well I added support to the holes in the side of the flute section, they are adjusted to simply pop out with pressure from your thumb and produce a clean hole. The support on the base supporting the rim can simply be squeezed & twisted and will come off cleanly, originally made from a skirt, it had to be remade from a cylinder with a negative volume to facilitate the use of the angled support to stop the wobble at the 113mm point and beyond. I reprinted the model with the changes and the result for this 170mm tall print was very clean, all supports simply snap off or pop out.
Adjusted Project file
I took pictures f the results but it's 2AM and I've got to get to bed.
I made more changes then I mention here, I would urge you to look over the .3mf project file provided and use it as an example, there are several lessons here.
Regards
Swiss_Cheese
The Filament Whisperer
RE: Printing a standing pipe
@swiss_cheese — Another masterpiece!
I always forget what's now possible with parts and negative volumes in Prusaslicer. Specifically for 3rd party models that are causing issues that's probably a quicker way to add sacrificial supports than going through Fusion or other CAD software.
Formerly known on this forum as @fuchsr -- https://foxrun3d.com/
RE:
@fuchsr
Thank you,
I agree for 3rd party models it's quicker. You can save the supports you built, adjust and reuse them, just like the modifier stacks, and Printing styles, you might create. It's still faster (by far) to do it in your 3D program for models you make though. I know you knew that, I threw that in for other folks.
People who model Always had the ability to add a somewhat adjustable support into slicer, however relative to once it was imported into slicer you had a limited amount of control, maybe I should say a (Befuddled) control. As an example of what I mean you could do Snug supports in Slicer 2.2.x (frankly since the advent of support blockers and enforcers) but you had to build it, you could do monotonic fill then also, however you had to create the circumstances. Now we have buttons for them and the math is better, we don't have to use old Indian tricks or modify our G code to get the results for those two things. I can't wait for folks to start seeing whats already possible now in slicer. Just to be clear I mean with the GUI, you could always do whatever by editing G code or adding Post processing scripts, but that's cumbersome IMO.
Oops, I ranted again 🤭
Swiss_Cheese
The Filament Whisperer
RE: Printing a standing pipe
@brakovic
I apologize, it was 2AM and I forgot to mention, when Prompted to use "Detect bridging perimeters" Select "NO"
I hate that they have that warning, they should just respect the settings in the .3mf file, Bridging perimeters on will completely mess up the support settings.
I hope you didn't try printing it yet.
Swiss_Cheese
The Filament Whisperer
RE: Printing a standing pipe
The Prusa I3 series is a great printer. Having said that, there seem to be a few things at which the I3 excels, as in producing consistent prints which are solid, square, dimensionally accurate, and have good eye-appeal.
One of these is little boxes. I have not purchased a small project box since I started 3d printing.
Another is, as the title states, standing pipes.
Even without vase mode I often have difficulty finding the seam on things like this (below) done last week in RepRappers white ABS.
One hint I will give is for things like this, which have a circular footprint but not that much area to it (as in a fairly thin wall) is to use a well-worn build plate, one which it will not matter much to you if it gets one more little booboo, as these things tend to leave those images on the PEI build surface, and also use a liberal amount of your favorite product as an adhesion booster and release agent.
I've found that you seldom need a brim for things like this.
RE: Printing a standing pipe
I love ABS,
It might be because Ive been using it for so many years, but it just seems to have all the perfect properties not only for print quality, but also for supports, and post processing. It also has very reasonable mechanical properties, especially the high quality products.
I downloaded one of Fuchsr's battery boxes for the 2032's and I'm about to grab one for my 76A's they printed nicely. ABS of course : )
The Filament Whisperer
RE: Printing a standing pipe
It seems like lots of people diss ABS, but I've used it for many things.
At our local makerspace, where I first took the classes to learn how to 3d print (wow, now several years ago) some of the instructors were encouraging ABS over PLA due to cost (prior to the pandemic, ABS was almost always cheaper than PLA) and durability.
One quote was along the line of 'If you can print successfully with ABS, you can always go to PLA, but not necessarily vice versa.'
ABS does require a bit more attention to detail than does PLA in many cases. Large flat ABS pieces, in particular, tend to warp. It also stinks ('Hey, it smells like melted plastic in here!') and I would not like to be exposed to the fumes regularly.
Acetone (and similar solvents) will attack and dissolve ABS, but that can be either a plus or a minus, as some folks like to vapor smooth/polish ABS prints.
I've found that I get consistently better ABS prints after adding the enclosure, but prior to that I often got very good results using the draft shield, available in both PS and Cura.
When I do an ABS print I will first preheat the machine to ABS temperature and let it stabilize for at least 15 minutes or so before launching the print.
When the print is done, I'll always let the print cool to almost room temperature before attempting removal.
I'll always use a release agent, usually Layerneer, with ABS prints.
RE: Printing a standing pipe
Never liked ABS (smell) but I recently started to use ASA. Much less odor; for my nose it's not worse than PETG. I've started producing a new line of dog collar accessories, and for objects that size it works perfectly. After acetone smoothing it almost looks like injection molded. I do occasionally end up with some rough/wavy top surfaces and still need to work out what's going on there. @jsw, I'm using satin sheets, and after cooling down, the ASA models pop right off without Layerneer.
Formerly known on this forum as @fuchsr -- https://foxrun3d.com/
RE: Printing a standing pipe
@fuchsr
I do occasionally end up with some rough/wavy top surfaces and still need to work out what's going on there.
What brand are you using?
The Filament Whisperer
RE: Printing a standing pipe
Prusament ASA (black). I usually print a batch of four identical objects, sometimes one looks a bit rough (but not always the same). I'm not too worked up over it, a few strokes with medium-grit sand paper takes care of it, and after acetone smoothing you can't see a thing.
Formerly known on this forum as @fuchsr -- https://foxrun3d.com/
RE:
OK , 👍
I have Prusament ASA white and orange, also Overture white, and one other brand I can't remember the name of right now. I have noticed occasionally on the side walls what looks to be inconsistent extrusion width, I correct it with more heat, and or a slow down, if I had to describe ASA I would say its more chalk like, this is just me spit balling, but I suspect that the texture effects the laminar flow at lower temps, I also notice it more at higher print speeds it changes from a tiny bit of sheen to flat very easily. It seems to change constancy very rapidly with minor temperature changes. (Mind you, I'm picky about these things) Overall it prints very well though. ABS Prints smooth and creamy, and is very consistent at various temperatures.
I'm not trying to convince anyone of anything, I'm just chatting about it.
The Filament Whisperer