PETG warping
tl;dr: How to avoid corner warping with a large PETG print?
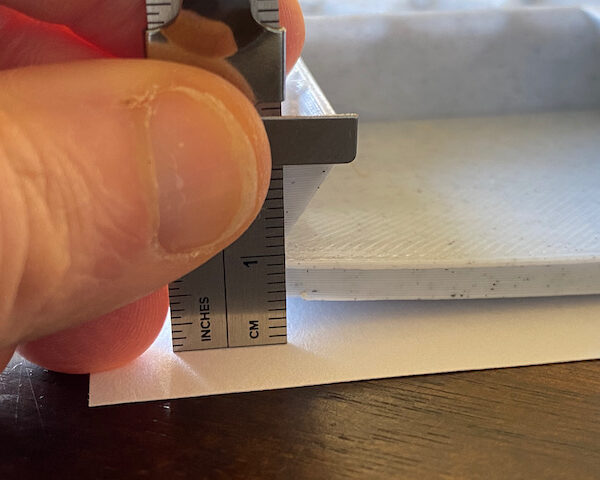
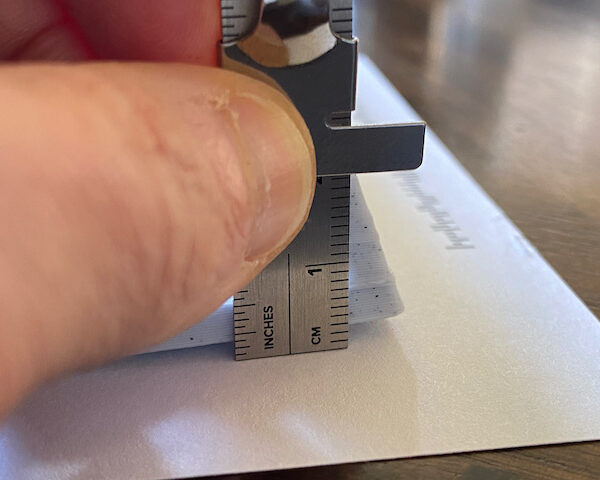
I started 3D printing last month and I'm having a serious warping problem on a large ramp that I designed. The ramp is scaled to 250mm wide, so it completely fills the i3 print bed on the X axis, and nearly fills it on the Y axis. I'm printing it with Atomic Filament PETG and a 0.6mm E3D brass nozzle on a Textured PEI Powder-coated Spring Steel Sheet. Here are close-ups of 2 of the 4 corners:
I created the following filament profile, based on the generic PETG profile:
- Nozzle: 260C 1st layer, 240C other layers
- Bed: 95C 1st layer, 80C other layers
- Cooling: both disabled
I have done various tests to confirm that my first layer seems correct overall. However, for this print, the perimeter did not adhere well, which I fixed with a glue stick around the perimeter. I suspect the print bed does not heat evenly, which I just confirmed using an infrared thermometer: the far corners are about 4C cooler than the center, and the near corners are about 10C cooler than the center! This explains why I haven't had first layer problems in smaller prints. Nevertheless, even with the glue stick, I got warping on the 1st layer.
My current ideas:
- Increase the bed temperature for other layers
- Add more glue stick or trying Magigoo
- Try a different filament profile
- Use the smooth sheet with glue stick or Magigoo
Any advice is appreciated.
Note: A skirt or brim are not an option because the print fills the print bed
RE: PETG warping
It's common for large rectangular objects to warp. Assuming Live Z is well calibrated and the steel sheet is clean (using hot water and fragrant-free dish washing soap), here are a few approaches that have worked for me:
* Slow down print speed.
* Add mickey mouse ears to the corners. I know you said the model fills the print bed but maybe mickey mouse ears are doable. You can add a cylindrical part in PrusaSlicer, maybe 10mm diameter, change height to single layer height, then place the part at the corner. Repeat for each corner.
* Add a brim. Okay, not an option in your case I guess.
* Use Layerneer Bed Weld ( https://www.amazon.com/Printer-Adhesive-Layerneer-Original-Filament/dp/B079984GV5/). Works better in my hands than glue stick, and you need only a thin layer.
* If you have design control over your part and it's possible considering the intended use, you can try to round the edges and/or add holes to the base of the model.
* Combination of above. Usually, brim and Layerneer works for me but large, rectangular objects can be a challenge.
Formerly known on this forum as @fuchsr -- https://foxrun3d.com/
RE: PETG warping
* Add mickey mouse ears to the corners. I know you said the model fills the print bed but maybe mickey mouse ears are doable. You can add a cylindrical part in PrusaSlicer, maybe 10mm diameter, change height to single layer height, then place the part at the corner. Repeat for each corner.
* Add a brim. Okay, not an option in your case I guess.
* Use Layerneer Bed Weld ( https://www.amazon.com/Printer-Adhesive-Layerneer-Original-Filament/dp/B079984GV5/). Works better in my hands than glue stick, and you need only a thin layer.
* If you have design control over your part and it's possible considering the intended use, you can try to round the edges and/or add holes to the base of the model.
* Combination of above. Usually, brim and Layerneer works for me but large, rectangular objects can be a challenge.
Thanks. I didn't think of Mouse Ears - 1/4 round ears might be very helpful. I also considered redesigning the base with a grid, like this Reddit thread. Also, you mention Bed Weld, though they say that it's designed for glass print beds - have you had a problem with that on a Prusa PC bed?
RE: PETG warping
This help you out.. This is something I wrote about selective brimming based on what I learned.
I was having issues with PLA warping on me on a rubber band print. Normally I use PETG for prints which don't warp on me but I was determine to use the Prusament PLA. Since I am new, I did it supports, and warped less, but still warped in one corner. I tried brim and it worked great but I had so much cutting I was pretty unhappy. Then I discovered someone on reddit talking about creating your own brims... still need to clean up, but so much less to cut off.
In PrusaSlicer you can add "Modifiers" to the print. This is how you do it:
1. In the 3D editor view, you right click and select "Add Shape". I selected Cylinder, but you can select what you want.
2. Now a huge cylinder has appeared.
3. Click the cylinder if it isn't already and resize it. On the right bottom side should be "Object manipulation" and you would put in the X and Y size you want.. then the Z axis size I put in 0.2 (or 0.1). NOTE: be sure to click the clock to unlock it so it doesn't auto adjust the X and Y shapes.
4. Play with the placement until your satisfied.
5. Right click the "brim" and select "Layers and Perimeters". On the right menu you should see "Shape-Cylinder" on the list of object, and sub category now has "Layers and Perimeters".
6. Click "Layers and Perimeters" and the bottom right side there should be a choice of "Object Setting to modify" and under that "Layers and Perimeters".
7. Set the following options: Bottom: 0, Layer Height: 0.1 mm, Perimeter 2 (not sure what this does), and Top: 0.
8. Right click the "brim" and select "Infill".
9. On the right object list, the "Layers and Perimeters" will look like "Infill; Laye...d Perimeters". Click that and you'll see a new option for "Infill"
10. For infill I did the following: Fill density 60%, Fill pattern: Grid. It is up to you what you want but this worked out fine for me.Interesting stuff you can do!
I believe it might be better to use Add Part so the part would be integrated into the original part. I think I noticed that it might reprint the brim on the same location as the part causing a minor layer shift.. This is better to be avoided, but on my print it didn't damage the printed part.
RE: PETG warping
@gglockner
Layerneer bed weld works great on both smooth and textured steel sheets.
Parenthetically I should say that I prefer the BCZAMD textured sheets over the original Prusa sheets. I found the Prusa textured sheets to be a bit temperamental, so I switched to the BCZAMD textured sheets, which have handled any material I've thrown at them (PLA, PET,G ABS, PC, TPU) with ease. The surface is a bit coarser than what you get with the Prusa sheet but I'm used to it now.
They're on Amazon:
Mk3S: https://smile.amazon.com/gp/product/B07XC673ZT/
Mini: https://smile.amazon.com/gp/product/B088LPJ8PK/
Formerly known on this forum as @fuchsr -- https://foxrun3d.com/
RE: PETG warping
@rhidium
That's essentially the Mickey Mouse ears I mentioned. Thanks for providing a detailed description for how to create them! I usually don't bother with steps 5 through 10, at least for me it always worked fine with just the defaults.
Formerly known on this forum as @fuchsr -- https://foxrun3d.com/

