Object Orientation
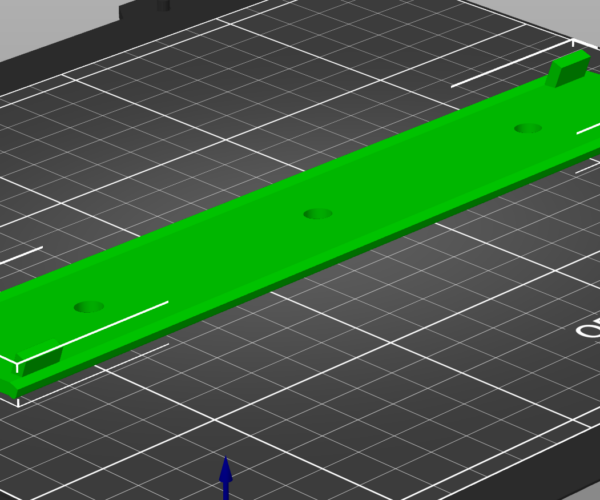
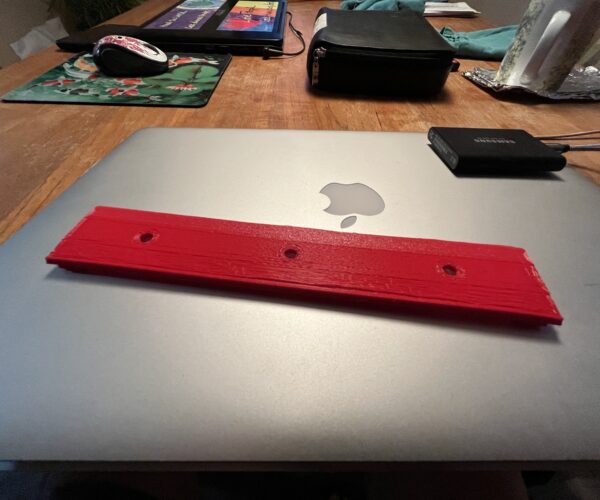
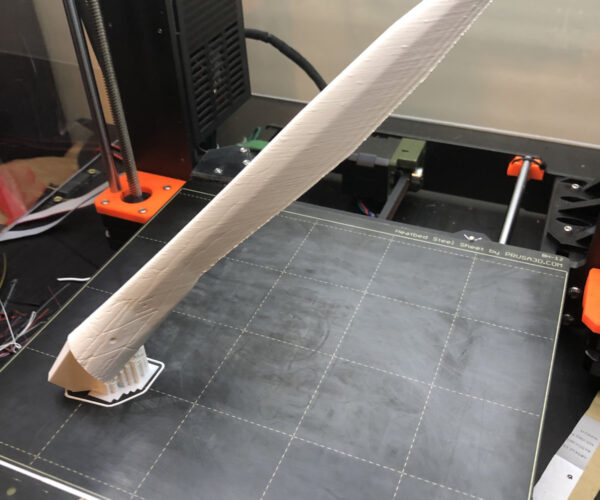
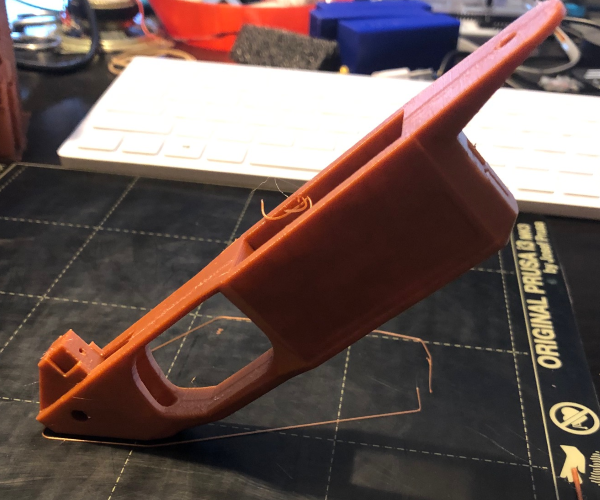
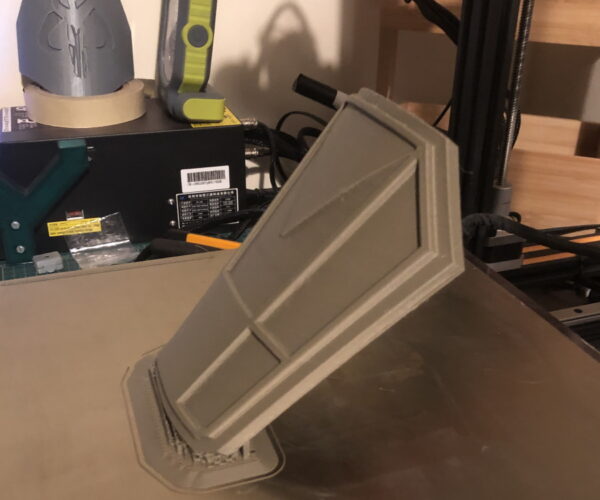
I'm looking for suggestions on how best to orient the object/print in the photos for printing so that it isn't completely stuck to the support material and inseparable from it, or so that it doesn't fall over during printing.
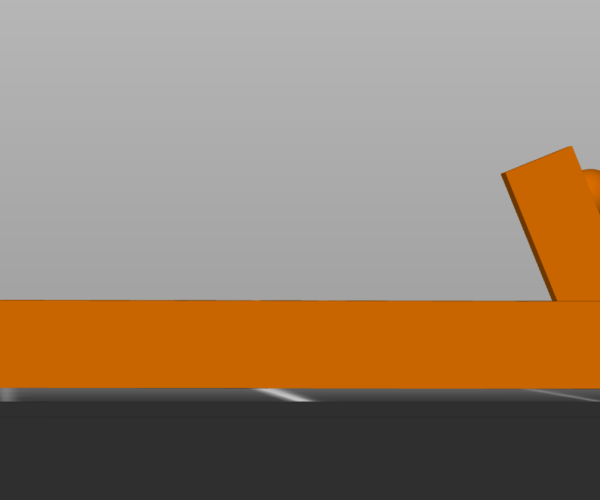
When I lay it down flat the support material seems to become really stuck to the object. You will notice in the side view photo where the object is orange it isn't perfectly flat and that it has a little lip on the left side that prevents it from lying perfectly flat on the bed so support material is generated under the object. I've printed it a couple times in that orientation and have damaged the object when trying to separate it from the support material. I think I printed in draft mode. Would printing at .2mm or finer help when it comes to separating the support material?
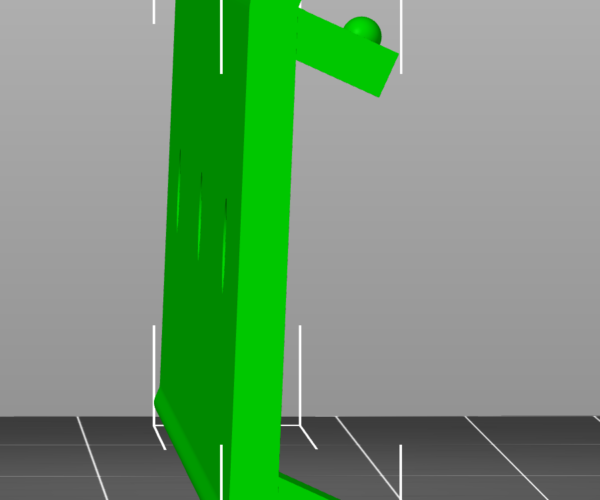
I've printed it standing on edge as in the last photo and it fell over.
What approach should I try in order to print this object successfully?
Thanks.
RE: Object Orientation
Save your project, take the saved 3mf file, zip it up and attach it here. Must be zipped or the forum won’t accept the file. With the project people can see and experiment with various options and then post back examples for you.
RE: Object Orientation
Thanks. Attaching the 3mf to this post.
RE: Object Orientation
I'll get the popcorn out and watch this show. Seriously, this is not something I believe has a trivial answer. Are there any particular constraints or considerations you can add? Such as, are there sides that are less important than others so support pock marks don't matter that much? Or can the part be cut in two, in the middle, which would make it much easier?
Regardless of the answers, supports should not be hard to remove. They may leave pock marks but with proper settings they should come off easily. I usually go with
Style: Snug
0.25mm top z distance
3mm pattern spacing
4 interface layers
75% xy distance
0.2mm interface layer spacing
0mm first layer expansion
and they come off easily but PETG may put up a bit more resistance than PLA.
Formerly known on this forum as @fuchsr -- https://foxrun3d.com/
RE:
@russg
Did a small test with snug support, added Raft layers.
Also made Perimeters a little thinner to get rid of Gap fill for the most part, you could tune it even more with Height Range modifier closer to the bottom.
There is some really tiny blemishes at bottom corners of the small supported "things"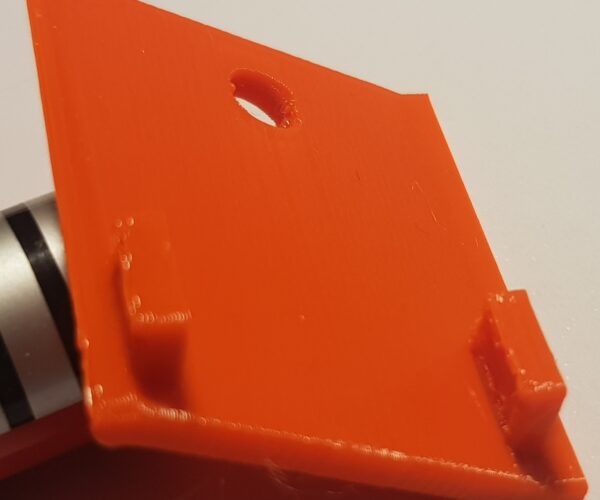
I know the picture is not that good 😔
edit: The part was standing up as in your last picture
Prusa i3 MK3S+ FW 3.11.0 (kit dec -20), PrusaSlicer 2.6.1+win64, Fusion 360, Windows 10
RE:
I'll get the popcorn out and watch this show. Seriously, this is not something I believe has a trivial answer. Are there any particular constraints or considerations you can add? Such as, are there sides that are less important than others so support pock marks don't matter that much? Or can the part be cut in two, in the middle, which would make it much easier?
Regardless of the answers, supports should not be hard to remove. They may leave pock marks but with proper settings they should come off easily. I usually go with
Style: Snug
0.25mm top z distance
3mm pattern spacing
4 interface layers
75% xy distance
0.2mm interface layer spacing
0mm first layer expansion
and they come off easily but PETG may put up a bit more resistance than PLA.
So, maybe I should add...the supports that have been a problem with this project...when the object is laying as flat as it will, because of its shape the supports built by the slicer cover almost the entire surface. That's why its a problem. I wouldn't mind a pock mark or two, or more, if the support material would just separate from the piece. I'm thinking the problem is that the support materiel covers nearly the entire surface of the piece and that there is so much of it it becomes part of the piece itself. I wouldn't mind some blemishes from support material if I could get it off.
This project requires a specific thickness to the piece because other pieces must mate with it where the holes are located and they rely on that thickness. When support material is stuck to the surface of the piece it alters the thickness. So, I would say that the two large surfaces need to be clean of support material within an inch of each hole. If the object is positioned on the bed so that one of the large flat surfaces faces the bed I don't see how it would be possible to keep that surface free of support material since it isn't in contact with the bed. This is why I thought to stand it on one of the thin edges, but wen I tried that it fell over.
I should add that I'm new to 3D printing.
I will look at the settings you suggested to see if I can implement them and give them a try. Do you know where I can find a good explanation of what they do?
Thanks.
RE: Object Orientation
@russg
Did a small test with snug support, added Raft layers.
Also made Perimeters a little thinner to get rid of Gap fill for the most part, you could tune it even more with Height Range modifier closer to the bottom.There is some really tiny blemishes at bottom corners of the small supported "things"
I know the picture is not that good 😔
edit: The part was standing up as in your last picture
Hey, thanks for doing all that! As a newbie I'm going to have to learn about all those things before I can utilize them. My course of study here is clear.
RE: Object Orientation
I'll get the popcorn out and watch this show. Seriously, this is not something I believe has a trivial answer. Are there any particular constraints or considerations you can add? Such as, are there sides that are less important than others so support pock marks don't matter that much? Or can the part be cut in two, in the middle, which would make it much easier?
Regardless of the answers, supports should not be hard to remove. They may leave pock marks but with proper settings they should come off easily. I usually go with
Style: Snug
0.25mm top z distance
3mm pattern spacing
4 interface layers
75% xy distance
0.2mm interface layer spacing
0mm first layer expansion
and they come off easily but PETG may put up a bit more resistance than PLA.
I forgot to mention that there really isn't a way to make this in two pieces.
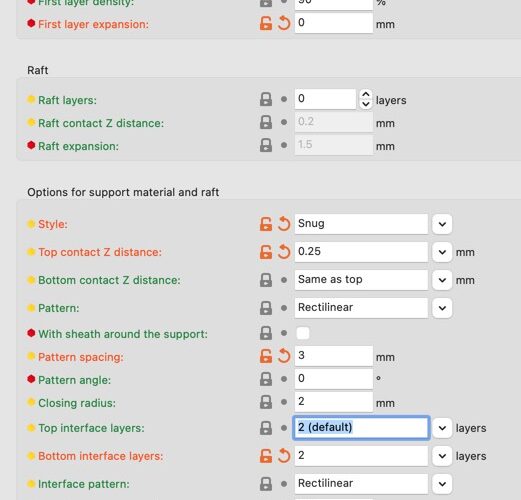
Are the settings in the screenshot as per your recommendation. There may have been more than one way to interpret what you'd written.
Thanks again.
RE: Object Orientation
Do you know where I can find a good explanation of what they do?
Check out this page of the Prusa knowledge base https://help.prusa3d.com/article/support-material_1698
Also check out the other pages, a boatload of information that Prusa offers on the gory details of Prusaslicer. Plus, you can click on most setting names in Prusaslicer, and it'll take you directly to the relevant web page.
And welcome to this community! I hope you'll enjoy your printer and this fulfilling hobby. You'll never run out of ideas for Christmas gifts!
Formerly known on this forum as @fuchsr -- https://foxrun3d.com/
RE: Object Orientation
Do you know where I can find a good explanation of what they do?
Check out this page of the Prusa knowledge base https://help.prusa3d.com/article/support-material_1698
Also check out the other pages, a boatload of information that Prusa offers on the gory details of Prusaslicer. Plus, you can click on most setting names in Prusaslicer, and it'll take you directly to the relevant web page.
And welcome to this community! I hope you'll enjoy your printer and this fulfilling hobby. You'll never run out of ideas for Christmas gifts!
Thanks for the suggestions.
Nothing happens when I click, control click, or double click on setting names in Prusa Slicer, however. Perhaps it's not clear to me exactly what you mean.
RE: Object Orientation
👍
Formerly known on this forum as @fuchsr -- https://foxrun3d.com/
RE: Object Orientation
Hope this screenshot helps!
I used your suggested support material settings and printed the part laying as flat as it would on the bed. The result is shown in the attached photo. I believe the surface we are looking at is about 2/3 support material, with the rearmost section not being support. I don't know where to begin trying to get the support material separated from the part.
I haven't yet looked into the techniques mentioned by @ringarn67 above, but apart from standing the part on one of its narrow edges I don't see how this is going to work and I'm not sure it will stand on a narrow edge. I tried that once and it fell over and made a mess. I'll look into @ringarn67's ideas to see what I can learn.
RE:
Sorry I was asleep 🙂 Looks like things have started well with lots of advice. Here is my take on printing this. Please download and load the project file to have a closer look. It was done in the 2.4.2 release rather than the 2.5rc.
This is using snug supports, paint on enforcers to define the areas for support. I upped your perimeter count to 5 as that gets rid of the rectilinear infill that would be shaking the printer about and should give a better print.
I turned off elephants foot completely (as the contact point is small at this orientation. Should be easy to post process the bottom corner. I added a brim for the same reason. Normally I print Snug supports with zero expansion but they are quite thin in this instance so I changed it to 2mm to give the supports their own brim in effect.
One other setting you could change would be supports , the' XY separation between an object and its support'. You could make it closer, like 50% as this is a sloped object now and that naturally puts it further away. Its one of those that you test moving it closer till it sticks too much though then back it off a bit further away. You can do that by just printing the lower section and seeing what works best for this model.
Haven't touched any of the filament settings in the project but personally I would change the 'Slow Down if layer print time is below' setting from its current 15 seconds to something like 5 seconds as that will make the very tip of this print better (helps with small pole like parts of prints).
RE: Object Orientation
With suggestions from those participating in this thread I was able to print the part by standing it up on one of its long edges and putting it on a raft of a few layers. I think I may also have used a brim. Anyway, it got done. There may have been a little bit of an issue separating the part from support but nothing problematic.
I have a lot to learn about using the slicer and all the various options.
Thanks everyone for your help!
RE: Object Orientation
Sorry I was asleep 🙂 Looks like things have started well with lots of advice. Here is my take on printing this. Please download and load the project file to have a closer look. It was done in the 2.4.2 release rather than the 2.5rc.
This is using snug supports, paint on enforcers to define the areas for support. I upped your perimeter count to 5 as that gets rid of the rectilinear infill that would be shaking the printer about and should give a better print.
I turned off elephants foot completely (as the contact point is small at this orientation. Should be easy to post process the bottom corner. I added a brim for the same reason. Normally I print Snug supports with zero expansion but they are quite thin in this instance so I changed it to 2mm to give the supports their own brim in effect.One other setting you could change would be supports , the' XY separation between an object and its support'. You could make it closer, like 50% as this is a sloped object now and that naturally puts it further away. Its one of those that you test moving it closer till it sticks too much though then back it off a bit further away. You can do that by just printing the lower section and seeing what works best for this model.
Haven't touched any of the filament settings in the project but personally I would change the 'Slow Down if layer print time is below' setting from its current 15 seconds to something like 5 seconds as that will make the very tip of this print better (helps with small pole like parts of prints).
Thanks a bunch for all you have done on my behalf! I will study the file you so kindly provided and set out to learn about all the settings you mentioned. There are a lot of lessons for me in that which you've written. Thanks again!
RE: Object Orientation
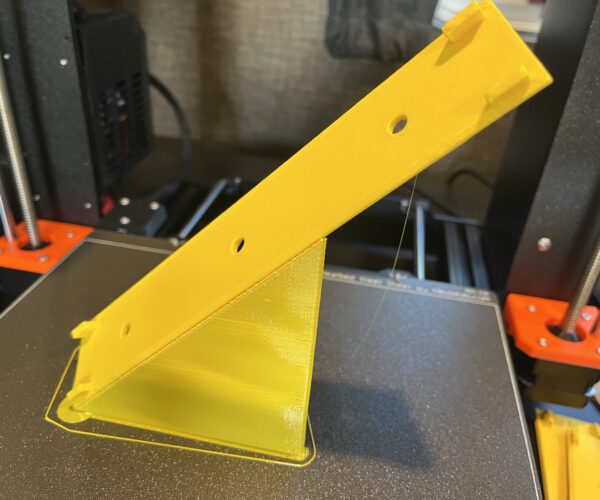
I printed the part as per your suggestions including the adjustments to "XY separation" and "slow down if..." It worked brilliantly well I'd have to say (see photo above). As a newcomer to all this it seems to me your idea was a stroke of genius 🙂 I'd never have expected it to print but rather just dribble filament onto the bed once the part rose above support level, even before. It was especially nice not having to separate support material from the four tabs on the part or to have to clean it our of the three holes.
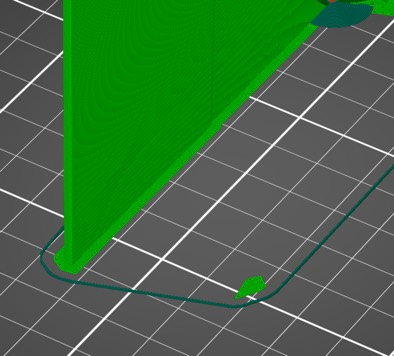
I'm very curious to learn what specific considerations you were thinking about when you decided on the print orientation and settings that you did. I would find it most educational, I'm certain. This includes why there was a tiny spot of support material in your 3mf file visible at the bottom right corner of this shot:
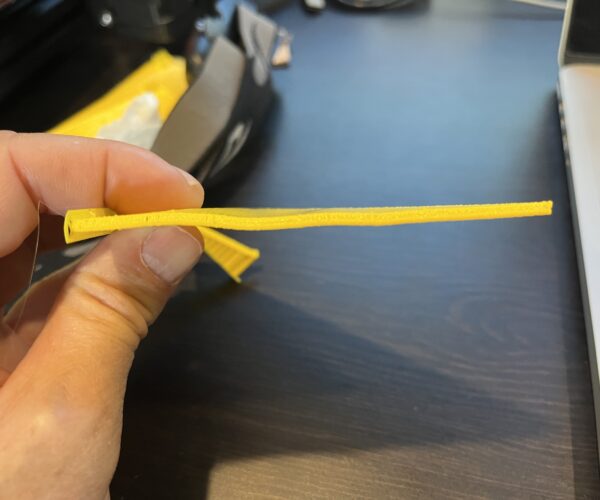
Beyond that, I did notice some warping of the support material (see photo below), especially, and wonder what might have caused this.
Thanks again!
RE:
In no particular order 🙂
Supports extrusion widths are generally a bit less than for a normal extrusion. So when the next layer goes on it can heat the one below again enough to cause warping. Normally you get a sort of lattice structure so there is enough cross linking that a bit of warping doesn't matter. Its expendable structure after all. You could always make support extrusion widths thicker in the settings. With the supports being such a thin area on this then its more noticeable. I have not (yet) had it cause me a problem though.
As for the orientation, well I've used similar before, had to on one part as it wouldn't fit on the bed otherwise, had to go bottom left corner to top right. On that one I had very little support at the bottom, didn't go up anywhere near as much as the example I did with yours.
The issue I had though wasn't that the supports, it was the model cross section itself was so thin that it started flexing as the extruder did each layer so I got slightly worse surface finish smoothness the further it went up. Lesson learned, and why I extended the support further up on the example. This one -
The more rigid the part the less you need to extend the support upwards. For thicker parts printed at an angle then often no supports are required at all. With a properly dialled in Live Z and a clean plate the PLA to smooth sheet adhesion is amazing. Even small contact areas can support tall structures without adhesion problems. You HAVE to have things clean and adjusted though.
or this one
The example I did fairly quickly and I tried several variations of the painted on supports. I re-examined the project and found a tiny spot of the enforcer above that area that isn't actually big enough to produce a viable support upwards but the base expansion is still active for it giving the little section on the bed. My bad.
It is all a learning experience and object orientation can be one of the most important lessons as it makes such a difference to prints. It all helps when you start designing parts though as you start thinking about how will this part be orientated when printing, can it be printed easily/at all. The 'best' designers of 3d models do this.
RE: Object Orientation
In no particular order 🙂
Supports extrusion widths are generally a bit less than for a normal extrusion. So when the next layer goes on it can heat the one below again enough to cause warping. Normally you get a sort of lattice structure so there is enough cross linking that a bit of warping doesn't matter. Its expendable structure after all. You could always make support extrusion widths thicker in the settings. With the supports being such a thin area on this then its more noticeable. I have not (yet) had it cause me a problem though.
As for the orientation, well I've used similar before, had to on one part as it wouldn't fit on the bed otherwise, had to go bottom left corner to top right. On that one I had very little support at the bottom, didn't go up anywhere near as much as the example I did with yours.
The issue I had though wasn't that the supports, it was the model cross section itself was so thin that it started flexing as the extruder did each layer so I got slightly worse surface finish smoothness the further it went up. Lesson learned, and why I extended the support further up on the example. This one -
The more rigid the part the less you need to extend the support upwards. For thicker parts printed at an angle then often no supports are required at all. With a properly dialled in Live Z and a clean plate the PLA to smooth sheet adhesion is amazing. Even small contact areas can support tall structures without adhesion problems. You HAVE to have things clean and adjusted though.
or this one
The example I did fairly quickly and I tried several variations of the painted on supports. I re-examined the project and found a tiny spot of the enforcer above that area that isn't actually big enough to produce a viable support upwards but the base expansion is still active for it giving the little section on the bed. My bad.
It is all a learning experience and object orientation can be one of the most important lessons as it makes such a difference to prints. It all helps when you start designing parts though as you start thinking about how will this part be orientated when printing, can it be printed easily/at all. The 'best' designers of 3d models do this.
Thanks so very much for all the information and your efforts on my and the community's behalf!
🙏
