need advice for optimizing prints
Hello,
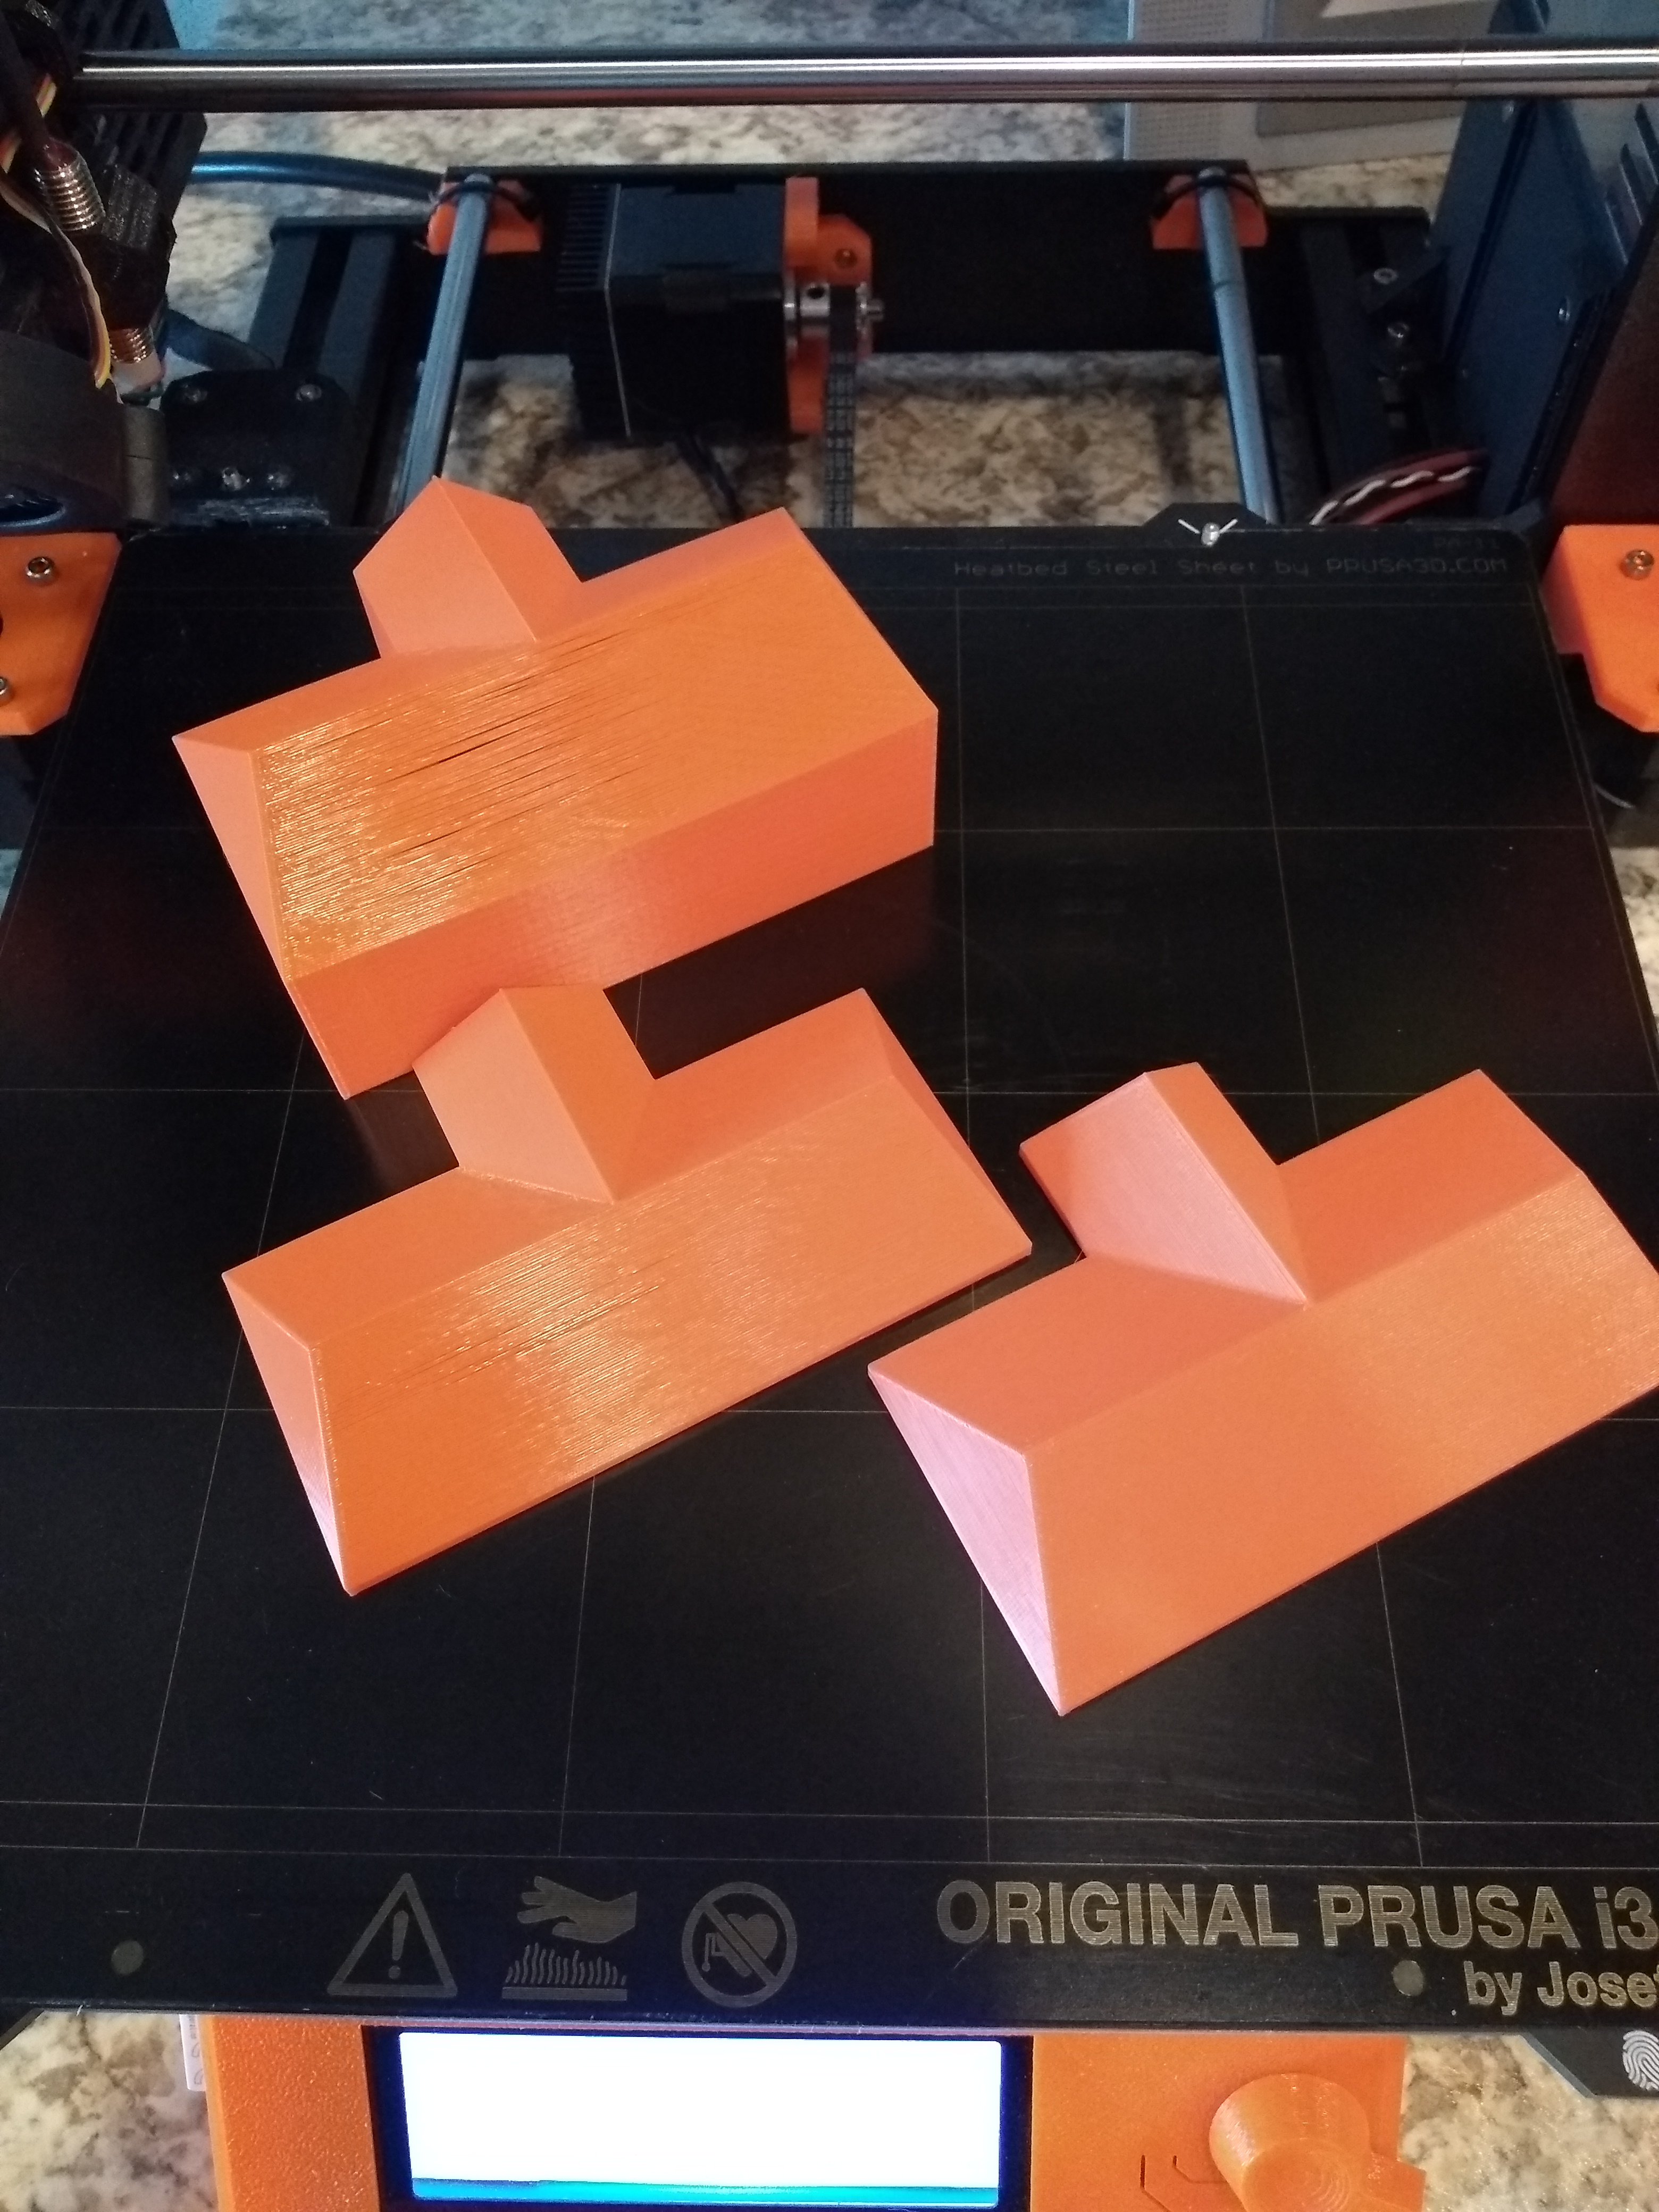
I'm currently printing simplified models of buildings (1/100 scale) for a scientific demonstrator. Hereafter is a picture of some of them to illustrate :
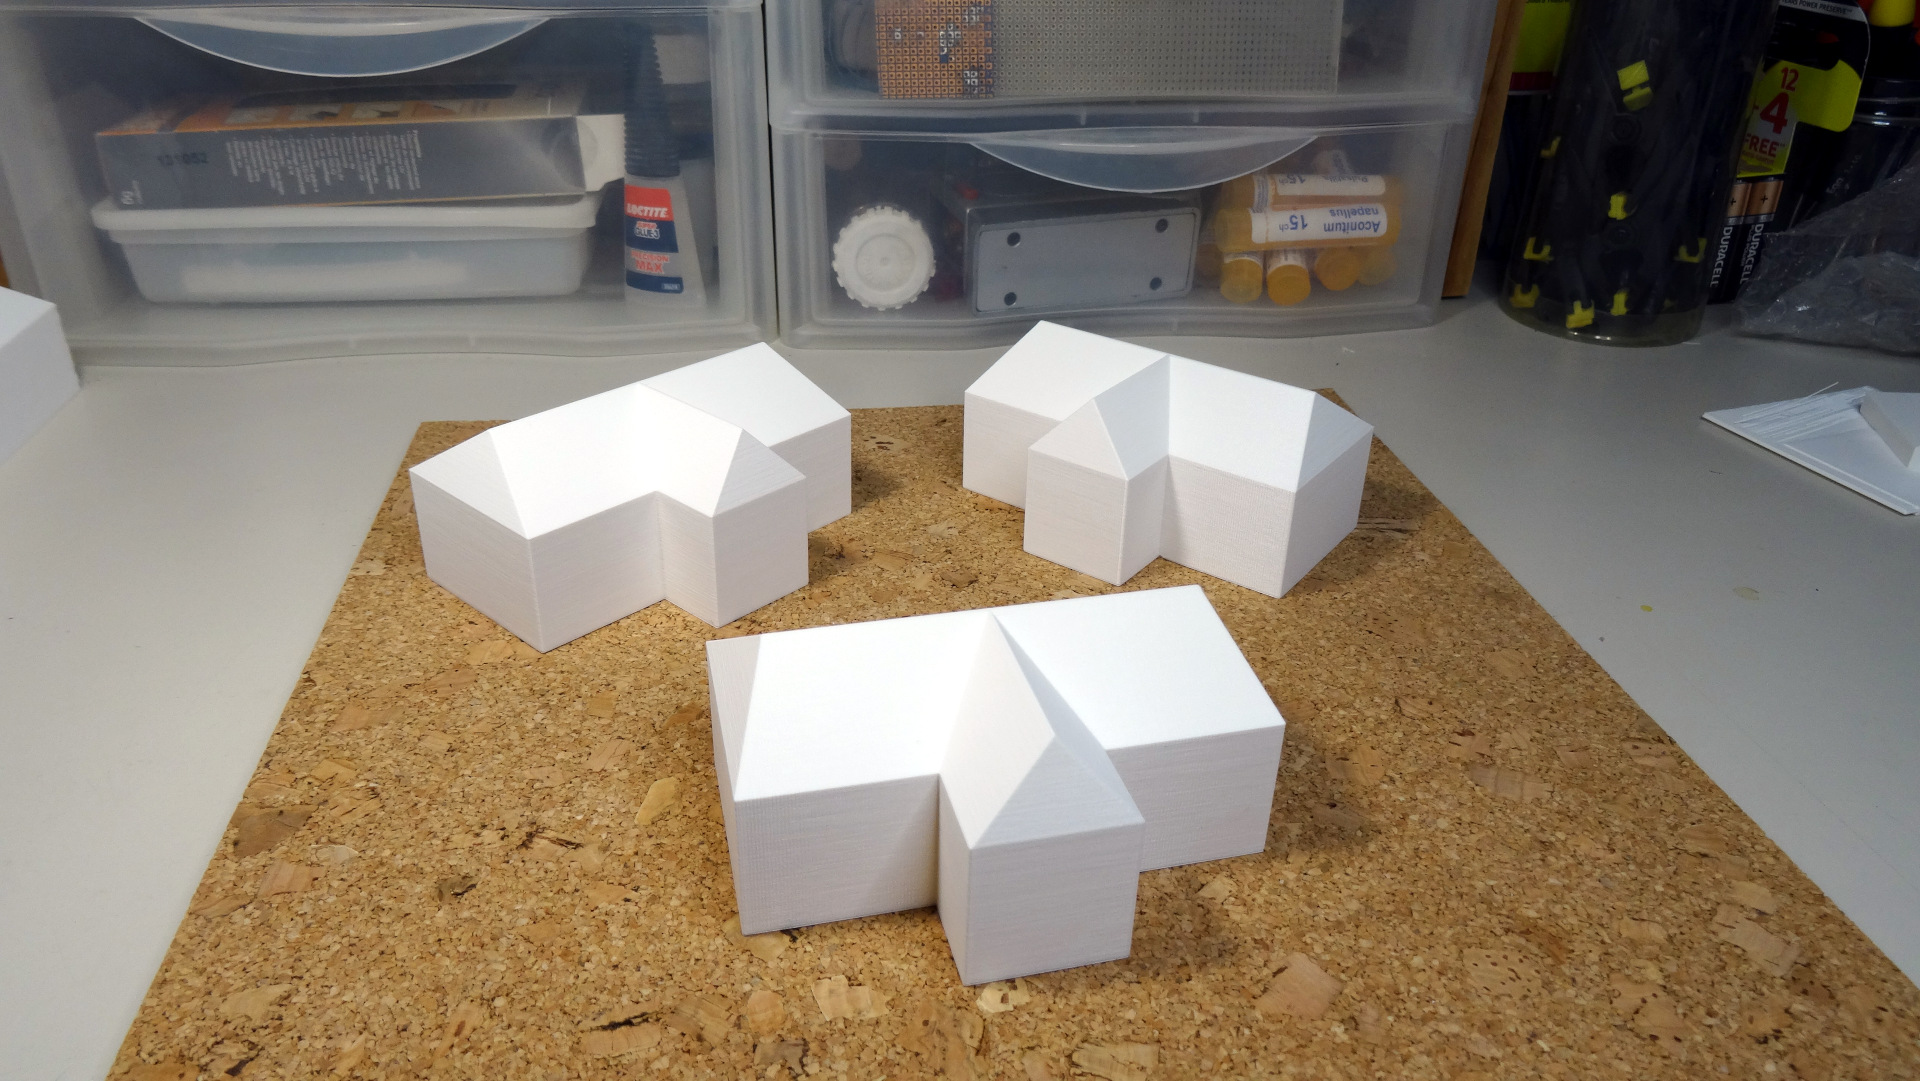
Everything is going well until now. More than 10 buildings of various shapes have already been printed with a steady amazing quality (PLA with 0.15mm layers). This MK3S rocks and it works so well that we have just ordered a second one to raise the productivity 🙂 I enjoyed so much the kit assembly of the first one that I've kept this option for its sister, despite the time it requires (maybe because of the gummy bears too :D)
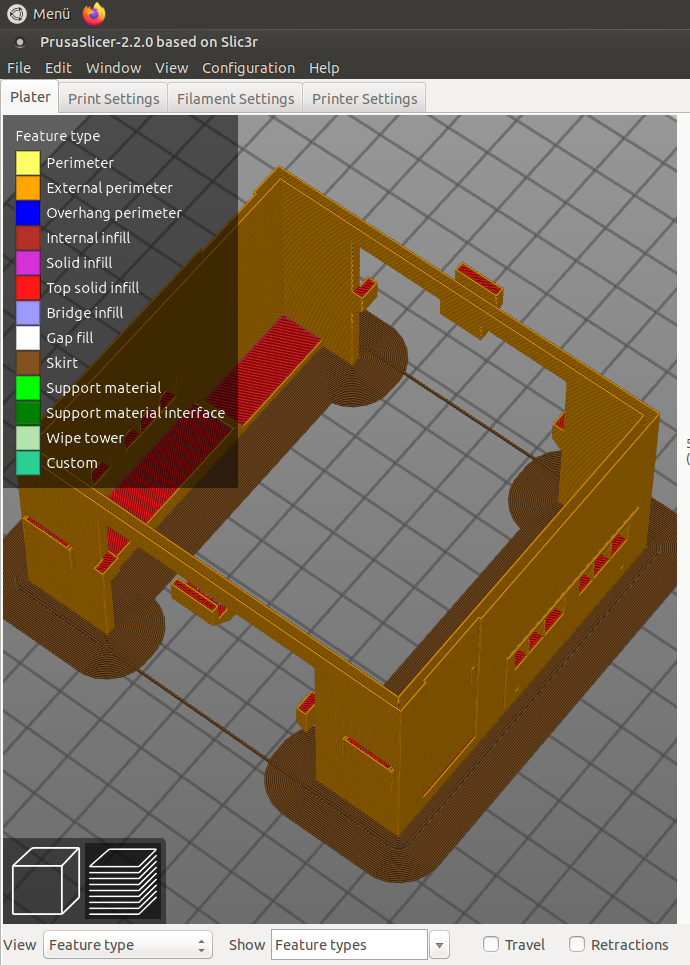
In order to save some time and filament, I've used modifiers to reduce the infill (default gyroïd) to the minimum (5%) in the body of the buildings, letting it back to 15% in the roof part because of the very slanted slopes. I've noticed during the preliminary experiments that using a 5% infill there creates small defects on the most horizontal parts.
My question is: is there a method to have a 0 infill for the body? The problem is that at a moment, it will be needed to start the roof infill and thus some kind of support is required at this point. Using supports would not solve the problem, since it is more or less the same as the low infill with respect to the printing time and filament consumption.
The model dimensions range from 5cm to more than 20cm, and having bridges on such long distances is not possible, even if the bridge quality of the underneath side is not a problem since completely invisible (will be inside the "box"). Maybe creating some inside structural walls as in a real bulding would help handle these bridges. Using supports with a wide spacing could play this role.
Anyway, would it save something at the end of the day? I suspect that a fully hollow model requires thicker walls. Adding to this the cost of the inner walls for supporting the bridges could result in an overall time and filament consumption more or less equivalent to the current technique with the minimal infill rate, at the risk of defects on the roof part (which is printed near the end of the job obviously).
I could experiment of course, but the models for which it could have an impact are the big ones, which print duration is 15 hours or more, and are by the way most of the time one of their kind.
Thanks in advance for any remark or suggestion.
Best regards.
MK3S, OpenSCAD, Blender, SolveSpace, Linux, electronics, robotics, software
RE: need advice for optimizing prints
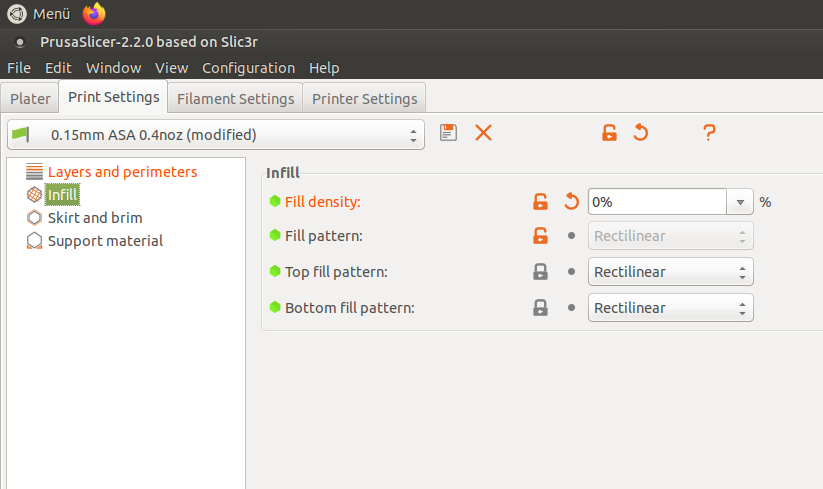
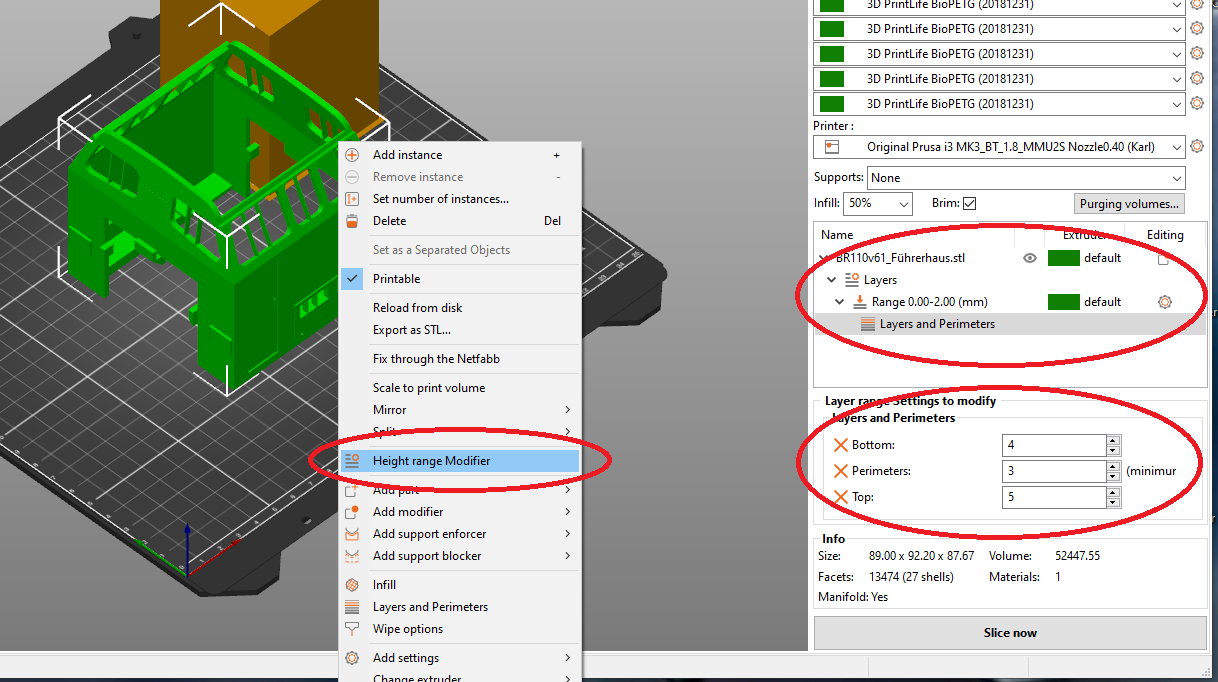
Try these settings. Only the inner and outer walls and possibly bottom and top surfaces will be printed.
An alternative would be the vase mode. But there you have to experiment a bit.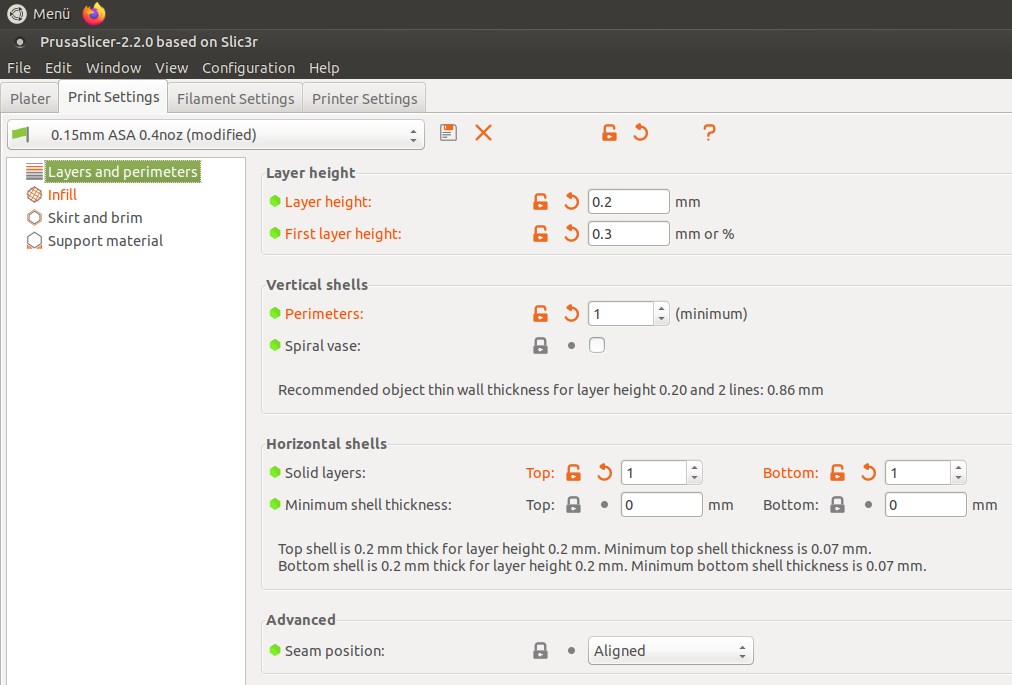
Statt zu klagen, dass wir nicht alles haben, was wir wollen, sollten wir lieber dankbar sein, dass wir nicht alles bekommen, was wir verdienen.
RE: need advice for optimizing prints
Is fine detail required? Using a 0.15mm layer height may not gain you much over a much higher layer height that will print in a fraction of the time. For models like that, I'd use a 0.6 or 0.8mm nozzle and 0.4mm layer heights or higher unless finish was important.
RE: need advice for optimizing prints
Thanks for your fast reply.
@karl Does your model have a roof too? My concern is that the empty part of the building body must support the roof, and from the experiment I've done, it requires a 15% infill to avoid surface defects on very slanted slopes. So when the top of the walls is reached, or near to this point, something must be done for being able to provide some support. Knowing the dimensions of the models, the bridges are quite wide, hence my question.
@bobstro I've done some tests with variable layers (0.20 for the walls and 0.15 for the roofs), but the surface of the walls is not as clean. The finish is important because the global model (2m by 3m) is all white (included the terrain) to be used as a projection screen for a multi-beamers system (UHD and laser) displaying animations illustrating simulation results, flooding scenarios,... produced by various research projects. This will be used in a permanent public exhibition under construction and aimed at scientific knowledge dissemination for non-scientific people. If you are curious about it, you can find some information here. Unfortunately, the texts are in French only for the moment, but Google Translate can help.
The 3D printed buildings are post-processed afterward by spraying a primer coating to remove the optical reflections and provide a crisp display of the projected images. This process has been validated by the company providing the projection system. The funny thing is that they have eliminated an alternative printing option (stereo-lithography) proposed by a company we had contacted for evaluation because their finish gave less crisp displays. No need to say that their option was by the way far more expensive, even when amortizing the cost of the Prusa printer used. So it was good news for us 😉
Best regards
MK3S, OpenSCAD, Blender, SolveSpace, Linux, electronics, robotics, software
RE: need advice for optimizing prints
Are the models solid shells, basically solid volume ? If so you could ‘shell’ them so that they have an internal void with say 5-8mm thick walls.
A shell like that would print no problem without support and the interior would be hollow so less time and less filament.
RE: need advice for optimizing prints
[...] @bobstro I've done some tests with variable layers (0.20 for the walls and 0.15 for the roofs), but the surface of the walls is not as clean. The finish is important
A few thoughts:
- If you design the buildings with an open bottom, you can both control the thickness of the wall and greatly reduce the amount of filament required. You could use thinner walls partway up, but angle the walls inwards at 45 degrees as you approach the roof line to speed up prints but still give good support to the roof without requiring excessive support in the entire body.
- Are the roof angles fixed? If you can use close to a 45 degree angle, they may print without support.
- If you want smooth walls, you will get smoother finish if you print the walls & roof separately and assemble after printing. The ironing feature in PrusaSlicer 2.3alpha should be particularly helpful.
- If separate parts aren't feasible, can you print the roof as a separate assembly? This would allow a hollow body but well supported roof.
- Enabling Print Settings->Layers and perimeters->Quality->Ensure vertical shell thickness and Extra perimeters if needed will help with the quality of the sloping roof without having to design in fixes.
- If using a layer height < 40% of the nozzle size (i.e. 0.16mm with a 0.4mm nozzle), you should be able to use Print Settings->Infill->Reducing printing time->Combine infill every to only print one infill line for 2 perimeters. With a 0.4mm nozzle printing 0.15mm layer heights, settings this to 2 will print a single 0.32mm high support line. The total should be at or below 80% of your nozzle size for good adhesion.
- Using Print Settings->Infill->Reducing printing time->Only infill where needed can reduce overall infill requirements in some cases.
- Using the same layer height, a 0.8mm nozzle cuts print times nearly in half. Combine this with Combine infill and you can reduce times a bit more.
[...] The 3D printed buildings are post-processed afterward by spraying a primer coating to remove the optical reflections and provide a crisp display of the projected images. This process has been validated by the company providing the projection system.
I'm surprised it works well with 0.15mm layer heights but not larger. You might try tweaking your extrusion multiplier to get more even vertical surfaces.
This is an interesting project. As you print larger things, improving print times, and reducing filament usage is increasingly important. Is there any chance you could zip one of the STL files and upload it here as an attachment? I'm playing around with an oversized Monopoly game piece, but the geometry is different.
RE: need advice for optimizing prints
@eric-g-pascual
Yes, the roof is separate and can be easily attached. But you probably want to print everything in one piece.
You could add modifiers and change the parameters from a certain layer height on:
Statt zu klagen, dass wir nicht alles haben, was wir wollen, sollten wir lieber dankbar sein, dass wir nicht alles bekommen, was wir verdienen.
RE: need advice for optimizing prints
@neophyl
Yes, they are solid.
I've no problem with hollowing the body of the buildings. I've tried an approach similar to the one you suggest, by adding a modifier shaped like the body, but scaled down a bit and set with a 0 infill. It works fine as far as the hollowing is concerned.
My problem is the transition from the hollow part to the roof part. The roof must be filled enough for the faces not to have defects, and the preliminary experiments have shown that a 15% giroïd was a good configuration. At some point, it is thus needed to start the infill, but you are in the air in the middle of the building, and the bridge can be as long as 15cm or more on some of the models.
MK3S, OpenSCAD, Blender, SolveSpace, Linux, electronics, robotics, software
RE: need advice for optimizing prints
[...] My problem is the transition from the hollow part to the roof part.
Don't use a square shape for the hollow part. In fact, a scaled-down version of the model might work well. Use a 45-degree angle for the transition from hollow to filled.
RE: need advice for optimizing prints
@eric-g-pascual
I wasn’t suggesting using a modifier as they are rather limited. I was suggesting doing the modification in proper design software which could ‘shell’ the surface properly and give an even wall thickness. If the wall thickness is set sufficiently you would need no support on any of it and it would print much quicker. When I refer to wall I don’t just mean the actual building walls but the roof as well.
As Bob requests if you can post on of your stl files we can have a play and I can modify one as an example of what I mean.
RE: need advice for optimizing prints
Many thanks to all of us for the time you spend answering. This is very valuable for me as I'm a beginner in 3D printing (I was more a CNC milling guy until I met the Prusa because 3D printed objects I had in hands before didn't convince me 😉
Printing the bodies and the roofs separately and gluing them has been one of the first options I've tried. Some of the models I've provided for testing the projection quality were done this way. The problem is that the seam can be noticeable, even after having applied the primer. It is even more visible if the direction of the projection is close to the vertical because of the tiny shadow created by the seams. Fixing this requires manually applying filler in the gaps, then sanding, then applying the primer, in addition to the assembly itself. This obviously takes a lot of additional time. I've concluded that the buildings should be printed in one piece to optimize the required manpower. This should be an acceptable tradeoff even if printing time is longer. After all, the printer works alone and it does not cost anything but electricity and filament, which are far cheaper than people's hours ;).
With respect to the roof angle, they cannot be changed very much, since even if the whole model is not supposed to reproduce an existing place, we are mimicking the local architecture for several reasons. And here in the south of France, roof pans are not very steep, unfortunately 😉
I've played a bit with combining infills but have not had enough time to push the option to the end. This is one of the solutions I plan to explore more deeply.
MK3S, OpenSCAD, Blender, SolveSpace, Linux, electronics, robotics, software
RE: need advice for optimizing prints
@eric-g-pascual
I wasn’t suggesting using a modifier as they are rather limited. I was suggesting doing the modification in proper design software which could ‘shell’ the surface properly and give an even wall thickness. If the wall thickness is set sufficiently you would need no support on any of it and it would print much quicker. When I refer to wall I don’t just mean the actual building walls but the roof as well.
As Bob requests if you can post on of your stl files we can have a play and I can modify one as an example of what I mean.
It was the way I have proceeded before understanding what the modifiers are and how they work 😉 I have built a couple of buildings in two parts this way. However, there are nearly 100 buildings, divided into more or less 30 different models, and the overall 3D model has been done by somebody else, using Sketchup. This gave me some headache by the way since if the models were OK from this visual point of view, it was sometimes another story in terms of 3D printing. So it would take quite an enormous amount of work, and I forgot to say that I'm doing this job as a volunteer (as president and co-founder of a robotics amateur association) in parallel to a full-time job without any connection to this project.
As requested I've attached an archive with a couple of STLs. Most of them are the original ones that have been provided to me and they need to be upscaled by 10. The one not requiring this is one of the models I had to re-create because it was unusable for 3D printing, as mentioned earlier.
These models have required between 4 and 5 hours of printing time each. I'm amazed at how precise are the estimations of time and filament consumption computed by the slicer. They have been respected in a margin of 1 minute or 1 gram, and always less than estimated.
Thanks a lot again for spending time on this case 😉
Best regards.
MK3S, OpenSCAD, Blender, SolveSpace, Linux, electronics, robotics, software
RE: need advice for optimizing prints
What is the overhang angle, or pitch, of the roofs you are having problems with?
RE: need advice for optimizing prints
@tim-m30
More or less 70° from the vertical. I have not measured them precisely, and the models have been made by somebody else.
MK3S, OpenSCAD, Blender, SolveSpace, Linux, electronics, robotics, software
RE: need advice for optimizing prints
Ok, here you go. Attached should be a zip with the 3 shelled buildings. I also include a basic 3mf project you can load in with standard profiles for 0.15 layer print. All 3 will print in just over 7 hours. I have made the walls pretty thin as I don't know what thickness you need but its extremely easy to alter that. Once the solidify modifier is set up its just a case of changing the number to make the walls thicker.
I did the work in Blender as that's my software of choice as its free and once you get used to it very capable. With simple stuff like these its a doddle really, although I should point out that the fixed model 02 was not really, and had non manifold edges that messed up the solidify modifier.
Basically it only takes a few minutes to do each building. If they are suitable I'd be happy to run you through the process as its very straightforward. I also scaled up the other 2 to x10 size as mentioned (02 was already scaled).
RE: need advice for optimizing prints
@neophyl
Waow !!! I'm really impressed by how quickly you managed it.
I'm a Blender user too, but very far from an expert. I did a lot of scripting for generating illustrations of robotics competition rules, but I must confess that each time I put my hands on it, it's like it was the first time. Unless you use it on a regular basis it's not so easy to remember where the things are and how to use them. Add this to the fact that even if it is less dramatic than it used to be in ancient ones (the ones with the alien style UI), each new version makes obsolete a good share of tutorials found on the net.
If they are suitable I'd be happy to run you through the process as its very straightforward
The models you gave me are very suitable of course. The only addition they would require is a bottom face so that they can be easily attached to the terrain with simple double side adhesive tape. For making them more robust during the manipulation, a thicker would be preferable too, but as you told me it is parametrized this should not be a problem.
If it would not take you too much time, I would of course be more than happy if you could teach me how to proceed so that I'll be able to rework the models yet to be printed.
I suppose that you've already used such printing configuration, but are your confident that large roof pans with such overhangs will print OK without anything under them?
Many thanks again for your support. It's amazing to see how much sharing is available in this community.
MK3S, OpenSCAD, Blender, SolveSpace, Linux, electronics, robotics, software
RE: need advice for optimizing prints
@eric-g-pascual
Yes the roofs as done will print, if you turn on detect bridging option the preview will display anything it considers an overhang in blue. Either of my prusa or cr10 would have no trouble printing those angles. I find that the slicer is conservative and it will print more than you think.
The trick with the models in blender is to actually break them 🙂
The following assumes you are running Blender 2.8x or above.
What I did was to import the model.
Scale it up to x10 and then apply the scale changes (this step is very important)
Select it and change to Edit mode (tab changes between object and edit modes)
Select all geometry (usually A or cntrl+A)
Press delete and on the choices that pop up select 'limited dissolve'. This will simplify the geometry down to make it easier.
The next step is to change to face select mode (keyboard number 3 , the number above the letters is the shortcut for face select)
Now select the bottom face on the model and press delete again. This time select Faces only. This will remove the bottom of the model.
Exit Edit mode back to object mode (press Tab).
Add a Solidify modifier to the object. In the modifier settings there are various options, including the desired thickness. I also selected Even Thickness.
Model is now done. All you need to do is make sure only it is selected and choose file>export>stl. On the file export screen give it a suitable name and location and make sure you have 'Selected Only' ticked (its not by default) and Apply modifiers ticked (usually is enabled by default).
That will export the stl file.
I usually then import them into slicer, slice and check the slice for any issues. If there are you can fix them in Blender, re-export using the same name and then in slicer just right click the model and choose Reload from disk. That will load in the updated model which you can slice again.
You can use blenders 3dprint tool to check for issues and to automatically fix a lot of them. You have to enable it as its not installed by default.
Once you get used to it, it becomes a pretty quick work flow. If you want it thicker you just update the thickness variable in the solidfy modifier. Then just export it again. As long as you DO NOT apply the modifier it can be edited. As it gets applied to the exported version it means you never really have to apply it in this case. Its whats termed Non Destructive modelling in Blender speak.
I'm not a Blender expert either, if I was you could probably script the process but that's way beyond me 🙂 I've just been using the basics for awhile and know the stuff related more to hard surface modelling, ie mesh editing for 3d print. I know nothing of the rendering or animation side of things.
Give it a go and if you have any questions just ask. Its nearly midnight for me though so any answer will probably be tomorrow.
Phil
RE: need advice for optimizing prints
Thanks Phil for all these details.
In the meantime, I've discovered the existence of the solidify modifier in Blender (because you've mentioned its name) and played a bit with it. I never paid attention to it before, not really understanding what it was supposed to do.
Blender has evolved a lot and is now something hybrid between the graphics and animation tool it was first, to a model editor for 3D printing too now. I've hard to figure usage scenarios for modifiers such as this one in the graphics and animation context. I hope they are not bloating Blender too much while trying to make it used in rather different areas.
Its nearly midnight for me though so any answer will probably be tomorrow.
Same here. Time to go to bed now 😉
Best regards
MK3S, OpenSCAD, Blender, SolveSpace, Linux, electronics, robotics, software
RE: need advice for optimizing prints
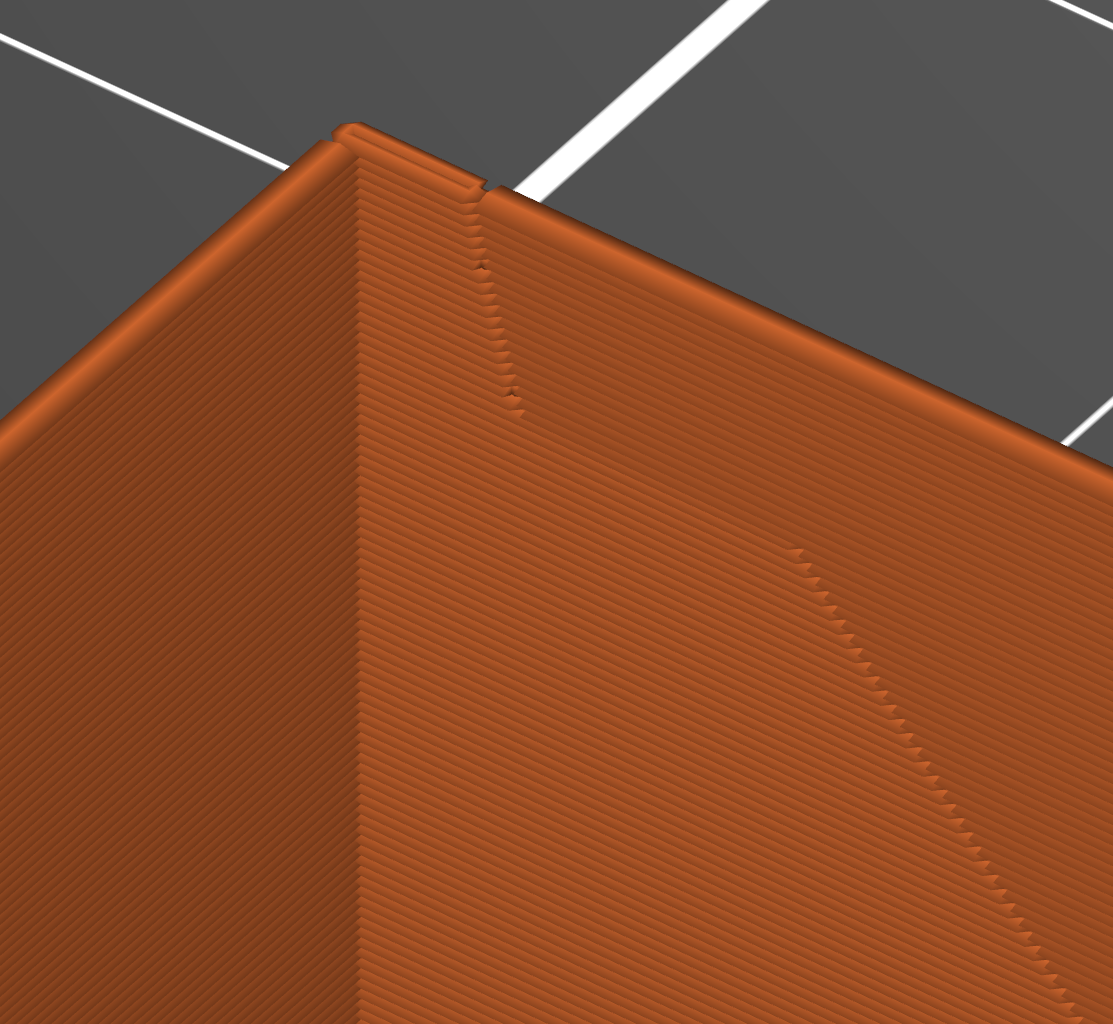
I also played with this; printing at 0.20 the roofs were not cooperating, so I tried using sparse infill, and found it creates a nice roof, and prints at 0.2 without too much trouble. You might be able to get away with less infill than the 5% shown here. Prints the three buildings in 6.5 hours.
Here's the 3mf and photos of befores and afters.

ps: the models all sliced without modification; I only had to scale the two "unfixed" building inside Slicer.
RE: need advice for optimizing prints
Also, those uploaded files from Blender have some undesirable artifacts when I slice them. Voids, single and double perimeters, etc. Weird things.