MK3 Broken?
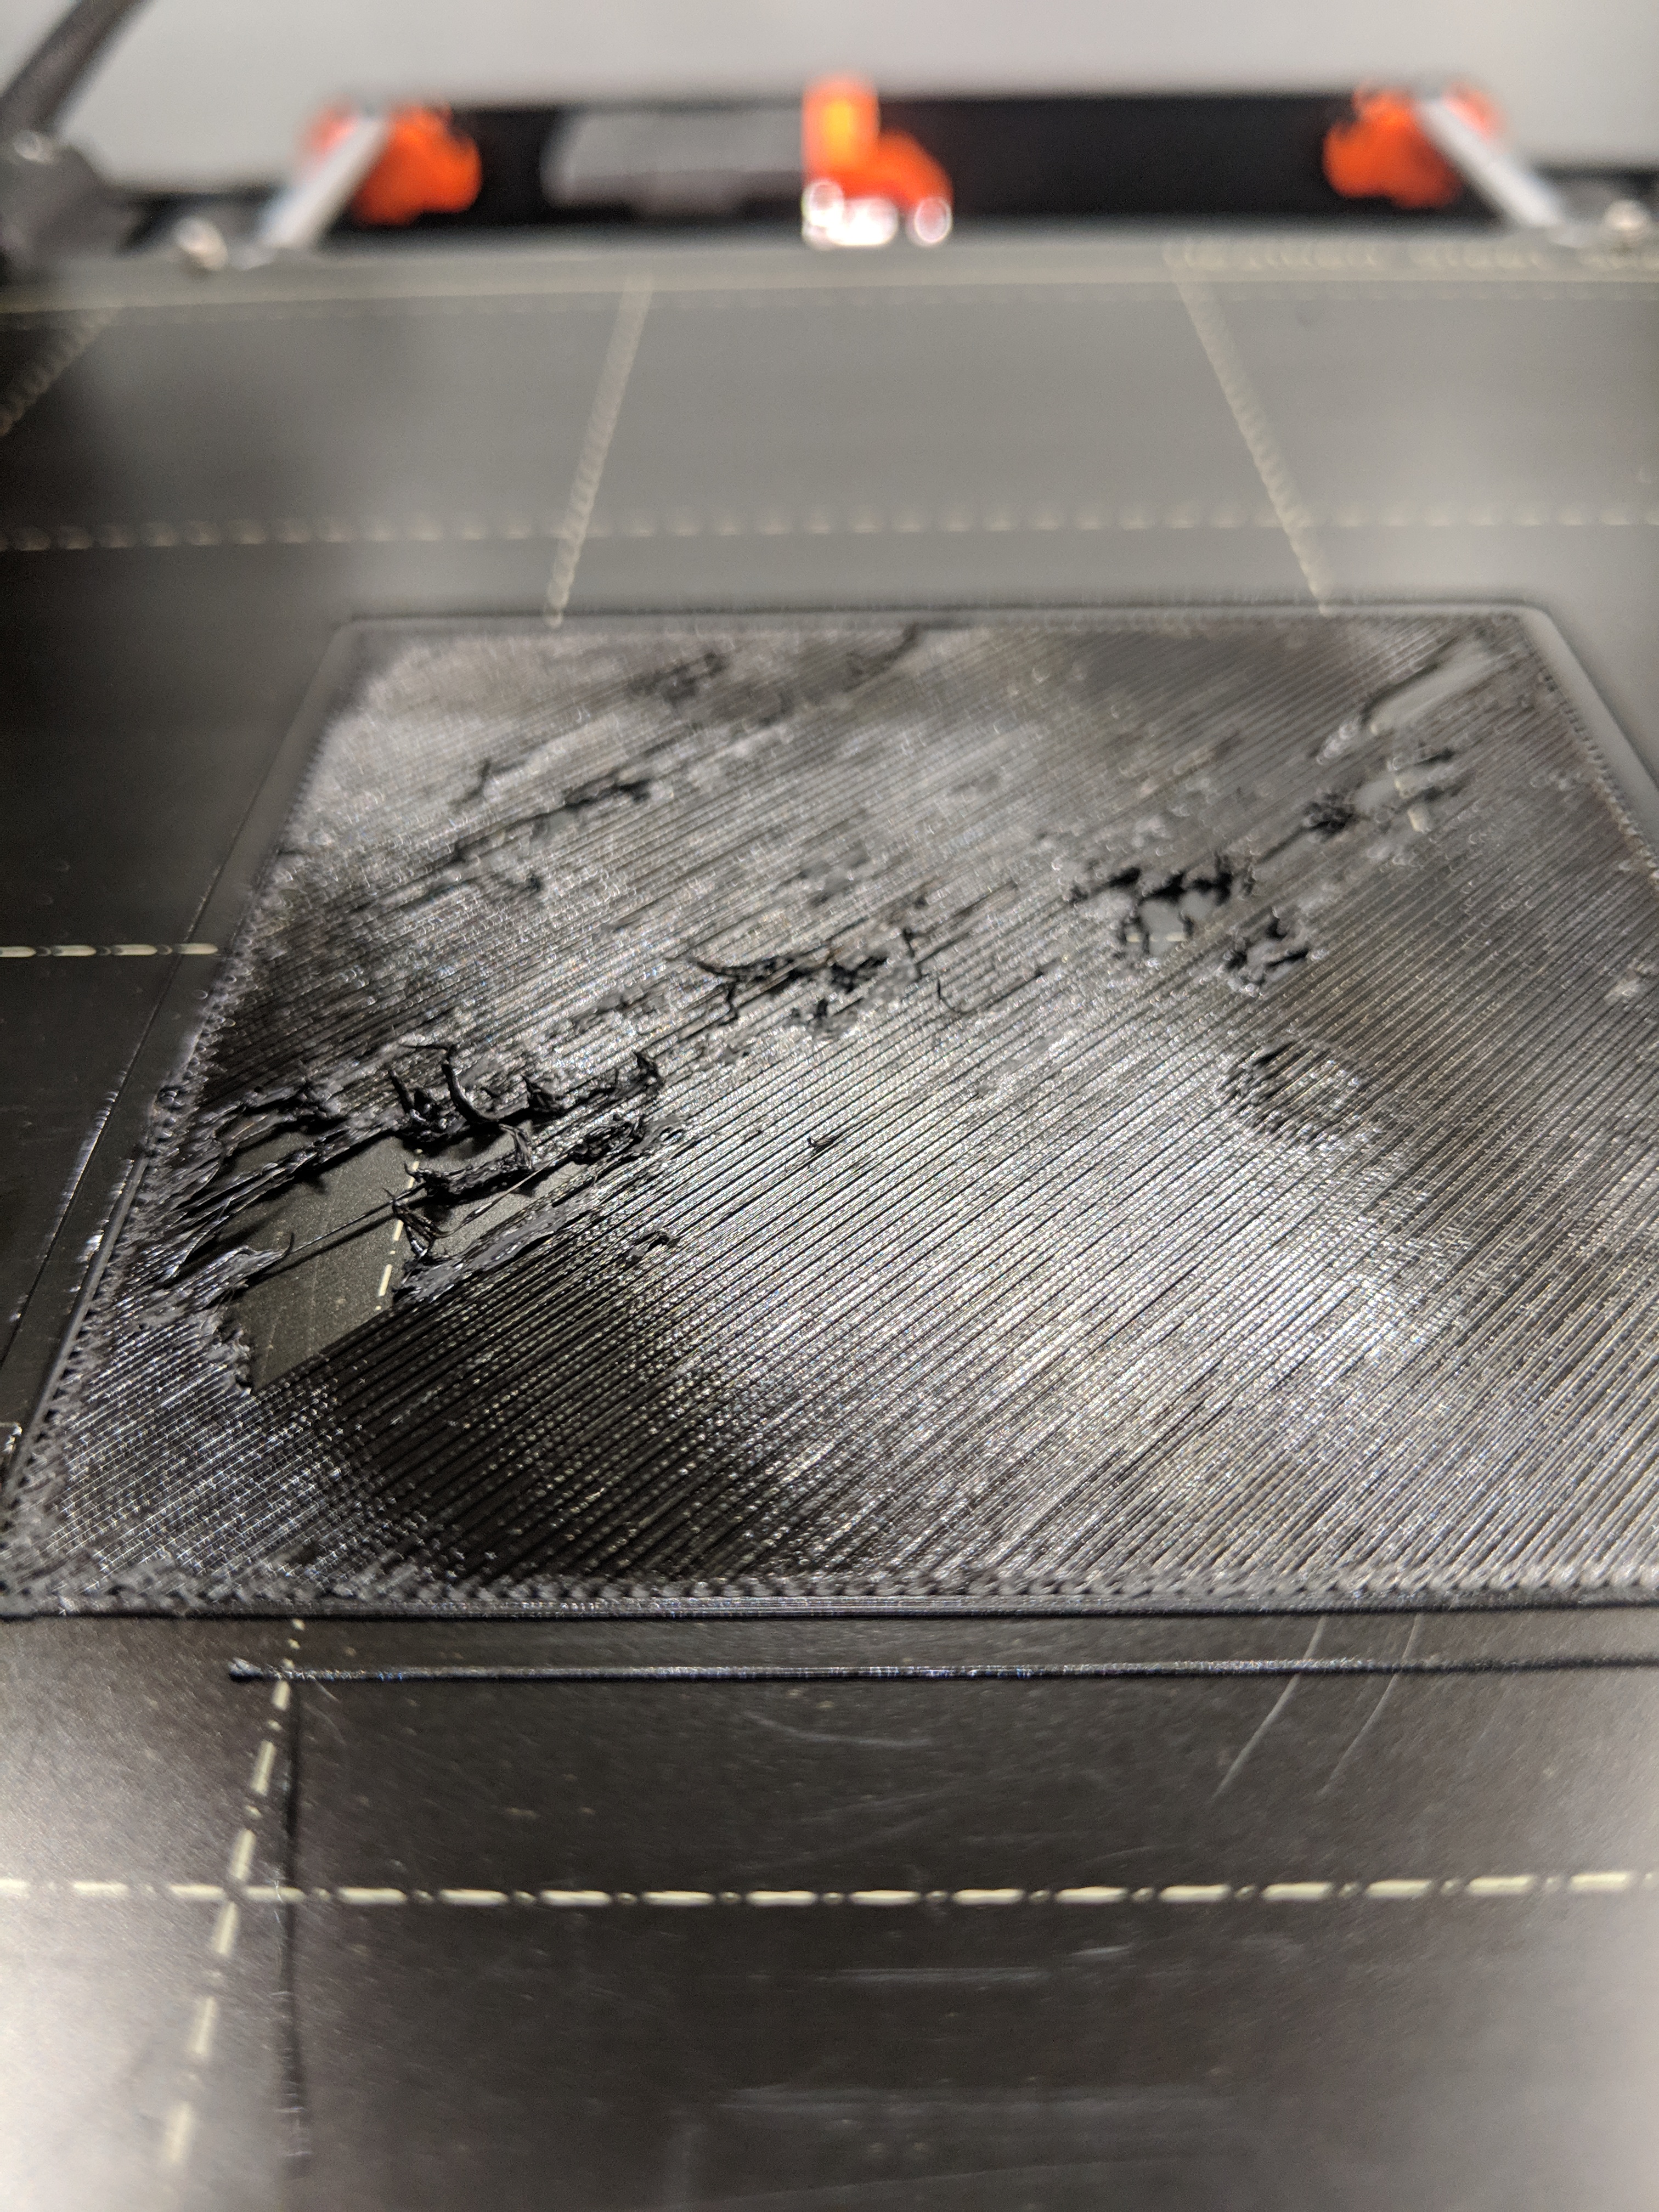
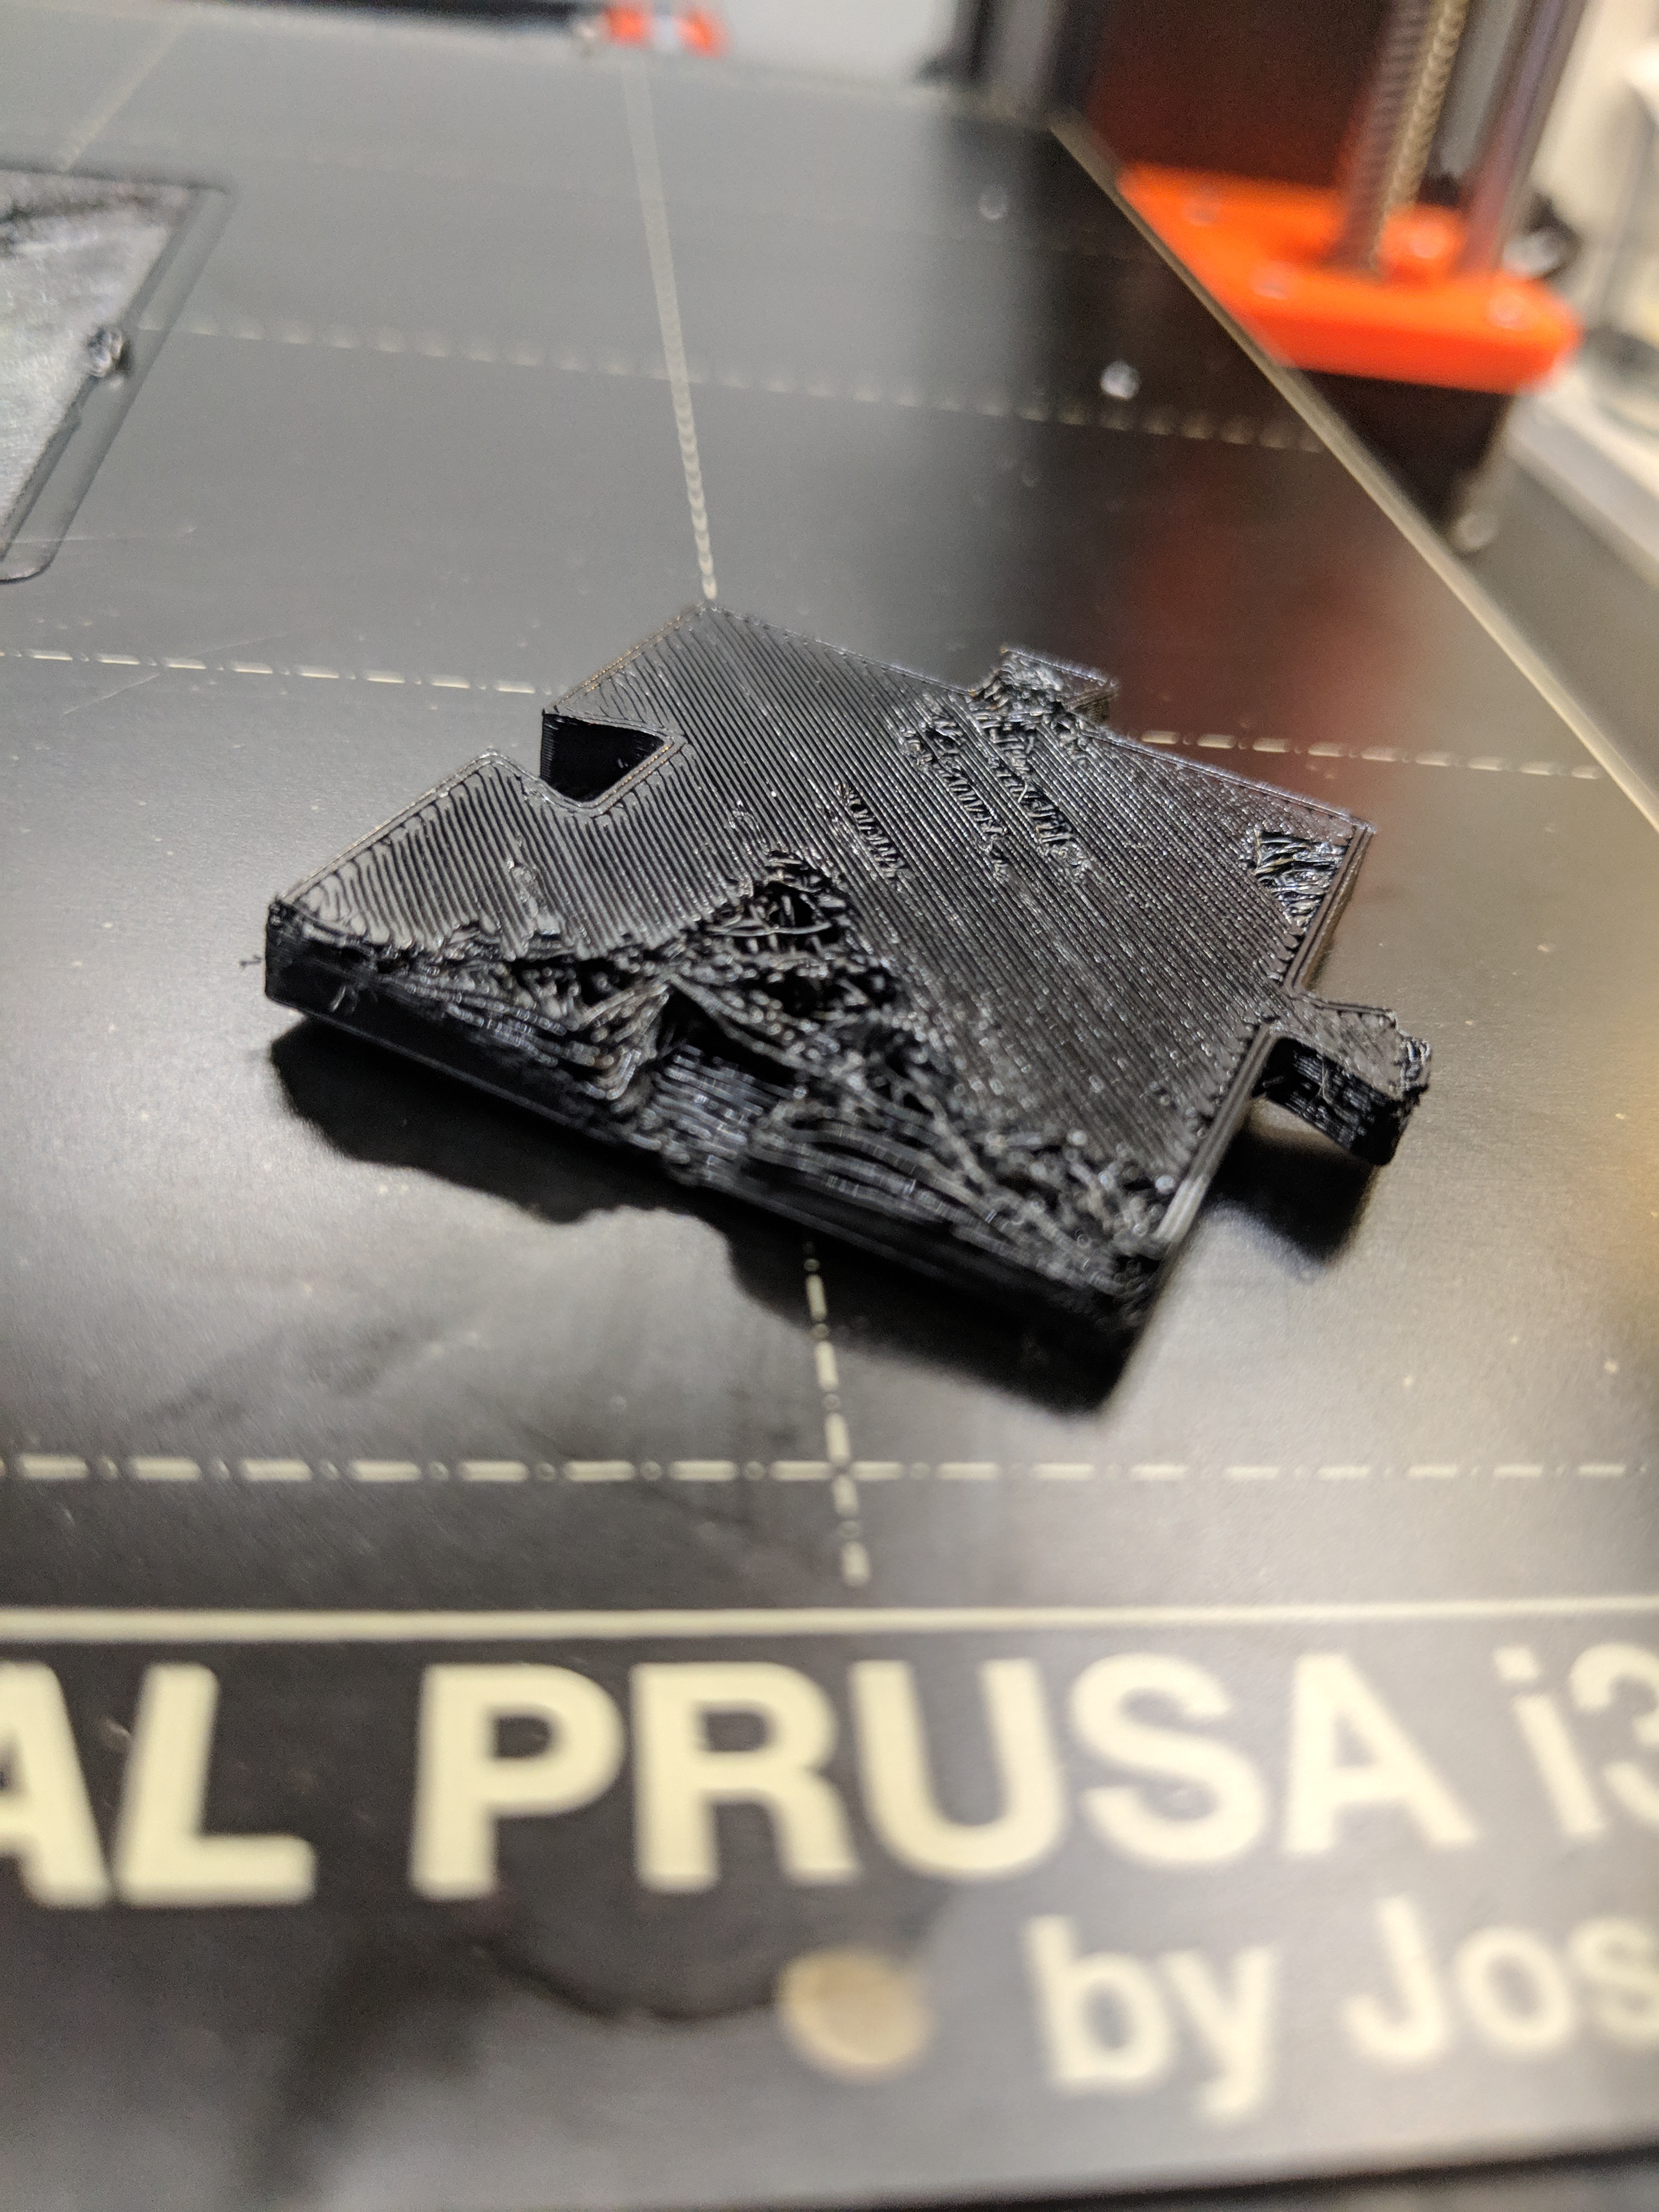
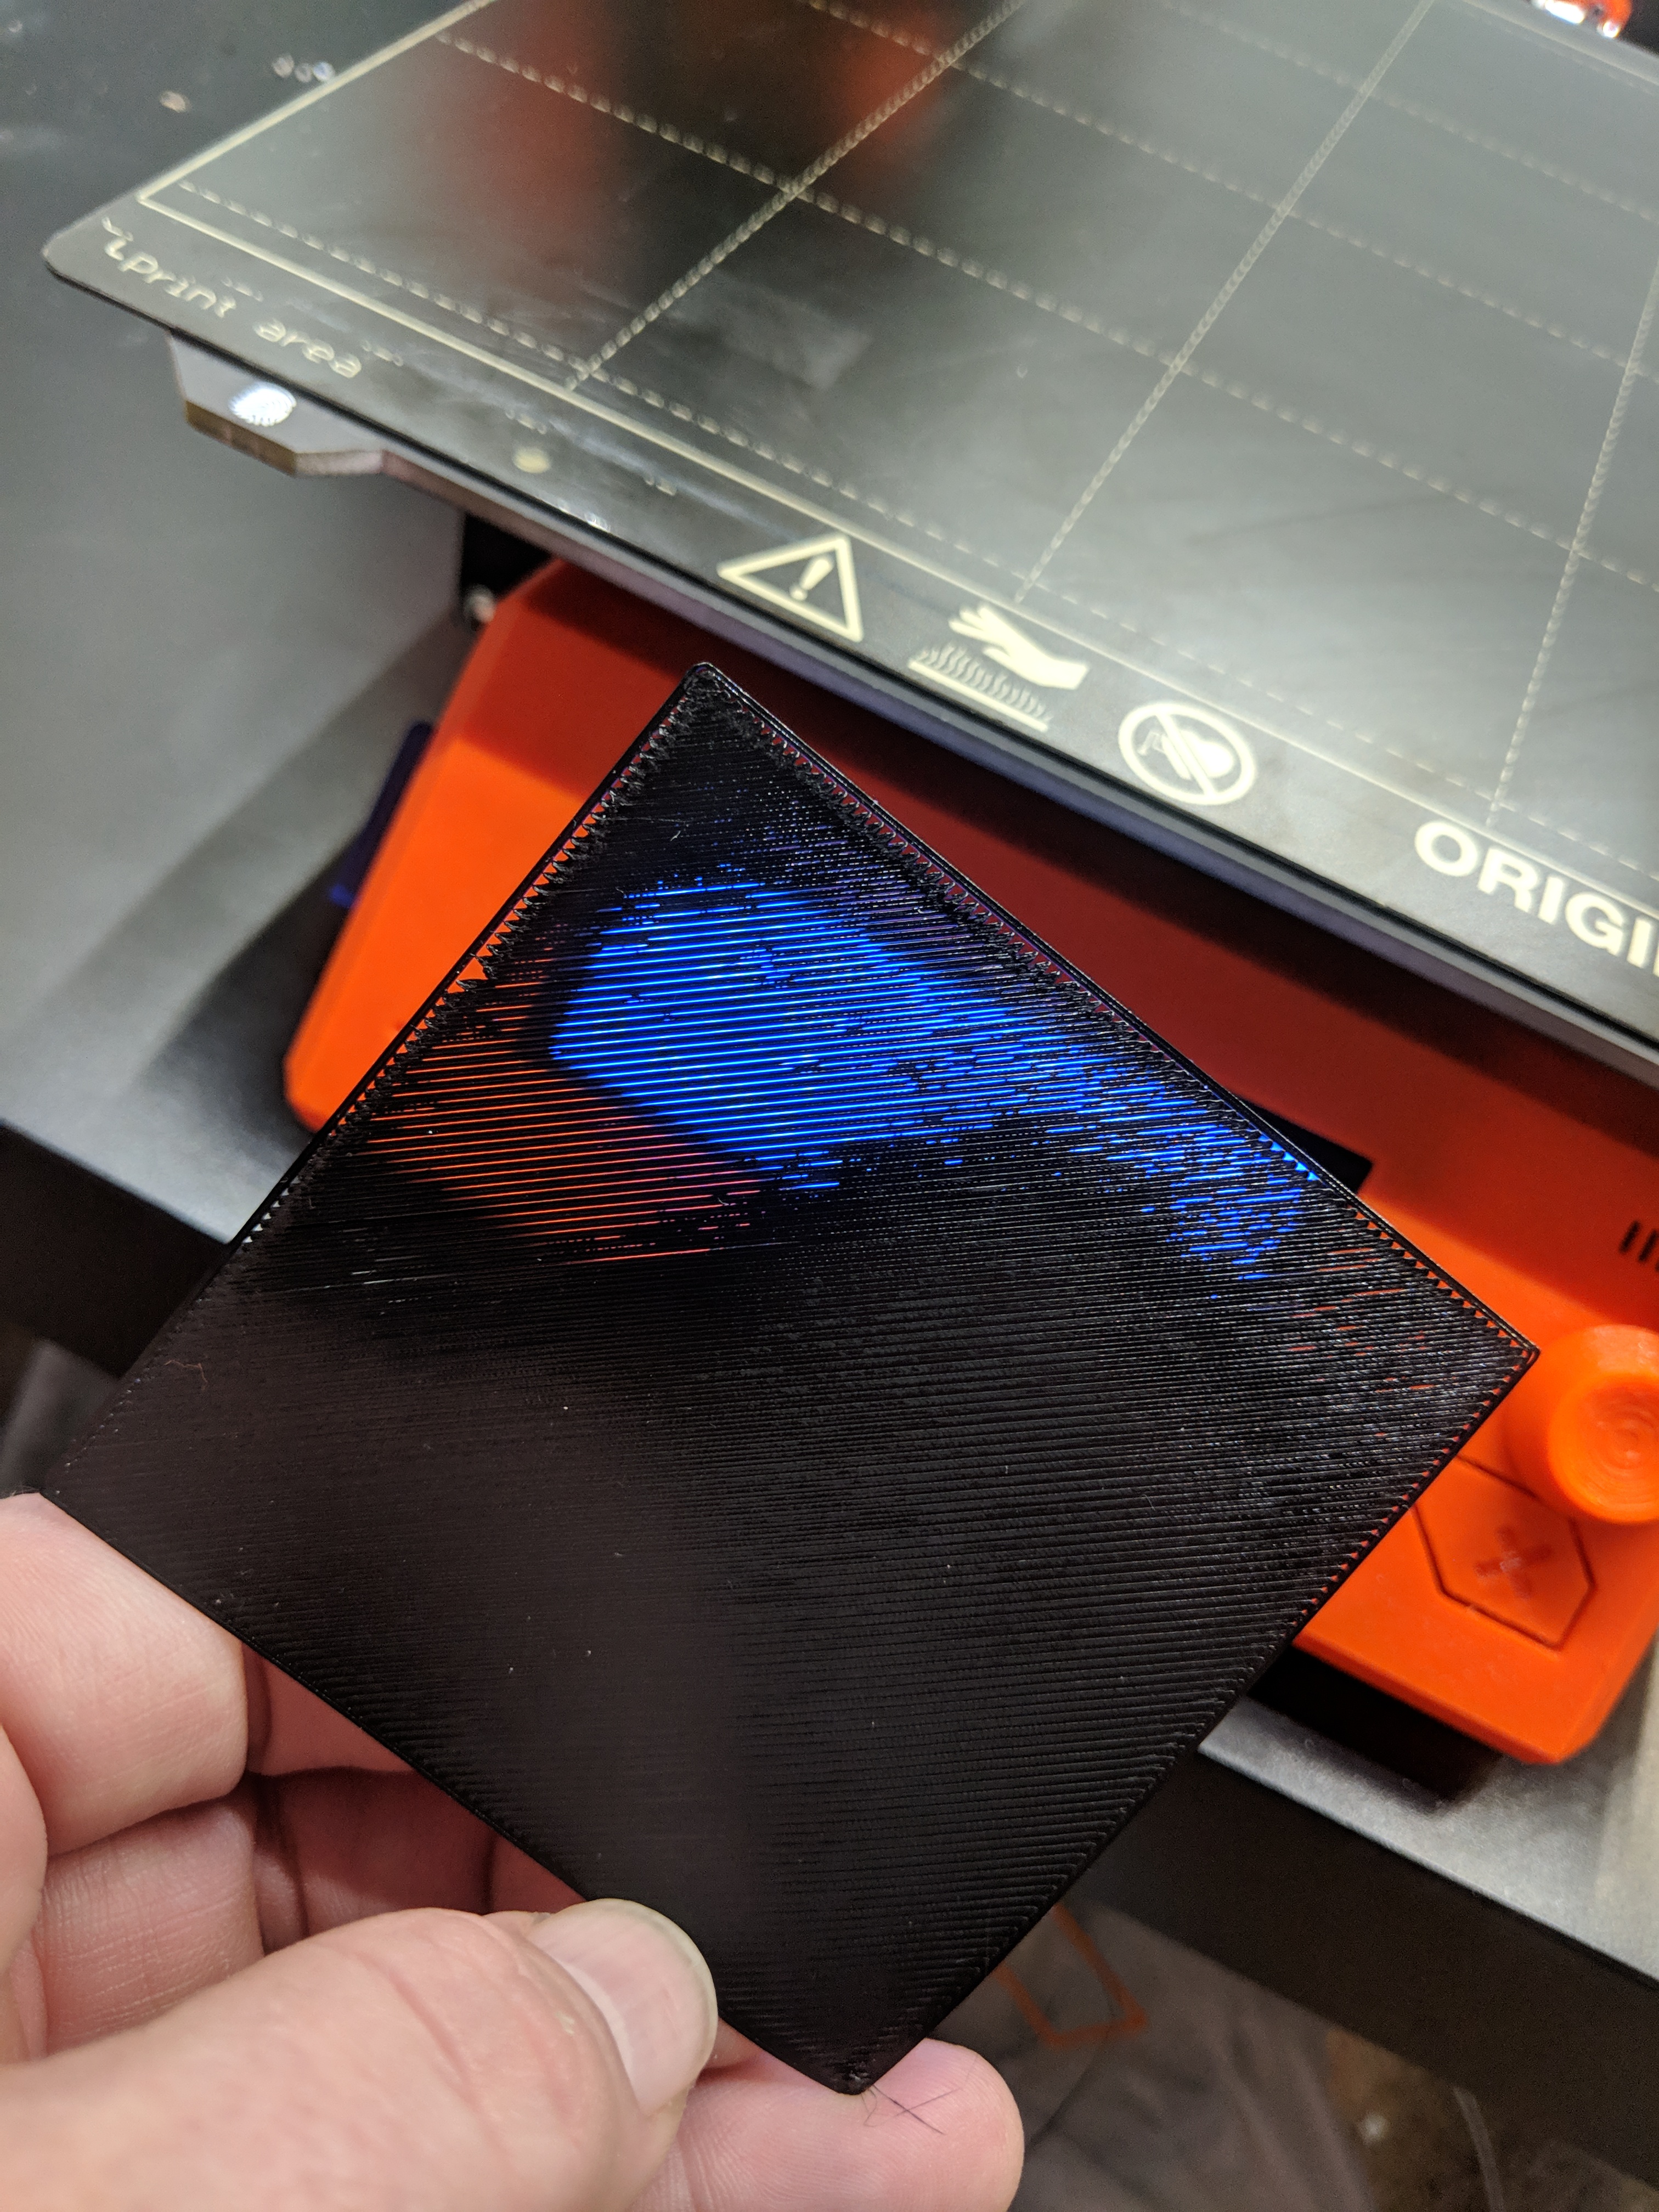
I've been with my mk2s for a couple years. We've learned to get long real well and that old printer is a clock steady ticking. The wife got me the mk3 as a gift and we are fighting (I mean the printer and me. Wife's cool.). I can't get consistency at all with any material. Just when I think I have it all worked out it fouls up again. S3D seems to produce more consistent results but I like being able to use whatever slicer I want... To save time I'm going to attach two pics of a recent prusa petg print sliced using slic3r 1.42 alpha (note these problems show up to one degree or another with any slicer). One is a single layer 75mm square I sliced for a test. The other is a simple test piece I pulled from my fusion 360 library, turned over so you can see how jacked up it is. Back story with these: I had printed a few things just prior to these that looked fantastic. This part in the pic was printed about where the more decent side of the test square is. Perhaps someone could offer a suggestion as to how to make this new machine behave? Note that I've been dealing with print issues a while. This isn't a dirty bed and is probably not a live z thing. I'm growing concerned there may be a deeper issue with this printer and I'm curious about thoughts. That said, if you think this is dirt or live z, tell me why. I'm also dealing with being frustrated and might be overlooking something.
Re: MK3 Broken?
Take a step back and try printing one of the prepared files off the SD card that came with your Mk3.
Success or failure there will tell you where to start looking.
Re: MK3 Broken?
C:
You indicate it is not live Z or surface adhesion and that you have been printing a while so my suggestion is based upon that. I have experienced what you are showing on my MK3 occasionally, not that bad though... Have the same items printed successfully on your MK2, with same GCODE and filament?
Is the PETG older? Could it be moisture of the PETG? I have some open PETG that started doing that and switched to a brand new roll for a test and it cleared up. I have high humidity and if i do not dry it well enough, that can happen.
Also, have you ruled out the extruder tension screws and or Flow issues? The 75X75MM test square is good for testing that and sometimes reducing the FLOW to 92 - 90% from the stock 95% clears that up.
Have you considered an ambient temp change (eg. much cooler in room than previous print temps). I notice my live z is wonky if the ambient temp changes drastically, like say 70s one print day and 50s the next.
Just offering things to consider which are variables that can be accounted for easily first.
Strange women, laying in ponds, distributing swords, is hardly a basis for a system of governance!
Re: MK3 Broken?
Take a step back and try printing one of the prepared files off the SD card that came with your Mk3.
Success or failure there will tell you where to start looking.
Dang. I typed a response and now it seems gone.
I swapped in pla and started a logo print. It looks great after lowering z just a click. I'm gonna do a couple more tests off the sd card and if those come out good, I'll say the physical part is good. Right?
I was worried about the printer because it shipped upside down. Weird, but true.
I also suspect the USB connection with octoprint (1.3.10) being suspect. strange pauses at random times causing blisters in the print, etc. That didn't happen in my pictured tests, (might have on the object, but not the cause of all of that). But I have a sneaking suspicion there's something not happy due to the USB connection, so I've disconnected it. I have no data to back this up, just a feeling.
Thanks for your help.
Re: MK3 Broken?
C:
You indicate it is not live Z or surface adhesion and that you have been printing a while so my suggestion is based upon that. I have experienced what you are showing on my MK3 occasionally, not that bad though... Have the same items printed successfully on your MK2, with same GCODE and filament?
Is the PETG older? Could it be moisture of the PETG? I have some open PETG that started doing that and switched to a brand new roll for a test and it cleared up. I have high humidity and if i do not dry it well enough, that can happen.
Also, have you ruled out the extruder tension screws and or Flow issues? The 75X75MM test square is good for testing that and sometimes reducing the FLOW to 92 - 90% from the stock 95% clears that up.
Have you considered an ambient temp change (eg. much cooler in room than previous print temps). I notice my live z is wonky if the ambient temp changes drastically, like say 70s one print day and 50s the next.
Just offering things to consider which are variables that can be accounted for easily first.
Thanks for the input... I've been scratching my head over all these things, frankly.
I've been working with new filament, so I think that part is fine. I have the same four or five rolls moving between the two printers in an endless cycle of crazy testing.
The MK2 never has a problem. In the past, maybe, but not in several months. Since they are sitting side by side, I'm going to call the weather a non-issue too... perhaps naive?
The tension screws are on the mk2 and not the mk3, right? Educate me because I didn't build either of them. I did have to adjust the tension screws on the mk2 early on due to feed issues. Of course my neanderthal brain thought because it wasn't feeding regular, it needed to be adjusted tighter. That was our last big fight. When I loosened them up considerably, it just never had the issue again. 😀
So flow rate might be the same thing for me? I tried increasing it. Maybe I'll drop it back some and see if that affects it.
First things first though. I'm going to print a couple more pre-sliced pla models as a test with no other changes.
Re: MK3 Broken?
No, both printers have tension screws on the left side of the extruder, opposite of the door on the right side of the extruder with the window where you can see the filament going through the bondtech gears.
https://help.prusa3d.com/article/3EMxwPQU0B-bondtech-extruder-gears
The first picture in the above link shows the two screws on the right side of the extruder under the window, the heads of the screws are on the left side of the extruder. 50 seconds into this video shows adjustment.
well, if you are printing ok now, it must have been something not mechanical with the printer but something else.
Those pictures sure look like the live z is too low, that is what happens when the nozzle is too low to the sheet and the filament is too squished so it goes out to the sides which cause those bumps which stack up each layer. You are not using the same live z adjustment for both printers correct? each printer is an individual and has its own settings, you can switch filament between the two and use the same GCODE on each, but each printer has to be calibrated by itself, just like if you have different plates, eg Powder coated vs PEI need different z values...
I would do like you suggest and print the same gcode file on each printer with the same filament to see if they come out OK.
Strange women, laying in ponds, distributing swords, is hardly a basis for a system of governance!
Re: MK3 Broken?
No, both printers have tension screws on the left side of the extruder, opposite of the door on the right side of the extruder with the window where you can see the filament going through the bondtech gears.
https://help.prusa3d.com/article/3EMxwPQU0B-bondtech-extruder-gears
The first picture in the above link shows the two screws on the right side of the extruder under the window, the heads of the screws are on the left side of the extruder. 50 seconds into this video shows adjustment.
well, if you are printing ok now, it must have been something not mechanical with the printer but something else.
Those pictures sure look like the live z is too low, that is what happens when the nozzle is too low to the sheet and the filament is too squished so it goes out to the sides which cause those bumps which stack up each layer. You are not using the same live z adjustment for both printers correct? each printer is an individual and has its own settings, you can switch filament between the two and use the same GCODE on each, but each printer has to be calibrated by itself, just like if you have different plates, eg Powder coated vs PEI need different z values...
I would do like you suggest and print the same gcode file on each printer with the same filament to see if they come out OK.
Cool. I just haven't gotten to the point of looking at the tension screws on the mk3. Thanks for the links and info.
No, both printers are calibrated separately. I pretty much only print in petg for whatever reason, so I never adjust the mk2 except after replacing pei sheets or something like that... then only very small bumps to keep it consistent. I only referenced the mk2 in this conversation to let you know it prints well at the same time the mk3 prints like crap to help rule out environmental issues. Both printers sit side by side in a pair of lack enclosures.
So there are a couple things here.
The prints I pictured originally were done after a lot of testing and calibration, starting with the pla that shipped with the printer. The factory test print wasn't good, actually. Anyway, I got the printer running pla fine before I switched to petg. When I did that I knew I had to raise live z somewhat to make petg happy, which I did.
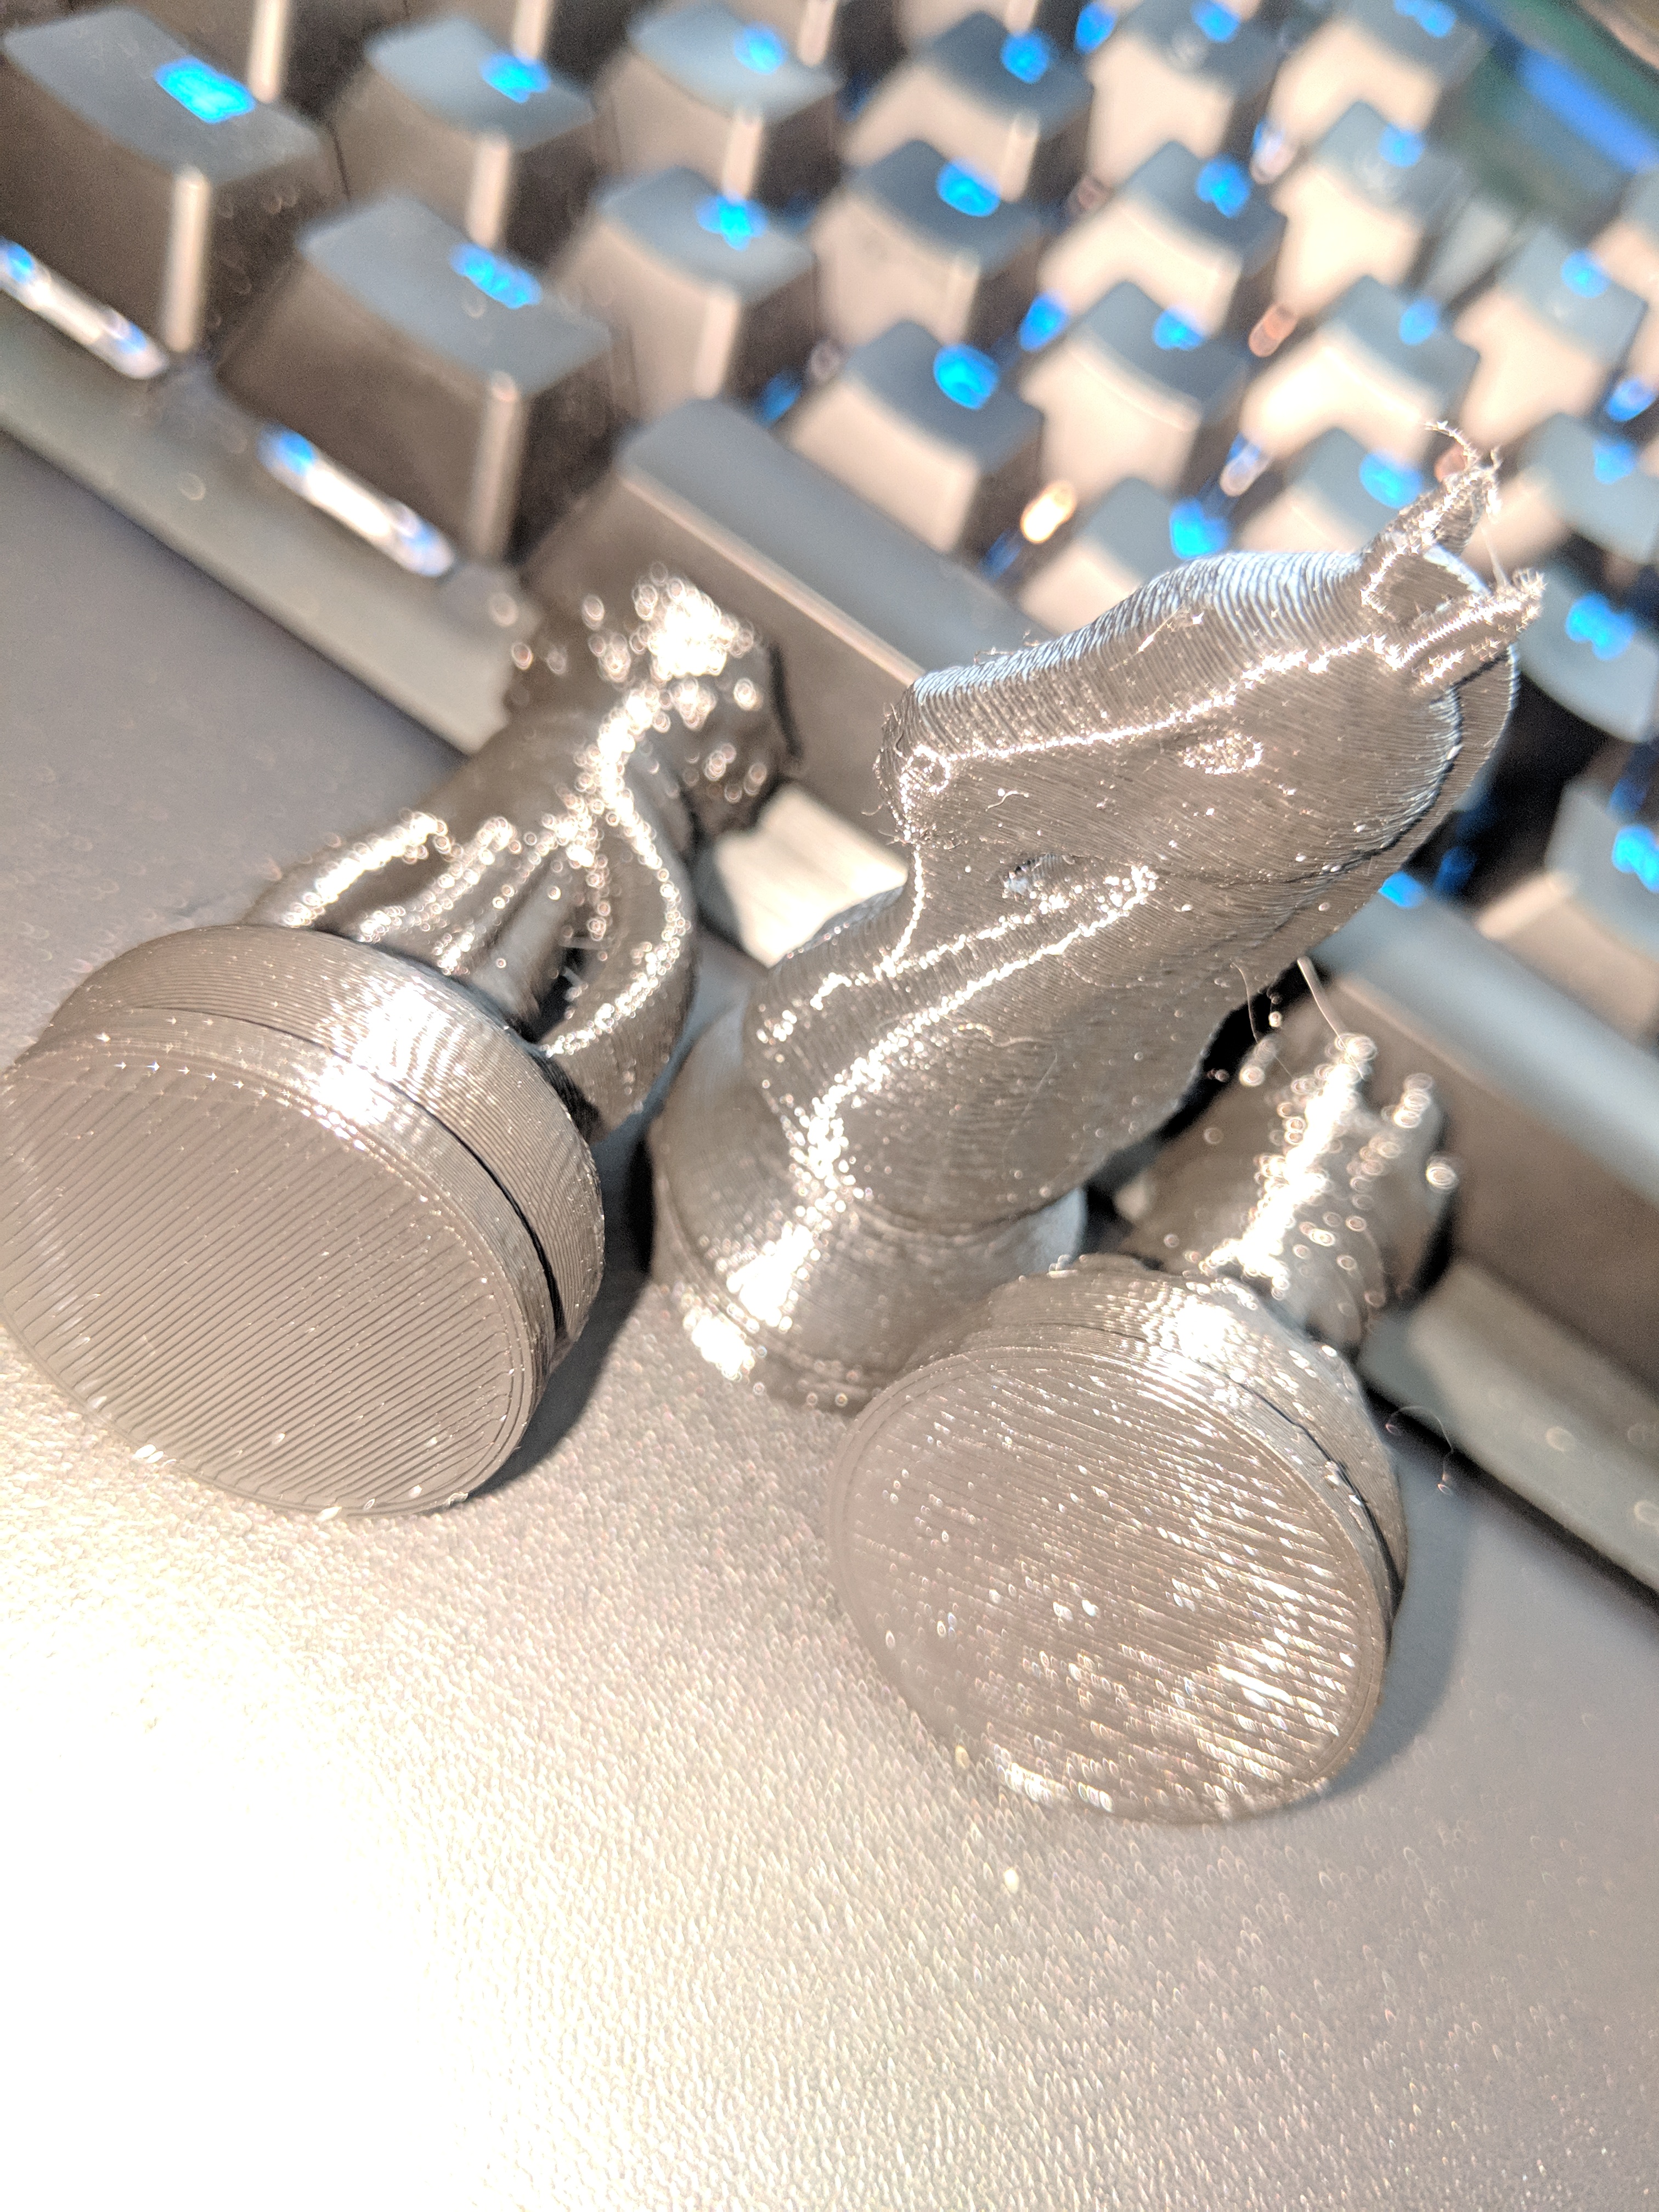
One issue I'm having trouble articulating is I've gotten inconsistent results and when/why. When I switched over to petg the first time, I spent a lot of cycles printing 75mm squares and other single layer test prints. I eventually got to the point where I was sort of able to produce a consistent-ish result. Absolutely no confidence. But I did get some good prints off the printer, like this full set of chess pieces.
While they aren't perfect, they are usable and none of them exhibited the same first layer issues I pictured. I set a few test pieces for a chess board I was designing to print. Four white squares on my mk2 and four black squares on my mk3. The originally pictured object was one of the four test pieces I printed on the mk3. All of them had the same first layer issue that translated into most of the infill being distorted. Oddly, you wouldn't have known it happened by the top layers. They looked perfect until I took them off the build plate. 🙂
So saying it here, it makes me think it is adhesion or first layer calibration. That's extremely frustrating to me considering the time invested to get that part dialed in and the fact that I have been getting such weird and inconsistent results.
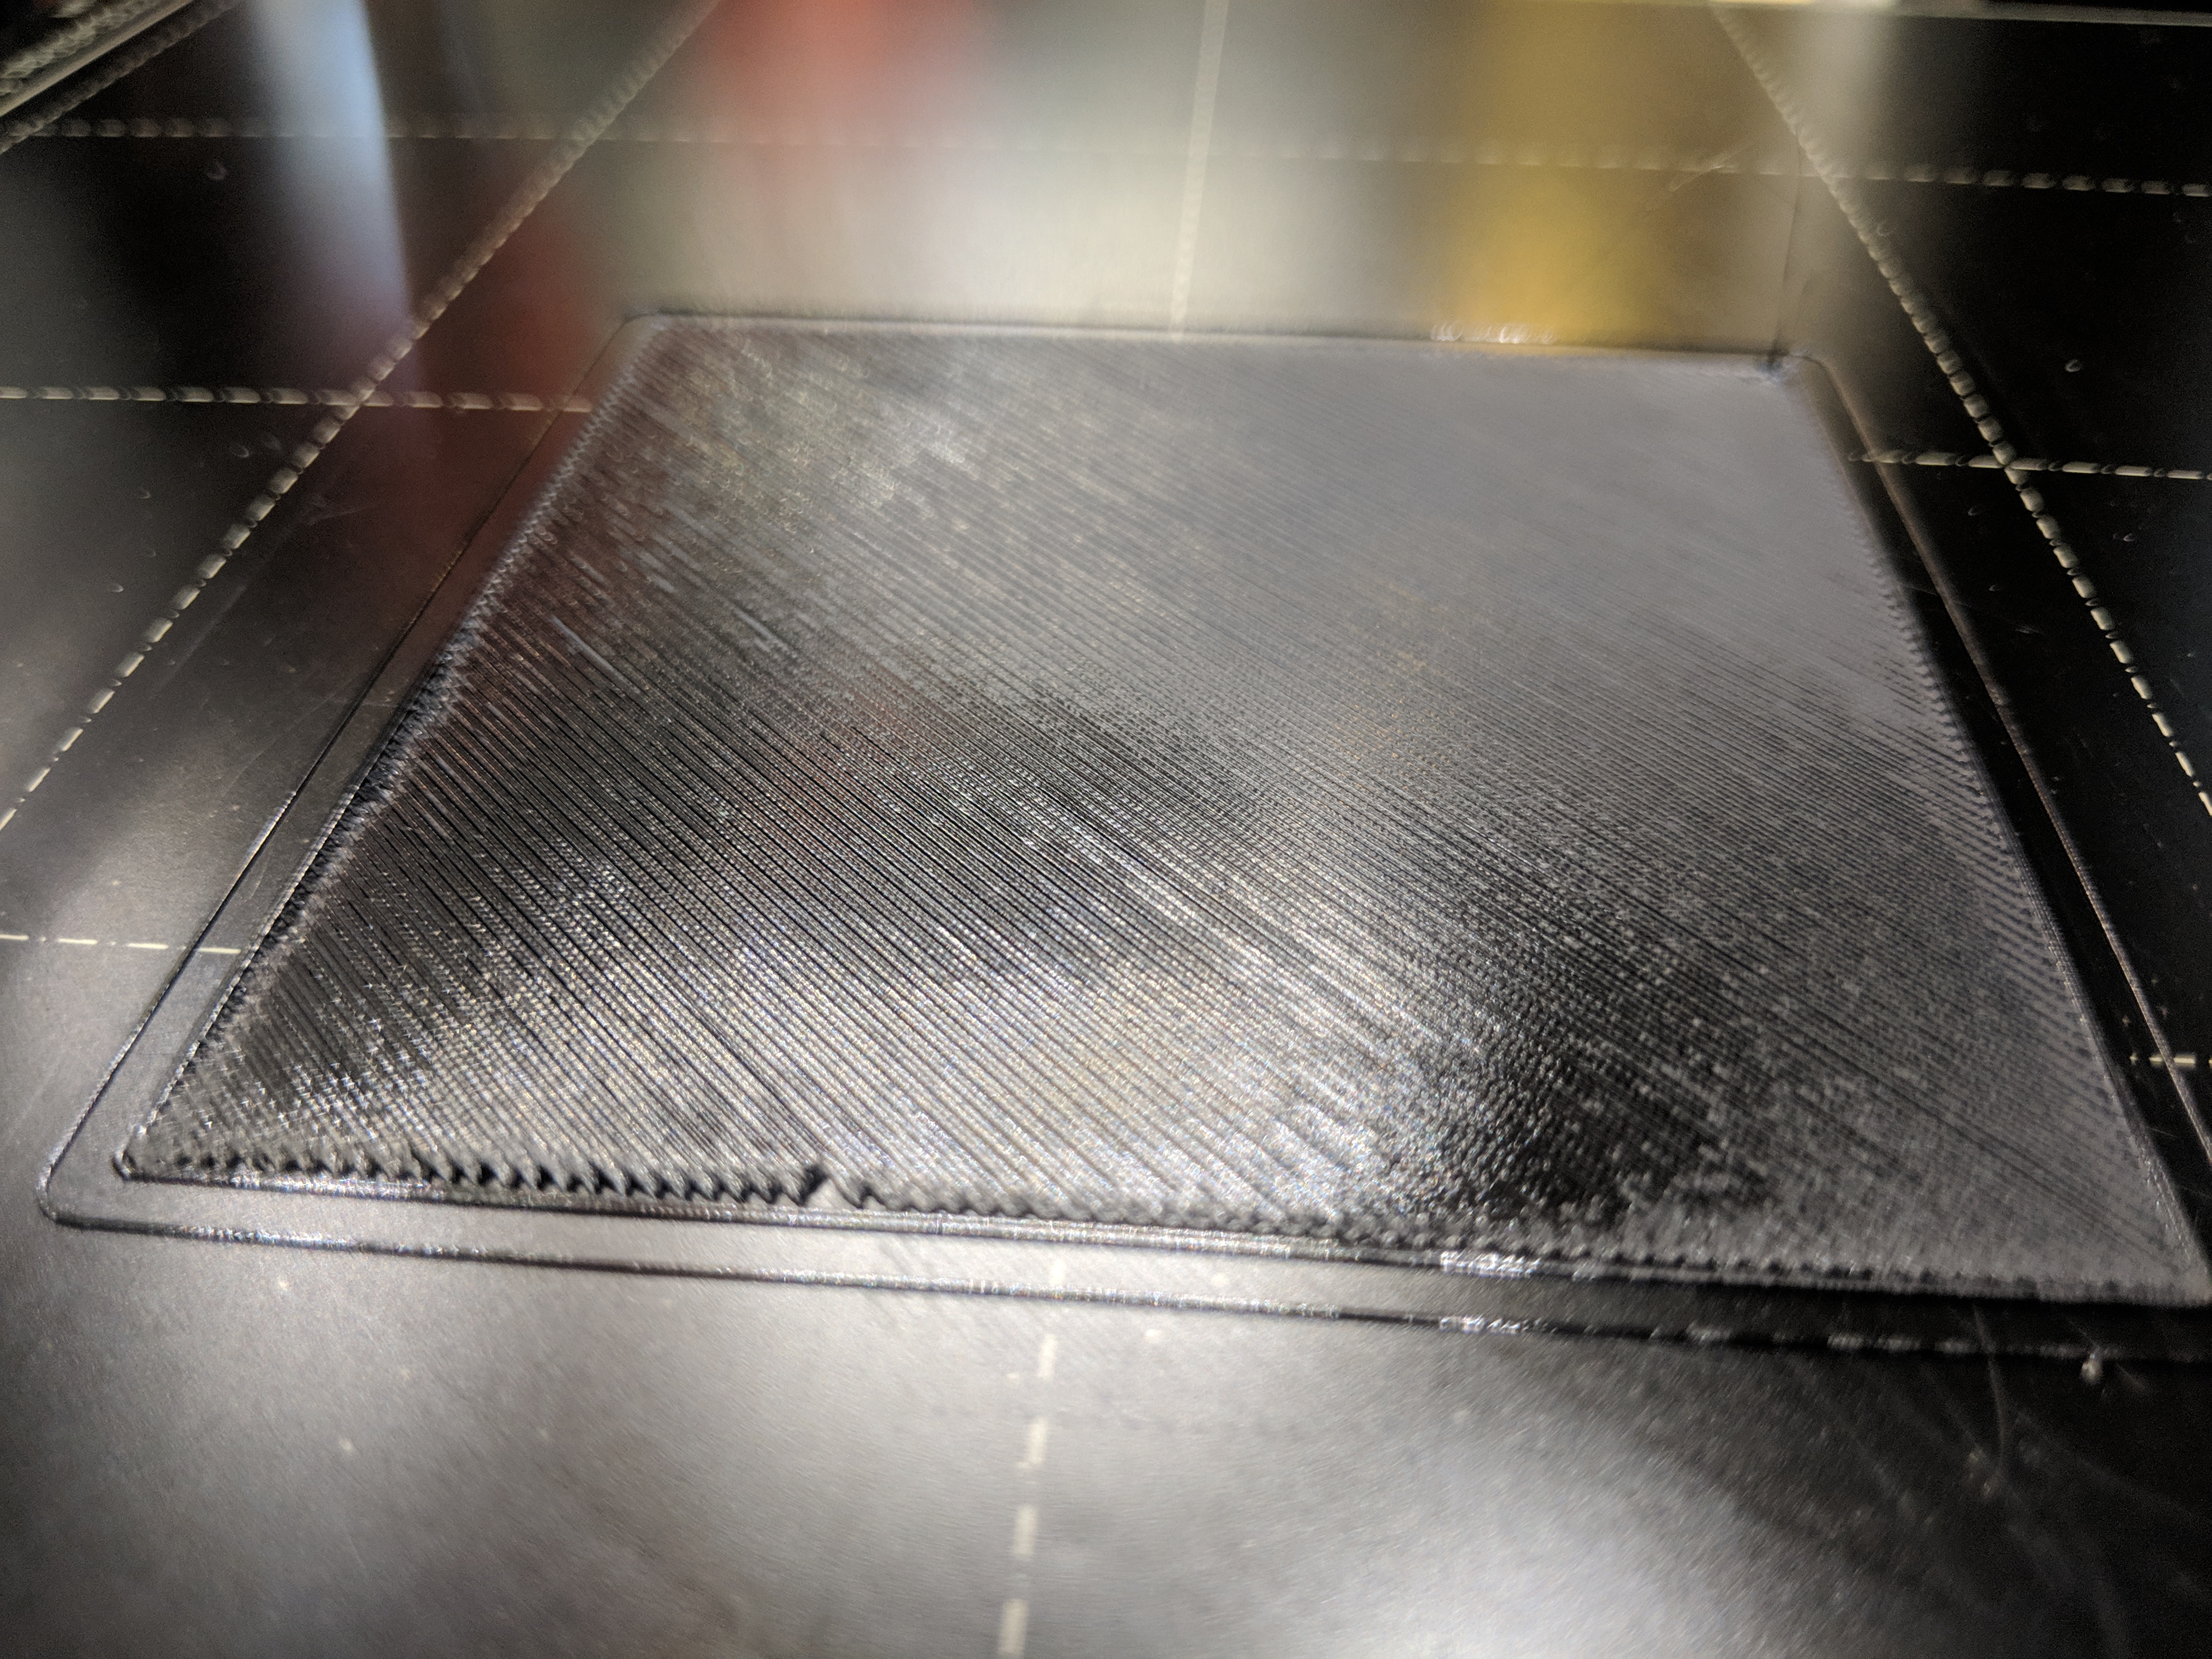
After printing a few batarangs and prusa logos in pla with no issues, I went back to petg and printed through a couple of test squares. I first played with live z a bit and that didn't really make any difference (ugh). So I set it where I thought it was mostly good like when I printed the chess set. Tested again and it was trash again. So I then restarted the print and set the flow down to 90. That resulted in this:
which looks a heck of a lot better. There is a pattern to the bad spot though which is clearly visible pictured in front of the LCD panel:
The very top left corner (back left print bed) and most of the bottom right (front right print bed) looks okay. That large swath through the middle is barely connected to the perimeter and not at all touching each other.
I swear this is feeling more like a first layer calibration issue. I'm just running in circles.
Re: MK3 Broken?
Extruder tension screws seem to be making a difference here. I had a failure with PLA exactly as I had with PETG. So I'm going through the rest of the common problems steps.
I greatly appreciate the time you folks take to help guide us lesser folk.
Re: MK3 Broken?
Yeah, there are a lot of moving parts to consider with issues. So, my take is the reduction in flow reduced the wrinkles, but also extruded less so the print is less than optimal which is also not good.
Make sure you check the flow on the next print to ensure it did not stay at 90% and went back to the original value - sometimes it stays at 90% and that would not help if you change other settings.
I understand what you are saying and I sometimes see the blistering issue the first few layers and it does end up working out during the print like you say. it is strange and as long as it is not too bad, i let it go and it works itself out. If it seems to be really bumpy, sometimes I will stop and restart the print after adjusting the live z and it goes away. It does not happen too often for me, but it really seems like whenever there are large ambient temp swings that it happens. i usually let the printer sit at temp for 5 - 10 mins before printing again and that seems to help believe it or not. I have not seen anything other than live z and flow as the most likely cause for the first layer bump issue, but is sure seems to be a common occurence.
Strange women, laying in ponds, distributing swords, is hardly a basis for a system of governance!
Re: MK3 Broken?
Yeah, there are a lot of moving parts to consider with issues. So, my take is the reduction in flow reduced the wrinkles, but also extruded less so the print is less than optimal which is also not good.
Make sure you check the flow on the next print to ensure it did not stay at 90% and went back to the original value - sometimes it stays at 90% and that would not help if you change other settings.
I understand what you are saying and I sometimes see the blistering issue the first few layers and it does end up working out during the print like you say. it is strange and as long as it is not too bad, i let it go and it works itself out. If it seems to be really bumpy, sometimes I will stop and restart the print after adjusting the live z and it goes away. It does not happen too often for me, but it really seems like whenever there are large ambient temp swings that it happens. i usually let the printer sit at temp for 5 - 10 mins before printing again and that seems to help believe it or not. I have not seen anything other than live z and flow as the most likely cause for the first layer bump issue, but is sure seems to be a common occurence.
Yeah, I keep having to remind myself this stuff isn't magic. I also see just severe inconsistency in my results. I try to chart it out and it just seems haywire. I decided to take an extreme approach here and carefully adjust live Z until the nozzle is on the bed, then dial it up from there. In the spirit of science, of course. I now think it is possible my live z, which was set to -375 at the factory, could have been off by about -200 from there. I'm about half way through what looks like a nearly perfect 75 mm test square. I will be able to check its thickness and other characteristics shortly. I had been playing with live z between about -450 and -475. I'm currently sitting at about -580. This result is contrary to my previous assumptions about working with PETG.
If this result is consistent I'll be happy, I just didn't expect it to come from this direction, necessarily.
Re: MK3 Broken?
Check there’s nothing stuck on the other side of your steel sheet.
Re: MK3 Broken?
In the middle of my testing a few days ago this did happen. I thought I'd found the whole entire problem when I found it too. Been keeping an eye on it and things are still just a big suck right now.
Thanks for taking the time to respond though!
As an update, I seem to have gotten first layer issues sorted fine. I've been playing with the tension screw adjustments now trying to get the rest of the print to happen correctly now. It's really not going very well, and I'm not sure where I went off the tracks, frankly. Gonna sleep on it, head back to work and maybe when I come back around I'll have the solution jump out at me.
Re: MK3 Broken?
For anyone here offering help and assistance, thank you.
My problem seems to have shifted up past the first layer now. First layer, which I am printing at a slower speed based on the prusa supplied profiles in slicer, are perfect now. I have taken them up and measured thickness at a very consistent .20-.21 layer height. Trying to be modest but it really is laying down the first layer well.
Then when it moves to 0.35 and prints the next layer, it turns out looking like the old first layer did. Maybe even worse.
My tension screws are almost backed out enough that I don't think they're actually applying any tension at all. When the X carriage is all the way to the left, the back screw head seems to be very close to contacting the z frame. I tried going the other way with it but that seems to cause my first layer to die.
Really, I'm going to bed this time... tomorrow is a new day. Thanks again for any and all assistance.
Re: MK3 Broken?
C:
Right on. Sleep is good.
To know if your extruder screws are engaged or not, use the allen key and try to lift the bottom of the extruder door, if it is engaged it will not open all the way like in the video I linked. I am currently doing some testing and switched nozzles today, so I have been working on that...
It is a process and while it is frustrating, it is a big help to post because you know there are others with the same issue who do not post. so keep rocking!
Strange women, laying in ponds, distributing swords, is hardly a basis for a system of governance!
Re: MK3 Broken?
a good starting point for the tension is to set the heads of the adjusting screws to be 0.5mm above the plastic . I use a standard metric feeler gauge but an inch feeler .02 in thickness will work just as well.
doing it the way the video presents works very well but it needs a 'touch' or 'feel' for printing that a person building his first printer has yet to acquire. for them a way to set via a metric value such as the one above should get them printing better than the advice to set the tension screw heads "just above the level of the plastic"
If I had built either one of my printers, I would have learned my way through this. I ~really~ feel now looking back the better path to success with these printers at least, is the path of purchasing the kit and building it yourself. I wound up staying awake way longer than I should have. I kept tweaking the tension screws and left a final test print going when I finally went to bed. It came out perfect and represents a slow progression from very bad to acceptable. I'll be setting up an additional test print this afternoon when I get home from work. If that one goes well, we won't be adjusting these tension screws again for a while.
Re: MK3 Broken?
C:
Right on. Sleep is good.
To know if your extruder screws are engaged or not, use the allen key and try to lift the bottom of the extruder door, if it is engaged it will not open all the way like in the video I linked. I am currently doing some testing and switched nozzles today, so I have been working on that...
It is a process and while it is frustrating, it is a big help to post because you know there are others with the same issue who do not post. so keep rocking!
I suffered a bit of trepidation in posting to begin with. I knew I was frustrated and had my thoughts a little scattered. Probably still do, honestly. But writing it all out made me think through it some, and the kind and helpful responses are truly appreciated.
One thing I think I have reinforced through this is that the tolerances we deal with in using these printers are extremely small. There is not a lot of distance between catastrophic print failure, and perfect results. I remember going through times like this with my mk2, but it is so consistent now it has me fooled into thinking that with it I couldn't have a print failure even if I tried. 🙂
Thanks again for everyone's help.
Re: MK3 Broken?
This extruder adjustment is fiddly and while you may have it adjusted for PLA and that basic adjustment might be fine for PETG or ABS but when you try to print something soft like NinjaFlex where you are trying to "push a length of rope" you will be back at square one....
Eventually if you keep good notes on each filament (type and brand and color and perhaps even lot number (though this last item is not really needed anymore as filament makers have greatly improved their consistency )) you might note things like (increase tension screws by 1/2 turn each) when adjusting from your Prusament PLA baseline tension.
Just another small adjustment to settings like the change in live Z going between the powder coated sheet and the smooth stickered sheet.
Seriously keep good notes on everything, I use the apple MacOS 'Notes' application which keeps everything synced in the cloud between the MacOS version and the IOS version on my phone and ipad for my 3d printing notes... when I started with my Delta Printer 5 years ago I used a pen an a paper notebook but the electronic one is better as my iphone is always in my shirt pocket
Re: MK3 Broken?
Figured I'd update the thread since so many folks offered such great advice and help... I wound up contacting support through chat. I gave them some pictures showing what was going on, and they sent me an RMA label. I very much wanted to believe the issue was adjustment, and it may very well still be, but it was just beyond what I could reasonably figure out. To be perfectly frank, my wife bought the printer fully assembled exactly for the reason that we wanted to avoid having to at least at first. It's a little difficult to justify even to myself, but I think the RMA speaks well of PRO, and I very much appreciate them being willing to stand behind their product even if the customer could be wrong in general.
I look forward to the replacement or repaired printer, for sure.
