Mechanical Parts Threading Help Quality
Hello Prusa Friends,
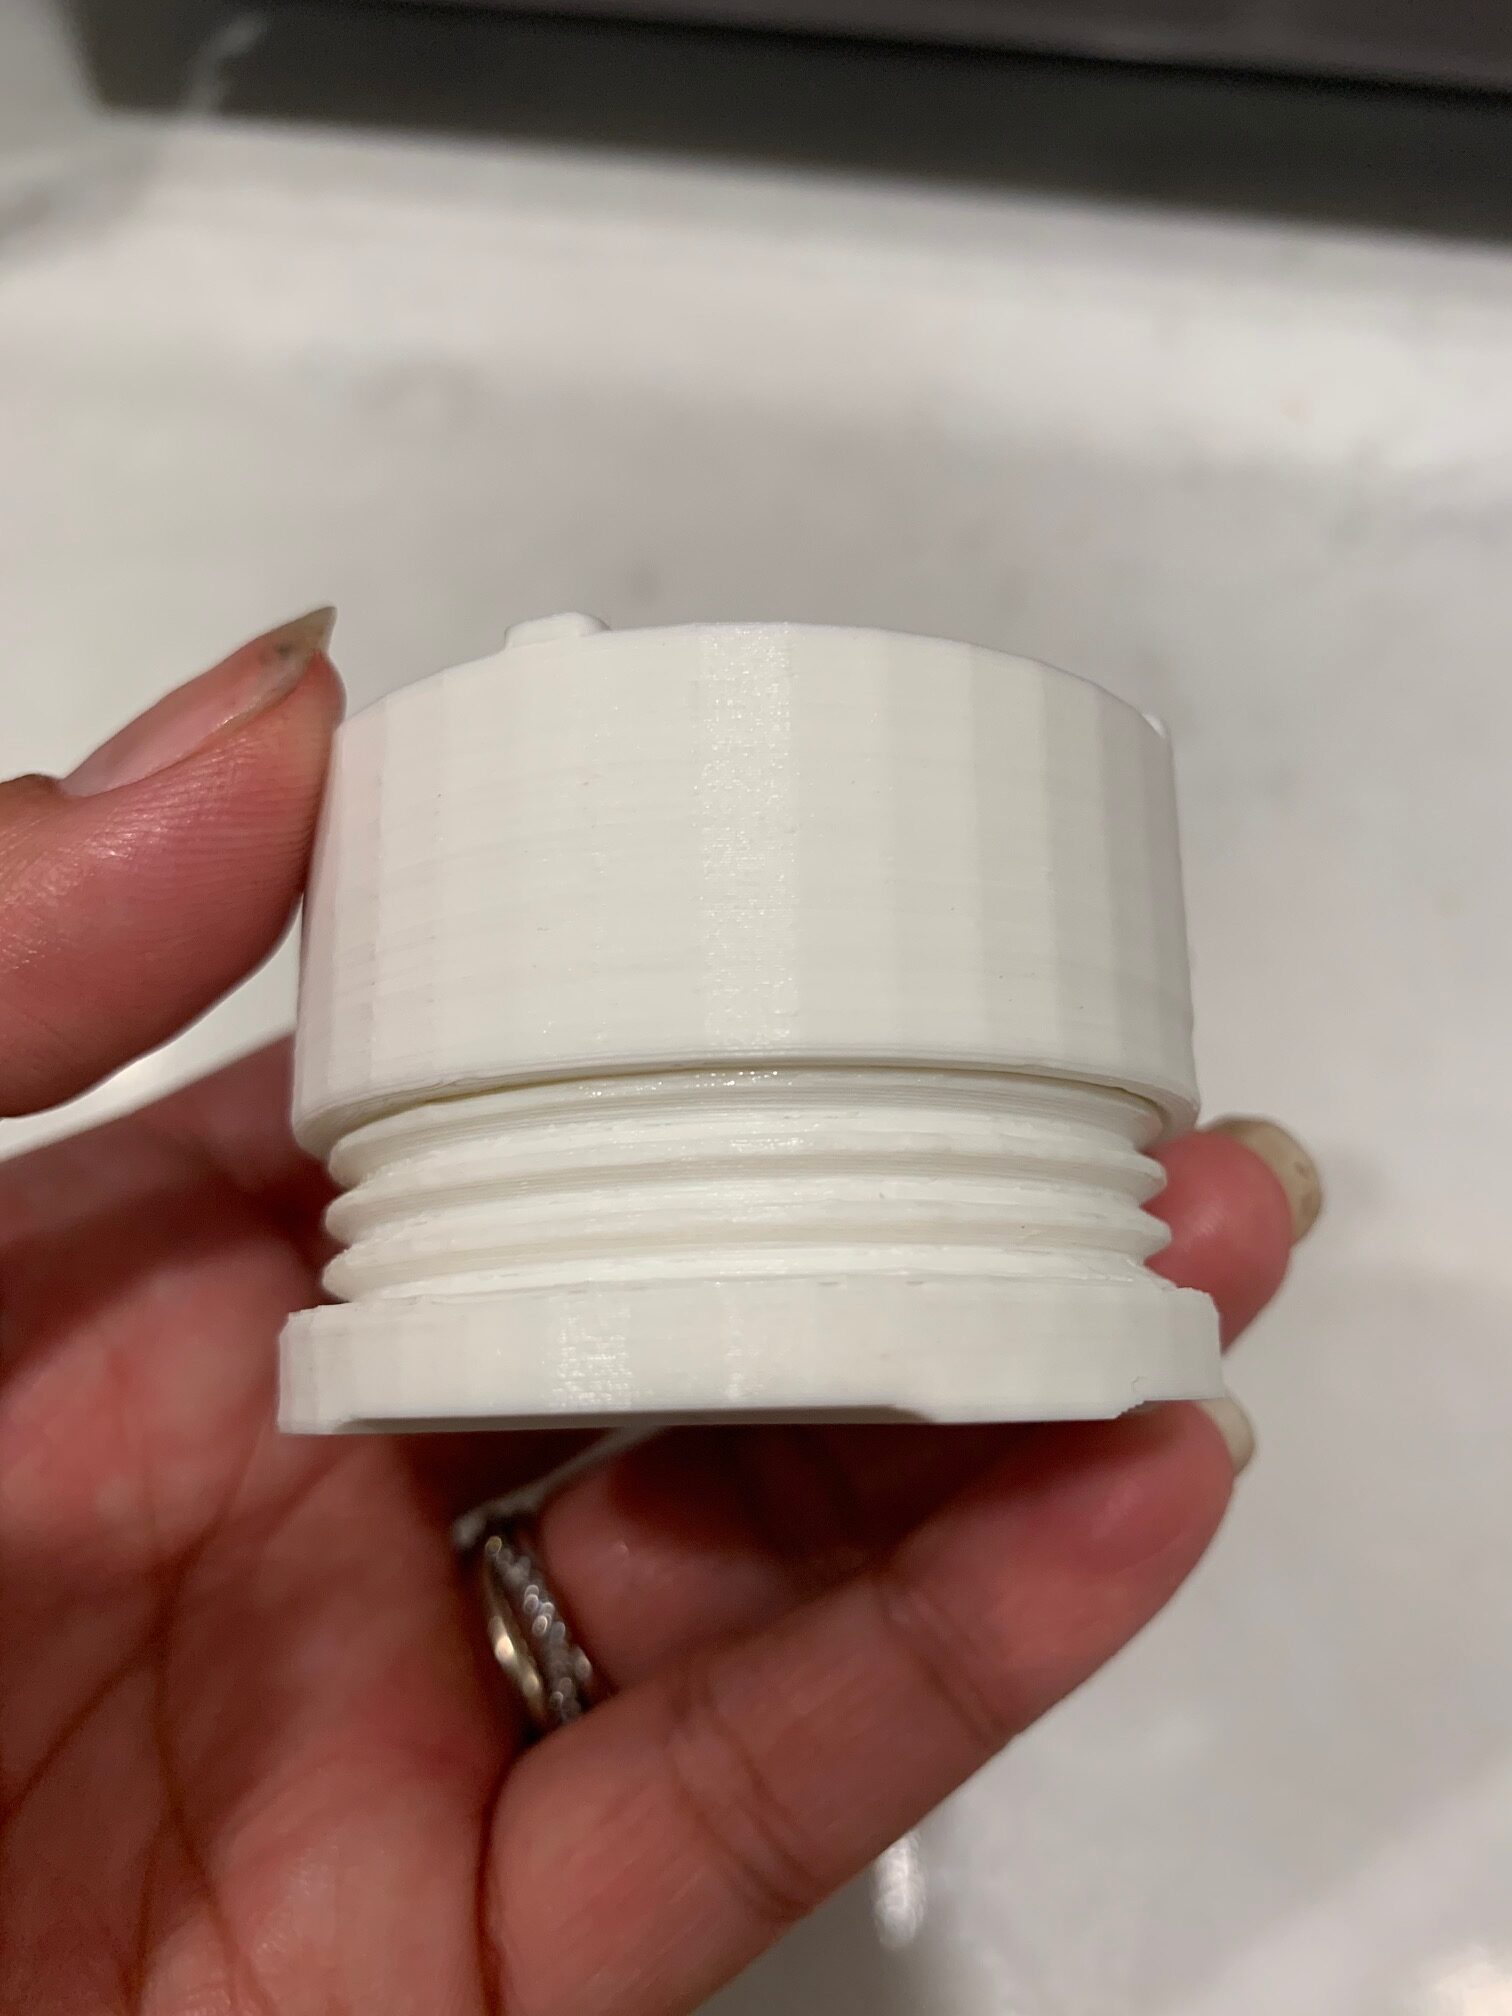
For the life of me I unable to successfully print these sections of model/parts and effectively use it so they don't jam up. I've checked with modeler and he is using solidworks and don't see an issue. What am I doing wrong? I'm only able to force a turn in about 1/4 ways in.
I am printing at .15 with Overture Matte PLA(Preferred) @200 with generated supports. Am I getting too much contact with supports or do I need to knock down the layering to get additional detail? I'm finding print when I print at .10 my supports are much harder to remove.
Your feedback is appreciated in advance
-Dee


Best Answer by DST:
@swiss_cheese,
It’s a learning process for me and I appreciate constructive feedback so don’t hesitate to share. I do see your recommended application serves function quite well and ease of printing as well for multiple reasons including user error. If someone has a big grip or get dirt in threads and If don’t put enough perimeters on the model. pla can be brittle and crack of someone pulls a Popeyes strength to force threads in. My modeler too is learning as well- so it’s two fold, thankfully he is willing to work thru trial an error as he absorbs caveats of fdm designing as well.
I plan on completing this model with correct threading tribulations.
I plan on trying to 360 my own threading model affer learning some basics.
It was not my intention to chastise you, I noticed this during the tuning of the lattice area of the model, but I felt it was best to let you experience this for yourself and learn the answer. and since we are at this point I'm going to suggest Twist Lock mechanisms for your product.
With that said take the time to learn about Threading, it's important, however not the answer for your plant support model.
Consider a design like this, for your locking mechanism. Try to understand the reasons why.
Regards
Swiss_Cheese
Mom, wife, career woman, tinkerer.
settings
For threads, I have found that I have to shrink them a little more than expected on the male side of the insert (externally threaded part).
Also, I use these settings in PS 2.3x
- 0.25mm z distance.
- 75% xy distance.
- 3mm support spacing.
- 4 interface layers.
- 0.2mm interface layer spacing.
--------------------
Chuck H
3D Printer Review Blog
Most likely, the designer didn't make accommodations for FDM printing but just gave you what came out of SolidWorks. which is fine for CMC but not FDM.
I've done a fair bit of threads lately, here's what I do, and it usually works great:
I offset the thread faces on both, male and female by -0.1mm.
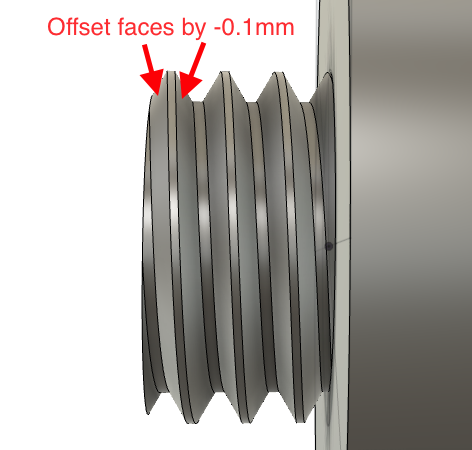

Then on the male side, I fillet the newly created edge by 0.1mm. 
Prints fine with 0.2mm, no supports, and usually screws in like butter. But based on size etc your mileage may vary, and some additional adjustments may be necessary.
Formerly known on this forum as @fuchsr -- https://foxrun3d.com/
Screw tolerences depend on orientation as well as filament.
For vertical threads in good quality PLA 0.1mm radius is usually enough, cheap PLA may require 0.2mm.
Horizontal threads generally require double the tolerance.
PETG and nylon vary, I generally start at about double PLA values and print a couple of test screws for each new filament.
You *might* be able to rescue your part with fine abrasive but be aware that if one part is not printed you may cause damage... Put toothpaste into the thread, repeatedly screw it as far as you feel safe to go and unscrew, wash away the paste and check the fit. Repeat until it fits, or is ruined.
Cheerio,
Cheerio,
@dst
If this is the same model I just helped you with? both male and female threads are the same size. that doesn't work in the real world. you must have a decided tolerance as well as creating a relief. you should also consider a slight taper to the male thread section.
Good Luck
Swiss_Cheese
The Filament Whisperer
video
@dst
If this is the same model I just helped you with? both male and female threads are the same size. that doesn't work in the real world. you must have a decided tolerance as well as creating a relief. you should also consider a slight taper to the male thread section.
Good Luck
Swiss_Cheese
There is a good video on Youtube about this and it reduces the size of the male more than expected.
--------------------
Chuck H
3D Printer Review Blog
Same model
Yes, I’m fact it’s is! Makes total sense. I’ll have to pass this along and see if we can make modifications. I wish I knew how to do it myself. I’ll have to learn some basics.
Mom, wife, career woman, tinkerer.
Yes you do
It was not my intention to chastise you, I noticed this during the tuning of the lattice area of the model, but I felt it was best to let you experience this for yourself and learn the answer. and since we are at this point I'm going to suggest Twist Lock mechanisms for your product.
With that said take the time to learn about Threading, it's important, however not the answer for your plant support model.
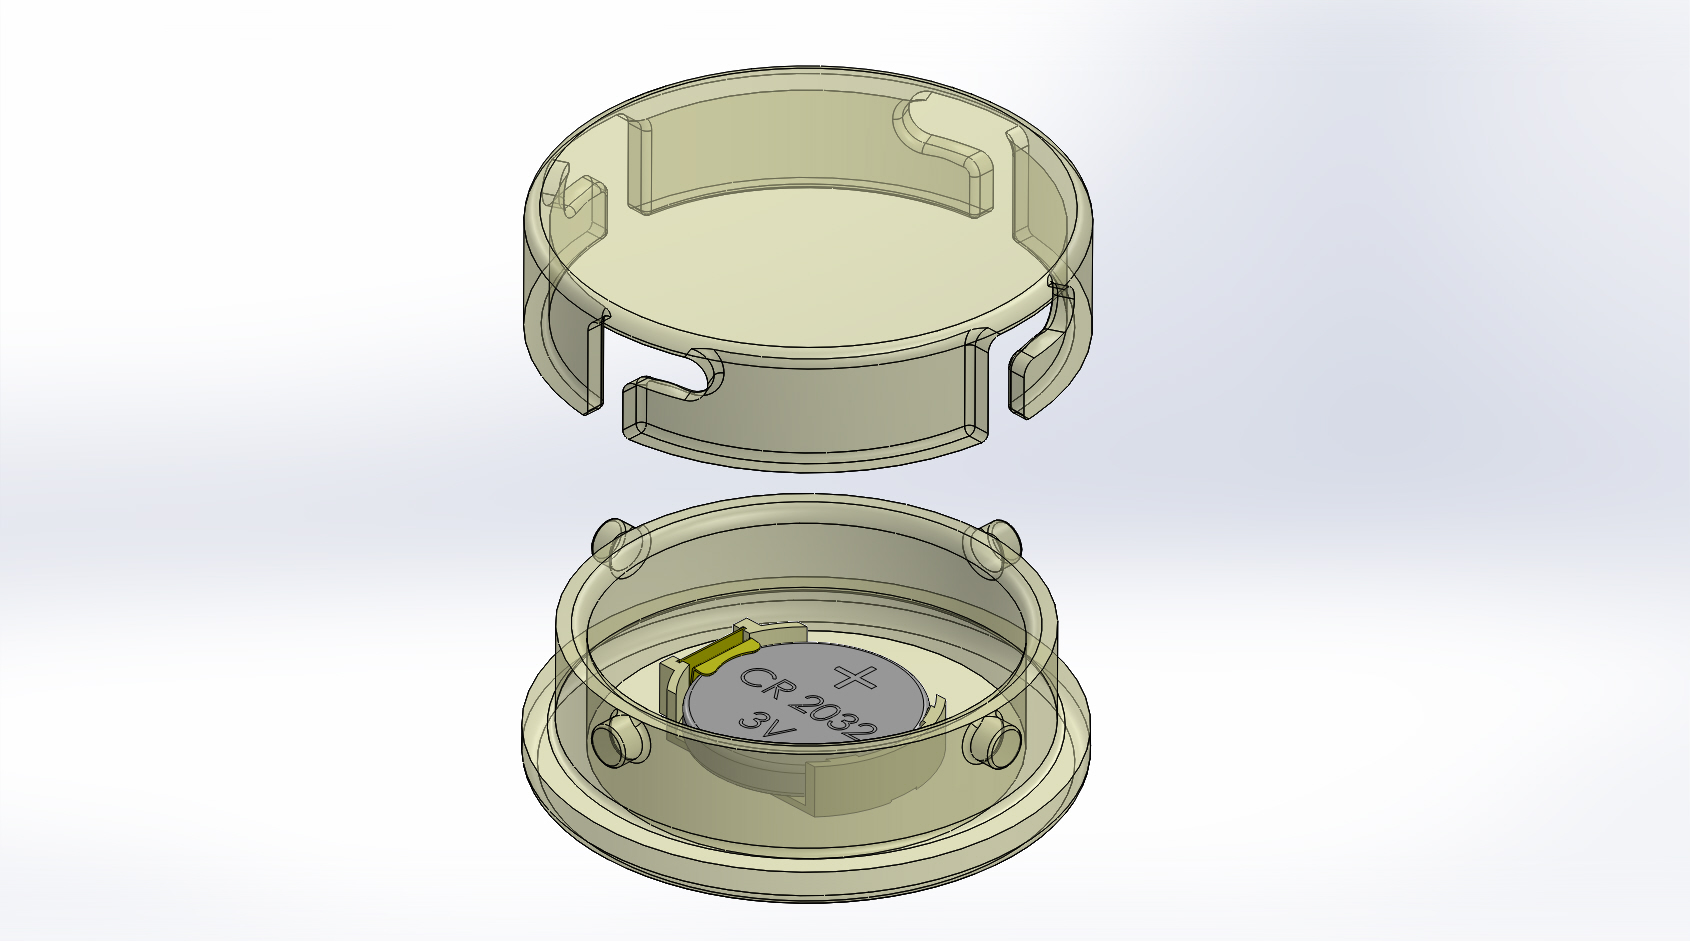
Consider a design like this, for your locking mechanism. Try to understand the reasons why.
Regards
Swiss_Cheese
The Filament Whisperer
Video thanks
@cwbullet, thanks for sharing the video And feedback
@dst
If this is the same model I just helped you with? both male and female threads are the same size. that doesn't work in the real world. you must have a decided tolerance as well as creating a relief. you should also consider a slight taper to the male thread section.
Good Luck
Swiss_Cheese
There is a good video on Youtube about this and it reduces the size of the male more than expected.
Mom, wife, career woman, tinkerer.
Function and ease of printing
@swiss_cheese,
It’s a learning process for me and I appreciate constructive feedback so don’t hesitate to share. I do see your recommended application serves function quite well and ease of printing as well for multiple reasons including user error. If someone has a big grip or get dirt in threads and If don’t put enough perimeters on the model. pla can be brittle and crack of someone pulls a Popeyes strength to force threads in. My modeler too is learning as well- so it’s two fold, thankfully he is willing to work thru trial an error as he absorbs caveats of fdm designing as well.
I plan on completing this model with correct threading tribulations.
I plan on trying to 360 my own threading model affer learning some basics.
It was not my intention to chastise you, I noticed this during the tuning of the lattice area of the model, but I felt it was best to let you experience this for yourself and learn the answer. and since we are at this point I'm going to suggest Twist Lock mechanisms for your product.
With that said take the time to learn about Threading, it's important, however not the answer for your plant support model.
Consider a design like this, for your locking mechanism. Try to understand the reasons why.
Regards
Swiss_Cheese
Mom, wife, career woman, tinkerer.
I wish you luck, it's a large/ long learning curve, I have 30+ years & several 3D suites under my belt.
I'm sure if you continue to try hard you will succeed.
Regards
Swiss_Cheese
The Filament Whisperer
And succeed i
@Swiss_Cheese, I am so impressed!
Every bit helps and makes me better and expands my knowledge. I'll take it a day and project at a time.
Speaking of success. With all the notes taken and some minor adjustments to female parts. It spins line butter and perfect seal!
I'm sure if you continue to try hard you will succeed.
Mom, wife, career woman, tinkerer.
Design
I like that mechanism. I might have to try it with a couple of my designs. It is simple and holds well. I need to figure a way to stop them from opening up back up. I though about a design like this for avionics bays on rockets, but the parachute rotates and might open them up.
It was not my intention to chastise you, I noticed this during the tuning of the lattice area of the model, but I felt it was best to let you experience this for yourself and learn the answer. and since we are at this point I'm going to suggest Twist Lock mechanisms for your product.
With that said take the time to learn about Threading, it's important, however not the answer for your plant support model.
Consider a design like this, for your locking mechanism. Try to understand the reasons why.
Regards
Swiss_Cheese
--------------------
Chuck H
3D Printer Review Blog
@cwbullet
What direction does the parachute rotate? Set the twist-lock mechanism to the opposing direction of rotational force.
As well you can model in a type of snap-fit at the end of travel.
Regards
Swiss_Cheese
The Filament Whisperer
Rotation
I was thinking the snap fit, but I might have over complicated things. The clockwise rotation seems simple.
@cwbullet
What direction does the parachute rotate? Set the twist-lock mechanism to the opposing direction of rotational force.
As well you can model in a type of snap-fit at the end of travel.
Regards
Swiss_Cheese
--------------------
Chuck H
3D Printer Review Blog