How to improve angled/overhang prints near the bed
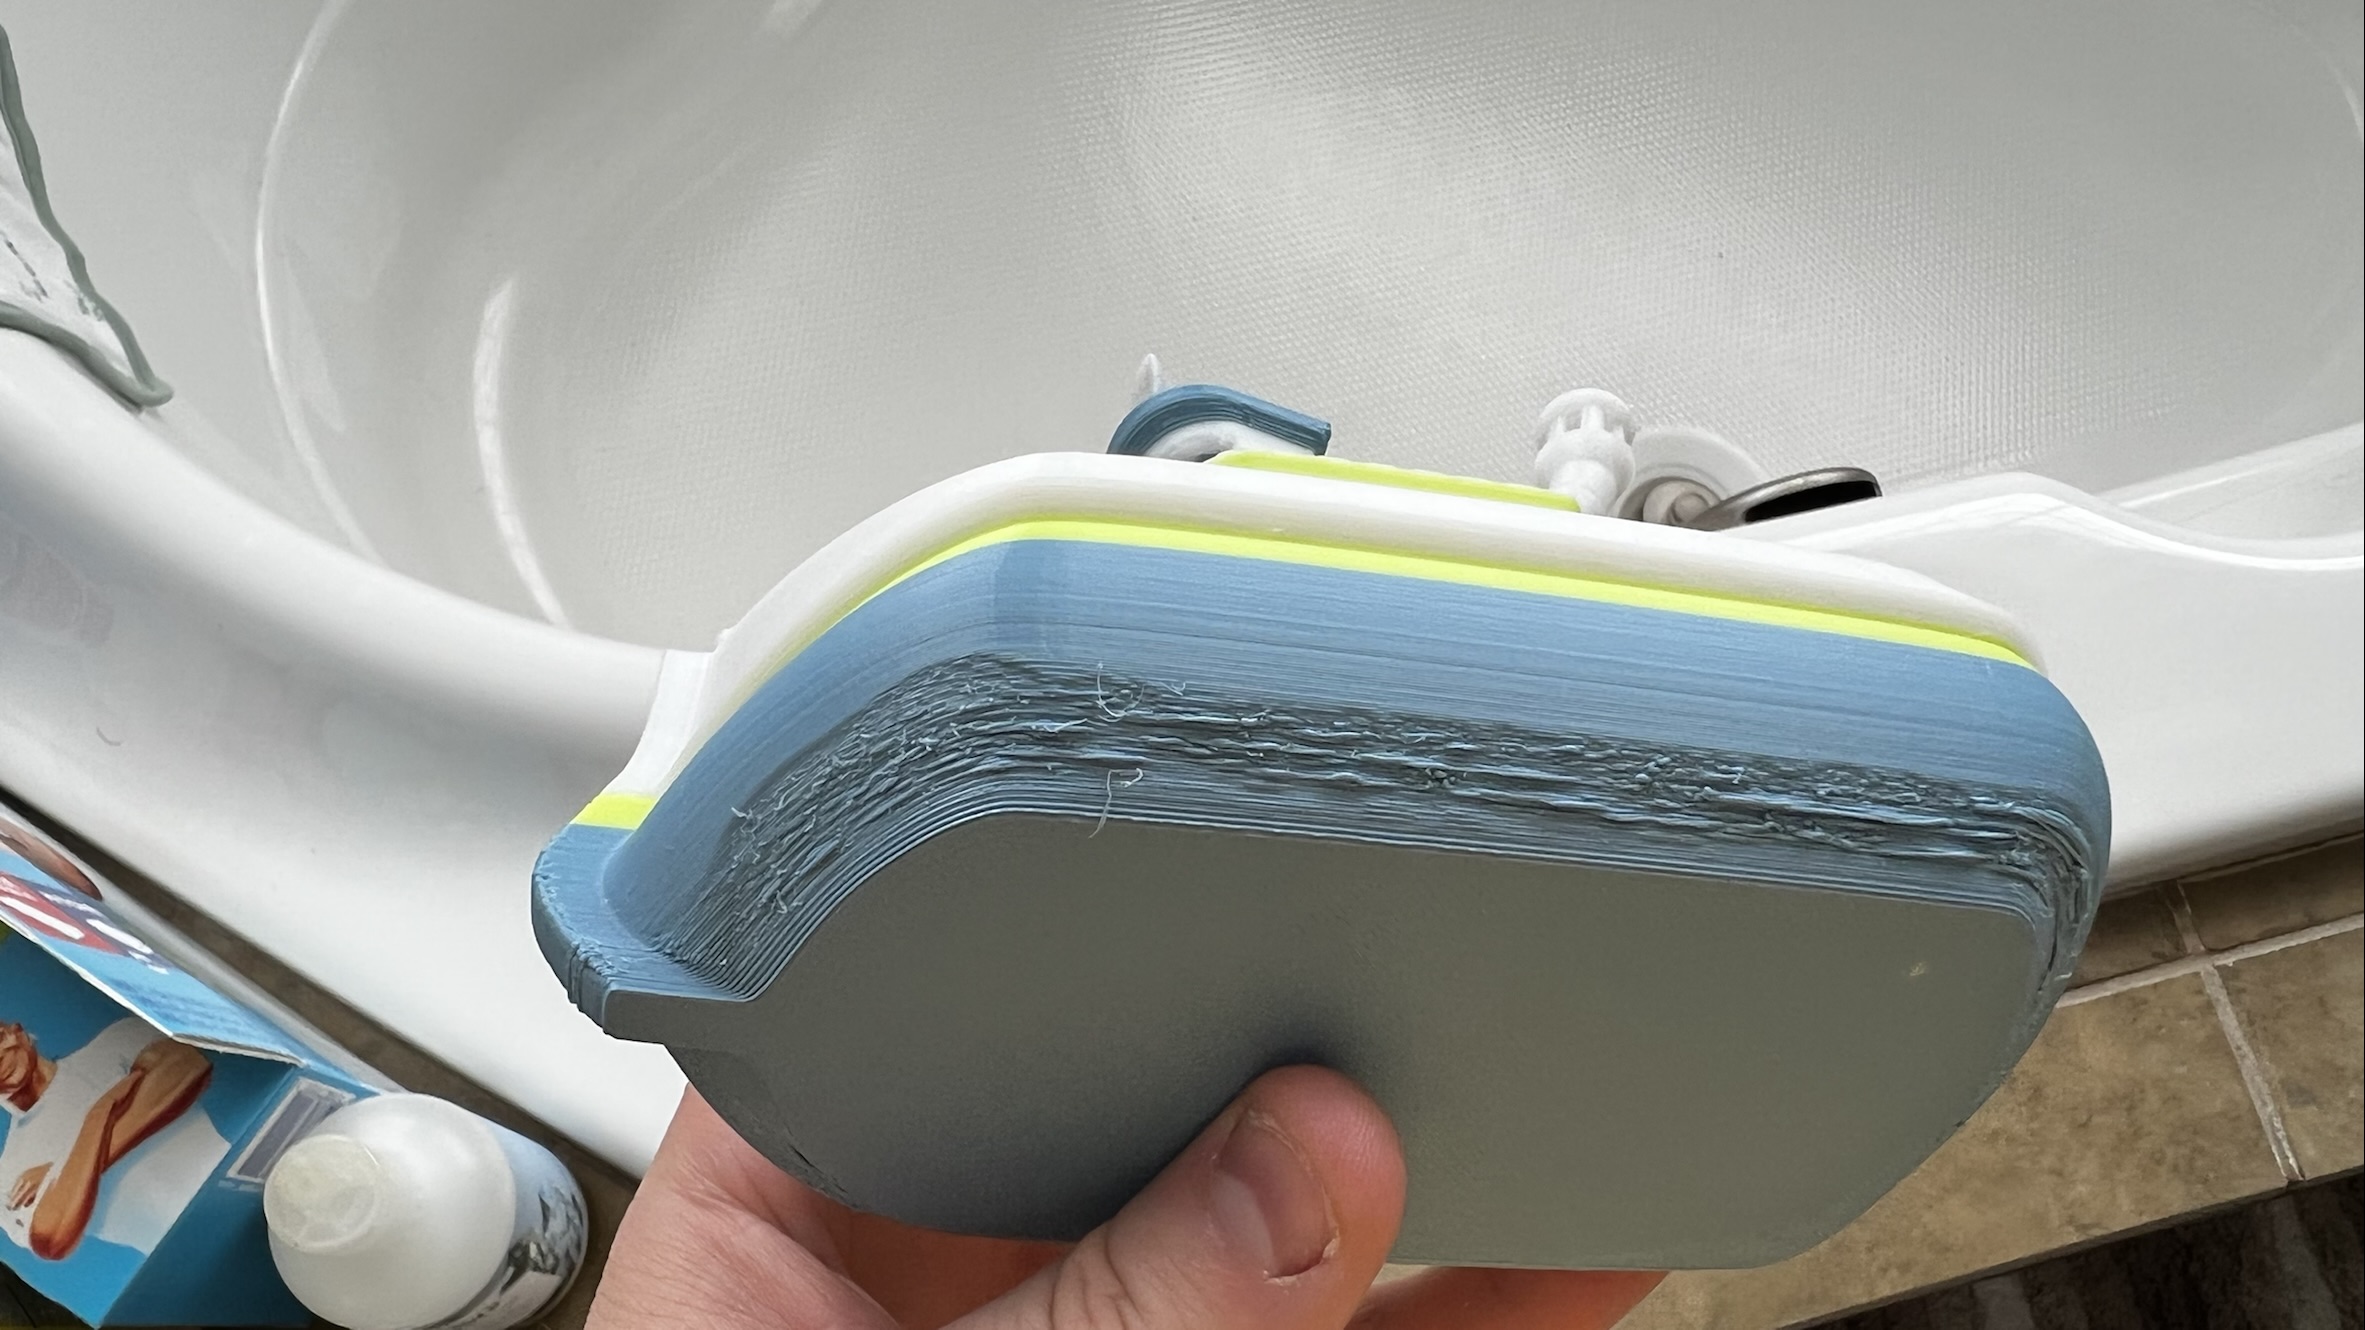
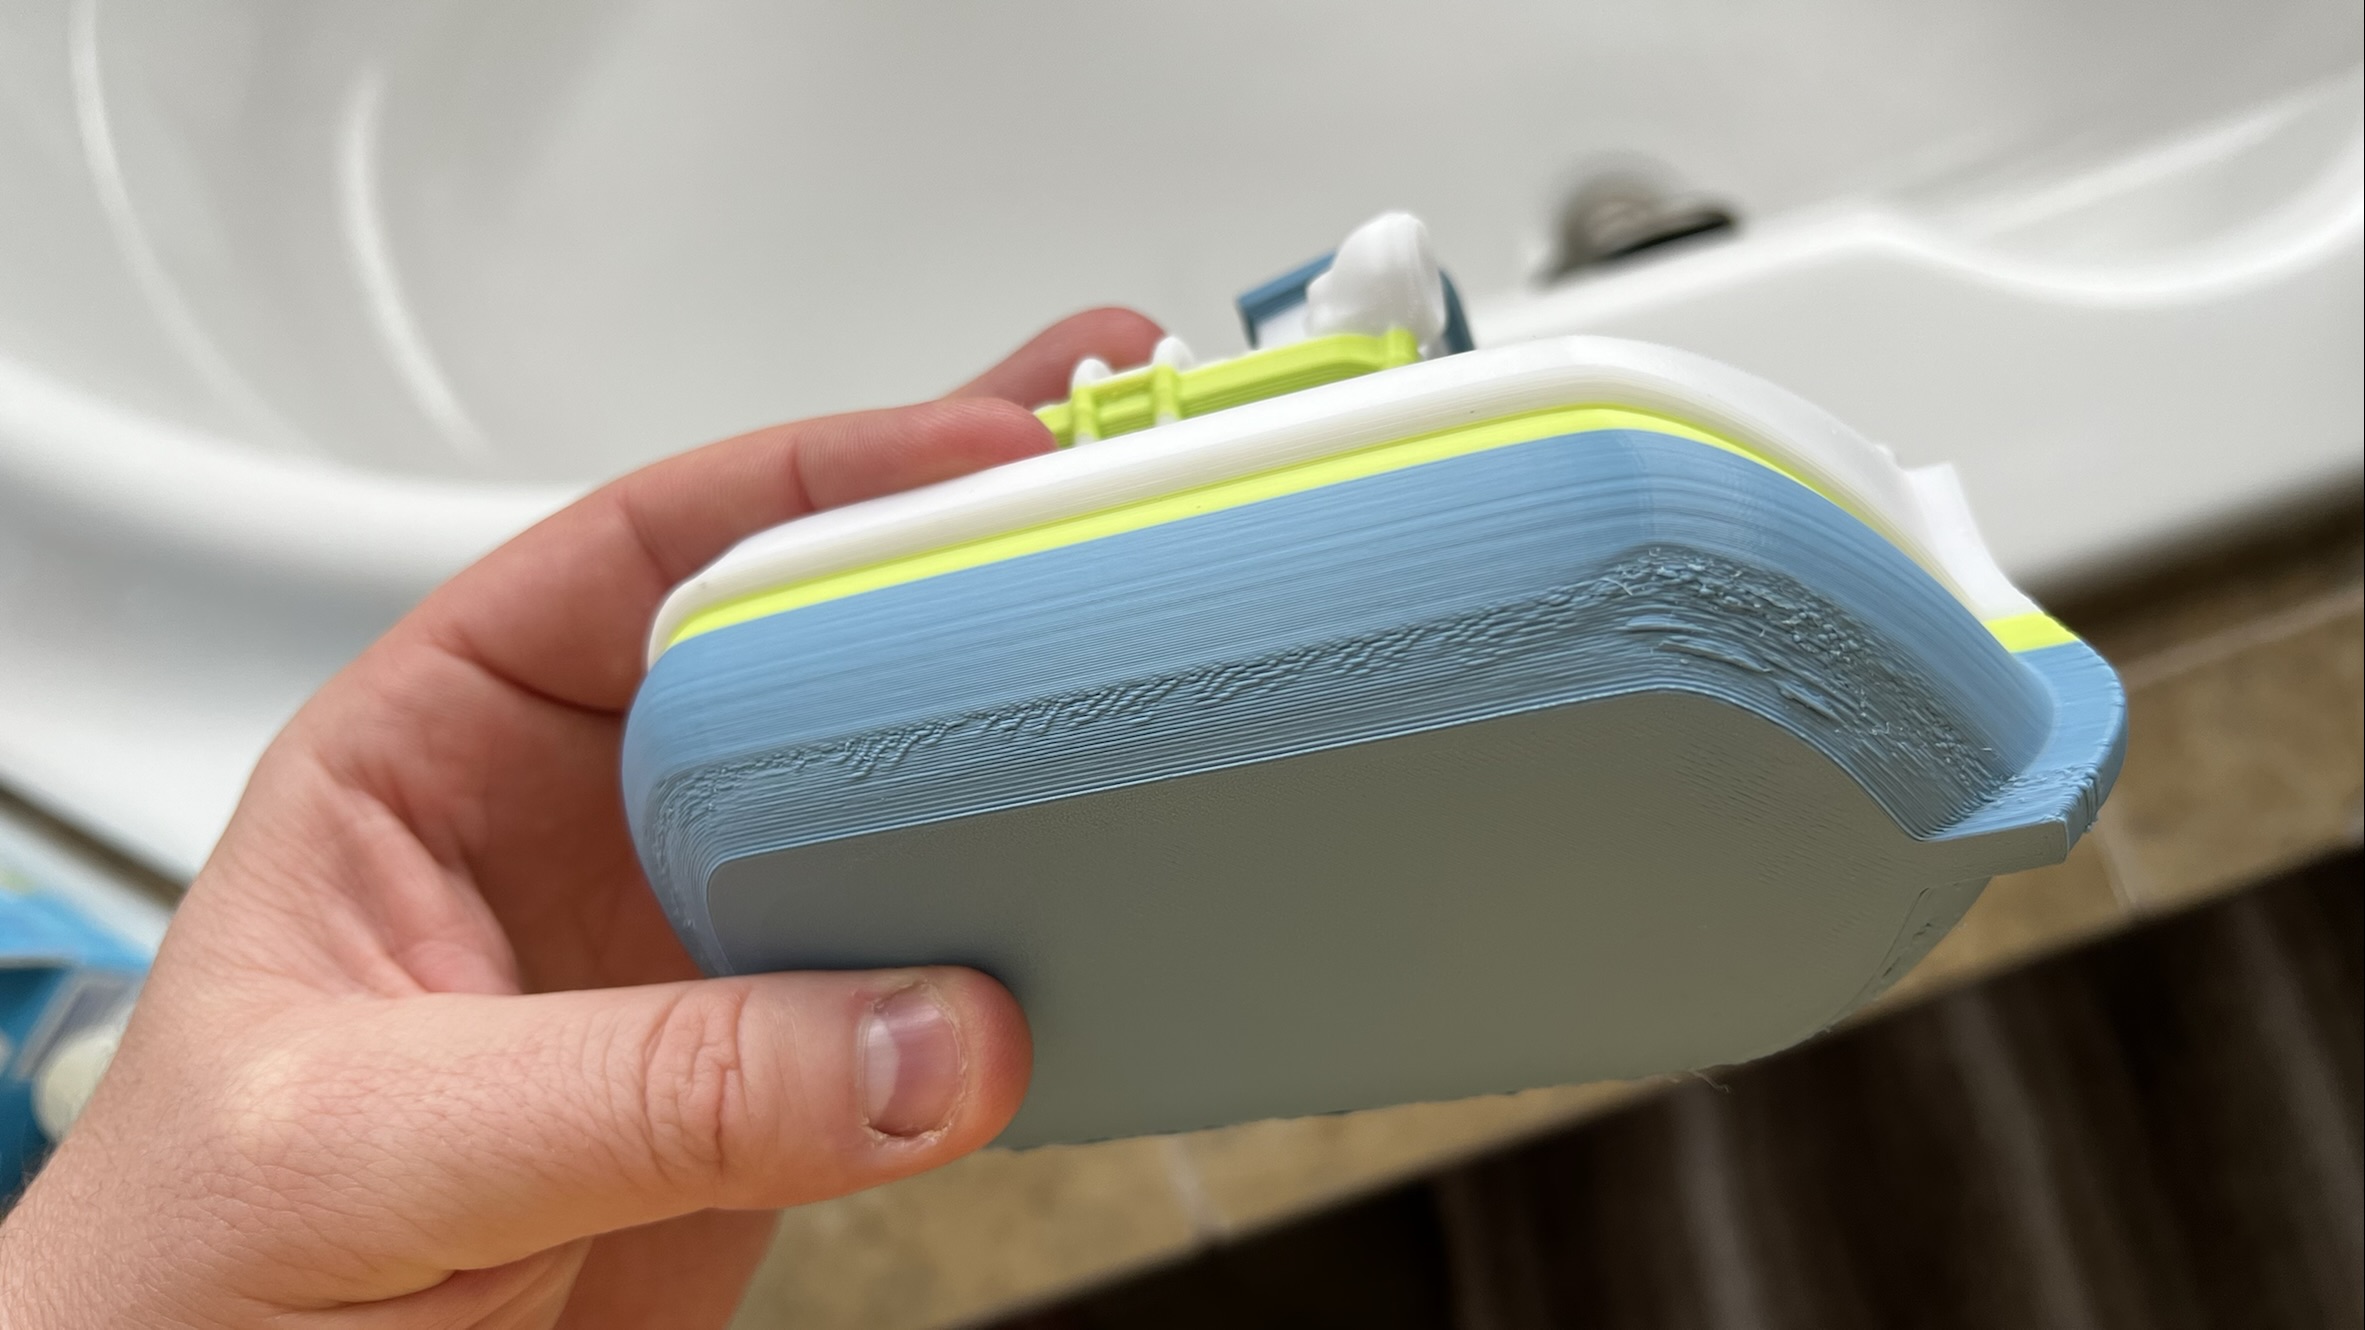
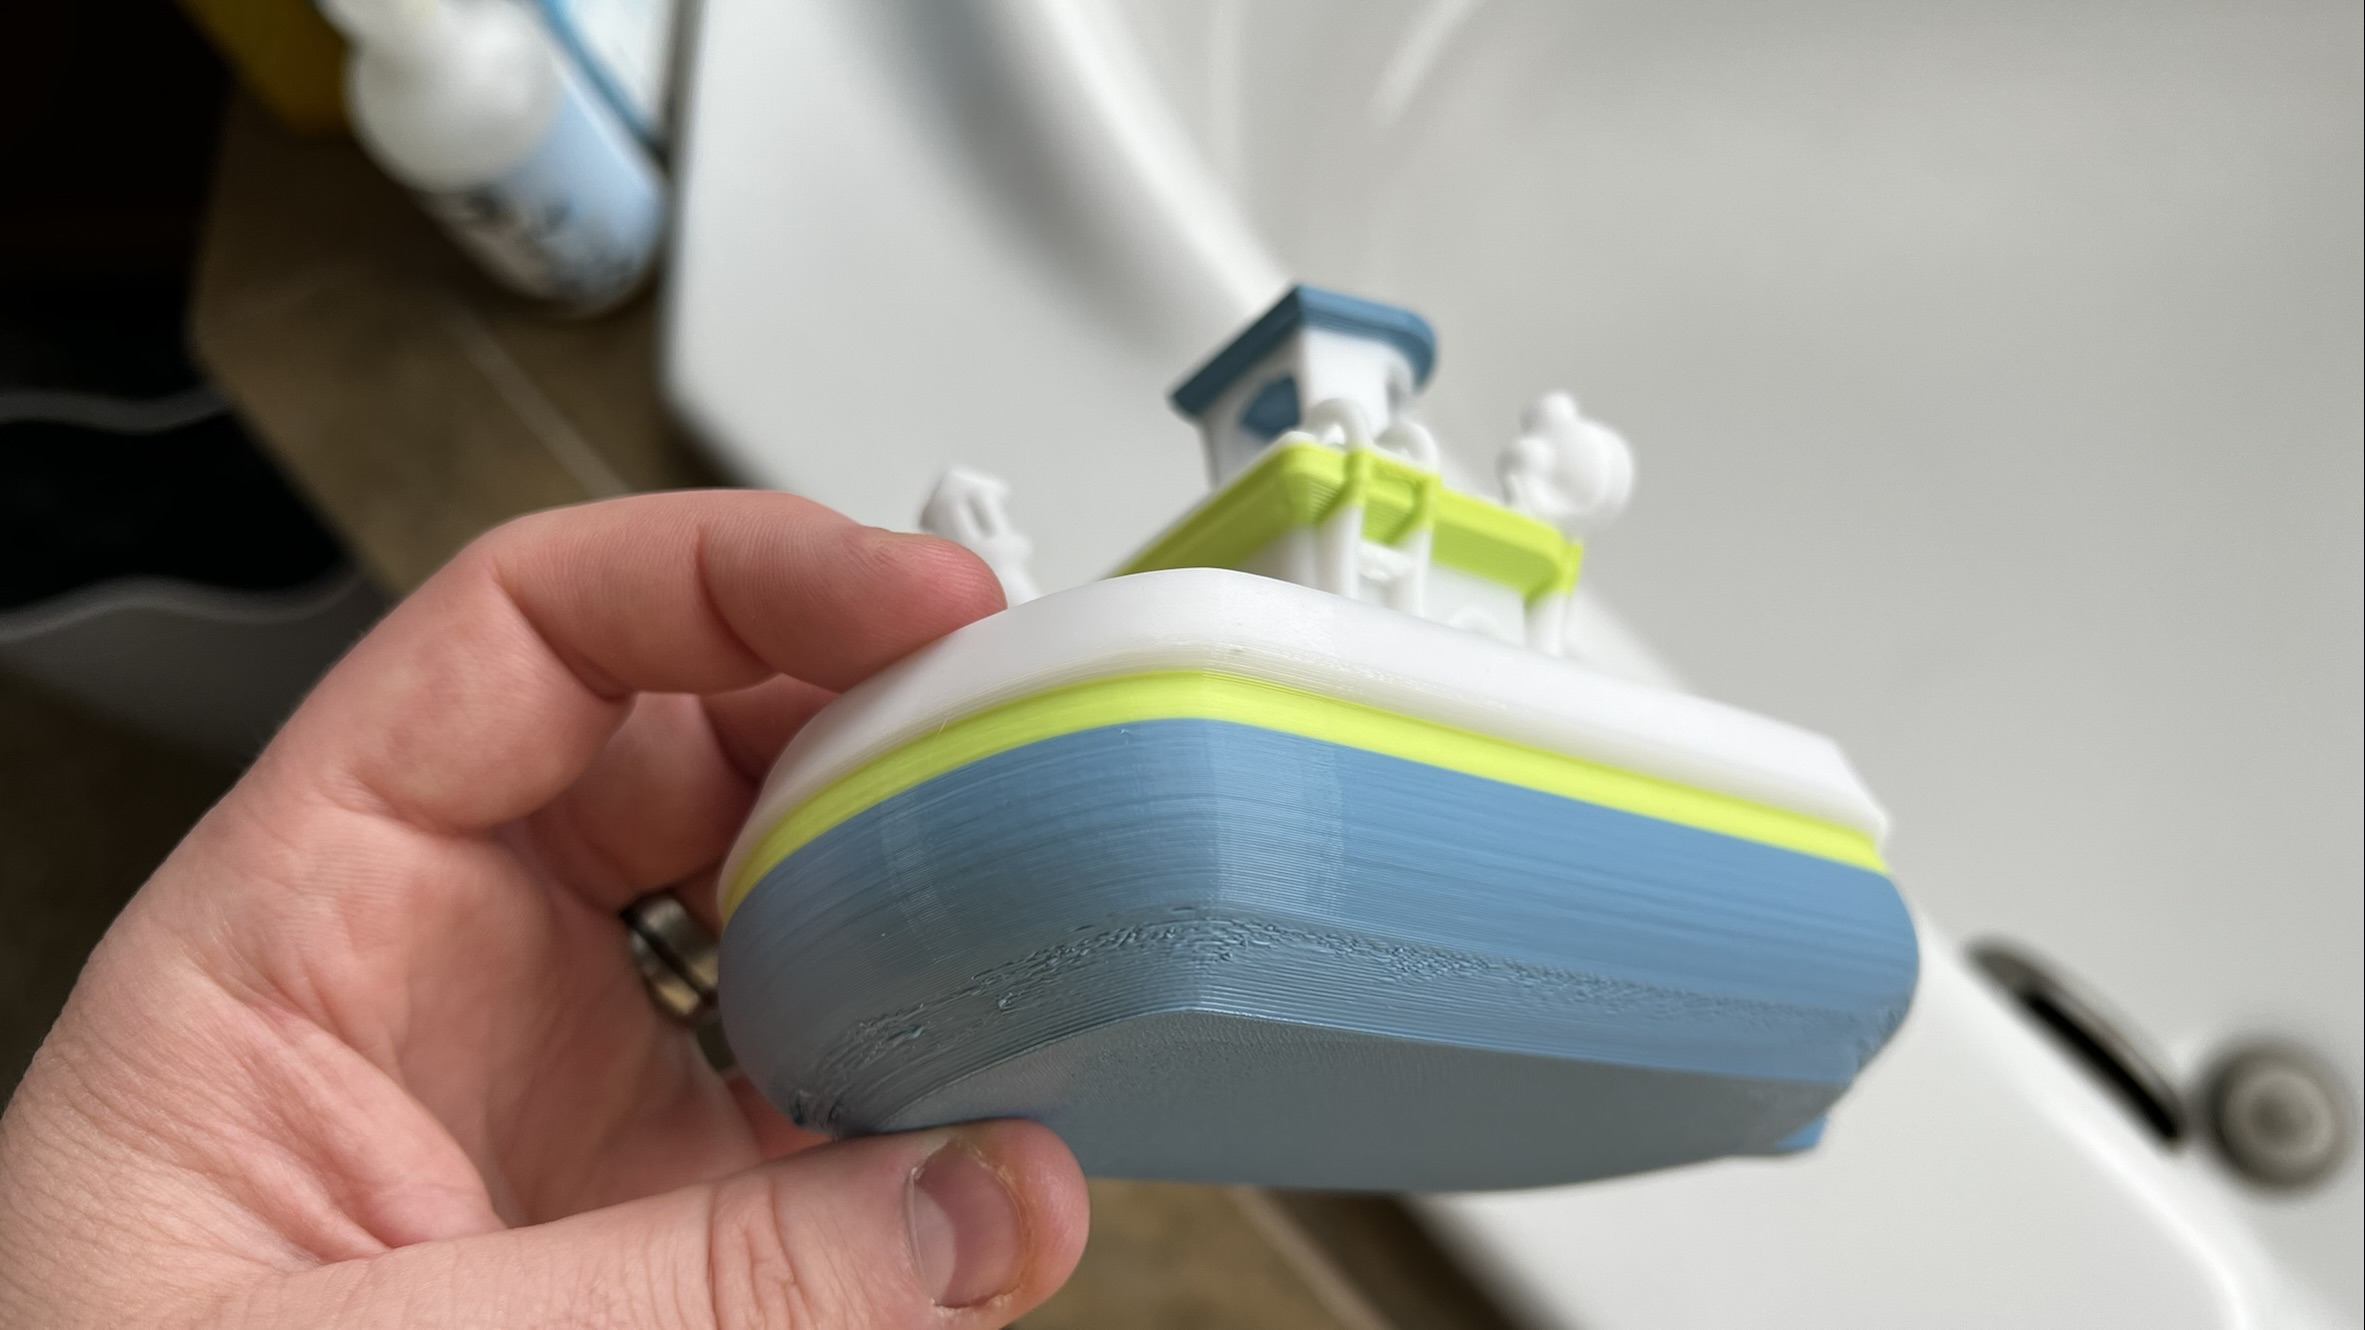
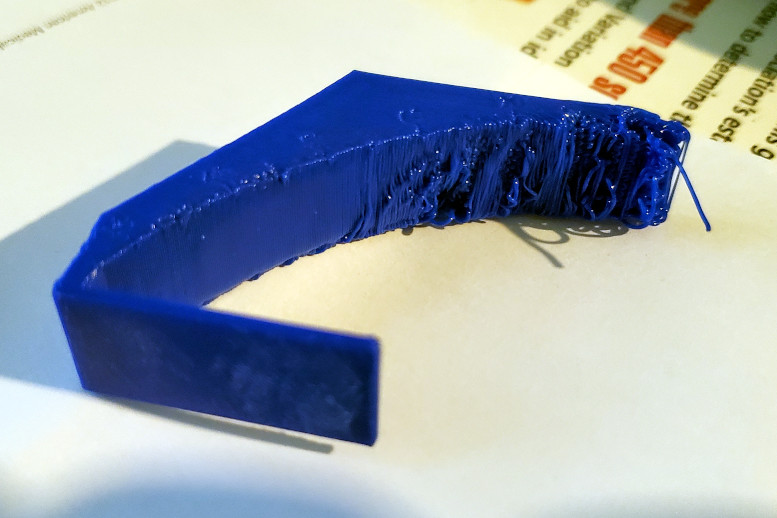
On several prints, I have some issues with the first 1/2" or so when the print is an angled overhang starting from the bed. I've attached some pictures to try to show it a bit better. The boat is probably one of the worse ones, and the rest of the print looks great.
I've tried increasing the number of vertical perimeters/shells thinking this would create a better 'base' as it builds out, but I seem to get the same issue happening. With the exception of this, the prints are coming out very well, so overall the settings seem to be in a pretty good place. I am mostly printing PETG, some Prusament, some Hatchbox, typically using the Prusament PETG and Generic PETG profiles in PrusaSlicer at 0.20mm Quality settings.
RE: How to improve angled/overhang prints near the bed
You might get some improvement by reducing the layer height and speed for problem areas and increase cooling. The shape on the lower part of that boat is hard to print well. See https://help.prusa3d.com/en/article/modeling-with-3d-printing-in-mind_164135
Mk3S+,SL1S
RE: How to improve angled/overhang prints near the bed
PETg filament isn’t that good for overhangs, if compared to PLA.
Follow @Sylviatrilling advices and perhaps reducing a bit the nozzle temp. would help too.
RE: How to improve angled/overhang prints near the bed
Sounds good thank you. I'll try those suggestions! Yes, PETG struggles more with the overhangs, but I hate how brittle PLA is... 😪
RE: How to improve angled/overhang prints near the bed
@jaltschuld
If you care to post a Zipped up .3mf project file exported from PrusaSlicer, and I'll take a look and see if I can offer any suggestions that may help. The .3mf file should be setup as you would when trying to print the part and will allow us to see all the settings as they pertain to the model in your project.
Note if you do not Zip the file the forum server will not allow it to be posted.
The Boat project may be the most advantageous.
Regards
Swiss_Cheese
The Filament Whisperer
RE: How to improve angled/overhang prints near the bed
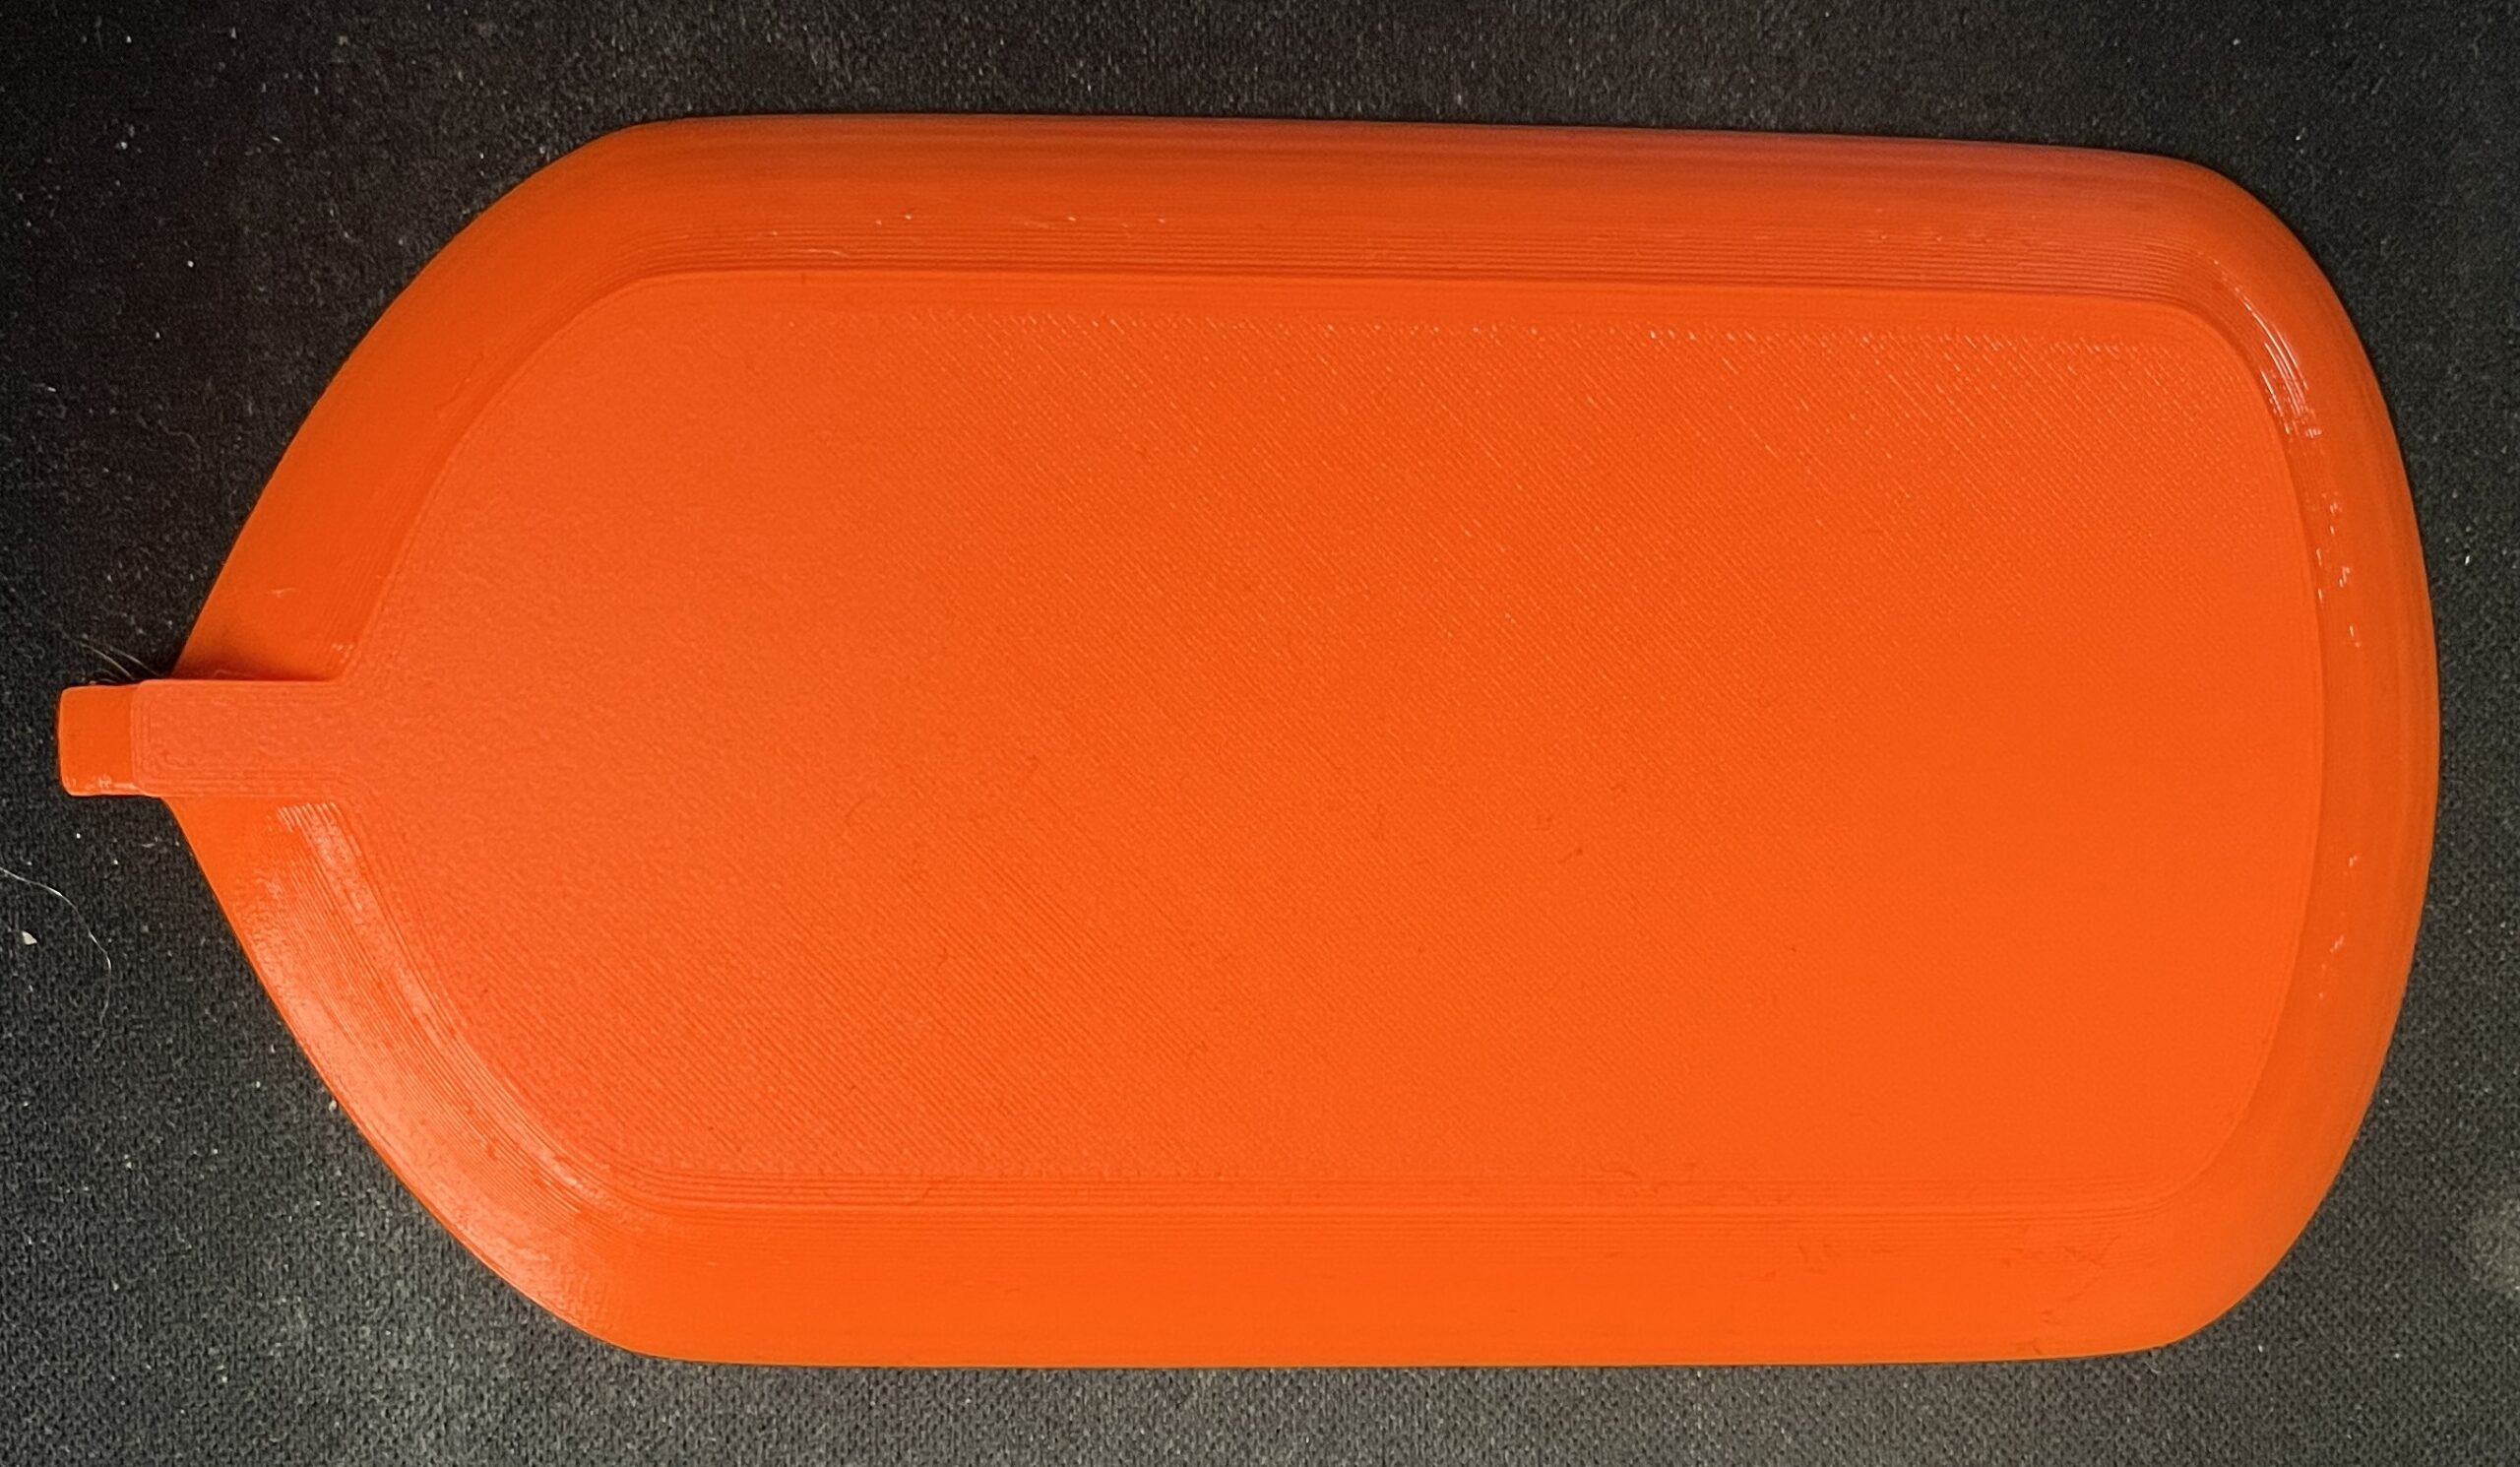
Thanks! Here is the .3mf file. The original STL was found on PrusaPrinters; I've scaled it up, added a modifier to add more infill at the bottom to make it tougher to capsize in water (this vertical distance does not correlate to the same distance that is having the issues on the outside), and added some color change layers.
Basic pointers to get the most out of your overhangs
@jaltschuld

(All angles are measured as the protractor goes)
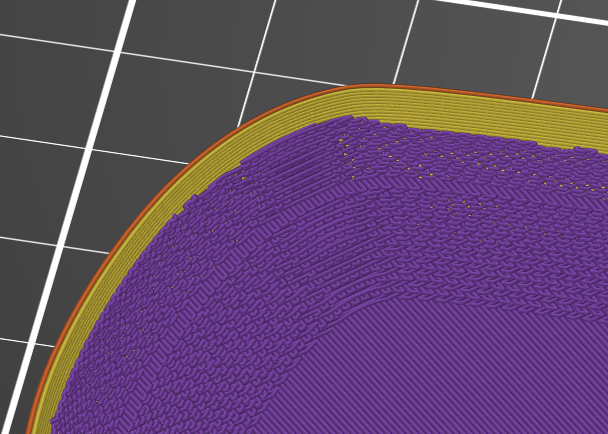
First I want to mention that every model is different and needs to be tuned for its unique properties, just because it has a 20°or 25° overhang is not an immediate disqualification from printing without support. The Bath_Boat model has some extreme overhangs, 20° at the bottom quickly advancing to 25°, then getting easier at 30° or greater as the print advances. Depending on the filament type and brand, your printer's cooling capabilities and frankly the shape of the overhang you can expect to get different results, you can also expect to have to use different techniques, or combinations of techniques to overcome them.
For this Bath_Boat model I used a Stock i3 MK3 printer and "Prusa Orange" PETG. For this example I focused on the lower portion of the model, (the hull of the boat) since this is the area where the trouble begins.
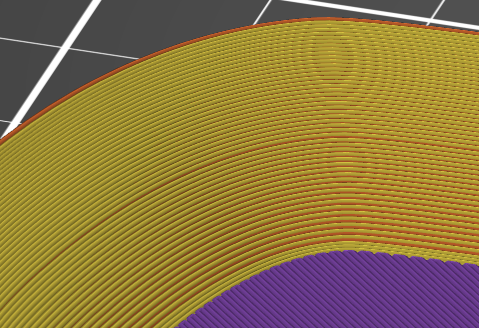
These were my results.
(Click to see lager images)
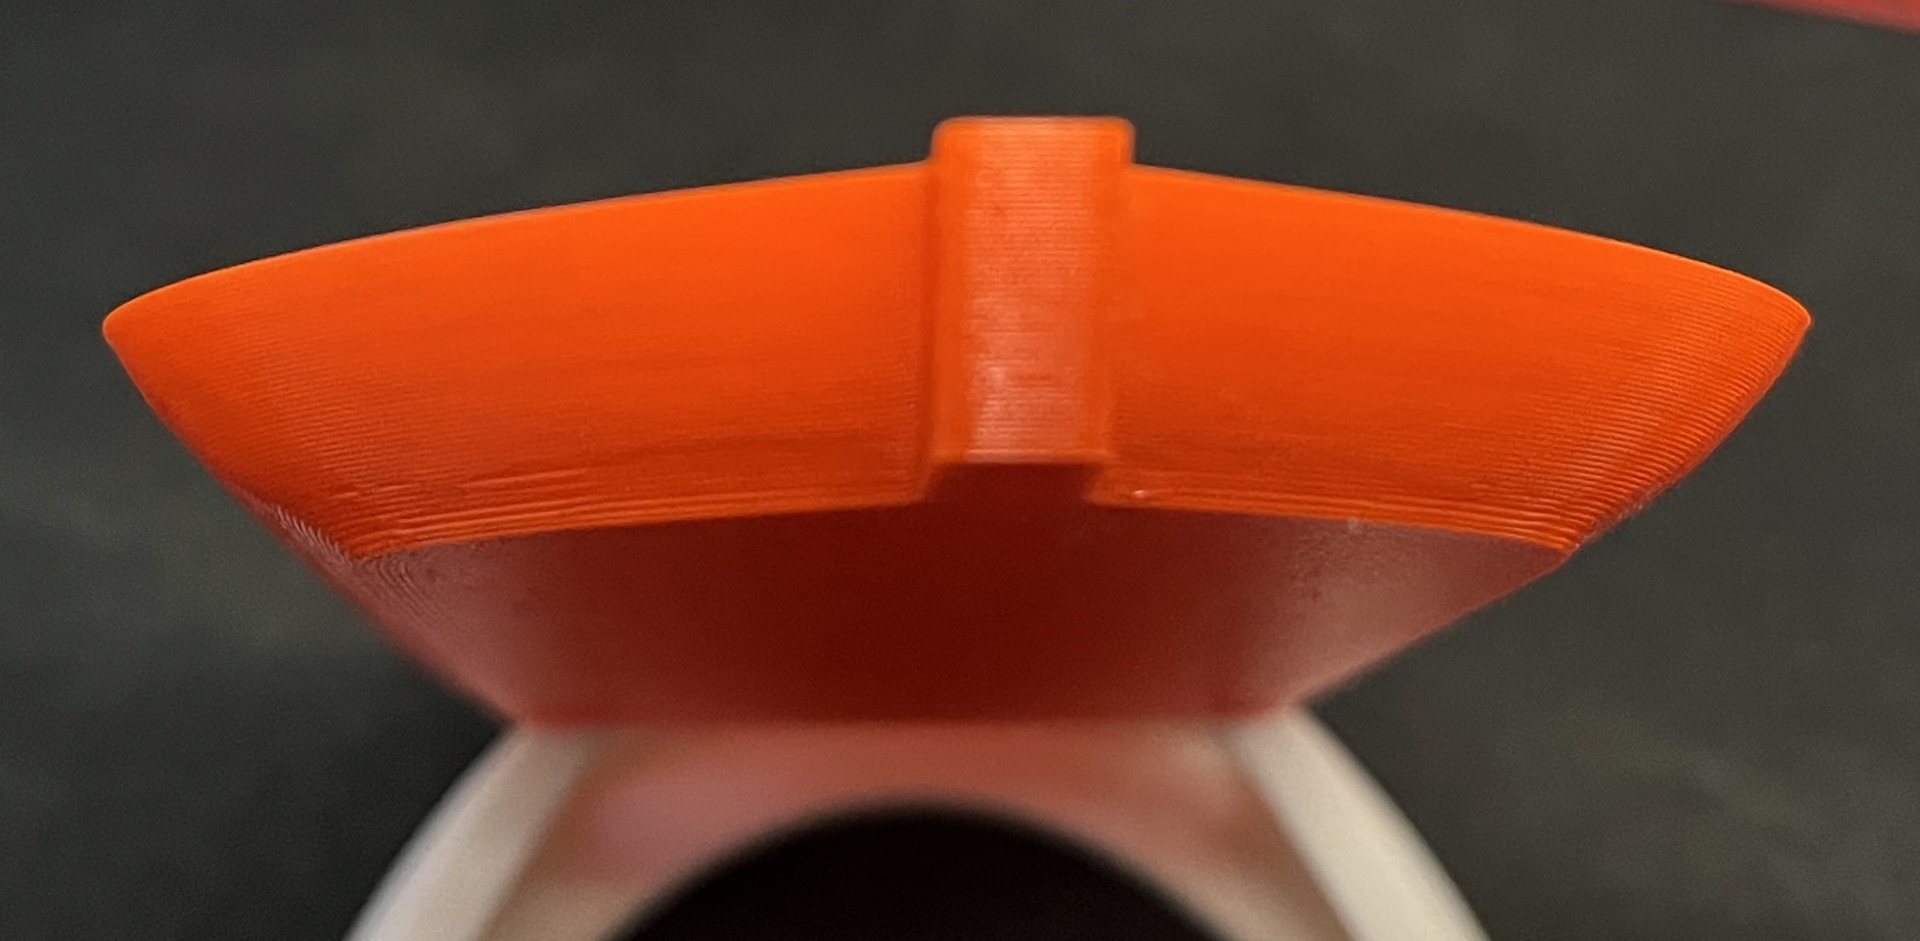
(Bow)
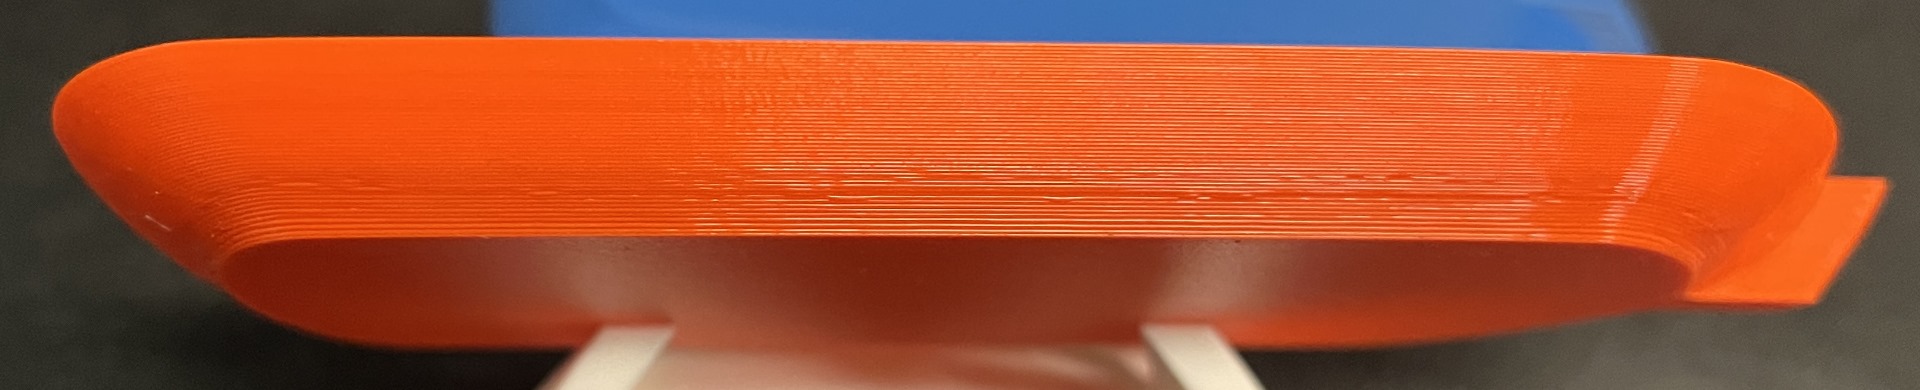
(Starboard)
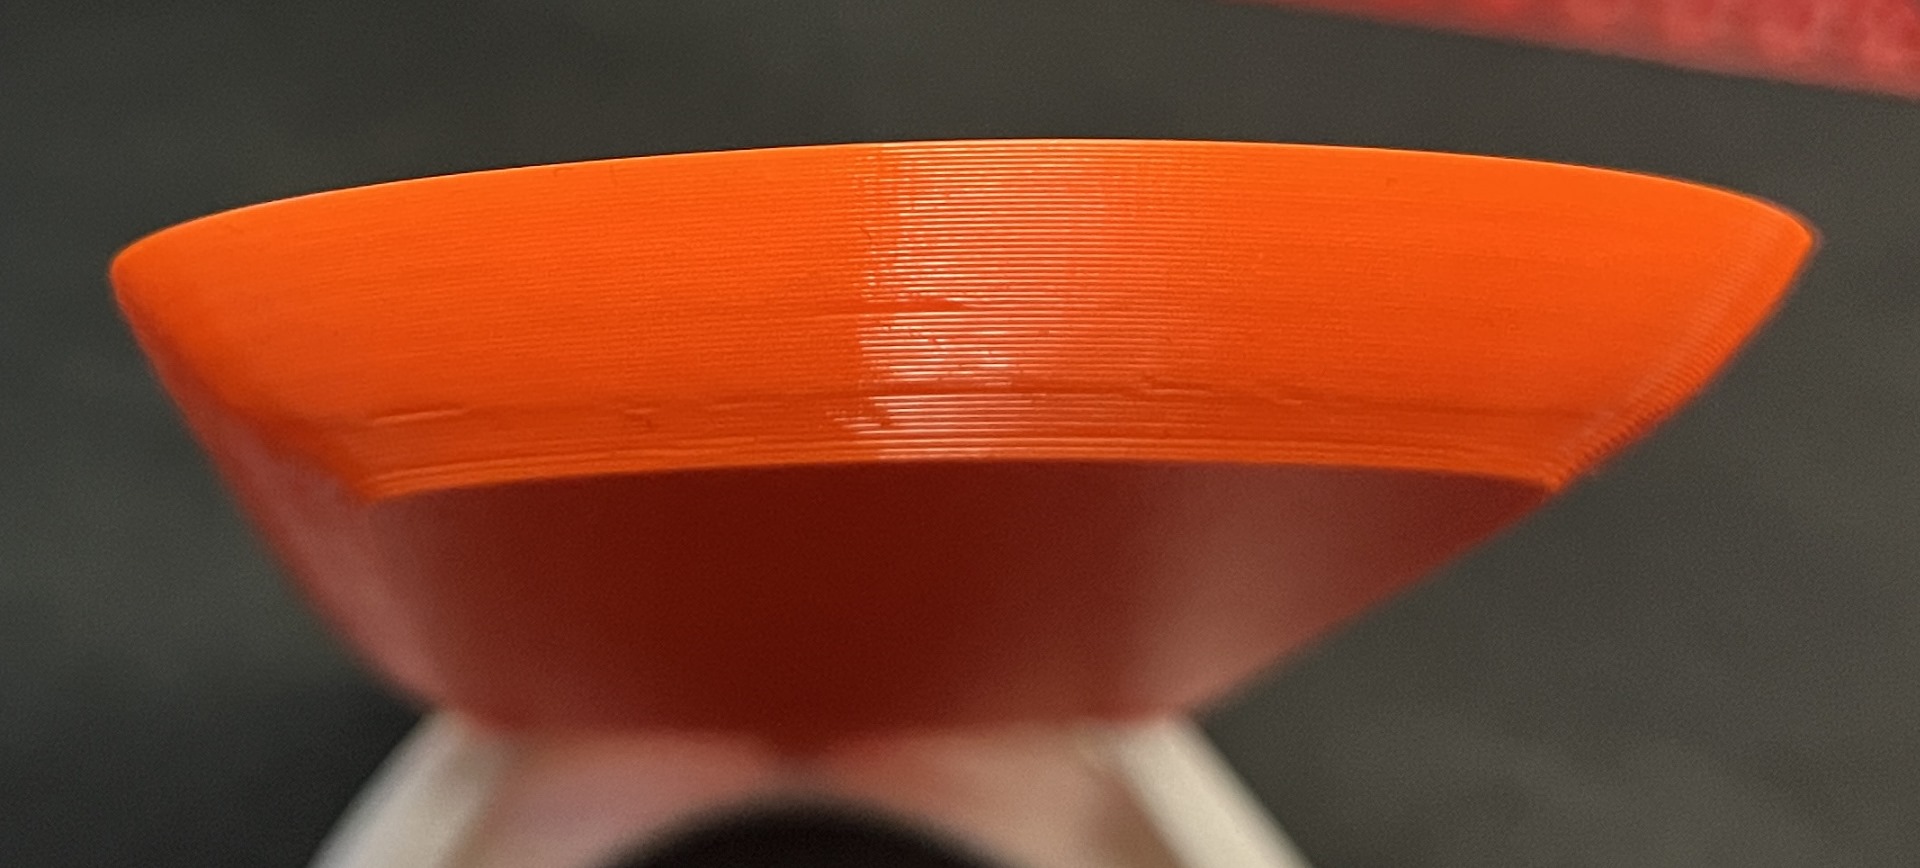
(Stern)
(Keep in mind how close up these images are, as I'm trying to draw attention to these areas)
They look substantially better to the naked eye.
When you're trying to overcome overhangs of gradual angle’s 30° or less, you’ll want to keep these factors in mind:
Heat applied :
This means all heat sources. The temperature you set the hotend, the heat that radiates from the hotend as it spends time over an area applying more plastic. Bed temperature, the heat that radiates up from the build surface over the duration of the print. Heat from accumulated plastic (Thermal mass). E.g. Dense or solid infill, high perimeters counts, etc,.
Cooling :
It’s important to consider how cooling affects the shape of the part as it solidifies. We only have two ways to cool with our FFF/FDM printers, passive (Time), and active (Fan), and we need to use both together, for best results. (More fan doesn't necessarily equal optimal cooling) this varies by material, and the qualities you're trying to achieve in your print. Too much cooling and your material may curl or warp, too little cooling and it may sag or droop, it’s a balancing act.
Print Speed :
This is very important for gradual angle’s, simply using the default speeds will result in less accurately laid perimeters in areas where more precision is key. In many cases slowing the print speed for the perimeters and external perimeters will aid in the attempt.
Extrusion widths : (Support)
Adjusting extrusion widths is a step that many newcomers seem to miss. The layer you are printing needs to have purchase on the layer below, we can cheat this a little. But you can’t lay hot filament in midair without consequences. Adjusting extrusion widths can help you achieve better overhangs. Try for 50%, you can get away with a little more if your heating and cooling are balanced well.
Layer Heights : (Support)
Layer Heights can play a role in supporting gradual angle’s, by changing the height of a layer or layers, it can at times become possible to position them for better purchase, this is not always true, and it is possible to have your layers to thin, to the detriment of the overhang, it’s a good idea to determine a good working range, (E.g. 0.1 - 0.25) the range will vary depending on the angle and features you're trying for.
Note:
As always, Layer height and Extrusion width play very closely together, and need to be adjusted within reasonable limits, it is however possible to achieve certain overhangs by only adjusting one or the other.
Moving on to the Bath_Boat example, I’m going to try and move through this kind of quickly. Layer one, Right off the bat I turned off “Ensure vertical shell thickness:”, reduced the hotend temp to 238C and bed temp to 80C first layer, 242C Hotend & 85C bed all others. I changed the height to 0.1 and turned off Elephant's foot compensation, because it helps just a little to improve the quality of the 20° overhang that this print starts out with. Every layer counts at these angles, if one fails so will the layers above, so it's important to finesse these layers.
Aside from the first layer changes, I used a (Height Range modifier) (HRM) 0.00 - 0.7 to change the Extrusion width of External perimeters to 0.55 to help facilitate better support of the layers above, I chose to maintain the 4 perimeters in this height range as this can help with warping since I reduced the bed temperature, and they are 100% filled bottom layers. I reduced the bed temp to help with cooling, the sharp edges want to curl up because the fan is cooling the top and the heat is rising, warming the bottom. Lower bed temps can make this easier to control. 85C is very safe and it worked this time, however I might go as low as 80C for the overall print with no problems, but I wanted to error towards the side of non-failure for those reading this in the future.
Finally, I reduced the print speeds for external perimeters (10mm/s) & perimeters (20mm/s in this range with the hope of adding more precision for a better quality edge. (20° remember?)
Tip: you can lower the bed temps even more if you use products that help adhesion. examples, Layerneer bed weld, or Magigoo and the like. These can be very helpful with plastics such as but not limited to ABS and PETG, etc.
Moving on, I added a (HRM) for 0.70 - 4.5 to maintain the 0.55 extrusion width, and the print speeds, however I added one more modifier, Layer and Perimeters Bottom: 0 layers. In this layer range we are into the 25° and 30° angles of the hull, and approaching the easily printed range but we still have to obstacles to overcome, as I mentioned earlier, I turned off “Ensure vertical shell thickness:” I did this because in some instances (more often than I think it should) “Ensure vertical shell thickness:” adds to much material in areas where it’s to the detriment of the print, and is applied in a way that is detrimental to the print.removing this material in this case will improve the overhanging quality of the perimeter wall and allow for better cooling.
(Ensure vertical shell thickness ON)
But wait, there's more?! 🤔

(Ensure vertical shell thickness OFF)
Even though we have turned off Ensure vertical shell thickness we still see what looks to be other instances of this occurring, however it’s not, in fact what is happening in these other areas is bottom layers (solid infill) Slicer sometimes recognises these angles as BOTTOM or TOP layers, we need to look for these as we tune our models for slicing, they have the same effect in this case as Ensure vertical shell thickness. To turn these off we need to use modifiers since we don’t want to turn off all bottom layers, hence the “Layer and Perimeters” Bottom: 0 layers In this layer range.
(Ensure vertical shell thickness & Bottom layers off)
The reason for turning these off is fairly simple, this extra material is not needed for the wall strength or the construction of the wall in this case, and is causing heat build up and curling in the areas it’s being applied. Aside from the extra heat the direction of application is detrimental to these gradual angle’s causing more curling. If we needed more strength for these walls it would be much better to add parameters then to allow the former. Remember we need to look at each model on a case by case basis, and specific areas/features of a model.
The last (HRM) was applied to 4.5 - 7.10, and was applied only to remove the last of that extra bottom layers issue. We have allowed the extrusion width to return to 0.45 since we are out of the problem zone.
@jaltschuld
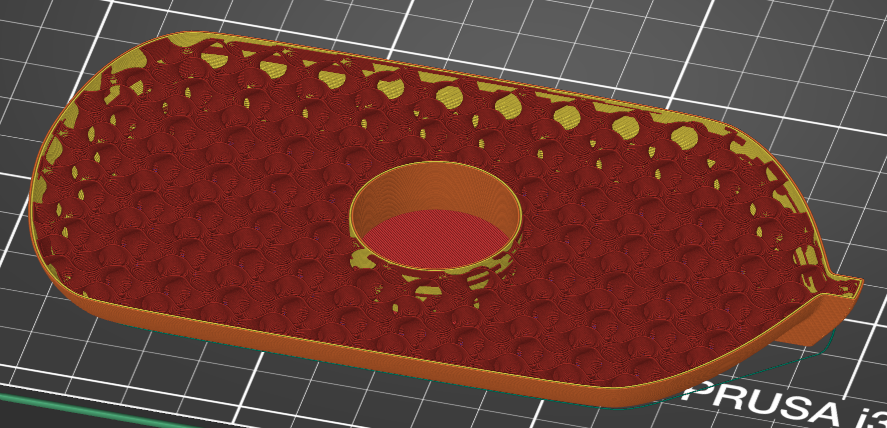
You mentioned that you left your infill at 50% at the bottom to help stabilize the boat while floating, My opinion is that the infill was to high for this application, I would go 15% max but recommend 10%, and to stabilize the boat find the “center of mass” in the X & Y and use a Negative Volume to create a cavity and put something with weight in it. Maybe a galvanized nut or something.
(Example)

(Side by side comparison of PETG and PLA for reference)
I'm sure I left something out, so if you have any questions just ask, these are just the basics. I’m confident that this could be tuned even better, but I only have so much time and plastic, hopefully this will help you, and maybe others with overhangs.
(Adjusted Project File)
Bath Boat_Swiss_Adj_Finished.Zip
Good Luck
Swiss_Cheese
The Filament Whisperer
RE: How to improve angled/overhang prints near the bed
Wow!!! This is incredible. I need to read through it all a couple times, but I can't thank you enough for taking the time to play with the model, much less write all of this up for me. Thank you again 🤩 🤩 🤩
RE: How to improve angled/overhang prints near the bed
Given just how difficult it print curves in this orientation, Swiss_Cheese made some super prints, he really knows his stuff.
Of course you always have the option of splitting the part and turning hull up the other way.
RE: How to improve angled/overhang prints near the bed
To late to edit so maybe something like -
RE: How to improve angled/overhang prints near the bed
@jaltschuld
Your welcome, hopefully you'll get what you need from it, you can use the posted project file to help you work your way through this, if you want to experiment I suggest using the cut tool, cutting at 10mm, setting top layers to zero and infill 10% to save time and material.
Regards
Swiss_Cheese
The Filament Whisperer
RE: How to improve angled/overhang prints near the bed
@swiss_cheese
Thanks! What a clear and comprehensive explanation. I struggled with curling in small parts with overhangs, for a while . With your explanation, I now have a couple of ways to try and solve this. Sometimes you just need a different view to continue learning.
I really appreciate your answers. Thank you very much!
Kind regards,
RE: How to improve angled/overhang prints near the bed
@Swiss_cheese - I just came across this thread and your detailed explanation of how and why you did what you did to print the overhangs successfully.
I just want to thank you for taking the time to share your knowledge in another master class in 3D printing. This kind of information is invaluable to those of us still learning the ‘art’ of making things with molten plastic.
Cheers!
RE:
Thanks everyone for the kind words. That goes a long way.
Enjoy
The Filament Whisperer
RE: How to improve angled/overhang prints near the bed
This thread really helps. I’ve got an outdoor project that will stare Southward into the Houston Texas sun. My time honored PLA designs have not printed reliably in ABS, to put it lightly. I had my first Blob of Doom on a design with 46.5 degree overhangs down low.
By trial and error I’ve eliminated low layer overhangs in the the design, without knowing why that worked. Going forward I’ll try your slicing options.
I’ve been running with The Prusa defaults for ABS of 255/110, in hopes of better inter-layer adhesion. I was considering a drop in the heat, I think I’ll try fat extrusions for the bottom layers instead.
Thanks much
RE:
This thread really helps. I’ve got an outdoor project that will stare Southward into the Houston Texas sun. My time honored PLA designs have not printed reliably in ABS, to put it lightly. I had my first Blob of Doom on a design with 46.5 degree overhangs down low.
By trial and error I’ve eliminated low layer overhangs in the the design, without knowing why that worked. Going forward I’ll try your slicing options.
I’ve been running with The Prusa defaults for ABS of 255/110, in hopes of better inter-layer adhesion. I was considering a drop in the heat, I think I’ll try fat extrusions for the bottom layers instead.
Thanks much
I can state with a very high degree of confidence that the Prusa I3 series can and will do a consistently good job of printing ~45 degree overhangs using ABS.
In the photo below (wow, used this same object as an example in three threads now) the internal ridge is a 45 degree chamfer, circular, and although it might not be obvious in the photo, it's clean and flat. This was done with RepRappers white ABS using the default generic ABS settings.
One thing that you might try is printing one of those overhang test prints using ABS. One I printed a while back (can't find it, otherwise I would post a photo) had varying angles and IIRC, the Prusa did an acceptable job even at on overhang 30 degrees relative to the build plate, which is really pushing it. There are all kinds of these test prints out there. Some of them actually go from 90 degrees relative to the build plate to zero degrees, and they are intended to fail at some point. Watch it and stop it when it starts failing.
RE: How to improve angled/overhang prints near the bed
Just for sh*ts and grins, I printed one of those overhang torture tests, using Hatchbox ABS, which is the filament currently loaded.
This is a 15mm thick print, and therefore any droop will be obvious, plus it's intended to fail at some point, as it goes from vertical to parallel to the build plate.
As you can see, it starts to fail between the 45 and 60 degree (from vertical) mark and starts to totally crump at the 80 degree mark or so.
RE:
@jsw
It depends on the model, my overhang tests are clean and clear for ABS at 30°as the protractor reads/60° degrees as the tests read. and that's without printing in an enclosure or with a Skirt, on a Original Prusa I3MK3. As well I commonly print ABS at these angles.
The Filament Whisperer
RE: How to improve angled/overhang prints near the bed
Hey @swiss_cheese, amazingly thorough response here!
I too am having some issues with overhangs (tiny ones). I've tuned my print to my ability but cannot for the life of me figure out a good way to mitigate the issue.
Not sure what the rules on compensating for services are here but I'd love to have you take a look if you'd like. 🙏🏼🙌🏼