RE: Help printing with FlexFill 98A
@calumd
Thanks for the help calumd, and where did you add the code? I may give it a try.
RE: Help printing with FlexFill 98A
@francisco-g4
No problem, I hope it helps. The code can be added in PrusaSlicer in the "Start G-code" under Printer Settings -> Custom G-code tab.
This worked for me but I have since installed this upgrade: https://www.thingiverse.com/thing:3933882 and I am no longer encountering the problem and am able to print Flexfill 98A (even with retractions enabled) without setting the extruder motor to a lower current.
RE: Help printing with FlexFill 98A
@halcon-designs
Thank you very much. I only saw your post today, I’m already printing the extruded cooler and by chance I had a fan here at home with that size, already extended the cable length, the only thing I have to check is the connector if it fits. I also prefer this solution to the other one. Maybe later tonight or tomorrow I try to assemble everything in place.
RE: Help printing with FlexFill 98A
@francisco-g4
Great, hope it goes well! I was using the code solution for a bit but, like you, after I found the fan shroud and that it also worked I decided to use that instead. I haven’t had any problems since and can run more aggressive retractions. With any luck it should have yours running flawlessly too.
RE: Help printing with FlexFill 98A
@halcon-designs
Yesterday when I was cleaning up the printed part I break it in several places, already printed a new one and I’m assembling it right now.
Are you using default settings in PrusaSlicer for FlexFill or changed anything?
Thanks once more.
RE: Help printing with FlexFill 98A
@francisco-g4
For Flexfill I have had to play around with retraction to reduce surface bumps and stringing, but it's still a work in progress. Currently 1.2mm retraction and 0.6mm lift z seems to give me little to no surface bumps and reduced stringing, although there is still a bit to go...
RE: Help printing with FlexFill 98A
@halcon-designs
After 11 months I made it! Thanks for the big help!

RE: Help printing with FlexFill 98A
@francisco-g4
Brilliant! Glad I could be of help!
RE: Help printing with FlexFill 98A
@morcegolas
Hi there! I am having all the same nightmare problems like you printing in Felxfill 98A from Fillamentum. I am trying to print an iPhone 11 Pro case and after the first couple of layers the filament gets "Tangled" on the bondtech gears pretty much like the first picture you shared on this thread.
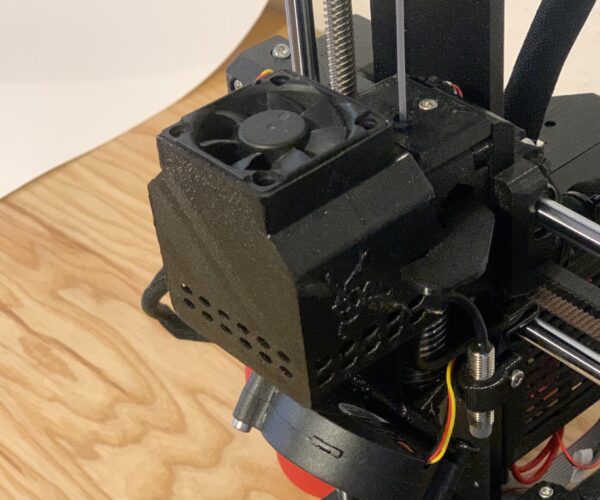
Was your solution to place an additional cooler on top? https://www.thingiverse.com/thing:3933882
Do you keep this cooler always on or you just use it with Flex materials?
I have no issues printing with PLA and PETG till now, but FLEX is something I am trying now, as I got the filter for my enclosure.
Thanks for sharing what you did to fix your problem!
Fernando
RE: Help printing with FlexFill 98A
@halcon-designs
Hi there, what I am wondering is, are the pre-configured settings on the Prusa Slicer wrong then? Why do we need to adjust so many things manually? I am new to all this world but it catches my attention that there are so many variables to fine tune to print in machines and filaments that seem to be quite standard nowadays.
Thanks for sharing your view 😉
RE: Help printing with FlexFill 98A
@fscheps
No worries, happy to hear it is helping people!
Regarding the solution to the filament tangling, I now run the extruder motor fan and shroud as you linked above on the printer always. As with your printer, my printer can print PLA and PET-G fine without the need to run the fan. However, as I have done the wire management for the fan as described on the thingiverse link I'm too lazy to unplug it from the motherboard each time I swap filament, so I run it whenever my printer is on.
The problem itself is a combination of two things. One, the extruder motor overheats and, coupled with a single shaft straight to the Bondtech gear, allows for the heat to travel straight to the filament, increasing its temperature and reducing the filaments stiffness. The second is that the path between the filament and the hot end doesn't seem to be restricted enough and allows the less stiff filament to buckle out to one side.
As to the presets for materials in PrusaSlicer, the most used material seems to be PLA and the presets provide brilliant results and again very good with PET-G. When it comes to flexible/TPE filaments the presets seem to be only a baseline to get you into the right direction, in which you have to test different settings yourself (which there seem to be a near endless amount to lean and different combinations can drastically change your print). The other option is to find profiles/presets people have tested themselves and see if they also work or at least provide better results. I have since tried filaments with a lower hardness (95A) which you'd expect to be even more difficult to print, but with the filament staying cool as it passes the gears I can even run full retractions of 2mm with retraction speed of 40mm/s without it buckling. Also some presets people have uploaded provide excellent results with TPE filaments.
I hope this has helped and that you get your flexible printing well. I've still got plenty of learning to do myself.
RE: Help printing with FlexFill 98A
...(which there seem to be a near endless amount to learn*
RE: Help printing with FlexFill 98A
@halcon-designs
Thanks a lot for your feedback. I will check and probably print the adapter with the new cooler. 😉
RE: Help printing with FlexFill 98A
@halcon-designs
One question, what is the exact model of the fan you used for this adaptation? Thanks a lot for sharing!
RE: Help printing with FlexFill 98A
Hi there,
After having failed 3 times in a row trying to print for the first time with Flexfill 98A, all prints failed more or less at the same point, the filament got clogged on the bond gear. I decided to give it a try with a quick test by pointing a little USB fan to the top of the extruder motor to reduce the heat it was producing. I can see the positive results already that the print at least finished.
There is quite a lot of stringing and quality issues, that I guess are created due to a fan pointing towards or near the print area? What do you think?
I am going to try again but with the housing for a new fan, ideally I wanted to avoid having to add an adaptation to the out of the box config, but if this is helping as it seems to be for many people, then I guess it will be the path to go.
In the sense of out of the box Flexfill 98A profile settings on Slicer, do I need to modify anything at all? Do you disable retraction or leave it in 0.8 as it is?
Please tell me the quality of this outcome is not what I should more or less expect as "normal" and that it can be greatly improved 😓
Thanks for your advice!
RE: Help printing with FlexFill 98A
@fscheps
1. What Replacement Fan to Use
With the Extruder Cooler linked I bought a replacement "Hotend fan Noctua" from purse while ordering more filament, here's the link:
https://shop.prusa3d.com/en/mk3mk3s/199-hotend-fan-noctua.html
If you are planning to get this fan and attach it to the motherboard it does require you to either replace the connector it comes with or to cut the connector to remove the signal wire and for it to fit into the connector on the motherboard. Instructions for this process and wire management (it is designed with wire management in mind) are provided at the thingiverse link. One note to bear in mind is with these methods the fan will always be on at 100% when your printer is on, but I have had no problem with this solution.
2. Profile Settings advice
I believe they suggest no retraction to try and avoid the clogging problem when the motor overheats as it is also linked to the jerk motion that is retraction. Therefore, without the upgrade having high retraction and high retraction speeds increases your likelihood of a clog.
With this in mind, retraction does help reduce the surface bumps that appear with stringing. I am no expert on profiles, but I believe the main settings worth a look at to reduce stringing are(especially after the upgrade as you will be able to test higher and faster retractions without the filament jamming):
1. Temperature - usually too high temperature leads to excessive stringing, try a temperature tower to see where your filament bridges best at and what temperature there is reduced stringing.
2. Retraction - TPEs tend to require higher retraction values than more rigid filaments. Note: Prusa recommends no higher than 2mm
3. Lift Z - Lift Z helps reduce surface bumps created with stringing, using a higher lift z can get rid of these but in my experience it swaps them for very fine hair like strings that are easily removed by pulling off and using a heat gun to finish. With the right retraction settings this isn't usually necessary.
4. Wipe while retracting - This can be used in conjunction with retraction and helps clear excess material off of the nozzle before moving.
These parameters when combined can provide great results, it seems to be about changing each of them to try and find a good combination that provides a good result. Again I am still quite new to this so I'm sure there is a lot more to it as well as other parameters that I have not mentioned that can change the effect of the outcome.
RE: Help printing with FlexFill 98A
@halcon-designs
Thanks a lot for your fast reply !
RE: Help printing with FlexFill 98A
@fscheps
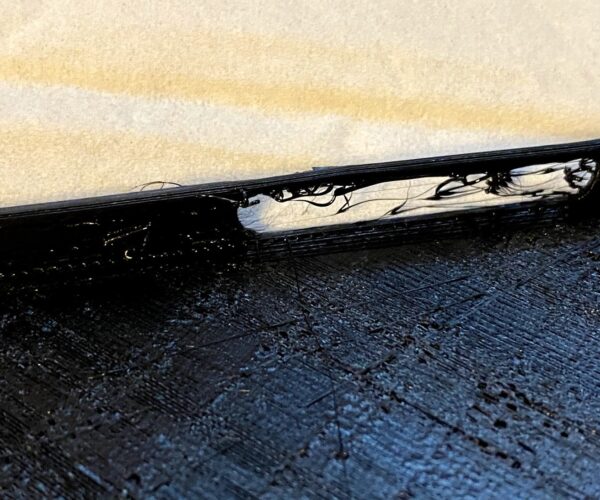
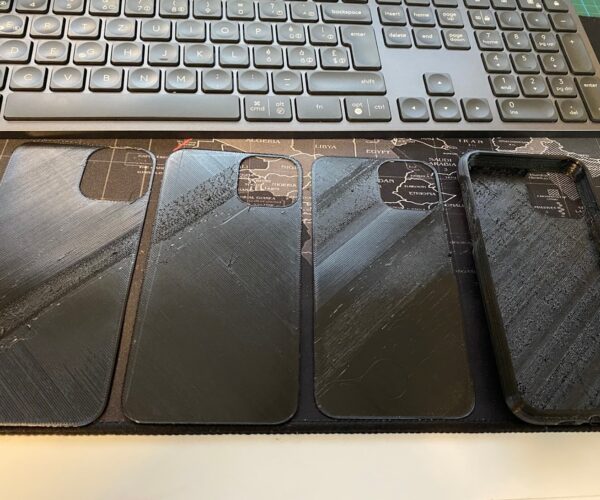
Also having just seen your pictures there are a couple of problems where the button holes are. This looks like poor "bridging" which is the effect of one or two of a few things.
1. Too high temperature causes bridges to sag.
2. Not enough cooling from the print fan during bridging
3. Too high "bridge flow ratio" in that too much material is being pumped out to provide enough tension in the flow for a bridge.
Also supports can help with bridging and overhangs especially. If you could upload an image of the first layer that bridges the gap it would be better to see the problem.
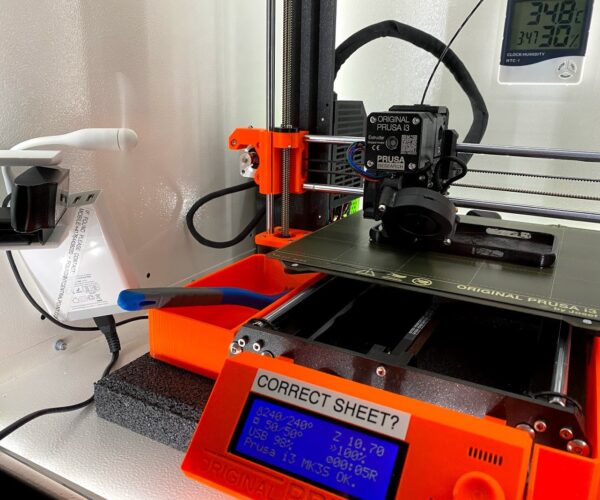
I need to get one of those labels above your screen!
RE: Help printing with FlexFill 98A
@halcon-designs
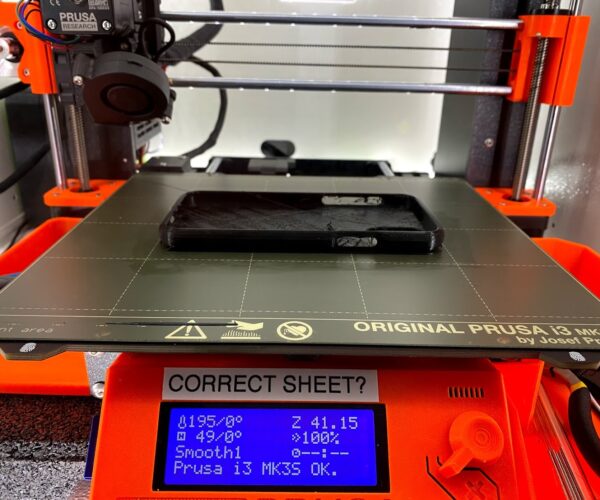
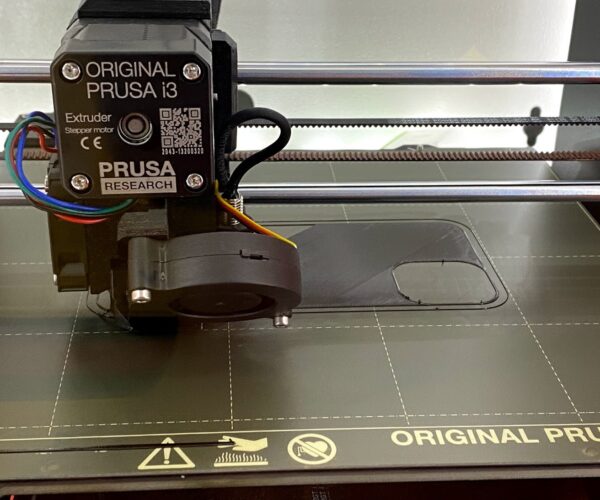
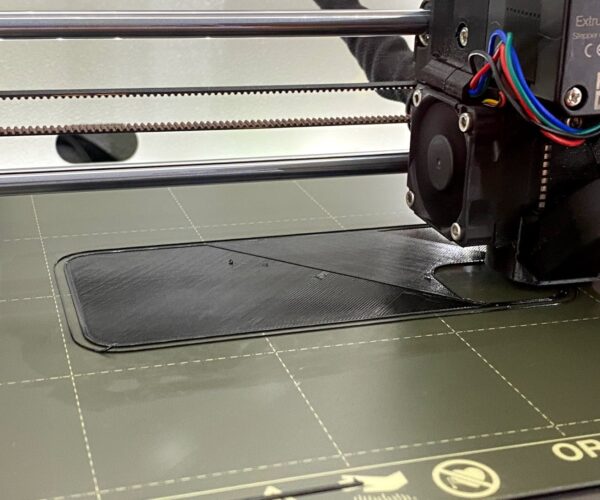
Here some more images:
Here while it was printing "OK"?
There are already signed of material where it shouldn't be
Here the first 3 failed prints all of them in the first layers, then the fillament clogged on the bond tech gears, and the last one the only succesful print but with very low quality.
I am reading the printing guide of the material (Flexfill 98A) directly from the manufacturer:
There are some things I dont really understand.
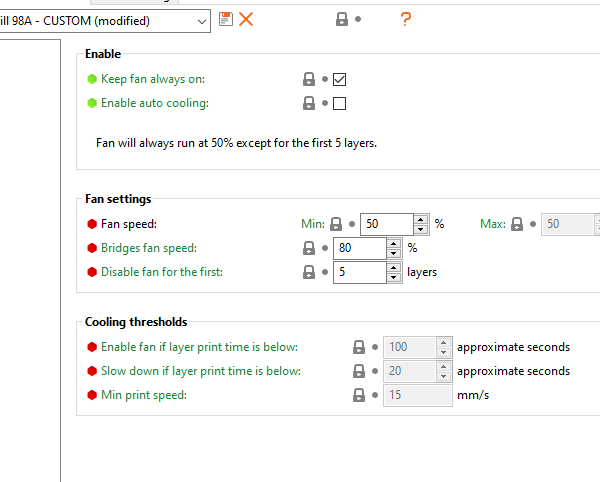
For example when they say: "Part Cooling Fan 70-100%" when I check this parameter in the material profile in Slicer I see:
Which parameter should I change? Should I change the FAN Speed? Should I change the Bidges Fan speed?
I´ve installed an E3D socket to my extruder, it helps keep things sort of clean or easier to clean, I hope this doesnt produces any alternation on the temperatures. In theory for what I read I shouldnt change any parameter due to this.
I am reading on the print material guide that loweing the Extrution Multiplier to 1.1 seems to help, I will try that too.
Thanks for your tips!
RE: Help printing with FlexFill 98A
@fscheps
Any time!
For the fan speed it means the "Fan speed" as you said, to do this you tick both boxes at the top ("Keep fan always on" and "Enable auto cooling") and then set Min to 70% and Max to 100%.
Bridges fan is for when you are trying to "bridge" a gap, this is shown in the image below with the light blue (and dark blue for bridging perimeters) features. Its where there is nothing to support the material being put down, so the printer tries to "bridge" the gap by: 1. rapidly cooling the material to stop it sagging, and 2. pushing less material through (bridge flow ratio is the ratio of material being pushed out in a bridge move compared to the standard amount, similar to the extrusion multiplier but only for bridge moves) to keep tension in the bridge line to prevent sagging.
