Different extrusion rates inside a model needed
Hello,
I try to print this piece (Prusa PETG with 0.1mm layer height and 0.4mm nozzle) for my RC Tamiya truck.

It's 13mm in diameter and I need it as a replacement for a lost piece, which was also printed by an enthusiast, when he build the truck. His printed piece looks like this:

Okay, the surface is not so smooth as I'm used to with my Prusa, but the knobs are fine.
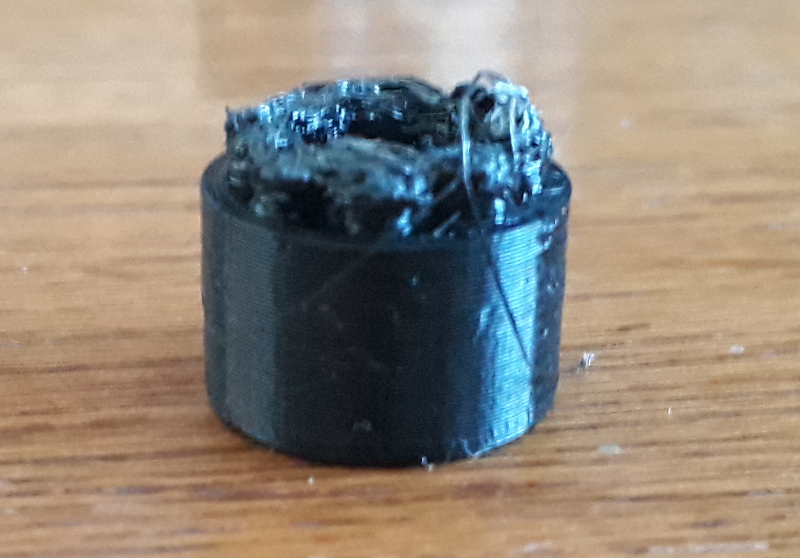
When I print it, the base section always becomes perfect, but the small knobs are horrible. They look in each try like these:

For me it looks like the extrusion rate is to too high for the small radius (1mm). So I tried to rework the g-code file to reduce the rate and went down to 70%. It's still to much for the knobs, but it begins to be to less for the sphere in the middle.
So for me it would be perfect to be able marking specific areas/sections of an item, where I can modify the extrusion rate. In this way I would be able to go with 55% for the knobs and 75% for the sphere. I can do this manually in the g-code file, but it's disgusting to change it several times for experimenting.
So, is there a way to modify specific sections of an item to adapt the printing process for special conditions and print the whole item in on process?
I appreciate any help and hint.
I use PrusaSlicer Version 2.3.0+linux-x64 with a Prusa i3 MK3S.
RE: Different extrusion rates inside a model needed
That part shouldn't be difficult to print, and you shouldn't have to do any editing of gcode to print it successfully. Save your current 3MF project file, zip it up, and attach it to a reply here so we can see your part & settings and give better recommendations.
RE: Different extrusion rates inside a model needed
I agree with Bobstro - that should be simple to print - there is a setting that lets you control the temperature on layers that take less than X amount of time. It might be easier to print 6 or so at a time - spread the heat around. Printing a small # of them is going to make the head being in that small an area for a long time built up a lot of heat. You need to move the head around and spread the heat out.
One trick might be printing the nubs side first - on the bed.
RE: Different extrusion rates inside a model needed
Thanks for your very quick reactions. My basic version, which I use to generate the different versions that I combined manually, is this one:
Tamiya Hinterachsblende Zwillingsreifen_v2
I was very irritated to get these problems. I even introduced cooling times between the layers of the knobs and let the fan run in the mean time, but this version then looked even worse. 🙁
RE: Different extrusion rates inside a model needed
@teacfreak
Try this one out, I corrected the settings and printed one to check.
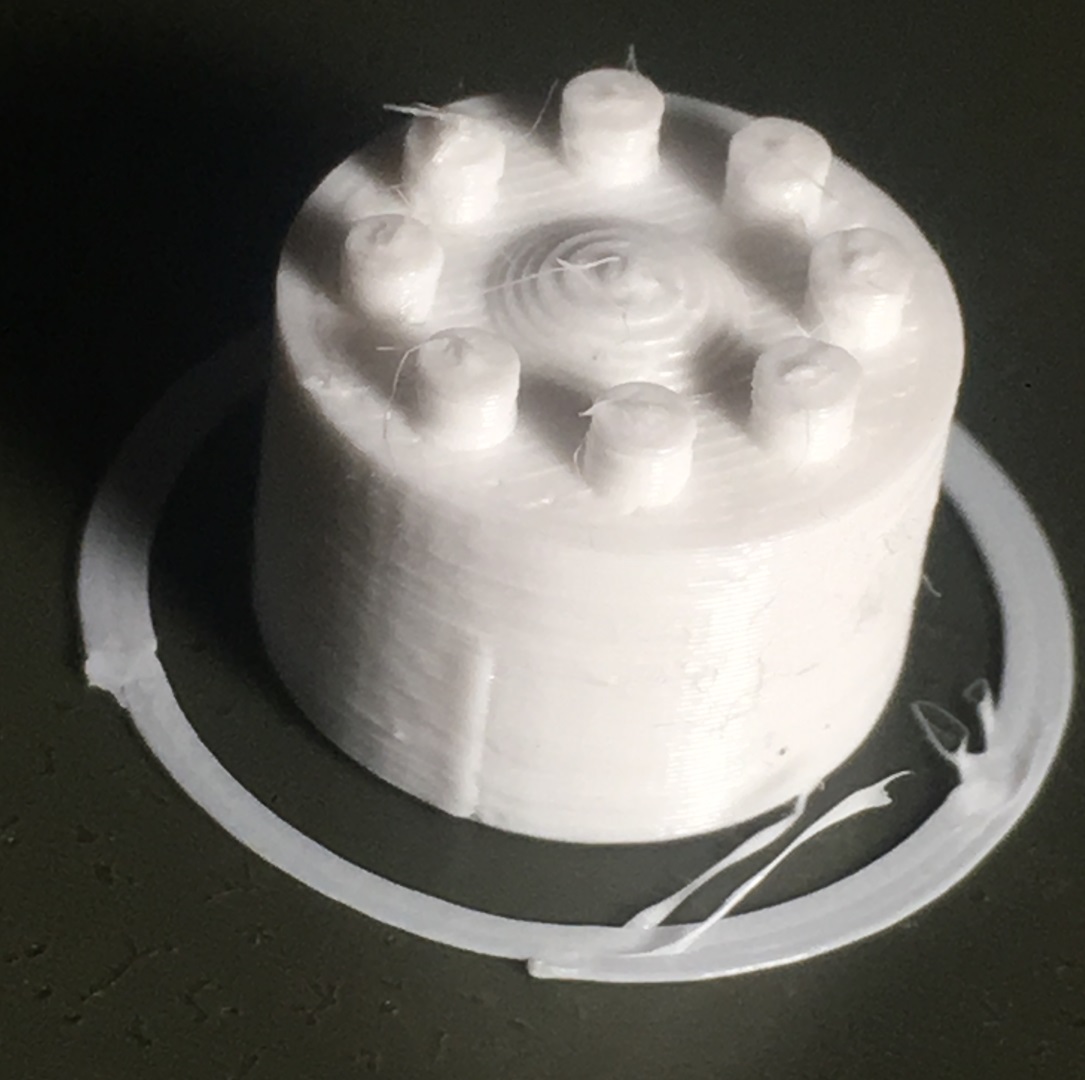
Photo is very close up, it's tiny
Here is the modified .3MF with the settings I used.
Rev_Tamiya Hinterachsblende Zwillingsreifen_v2
Enjoy,
Swiss_Cheese
The Filament Whisperer
RE: Different extrusion rates inside a model needed
@swiss_cheese
Wow, thanks a lot. That's unbelievable quick help! 🙂
I will directly print one and check what you've adjusted, to learn making it better next time.
I'll come back after the print has finished.
RE: Different extrusion rates inside a model needed
@swiss_cheese
Checking the settings, I'm not sure to understand all changes.
Maybe you can help me by explaining your thoughts, that I can use you knowledge for my next prints.
(Sorry for possible translation mistakes, my Slicer is in German.)
Tab "Printer Settings":
There is a change in the custom G-code for the start announced, but I can't find any. Maybe I over see something. Can you tell me what you did there?
Tab "Filament Settings":
Page "Filament":
* You decreased the bed temperature from 90 to 85 and resetted the nozzle temperature form 230 to 240. Is this a general suggestion from you or is it specific for this print?
Page "Custom G-code":
* You did several changes to the start G-code, which are connected to the Prusa Mini or 0.6mm nozzles. So for my case, having only the MK3S they have no effect. Do I understand that right?
Page "Dependancy":
* The software announces also a change for the compatible printer settings, which I seem to also over see. Can you tell me what you did there?
Tab "Print Settings":
Page "Layer and Coverage":
* You changed the minimal hull strength. Was this forcing the printer to make thicker walls?
* Then you unchecked the point to ensure the vertical hull thickness. What does that influence?
* Further you ckecked avoiding crossing of contours. What does that do?
* Then detection of bridges you unchecked. I know it's written that it's experimental, but up to now I had the feeling it works. Is it to your experience better to disable it?
Page "Infill":
* You returned to 15% infill density. Is it standard for you or is it needed for my print? I assumed in the small knobs on top (they represent screw-nuts) there was no place for the infill, so I didn't took care of this setting.
Page "Skirt and Brim":
* How does the height of the skrit influence the print? I never understood that, because in my eyes the very low wall can have only very little to no effect on the airflow. I kept the three layers as an additional nozzle cleaning.
Page "Multi Extruder":
* The cleaning tower only was disabled, because during my trails once the slicer asked me, if he should deactivate it, as it's recommend. I think for my normal MK3S there is no effect by this point, right?
Page "Output Options":
* I assume to uncheck the point for naming the objects is a standard for you, right? I assume this means that in the G-code file a note for each slice of an object is written and it has no influence on the printing process, right?
Finally you increased the layer height for 0.1mm to 0.15mm. Do I understand it right, when I assume that the 0.1mm height is to small for such small objects as the knobs?
Hope I don't bother you, I really try to understand and learn, because I have a lot parts that can be mounted on my trucks and rigs. 😉
Cheers.
RE: Different extrusion rates inside a model needed
@swiss_cheese
Using your 3MF file, my print looks like this. 🙁
What can be the reason for that?
The only thing I can think of is the housing. I build the Prusa housing with the Ikea tables. Should I use maybe a fan to cool the whole inside of the housing?
RE: Different extrusion rates inside a model needed
It could be the housing your using, you are using PETG, right? in this case you don't need all that heat for this tiny print, that's one of the reasons I turned the bed temp down I could have gone down to 80C. If you are printing in an enclosure I would leave the door wide open, you have no danger of your print warping at this size.
It seems like your printer is over extruding massively on the last part.
I printed my copy using Overture white PETG the manufacture suggests a temperature range from 230 - 250C I find that it prints best at 252C, however for this small print I choose 240C so the small areas could cool faster, but aside from the bed temp and hot end temp and changing the layer height to .15mm I just used the standard Prusa PETG profile you had selected. I changed the layer height to try and reduce the amount of hot material that was being put in such a tiny area.
I unchecked the "ensure vertical shell thickness" because I have found that it sometimes adds material in places when its not needed, to the detriment of the print and I think should only be turned on only when needed, but I believe Prusa has it on by default because more often then not its needed for new users.
"Avoid crossing perimeters" helps reducing stringing, on larger prints it can increase print times, but for this tiny thing it was easy to do and may add some benefit in keeping the print clean.
I turned off supports because you simply didn't need them, and I turned of "detect bridging perimeters" because this model had none and didn't need it.
as for the G-code Items I only removed the custom G-codes you put on each later of the lug nuts they were not needed at all and I may have missed removing something but it shouldn't effect the print at all I printed my copy using that exact same .3MF that I posted for you on a MK3S printer
the only thing I can think of to try now based on what you had mentioned, is try printing it with the door wide open as I mentioned above. your printer is over extruding and I'm guessing its because of the added temperature of the enclosure.
I hope this helps,
Swiss_Cheese
The Filament Whisperer
RE: Different extrusion rates inside a model needed
@swiss_cheese
Family Easter took a bit time, but now I can work on the printer again. 😉
Happy Easter!
Thanks a lot for you explanations.
Leaving open the doors, I already tested, I could not see any difference. What I will try is to reduce the nozzle temperatur for the knobs, this should be possible manually in the G-code file. And I will decrease the bed temperature, as you suggested it. Reducing the extrusion rate is also manually possible, so I will try this again, but now with lower temperatures. Maybe I find an old PC fan to aditionally cool the inside of the housing. I'll come back with the results.
RE: Different extrusion rates inside a model needed
You should not have this problem. just out of curiosity, have you checked to see if your hot end wiggles a bit or is loose? check the printer for play/ slack in areas that it shouldn't have any.
I didn't have to alter any temps during the print for specific features.
The Filament Whisperer
RE: Different extrusion rates inside a model needed
@swiss_cheese
Now I printed two items in one job, reduced the bed temperature to 80°C after the first layer and set nozzle temperature to 230°C up to the last layer of the base. Then I decreased to 220°C, waited 10 seconds and printed the rest. Extrusion rate I lowered to 95% for the whole job.

The result is not perfect, but I can use it to manually rework and then put it on my truck. So of now, my initial demand for the spare part is fulfilled.
But in principle I'm not happy with the result, because I'm used to better quality, less problems and when I see your nice result, I'm quite a bit jealous. Maybe I will try the print with a different filament, even if this spool made no problems up to now at other prints.
Concerning your question about wobbling: I check all moving parts of the printer and couldn't find any unsusual movment. Everything feels stiff and tight.
If I print "normal" parts, I mean things that are bigger, the shape is always very accurate. When I measure the dimensions of their shape and the position and width of holes, the tolerance is always less than 0.1mm, mostly less than 0.05mm. I'm very happy with the printer, this is the first parts I couldn't print since I built it end of 2019.
The only thing, that comes into my mind, writing these lines to you, is the wobbling of the Ikea housing/rack. this one can see a bit, looking at straight walls after 90° edges. But round shapes are always fine. Maybe I should do a test print when stiffened the rack. But again, this effect is pretty small and only noticable on even walls after sarpe 90° edges.
If I found a way to stiffen the rack and did the prints, I'll come back here. But this may take serious time, as my primary goal is reached for now.
I think it would be very helpful to be able to configure the printing parameters for speed and extrusion rate for small radius. The speed I found "a bit", you can reduce the speed for a radius of less 6.5mm. I think the proportional reduction of the extrusion rate many not be sufficient.
Another thnig could be to adapt the extrusion rate for specific, manually selectable parts of a workpiece. I would like to talk about these points with Prusa, but I have no idea how to suitable contact them for such topics.
RE: Different extrusion rates inside a model needed
@teacfreak
I'm glad you were able to get a result that is acceptable to you, however I would continue to explore this as it may help you in the future to know the cause of the problem.
Good Luck to you
Swiss_Cheese
The Filament Whisperer