RE: Buldge when print reaches "solid" layers
I have had the same contraction or buldge. I think it had to do with infill and cooling. Never been able to resolve it. It is worse with some filaments.
--------------------
Chuck H
3D Printer Review Blog
RE: Buldge when print reaches "solid" layers
I have had the same contraction or buldge. I think it had to do with infill and cooling. Never been able to resolve it. It is worse with some filaments. I will try you 2mm and fillet version.
--------------------
Chuck H
3D Printer Review Blog
RE: Buldge when print reaches "solid" layers
Good to see that you’ve come up with something that works in this particular case yet it’s unclear how much it generalizes. For one, some models may not allow for thicker walls or fillets.
I’m keen to see what comes out of the efforts in Cura. I firmly believe there’s got to be a programmatic solution to it, between firmware and slicer software. The occurrence of bulges are well defined, and the slicer should be able to detect those situation and make adjustments. Again, how well that would work in all cases and to what extent it is influenced by filament properties is open for speculation.
Thankfully I mostly see those lines on board game inserts I design, and usually don’t really care. Or see them as adding “character” to my artisan products 😇
Formerly known on this forum as @fuchsr -- https://foxrun3d.com/
RE: Buldge when print reaches "solid" layers
I just saw this announcement and was wondering if anyone can speak to the bulge issue and Arachne
https://github.com/Ultimaker/Cura/releases/tag/Arachne_engine_beta
Formerly known on this forum as @fuchsr -- https://foxrun3d.com/
RE: Buldge when print reaches "solid" layers
@fuchsr - I've been quietly monitoring the release for a couple of months now. When I last checked, it was far from usable. Sounds like they're making progress on it. I'll start lurking in the Cura forums again. Good news!
RE: Buldge when print reaches "solid" layers
I just saw this announcement and was wondering if anyone can speak to the bulge issue and Arachne
https://github.com/Ultimaker/Cura/releases/tag/Arachne_engine_beta
Exciting!
MK3s / My IKEA Lack enclosure
RE: Buldge when print reaches "solid" layers
I found this thread while working through this issue on a model. I have an Ender 3 so this may not apply due to the mechanical differences, but I use Cura 4.8.
I found that if I set the z seam position to x=0 and y=220 it was consistent in drawing (starting in the left rear) the walls in open areas, horizontal floors and solid/infill areas. I found a lot of improvement here. It was better still if the model had dimensions that were a multiple of the line width but obviously that only helps if you're modeling. This could add consistency if there is a concern that x0->x1, y0->y1 is not exactly the same as x1->x0, y1->y0 whether due to mechanical or slicer calculations.
The default z seam position in Cura 4.8 is the midpoint/rear of my Ender 3 bed (x=110, y=220). This setting caused gcode differences in the starting corner (left vs right rear) and direction of walls in those various sections. The drawback is that your left rear corner on a cube is not going to look as nice as the others and may need some post-processing.
I also reduced travel speed from 150mm/s to 100mm/s to avoid shaking the gantry during combing moves.
If the Prusa slicer allows for similar control of the z seam you may want to give it a try?
RE: Bulge when print reaches "solid" layers
I made an account just to drop in and share my findings as I have been fighting this same issue the last few days.
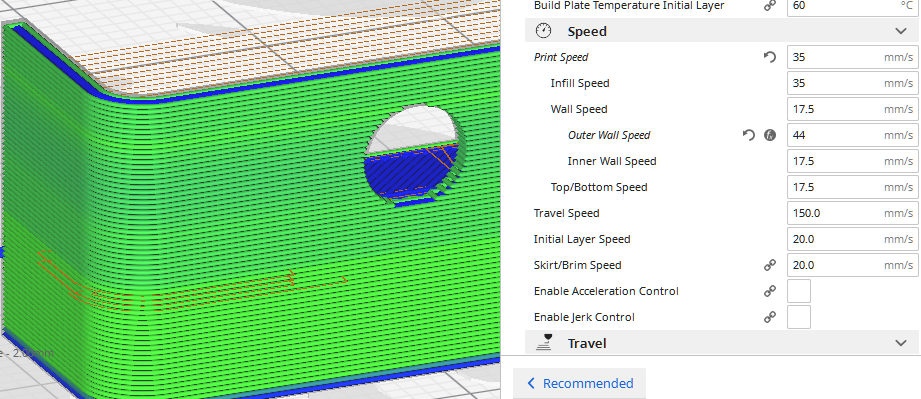
I managed to correct the issue by making sure the “solid layer” and the “perimeter” were perfectly matched in speed, jerk and acceleration.
at one point I overshot my settings and turned the overextruded bulge into an underextruded gap, but I just needed to tune my flow.
I’m using an Ender 3 on Cura but the issue seems identical as far as I can tell.
RE: Bulge when print reaches "solid" layers
@robert-4
The ender-3 works very similar. The biggest difference is the Bowden step which is similar to the mini.
--------------------
Chuck H
3D Printer Review Blog
RE: Bulge when print reaches "solid" layers
After reviewing it in a different light, the line is actually still visible, however I have spent all this morning trying out various slicers and past versions, and I have found that for me personally, a past version of Cura (4.4.1) has offered the best results so far. Besides a change to retraction for my DD I’m using the default profile that comes with the program.
I think there may be an extremely faint line there but this is by far my best one yet.
I think with further tuning I could hide it more, but so far this is the best result I have been able to achieve with zero slicer tuning (default slicer profile straight from install)
I have come close to this result in other slicers and versions but only after messing with settings for hours. I think I’ll be sticking to Cura 4.4 until a better solution comes along. I’m sure there are better solutions but so far this is my easiest solution as I don’t have to change any slicer settings.
Curious to see if people have different results with past versions of their slicers.
RE: Bulge when print reaches "solid" layers
Damn sorry for the double post but I just noticed something.
I was listening to it print carefully and as soon as the “problem layer” started, the motors sounded entirely different, like they were moving much faster.
This change of sound was during the entire layer including the inner and outer wall extrusion move, not just the top/bottom skin.
I don’t understand why that is happening, as the speed, jerk and acceleration settings should still be the same for inner and outer walls regardless of what else is in the layer, right?
It seems the presence of a “top/bottom” in a layer causes the print speed/velocity to change for that entire layer, not just the skin part.
I don’t know if that helps much, but I’ll be taking another look into speeds and velocity changes next to see if that has any impact.
RE: Bulge when print reaches "solid" layers
OKAY I might be on to something here. Turns out I wasn't hearing things, the speed is indeed changing, Here is a before and after pic of my attempted fix using bobstros file.
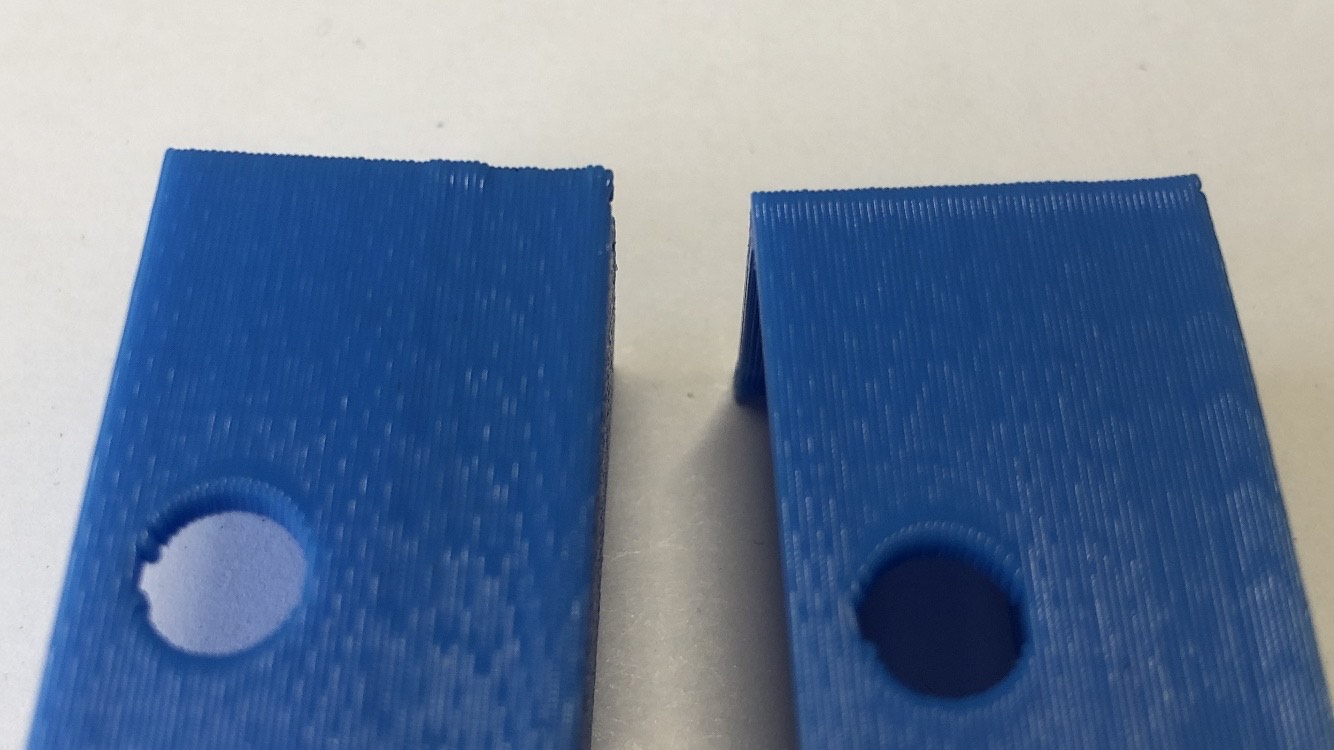
It is just a theory, let me know if this works for you guys as it seems to have corrected whatever my issue was. This is for Cura but now that I think about it, Prusa MUST have a similar setting.
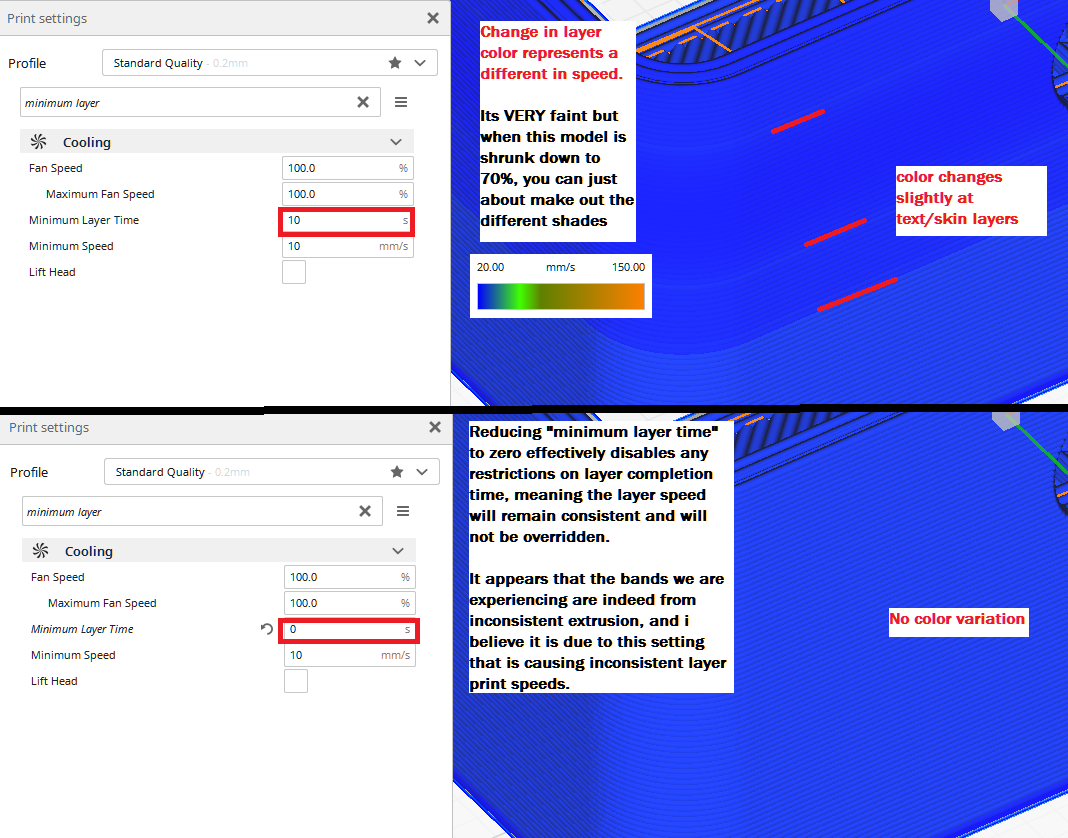
I checked the layer view and color coded it according to speed, and at first didn't think much of it, but before clicking out of it I thought I saw a few layers at a slightly different shade of blue. I got the color picker tool out and lo and behold, the layers are indeed a different speed.
(I've attached pictures below of the faint difference using default profiles, but I have also included another example where I have tweaked the speeds to emphasize the color difference.)
This is caused by a setting called "Minimum Layer Time"
It seems Cura (and I assume Prusa too) have a settting enabled by default that will limit your layers to be at LEAST 10 seconds each, if your assigned speeds cause a layer to be faster than 10 seconds, this feature kicks in and will slow the ENTIRE layer down to be 10 seconds to ensure that it has adequately cooled before the next layer is started. (This actually makes sense for the small top layers such as chimneys as they need to be printed slower)
As a result, all of the fast wall layers that would normally be faster than 10s are slowed down to 10 seconds each which causes a slighty different extrusion - But when it reaches the layer with the solid infill skin, it is performing a lot more print moves and as a result the layer takes much longer than 10 seconds. Therefor the feature does not kick in for those layers and It is achieving the true assigned speed.
So funnily enough, the thick bands I am experiencing is actually the true extrusion rate I should be seeing for my assigned speeds. The other 90% of the print is the part that is inaccurate and has been extruded differently due to the "min layer time" feature slowing all those layers down.
I "fixed" this issue by simply turning the "Min. Layer Time" to zero, essentially removing any limits to printing speed... BUT this will pose a problem when I need to print tall narrow parts like chimneys. The printer will not know to slow down for tall narrow parts and will try to print them using ridiculous speeds, which will likely fail as the previous layers wouldn't have time to cool.
I think I'll have to find a sweet spot between printing speeds, and the "Min Layer Time" and "Minimum speed".
TL;DR: "Minimum Layer Time" is restricting the total speed of faster layers down to 10 seconds each to allow for cooling, which causes the extrusion not to match up with the rest of the unrestricted speed layers that would normally take more than 10 seconds.
RE: Bulge when print reaches "solid" layers
I don't think you're incorrect. Any deviation in speed or filament flow can (apparently) trigger this, and those are the very things that affect the printer sounds you've noticed. Any time there's a transition, be it from sparse infill to solid, perimeters to gap fill, speed fluctuations from z-seam, you'll both hear changes in the printer and possibly notice these deviations. They are very small -- most are < 1mm and can barely be detected with a fingernail -- but on an otherwise-even vertical layer, they pop out, especially under harsh lighting or with shiny filament.
Our goal is to reduce those deviations. You're taking a brute force approach of making speeds consistent, which certainly works. As you test, also experiment with jerk and acceleration settings which affect the rate of speed change. Also see if you can limit the changes -- and thus the slower print times -- to external perimeters only. As the nozzle speeds up, extrusion is spread unevenly unless you've done a good Linear Advance calibration in addition to all this.
This might not be practical for all cases due to print time impacts, so other approaches such as varying extrusion widths are also important. This really underscores that dealing with this, at least for now, has to be done on a part-by-part basis. We have a general approach, but users have to apply it and test individually. Cheats like matte filament also help. What is acceptable for one user may be unacceptable for another.
Let's hope Cura's Arachne engine is better at producing even results with less fuss.
RE: Bulge when print reaches "solid" layers
@hudsonforge
To be clear. I’m NOT arguing with anything you said. In fact, I totally see why speed differences may have this result.
However... I’m also seeing the bulge on large models (e.g. game inserts ) where the time spent on a layer, where somewhere in that layer there’s a transition close to the perimeter, is way more than 10 seconds. So while your findings are very interesting and the idea of changing min layer time may well be the solution for thin walls and layers less than 10 seconds, alas it can’t be the whole story.
Formerly known on this forum as @fuchsr -- https://foxrun3d.com/
RE: Bulge when print reaches "solid" layers
@bobstro
Thanks for the quick reply there bud!
Yeah I previously tried messing with Jerk and Acceleration to try and sharpen my corners but honestly I was just typing random values and hoping something would change. Now that I've found this feature I'll definitely revisit Jerk and Accel and see what I can do with it.
As for the brute force, I have just stumbled upon an experimental Cura feature that may correct that to an extent called "Small Feature Speed", essentially you define a "Small Feature" in the settings by specifying a length in mm (lets say 20mm for example). When Cura detects these "Small Features" that are smaller than 20mm, it will use a new unique speed value called "Small Feature Speed" that will over-ride our perimeter and skin speeds we have assigned to the rest of the print.
This should allow the small parts like chimneys to still print using a slower speed without relying on the "Minimum Layer Time" setting, so the rest of the print speed should carry on as normal including the parts on the same layer as the chimney.
For example if I'm printing a house with an angled roof, when we reach the chimney it will be detected as a "small feature" and should print slow with our new speed, but when the printer head moves to print the rest of the roof on that same layer it will go back to printing at its original regular speeds, the same as the layer below it, so the entire roof will print from top to bottom using a consistent speed value in the slicer (perimeters and infill etc) and the chimney, and only the chimney, will be printed slow, rather than reducing the speed of that entire layer.
That's how I am understanding it anyway, I am yet to actually test this experimental setting so I could be miles off.
RE: Bulge when print reaches "solid" layers
I don't think you're off. But there are several variations on our "buldge" issue. As @fuchsr notes, large parts with long layer print times can also suffer. "Consistency" seems to help, but that may be due to speed/acceleration/jerk settings with small features, or linear advance, speed, and extrusion calibration for larger.
I wonder if some of this might be addressed by the "autospeed" feature. Although it seems to have been abandoned, or at least not given much love recently, autospeed was intended to ensure consistent extrusion rates -- and thus fewer variations on pressure. Speeds would adjust up or down in order to maintain a consistent flow. I didn't get great results with some quick tests, so quit playing with it, but it's worth considering. Essentially, you set all speeds to 0 (auto) and set Maximum volumetric speed and maximum print speeds. Not a good week for experimentation for me, unfortunately.
RE: Bulge when print reaches "solid" layers
Here's something that may save you some time...
If you print with normal settings, you'll see the Volumetric flow rate change throughout the print, with changes in flow corresponding to most defect areas:

If you change Filament Settings->Advanced->Maximum volumetric speed (MVS), that will slow all speeds down so that the specified flow rate is never exceeded. This, of course, slows things down tremendously (45m to 1h6m in this example), but it's an easy way to get a consistent flow rate and speeds throughout an entire print without a lot of fiddling with settings. Here's the result of lowering filament MVS to 2:

RE: Bulge when print reaches "solid" layers
@fuchsr
I think you are right, which leads me to my next tinfoil hat theory: I think for some people, this is a combination of bad flow and speed limiting. Its just a theory and I am in no way suggesting this is the problem that everyone is having, but it might be worth considering, just hear me out:
I want to draw your attention back to the bulge in the picture of bobs file that I uploaded. We already know the only difference between those two prints was the removal of the speed limits, and it would make sense for us to say the "bulge has gone" because of it, but technically it hasn't.
The opposite has happened, the bulge has remained in exactly the same place, and the rest of the print has bulged out to match it. Think of it like this, that bulge was printed during a slow layer with infill and therefor was not reduced in speed in any way, meaning that bulge was actually printing exactly at our specified flow/speed/jerk/accel rates that we input into our firmware/slicer. Its the other 90% of the print that is actually being printed "inconsistently" and has been printed "smaller" due to the speed restrictions in place. If you were to print something large using these same settings, you would be printing using the unrestricted "bulged" extrusion and speed rates, not the thinner parts.
And then consider this: Most calibration test prints are usually no bigger than 30-40 mm in XY, and we don't often use high infill and wall rates for just a calibration print do we? I'm sure you can see where I am going with this. We are all acting under the assumption that the bulge is the problem, and we are adjusting our flow rates and settings for the non-bulging parts, but if we are printing calibration prints that are being speed-restricted, those are not reliable values because they will change as soon as we go to print something larger or slower. The bulge is actually our true extrusion/speed values defined in the slicer.
We have probably been tuning our printers using small and fast calibration prints that have been speed-limited. Look at the difference in extrusion width on the bulge in my print, and then consider that we may have been calibrating our printers to the non-bulging parts when in reality, anything we print that is bigger than 4-5 cm will print using the unrestricted bulging parts rates, its fair to say that some of our flow rates might be completely out of whack because of this.
Its obviously a bit of a stretch, and I am by no means suggesting that this is the cause for everyones problems, but perhaps it might help one or two people solve a few of their problems, I know stumbling on this thread certainly helped me rule out a lot of issues.
My thinking: I would say that most of my print using bobs file is relatively "well-extruded" except for the bulge which looks messy and is overextruded... BUT we have established that the bulge is actually my true flow/speed rates, so even though 90% of the print looks great, my true flow rate is actually way too high and will become apparent as soon as I print something bigger that is not speed restricted.
This is where the bulge could potentially come in on bigger prints like you mentioned, with no speed limiting on such a large print, the entire print will be done using your true specified flow/speed rates, which could be way too high and over-extruding if you have been calibrating using smaller speed-restricted prints. The overextrusion alongside the solid infill could cause a common overextrusion bulge as the material has nowhere else to go (assuming they are making contact, if they are not then I am stumped). Thats the only reasonable explanation I can think of for the issue to persist on large prints based on this tinfoil hat theory.
RE: Bulge when print reaches "solid" layers
@bobstro
Thats really interesting ill definitely have a play around with those settings when I'm back at the printer!
RE: Bulge when print reaches "solid" layers
[,,,] This is where the bulge could potentially come in on bigger prints like you mentioned, with no speed limiting on such a large print, the entire print will be done using your true specified flow/speed rates, which could be way too high and over-extruding if you have been calibrating using smaller speed-restricted prints. The overextrusion alongside the solid infill could cause a common overextrusion bulge as the material has nowhere else to go (assuming they are making contact, if they are not then I am stumped). Thats the only reasonable explanation I can think of for the issue to persist on large prints based on this tinfoil hat theory.
This is where calibration of the extrusion multiplier (to a degree) and linear advance (much more importantly) come into play. Here's a test print showing the extremes of Linear Advance throughout a large-ish print.
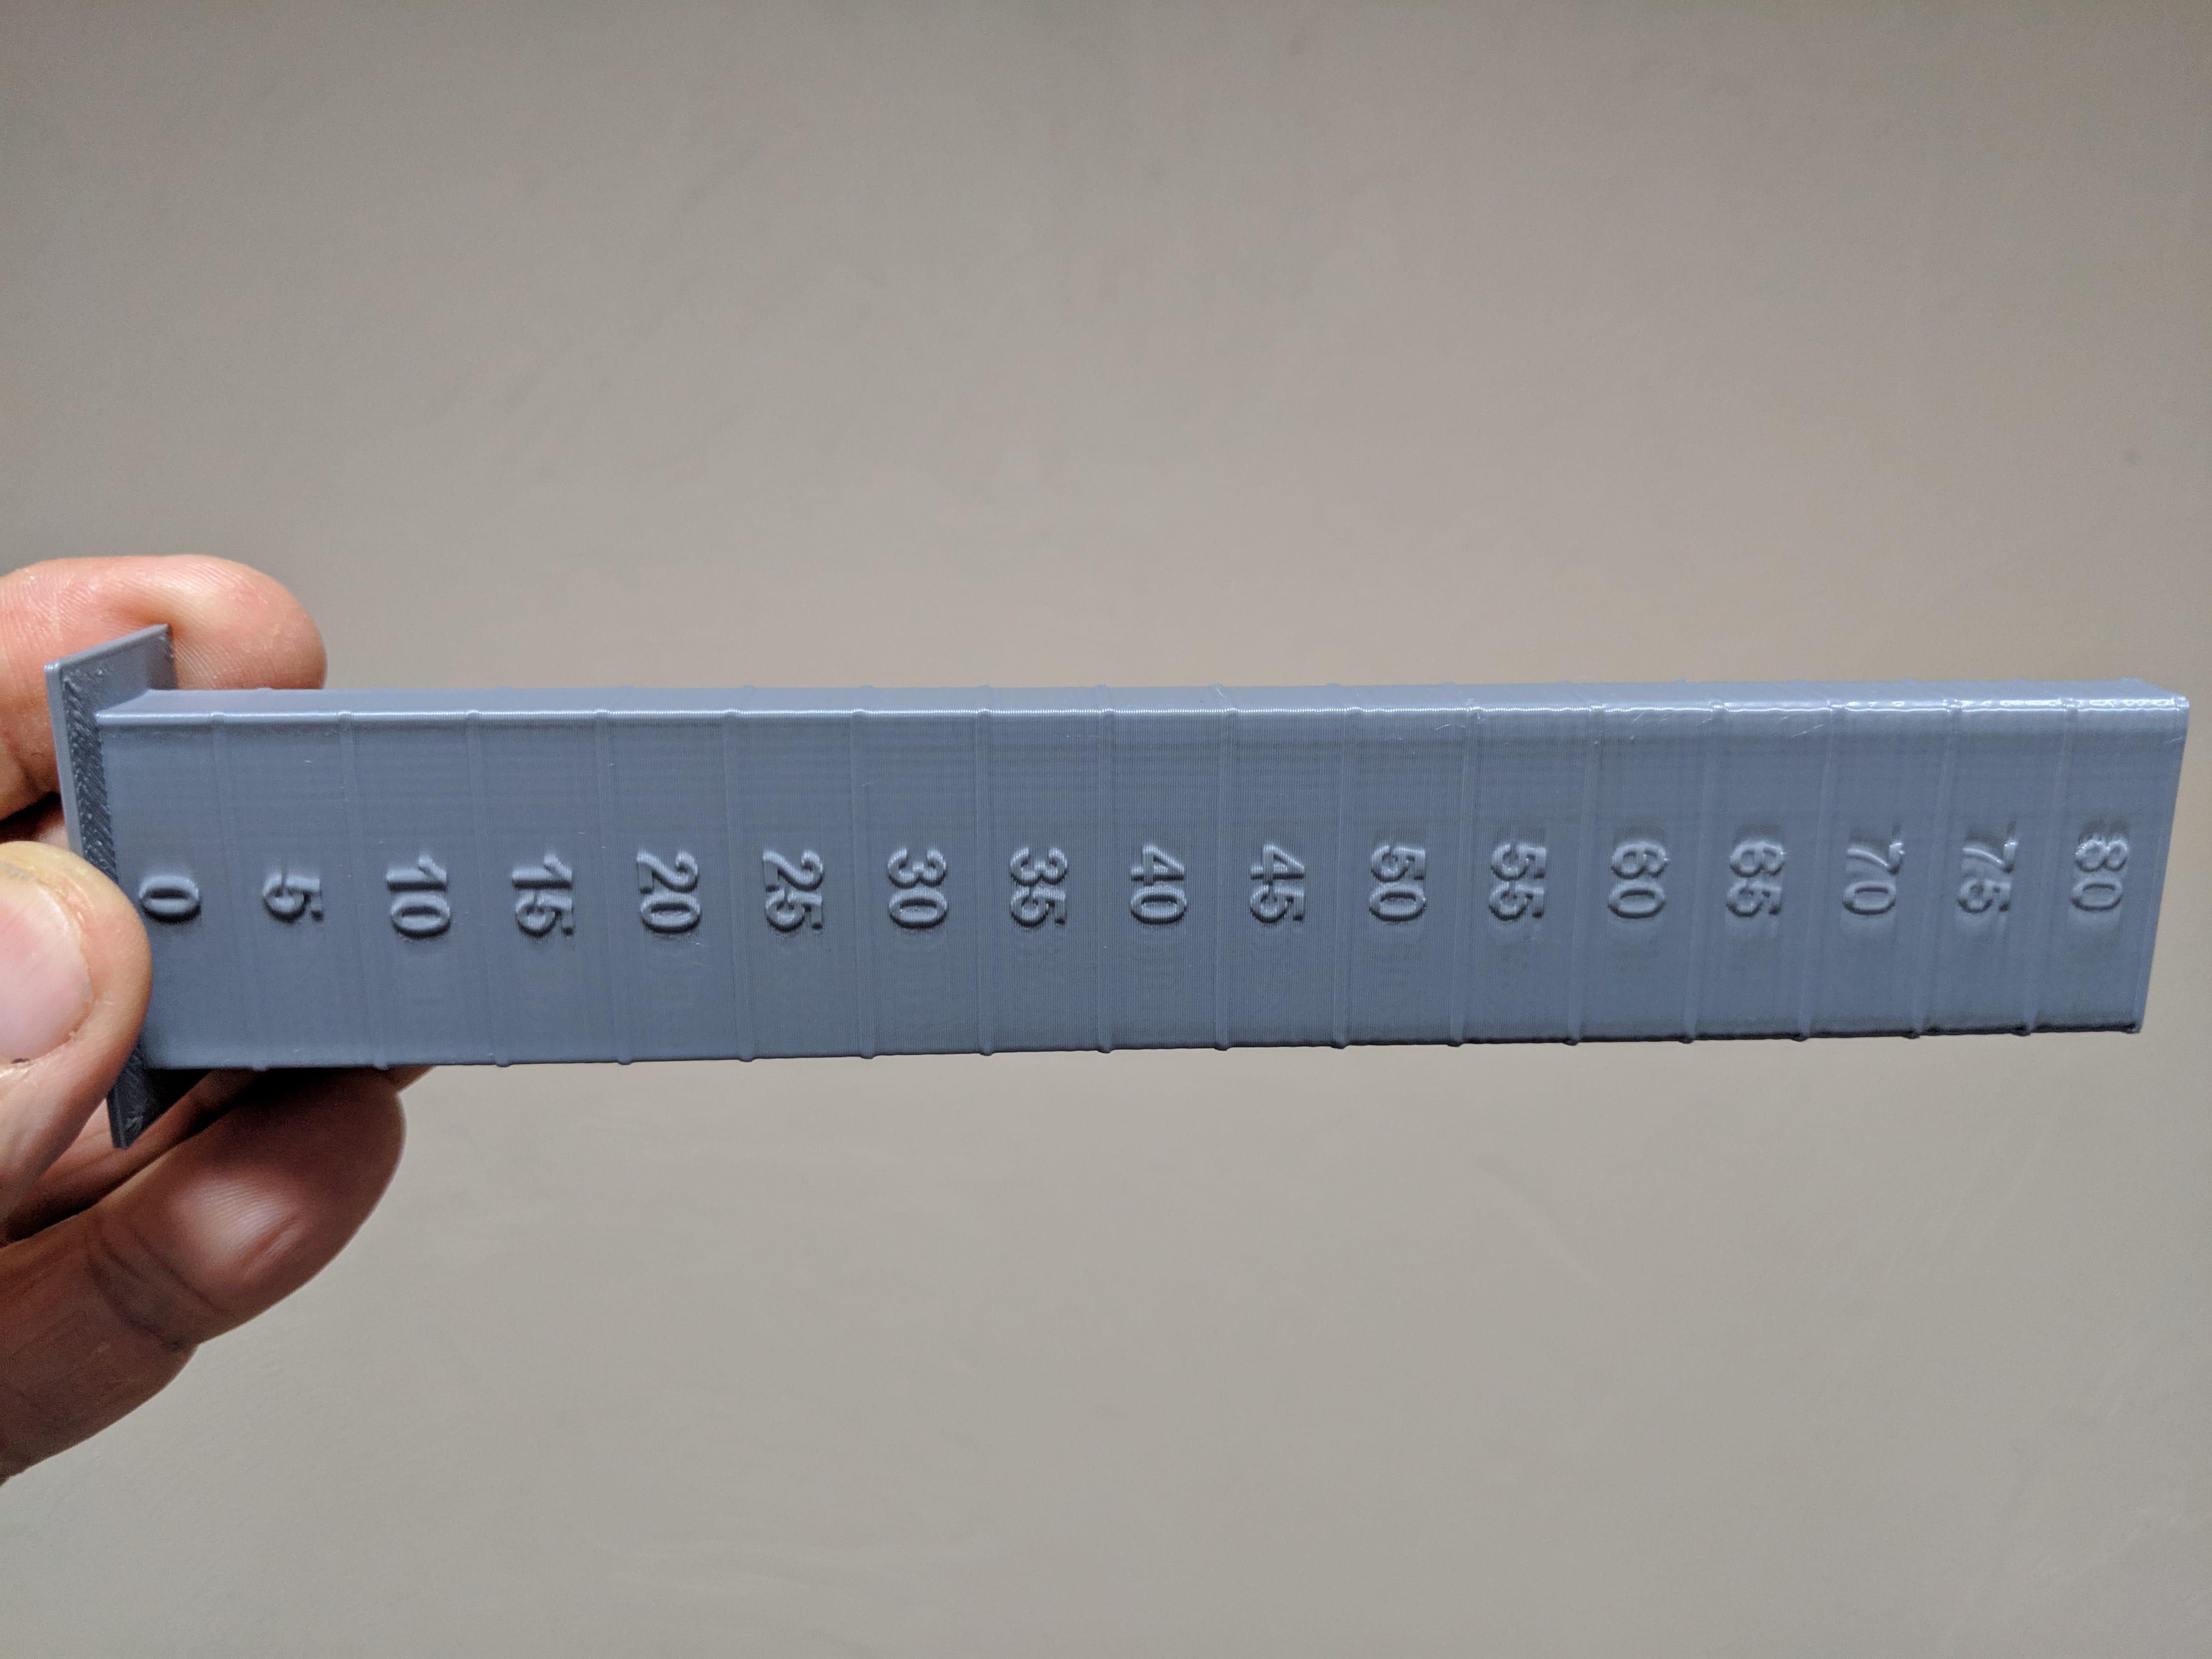
As you can see, although slicer setting speeds are consistent throughout the entire print, there is a "dog bone" effect in the corners without Linear Advance (0 setting) as the nozzle speeds up and slows down. The faster the nozzle moves, the thinner the extrusions. As Linear Advance is increased (this sample uses the old LA1.0 values), the flow evens out until you get to a point where the middle is over-extruded.
In my testing, 50mm seemed to be sufficient to allow the nozzle to come up to a speed that would show the "buldge" effect. That's the reason for the hole in the middle of the otherwise-straight wall in the test print. You'll often see thicker lines on the layers with the hole since the nozzle can't come up to the same speed as it can on the layers without the hole. I've used larger prints, but of course, they more slowly.