Any tips to get rid of the bulge?
Ignore my previous post.. I was trying to work out how to embed an image and by the time I saved, I had lost my edit rights.. And I lost everything I wrote in the process so have to start again. I still havn't worked out how to "embed" an image... The "Insert Image" button above doesn't work for me. So I will jsut give 3 URLs
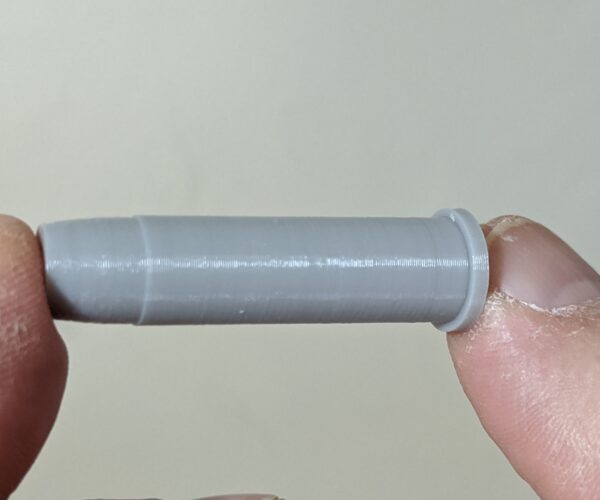
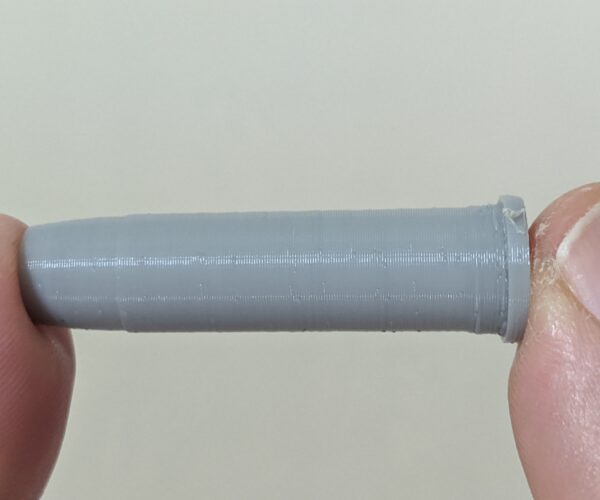
I am trying to print this.
This has a tube running through its length, which is wider near the bottom:
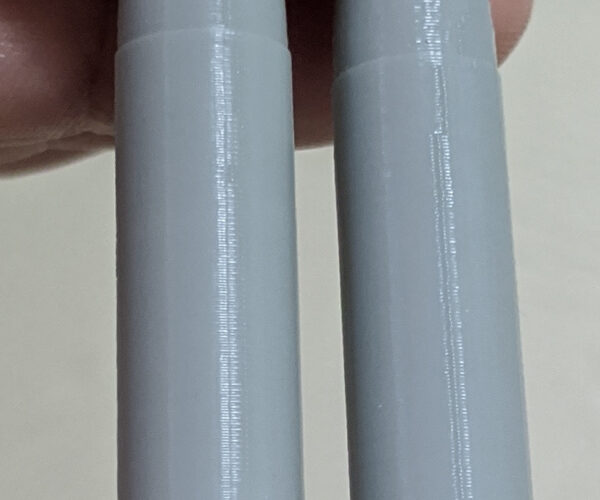
When I print it, I get a 'bulge' on the outside wall:
I guess this is to do with wall thickness which is thinner at that point.
I could obviously fix this by compensating for this in the original design.. But I don't have the CAD files nad would have to edit the STL which is tricky.. So are there any tips or techniques on the printer or in Slicer which might help?
I printed some last week on my Mini and don't think it was an pronounced but I need to print these on the MK3.
Thanks in advance for any advice.
Jon
RE: Any tips to get rid of the bulge?
I have been wondering why I didn't see this before.. And checked them against the ones I printed on the mini and they are PERFECT.
Yellow is the Mini, Orange Mk3.
Anyone got any ideas why???
RE: Any tips to get rid of the bulge?
Hi,
That doesn't look like a "bulge" artifact to me. My guess, (and it is a guess), is that the program is being told to print at a bigger diameter in that spot. The step is too sharp and too consistent to be an accidental error. I would look at the .stl closely and try to re-slice the model if you haven't already.
RE: Any tips to get rid of the bulge?
I don't think its a slicer error... The exact same file prints on my Mini just fine..
It just seems that where the wall thickness changes, the bulge happens...
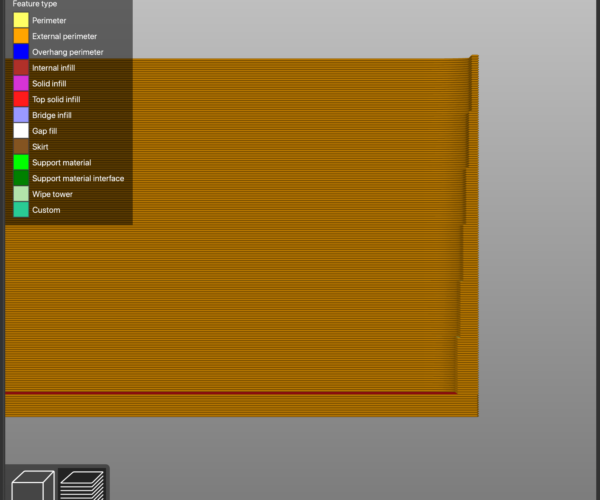
Slicer shows the walls as being perfectly straight, so I don't think its slicing like this.
This afternoon I have been playing with making an artificial indentation where the "bulge" happens.,. And if I make it 0.05mm radius, I can pretty much correct the issue... But its clearly not right, beacuse the Mini handles this with no issues.
RE: Any tips to get rid of the bulge?
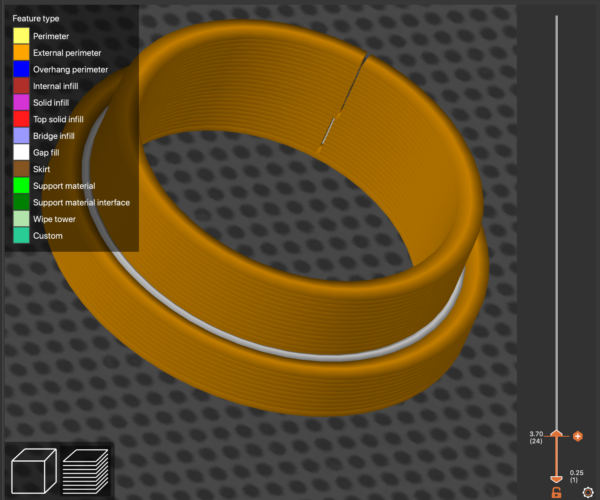
Looking at the slicer results in PrusaSlicer's preview mode, I do so something significant occurring at what appears to be the corresponding height. At up to 3.7mm, the outer wall is one extrusion wide:
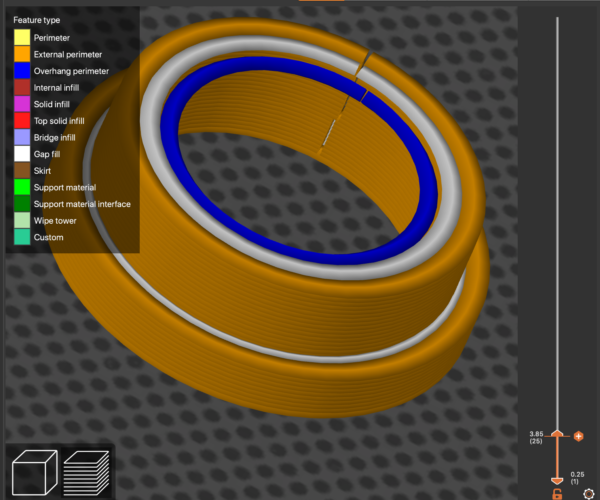
At roughly 3.85mm, it switches to 2 perimeters with infill, and the inner-most perimeter is printed as an unsupported overhang.
Unfortunately, if you don't have the source CAD file, you'll be limited to figuring out the best slicer settings. If you can save off a 3MF project file for each printer (Mk3 & Mini), zip them and upload them here as attachments, we can compare slicer settings. It may be a slight variation in perimeter widths or speeds.
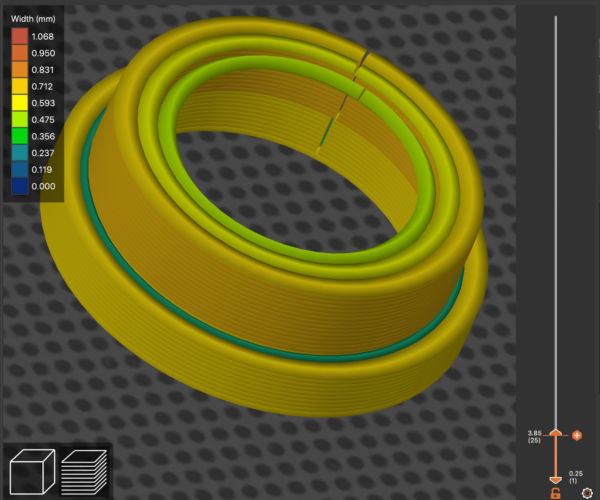
It is interesting that the print tends to constrict as more perimeters are added. It's common to see it go the other way, with an outward bulge as thicker or solid internal layers are encountered. If you view the extrusion widths in preview mode, you can see that it goes from slightly wider to slightly narrower at this transition with a deliberately exaggerated extrusion width (I'm using a 0.6mm nozzle).
I suspect you'll find something similar going on with your settings. Compare this view using both the Mini & Mk3 profiles and see if there's any difference.
and miscellaneous other tech projects
He is intelligent, but not experienced. His pattern indicates two dimensional thinking. -- Spock in Star Trek: The Wrath of Khan Unfortunately,…
RE: Any tips to get rid of the bulge?
Sorry for the delay.. Attached are the 3MFs for both printers.. Same file.. Same (default) settings..
On the Mini the walls are perfectly straight.. On the MK3 I get the "bulge"
One thing I should point out.. On the Mini they print at a diameter of 9.8mm.. On the MK3 they are also 9.8mm, but the "bulge" is 10.2mm.
So the bulge is wider than it should be.. Rather than the bulge is correct and the rest of the print is are narrower.
RE: Any tips to get rid of the bulge?
Just responded in the "buldge" thread. Meant to post this here.
I did a quick print using my settings with a 0.25mm nozzle (what I've got mounted at the moment):
I've got a comparison print using Prusa default profiles now.
and miscellaneous other tech projects
He is intelligent, but not experienced. His pattern indicates two dimensional thinking. -- Spock in Star Trek: The Wrath of Khan Unfortunately,…
RE: Any tips to get rid of the bulge?
Was that printed on the Mini or MK3? Thats how they come out on the Mini, but on the MK3 I get a 'bulge' at the bottom.
I am going to do a test later and design a cylinder with a different thickness wall from top to bottom to see what this has on the outside dimensions.
RE: Any tips to get rid of the bulge?
Given that I don’t think Bob has a mini as yet I’d say that was done on the mk3 lol.
RE: Any tips to get rid of the bulge?
To be honest, i am 99% sure i have printed these on my MK3 without this issue...
i do have an older version of the STL that had thicker walls which i know i printed.
any ideas why this is happening?
i am going to do some test prints later to prove whether this is an issue that wasnt there before.
RE: Any tips to get rid of the bulge?
Ah, sorry. Yeah, that's a Mk3 with a 0.25mm nozzle. Prusa default PLA profiles for 0.25mm on the left, my tweaked on the right:
Both look pretty good. The z-seam is difficult to find under normal light. Nothing really conclusive, other than the Mk3 can print PrusaSlicer code without the bulge. A quick solution might just be mounting a 0.25mm nozzle.
I'll try to do some tests with a 0.4mm nozzle. FWIW - I'm using Paramount PLA filament. Have you tried different filaments?
and miscellaneous other tech projects
He is intelligent, but not experienced. His pattern indicates two dimensional thinking. -- Spock in Star Trek: The Wrath of Khan Unfortunately,…
RE: Any tips to get rid of the bulge?
Both look pretty good. The z-seam is difficult to find under normal light. Nothing really conclusive, other than the Mk3 can print PrusaSlicer code without the bulge. A quick solution might just be mounting a 0.25mm nozzle.
You know I am not talking about the Z seam dont' you? I am talking about the wide section at the bottom of the print......
I am sure you know this, but your photo doesn't show the bottom and you talk about the seam, so i wonder if we have got our wires crossed.
Changing Nozzle is not really something I want to do.. And I knew this isn't filament dependant as I have printed this is a wide range out colours/types.
RE: Any tips to get rid of the bulge?
You know I am not talking about the Z seam dont' you? I am talking about the wide section at the bottom of the print......
I am sure you know this, but your photo doesn't show the bottom and you talk about the seam, so i wonder if we have got our wires crossed.
Yes, I posted about the "buldge" at length above. Neither print shows it protruding that much.
I mentioned the z-seam because that's something else that can cause problems with cylindrical prints. If surface smoothness is an issue, I suspect you'll be looking at that soon enough.
You have to click on the pic to see the bottom. The forum software likes to cut it off for display.
In the spirit of trying everything, here's the print done using your 0.4mm settings through a 0.25mm nozzle. I've found that using a smaller nozzle with wider extrusions (still below 2X nozzle) can be revealing. There's slight evidence of the buldge (that's my term for it -- easy to search on) and you can see the difference in the z-seam.
Did you happen to catch the tail end of the other "buldge" thread? Someone reported interesting differences near the bottom of prints where internal surfaces change by dropping the heated bed temp. Try knocking 10C off and see if that changes anything.
and miscellaneous other tech projects
He is intelligent, but not experienced. His pattern indicates two dimensional thinking. -- Spock in Star Trek: The Wrath of Khan Unfortunately,…
RE: Any tips to get rid of the bulge?
So I have just done a test and the results are interesting..
I made a 12mm diameter cylinder. With a wall thickness at the bottom of 2mm.. And then ever 4 mm, dropped by 0.25..
How do I insert pics... I can't work it out
RE: Any tips to get rid of the bulge?
Ignore the above.. I lost my edit window
So I have just done a test and the results are interesting..
I made a 12mm diameter cylinder. With a wall thickness at the bottom of 2mm.. And then every 4 mm, dropped reduced the thickness by 0.25mm..
How do I insert pics... I can't work it out
See slice.jpg.
This resulted in a very messy print with obvious changes to the diameter on the ouside wall (See Print.jpg).
But whats interesting is that there is a patern to the thickness of the outside wall:
Inside Outside (Rounded down to the nearest 1/10mm)
0.50mm 12.2mm (Ignore because wall to thin)
0.75mm 12.1mm
1.00mm 11.9mm
1.25mm 11.9mm
1.50mm 12.1mm
1.75mm 11.9mm
2.00mm 11.9mm
My gut feel is that 11.9mm is the correct diameter and most of the sections to the print are correct. But I am seeing the same "bulge" where it prints the OD wider when the wall thickness is 0.75mm & 1.50mm.
3MF attached incase anyone wants to take a look.
RE: Any tips to get rid of the bulge?
At what heights are the transitions? Knowing will make it easier to measure. Printing now...
and miscellaneous other tech projects
He is intelligent, but not experienced. His pattern indicates two dimensional thinking. -- Spock in Star Trek: The Wrath of Khan Unfortunately,…
RE: Any tips to get rid of the bulge?
At what heights are the transitions? Knowing will make it easier to measure. Printing now...
4mm
RE: Any tips to get rid of the bulge?
[...] But whats interesting is that there is a patern to the thickness of the outside wall:
Slice the part, then go into preview mode. Check the following...
Inside Outside (Rounded down to the nearest 1/10mm)
0.50mm 12.2mm (Ignore because wall to thin) NO GAP FILL
0.75mm 12.1mm NO GAP FILL
1.00mm 11.9mm GAP FILL
1.25mm 11.9mm GAP FILL
1.50mm 12.1mm NO GAP FILL
1.75mm 11.9mm NO GAP FILL
2.00mm 11.9mm NO GAP FILL
Unless I'm missing a step, you see the external thicker wall on every layer printed without gap fill (white).
My gut feel is that 11.9mm is the correct diameter and most of the sections to the print are correct. But I am seeing the same "bulge" where it prints the OD wider when the wall thickness is 0.75mm & 1.50mm.
In all of the "buldge" threads, wall thickness has always tied into it. Your test piece is interesting in that you're varying wall thickness within the same part, so highlighting an issue that hasn't shown up in the previous tests I've tried.
I'm doing tests with default 0.4mm and my 0.25mm tests, but an interesting test would be to print with Print Settings->Speed->Speed for print moves->Gap fill set to 0 to disable gap fill. If that matters, try it set to the same speed as perimeters and/or external perimeters.
and miscellaneous other tech projects
He is intelligent, but not experienced. His pattern indicates two dimensional thinking. -- Spock in Star Trek: The Wrath of Khan Unfortunately,…
RE: Any tips to get rid of the bulge?
I've created a test piece with walls starting at 2mm thick, then stepping down by 0.25mm to 0.75mm.
I've played around with extrusion thicknesses to confirm that it prints some thicknesses without gap fill. At 1mm, the wall consists of 2 solid perimeters with no gap fill. At 2mm, the wall is 2 perimeters thick with sparse infill. If I can trigger the buldge at the 1mm layer, I'll try it with gap fill disabled, adjusting perimeter count and varying extrusion width.
I've attached the part if anybody wants to play along at home.
and miscellaneous other tech projects
He is intelligent, but not experienced. His pattern indicates two dimensional thinking. -- Spock in Star Trek: The Wrath of Khan Unfortunately,…
RE: Any tips to get rid of the bulge?
I am also interested to see what impact changing Print Settings->Layers and perimeters->Quality->Detect thin walls has. That setting plays in with gap fill. I'll try that in a bit if nobody beats me to it.
and miscellaneous other tech projects
He is intelligent, but not experienced. His pattern indicates two dimensional thinking. -- Spock in Star Trek: The Wrath of Khan Unfortunately,…
