Advice on printing this item
This item would be round, except for the top, which would be a ring (for running a cable through it - it's part of a duct pulling system).
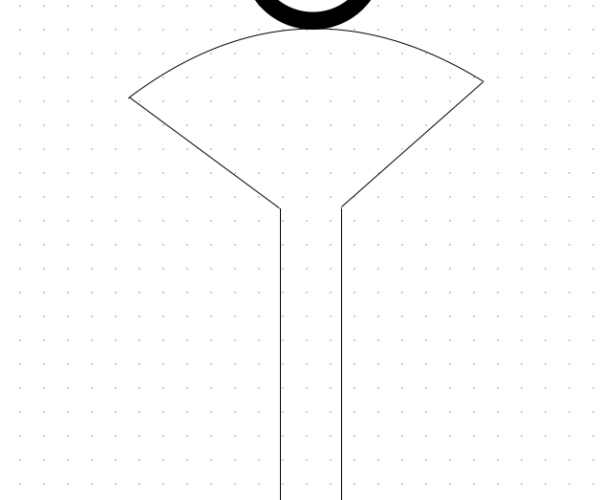
This is a rough, far from too-scale sketch of it. The height from the top of the lower, wider cylinder, to the top of the curve the ring rests on will be about 75mm and the width of the central column would be 5mm, minimum. I haven't done this as an object in Blender yet because I want to know what to avoid before I design it. The slanted lines going from the central column to the curve at the top will be 45°, since I find that my printer (Prusa i3 MKS3+) can handle that without issues. (I've heard 50° is generally the limit, but I haven't spent enough time experimenting to know just where the line is.) The bottom wide cylinder will have threads on it to screw into another part. The top will "wedge" into a dome shaped section to hold it in place. The bottom part, with the threads, has to be smaller than the wider area at the top, since the bottom has to go through the hole the top sits in.
My main concern is that I have a column that's tall, relative to it's cross section and that, once the printer reaches the top and starts expanding, that there might be a stability issue. Of course, I can do a thicker column. If I do that, I'm still experimenting with fill patterns and amounts and would like to hear what I could do so I don't waste a lot of filament on that.
For those with experience, what kind of problems do I have with this object and what do I have to change if I want it to be printable without wasting a lot of extra filament?
RE: Advice on printing this item
Id make the centre column wider, as wide as it will go really. 5mm and it will probably snap under even moderate pressure. More perimeters give more strength than increasing infill. Again Id go 4-5 perimeters minimum on this.
That top black ring I hope you aren't printing, as that will almost immediately break. Its thin and the layer lines are always the weakest points so theres almost no cross section on that area.
Another thing that you could also do to increase strength is to put a 3mm hole through the middle and then use that hole to fit a M3 screw or metal rod. Depending on the bottom and top of the design which we cant see as its a side on plan you could fit a nut in to properly hold it. If you cant then it can always be glued in place. That would massively increase the parts durability.
Another general design technique is to not have 90 degree transitions. So where your column meets the base, at the moment you have a 90 change there. Thats a stress concentrator. Add a chamfer or bevel to that join and it will spread the stress out making it less likely to break.
Once you get to the Blender stage you can post that if you want, several of us here use that software (including myself) and its always fun playing design with models 🙂
RE: Advice on printing this item
If there is any load in vertical direction on the part it would perhaps be better to orient it in a way that does not rely just on layer adhesion, but on longer perimeters. Otherwise the print will break under strain along the layers. So printing it laying down and not standing up would probably give you a stronger part. You'd need more support, sure, but a broken part is also wasted plastic. You could split it in the middle (along the vertical axis in your drawing), put the flat sides on the build plate and glue the two halves together after printing. This way you would not need supports at all.
RE: Advice on printing this item
I would also consider modeling sacrificial support into the design, to stabilize the model in the vertical direction, or you may run into stability issues/vibrations at higher Z.
Formerly known on this forum as @fuchsr -- https://foxrun3d.com/
RE: Advice on printing this item
I would consider splitting the model through the column (after making this a little wider), and printing each half horizontally.
That way, there would be no overhangs, and the printing orientation would optimise strength.
RE: Advice on printing this item
Again Id go 4-5 perimeters minimum on this.
I'm not clear on what you mean by "4-5 perimeters."
That top black ring I hope you aren't printing, as that will almost immediately break.
I really should have said more about that, since that issue is solved already. This is a photo of a test print of an earlier version. The ring is a torus and the newer version will be thicker than this, but it stood up to a lot of stress.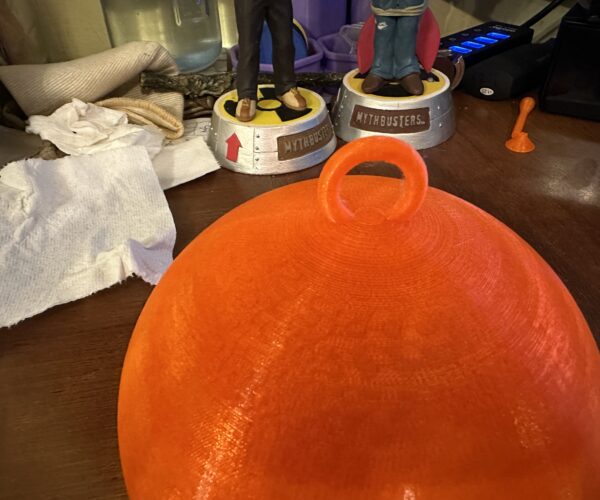
I'll be using this to pull 4" flexible conduit (like on the back end of a drier, going from the drier to the wall) through an inaccessible area. My friend, who's helping me on this project, is an HVAC contractor and wants one for himself when I finish and a few of his friends are interested. While there is a chance of something getting stuck, we've talked about this very issue - how much stress should that loop take? We decided that if it has to be pulled too hard, it's probably stuck where it shouldn't be anyway.
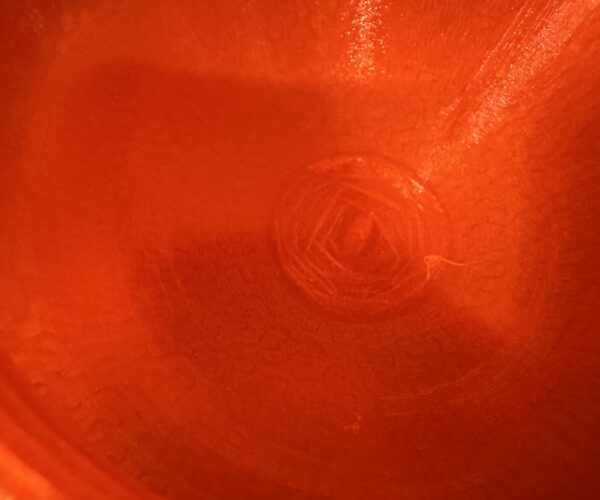
One of the issues with printing the dome is underneath the top part. The curve flattens there (in relation to the horizontal plane), and there's a mess under it because it's like a super-long bridge. This is one issue this particular part is intended to fix.
Another thing that you could also do to increase strength is to put a 3mm hole through the middle and then use that hole to fit a M3 screw or metal rod. Depending on the bottom and top of the design which we cant see as its a side on plan you could fit a nut in to properly hold it.
The problem is this part is intended for reuse, so a metal screw would, when tightened each time, do a little to strip the inside of the hole it goes in, so once I do that, it seems to me I'm suddenly making it so this has a limited number of uses. I didn't get into all the related design issues for the related parts and usage because, too often, when I do that, I get fewer responses and people say "TL;DR."
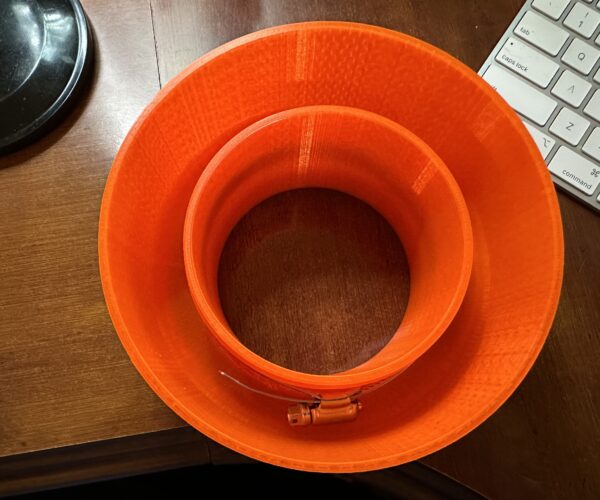
I have an inner pipe that the conduit will slide on, then it's fastened on this pipe (which is also printed) with a hose clamp. Then that part is put in a shielding that has a dome front (so it can't catch on anything) and the dome extends down in a cylinder, covering the pipe. That way everything on the outside is smooth, so it won't catch on wires or anything like that when it's pulled through smaller spaces. The outer cylinder is to keep the hose clamp from catching on anything. The process is to put the flexible conduit on the inside pipe, secure with the hose clamp, then slide that into the outer sheathing and fasten the two together. This piece I'm asking about would be the fastener, going through the front of the dome/hemisphere and then fastening to and screwing into the top of the pipe the conduit is fastened to.
Another general design technique is to not have 90 degree transitions. So where your column meets the base, at the moment you have a 90 change there. Thats a stress concentrator. Add a chamfer or bevel to that join and it will spread the stress out making it less likely to break.
Good point I had completely forgotten about!
Once you get to the Blender stage you can post that if you want, several of us here use that software (including myself) and its always fun playing design with models
There's a good chance I'll do that. I've found this, and the Blender forums, are some of the most helpful I've run into - and I've been using the internet since before most people had heard about it.
If there is any load in vertical direction on the part it would perhaps be better to orient it in a way that does not rely just on layer adhesion, but on longer perimeters. Otherwise the print will break under strain along the layers.
There will be some strain, but limited - I mention that in a point above. If we have to pull too hard on it, it's most likely going through a spot it should be in!
You could split it in the middle (along the vertical axis in your drawing), put the flat sides on the build plate and glue the two halves together after printing.
I had not thought about that. There are sections I don't want to do that with, but I could break this into multiple smaller parts. I feel better about gluing along a vertical break than on a horizontal one, since the stress will come from the ring on the top of this part.
I would also consider modeling sacrificial support into the design, to stabilize the model in the vertical direction, or you may run into stability issues/vibrations at higher Z.
That's something I can do. I can also add in supports that won't be removed that'll strengthen it overall. I was working with a smaller diameter because I'm trying to develop a sense of economy of design - not being chincy, but in just not adding what's not there. So I guess I need to do more than one 5mm cylinder there. I have a few ideas for that.
I would consider splitting the model through the column (after making this a little wider), and printing each half horizontally.
Touched on above. I feel much better than a vertical split and printing them horizontally than I would about a horizontal split where I'd be using something like glue to hold the top and bottom together. I don't want to split the top, but that could be designed as a separate part. The bottom would have threads, as I envision it now, but I can change that, too. Or maybe find a way to print only the shaft horizontally.
--------------
Thanks, everyone, for the thoughtful replies. There are some changes I can't reallly do and some I can, so this gives me a lot of ideas for redoing this design.
RE: Advice on printing this item
Sorry I assumed as you were posting on the prusa forum that you were using Prusa Slicer. The setting prusa uses to determine the thickness of the outer on x/y are called Perimeters. Other slicing software uses other names like walls or shells. Most profiles have it set to 2. All of mine default to 3 and I up that if a part needs to be stronger. With an extrusion width of 0.45mm and 5 perimeters you get a 2+mm wall thickness. Combine that with 10-20% of cubic infill and its enough to make most parts strong (depending on geometry and print orientation naturally).
I guess without seeing the full intended use its difficult to get the proper idea. From your diagram I assumed the part was to be printed in a single piece. As such my suggestion for a screw that went up though the centre and acts as a spine wouldn't have been something that you remove. You would fit it and leave it in place. It would remove almost all the weakness issues with such a shape printed vertically as the screw is going through nearly all the layers.
After I logged off last night and went to bed I couldn't help but turn the design over in my mind. I still think that top loop is going to break. Its the obvious weak spot besides the thin bottom column of the mushroom. If I were making this I would use a Lifting Eye Nut, something like https://www.orbitalfasteners.co.uk/products/m6-ring-nut-steel-bright-zinc-plated-20mm-eye-din-582
I would model a recess into the top of the dome so the lifting eye fit in snug. I would then have the hole through the centre as suggested and the screw would fit from the bottom and screw into the lifting nut. You would then have a solid metal spine with a metal ring that would not break, even under prolonged use. The plastic part would just be providing the bulk of the geometry and the threaded section you mentioned at the bottom (presumably used to screw the hvac hose to ?).
If you made that thin post (the 'stalk 'of the mushroom shape thicker then if this part is 75mm high as you mentioned then I don't think it would need support at all, z wobble wouldn't really be a problem.
RE: Advice on printing this item
We decided that if it has to be pulled too hard, it's probably stuck where it shouldn't be anyway.
I don't know, that sounds like a recipe for disaster. Well, not quite disaster, but "too hard" is in the eye of the beholder and I'd bet money that the ring will break sooner than later even if you think you're not pulling too hard, and you'll have that piece of plastic . I very much like Neophyl's idea of using a metal loop secured from below. Guaranteed to last unless you rip it out of the plastic part, which requires a lot more force than breaking off a plastic loop, and it's resistant to lateral force.
Formerly known on this forum as @fuchsr -- https://foxrun3d.com/
RE: Advice on printing this item
After I logged off last night and went to bed I couldn't help but turn the design over in my mind. I still think that top loop is going to break. Its the obvious weak spot besides the thin bottom column of the mushroom. If I were making this I would use a Lifting Eye Nut, something like https://www.orbitalfasteners.co.uk/products/m6-ring-nut-steel-bright-zinc-plated-20mm-eye-din-582
I would model a recess into the top of the dome so the lifting eye fit in snug. I would then have the hole through the centre as suggested and the screw would fit from the bottom and screw into the lifting nut. You would then have a solid metal spine with a metal ring that would not break, even under prolonged use. The plastic part would just be providing the bulk of the geometry and the threaded section you mentioned at the bottom (presumably used to screw the hvac hose to ?).
I have also to concur. This is similar to what I do with high power Rockets. Metal attachment points to plastic parts make them more durable to the forces exposed when pulling.
--------------------
Chuck H
3D Printer Review Blog
RE: Advice on printing this item
From experience pulling cables and other stuff, you need a swivel of some type on the pulling end. These can be purchased at most hardware stores. Anything being pulled has a tendency to rotate. If you have any bends, it gets harder. You are talking about 4 inch flexible duct, metal or plastic will make a difference. I would be looking at a way to screw the duct into the puller end instead of a hose clamp. Clamps take up space and get caught. Most flexible conduit has ridges or embedded wires for strength. I would use those for the threads.
One tool that you can purchase for smaller types of pulls uses a rubber cork that expands as you tighten the bolt on it. Like corks on some water containers with a flip type lever. Use a threaded rod to connect to 3D printed, thinner wall tube that will expand to the sides of the tube and pull using the threaded rod.
One thing to watch for, you may have to pull backwards if you get stuck on something. A stud or wire that has not been seen. That is always a headache to fix.
RE: Advice on printing this item
I was thinking more about this. I would use a wedge idea where the pull bolt is going through the centre of the part into the tubing and then the wedge expands segments to grip the inside of the flex duct. For the pull to break, it would have to pull all the way through the printed parts. The flex duct would hold the printed material together. All forces are on the back of the duct. I could do a quick drawing to make it clearer if needed.
RE: Advice on printing this item
Sorry for a long delay - life gets in the way of important stuff sometimes plus I've had to spend time working with my wife on our other business.
There's one thing I am either misreading or don't understand that I'd like clarified.
If I use a metal screw or bolt that goes into the plastic, and screws in, I can see that working if it is designed to go in one time, or only a few times, but it seems to me if I use a metal screw going into plastic, and that screw will be screwed in and unscrewed for every use, it's going to fail after a while. If I use a screw like a wood screw, each time it'll tap the threads differently until soon there isn't enough plastic in that hold to keep the screw tightly in place. I think trying to match threads with a metal screw would be a long and frustrating experience. I can see using a metal bolt that fastens to a metal nut, but I think any metal screw or bolt that fastens to the printed plastic would have to be something that's put in once or only a few times here and there.
Also, with other issues going on right now, I will be reading responses as soon as I can and I will come back when I'm done so I can post what I come up with.
As such my suggestion for a screw that went up though the centre and acts as a spine wouldn't have been something that you remove. You would fit it and leave it in place. It would remove almost all the weakness issues with such a shape printed vertically as the screw is going through nearly all the layers.
Okay, I can use an eyelet with a long bolt on it that goes through all the parts. I'm working out ways to include fasteners in the design or so I can have a nut held in place on the last layer so it can be screwed on. That's a good point. Thanks!
I would model a recess into the top of the dome so the lifting eye fit in snug. I would then have the hole through the centre as suggested and the screw would fit from the bottom and screw into the lifting nut. You would then have a solid metal spine with a metal ring that would not break, even under prolonged use. The plastic part would just be providing the bulk of the geometry and the threaded section you mentioned at the bottom (presumably used to screw the hvac hose to ?).
This was in my head while thinking things over and deciding what to do. I read the posts here, but didn't have time to respond, so over the past few weeks suggestions like this echoed in my head and I listened to them.
I don't know, that sounds like a recipe for disaster. Well, not quite disaster, but "too hard" is in the eye of the beholder and I'd bet money that the ring will break sooner than later even if you think you're not pulling too hard, and you'll have that piece of plastic
This device is used for pulling 4" flexible conduit through crawlspaces or areas where a human can't get in. I figure if it's being pulled too hard, the flexible conduit would break. If the lead goes through something where it's a tight fit, that's also going to be a poor path for running the conduit through.
From experience pulling cables and other stuff, you need a swivel of some type on the pulling end.
A good point I wasn't even thinking about - didn't even know enough to think about it. I think there are eyelets I can get at places like Lowe's that are on a swivel on the end of a long bolt. (Or I'm making up them in my imagination as I read this.) So I'll see if I can find an eyelet that will swivel.
I would be looking at a way to screw the duct into the puller end instead of a hose clamp. Clamps take up space and get caught.
I've thought about this, and it will screw on over threads for that, but I'm not convinced that it can be held on tightly with that method. So I designed this so it has an inner pipe the conduit attaches to, with the pipe clamp on it. Then there's a sleeve that fits over that. It means it takes more width for it to be pulled through a space, but that sleeve is over the connection between the flexible conduit and the printed tube in the middle. That will eliminate the issue of the clamp causing any drag or snagging on anything.
I would use a wedge idea where the pull bolt is going through the centre of the part into the tubing and then the wedge expands segments to grip the inside of the flex duct.
If I understand you correctly, that's close to what I'm now thinking. Not anything expanding, but the general design. but if you have time for a quick drawing, that would help clarify what you're saying and I would appreciate that!
RE: Advice on printing this item
I have pulled thousands of km of cable and installed conduit is some pretty strange places so I do understand the situation very well. I have been in crawl spaces where I had to be pushed into and pulled out of. This is why I don't like external clamps. More things to get caught on.
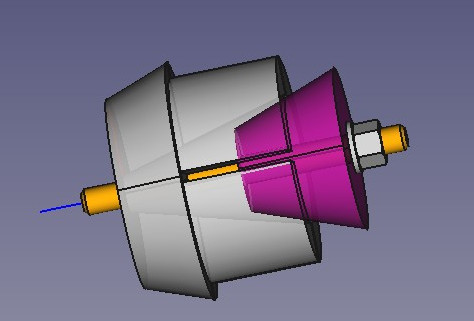
Here is a very quick drawing I did. Close to scale but no idea of strength or how things flex. I would embed the nut into the back of the rear wedge.
Concept is for the wedge to spread the outer part of the insert to grab onto the tubing. "O" rings on the outside could add extra friction to grab the tubing.
Unknown
Mon Jun 12 11:42:26 2023
FreeCAD 0.20
1.0
Threaded rod going through. Could be a long I bolt. If I was going from the outside, I would look at something to prevent the tube from collapsing and use the Chinese finger trap idea to hold onto the tubing. Much less space and grabs tighter when pulled.
RE:
The image didn't show up. Second try. One of these days I will learn how the images work on this forum.
RE: Advice on printing this item
This is why I don't like external clamps. More things to get caught on.
This is an early test - the outside is much wider than it needs to be, but this is how I was dealing with the clamp. The idea here is to keep the clamp and the entire part where the flexible conduit attaches protected. While it might be pulled off in other ways, like part of the conduit snagging on something, I want to protect the connection between the conduit and the "bullet" (quickest name I came up with) that is pulled through the space. The conduit would fit around the inner pipe and the clamp fit right over it, but all that would be protected by the outer sleeving.
A note on what I'm taking it through: 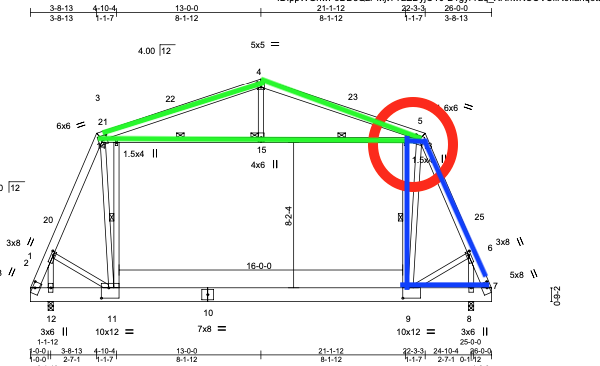
It's all one truss, with the entire room of the 2nd floor inside the truss. The one catch is circled in red. The green is too small for a person to get into. The blue is the crawlspace to the side. There is a gap between the wall and ceiling corner in the red circle and the corner formed by the 2 parts of the roof. It's more than big enough. While I expect to use this in other situations in the future, the main goal on first use is to be able to use it to pull the conduit from the blue crawlspace area, through the green, to halfway across, where there'll be an opening for it to attach to. Eventually I'll be connecting a vent hood to a ceiling plate there. Also, once that part is run, I'll do the same thing on the other side.
You're using a wedge for the "bullet." (If you have a better term, please, tell me!) Any thoughts on that shape verses a hemisphere for the front?
I am now thinking pretty close to you with the loop on a bolt, and if I can get one where it turns, I'll use that. The bolt will go through the front "shield" and through to the part that the conduit is attached to. I'm going to use a decent sized washer between the plastic part and the bolt to provide more of a surface for the force of the bolt to spread out through.
