Printing Bands
Sorry, I have no idea what to call this, but I can describe it...
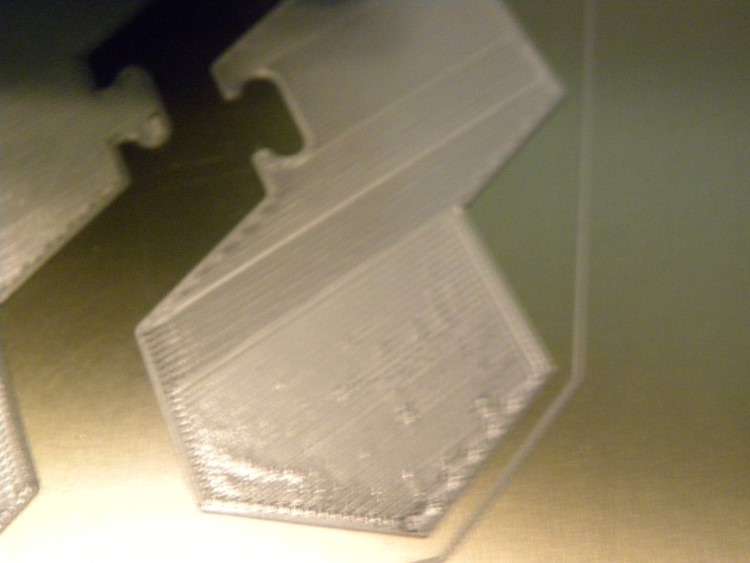
When printing a large area, the print head doesn't print continuously from one end/side to the other--it splits the printing up into "bands" (for lack of a better term) that get printed contiguously, and eventually coming back to fill in whatever got missed. I figure this is intentional (though a bit foggy on the rationale) but I don't know if it's a function of firmware or G-code, or if it can be turned off (so as to print continuously as above) or modified in some/any way.
It shows up quite visibly (apologies for the focus; I snapped the pic as it was printing. 😳 )
Here's the problem(s)
1. There are obvious color differences in the bands. I don't know if this is a printer thing or a filament thing. Sometimes there's no tactile difference between the bands, but sometimes there is, regardless of what layer this occurs on.
2. Where the bands merge, the extrusion lines/beads don't always meet exactly. This can result in either a slight gap (when too far apart), or a slight ridge (when too close together).
Neither of these are a killing thing currently, as the offending seams usually get covered up by subsequent layers (as do a multitude of other first layer sins 😳 ). However, sometimes it happens on the final top layer, in which case it's not terribly aesthetic.
Is there anything that can be done about this (like a way to tell the printer to print continuously rather than contiguously)?
That's "MISTER Old Fart" to you!
Re: Printing Bands
[...] Here's the problem(s)
1. There are obvious color differences in the bands. I don't know if this is a printer thing or a filament thing. Sometimes there's no tactile difference between the bands, but sometimes there is, regardless of what layer this occurs on.
2. Where the bands merge, the extrusion lines/beads don't always meet exactly. This can result in either a slight gap (when too far apart), or a slight ridge (when too close together).
I think you're looking at 2 issues. Those pics look like your Live-Z adjustment is too close. Ignore the pattern issue for now. I'd suggest focusing on your 1st layer before moving on to more complex prints. As long as you have issues with your 1st layer, you're going to have issues with every print. What is happening is that your nozzle is too close to the bed, causing too much filament to be squished into too tight a space. This affects adjacent layers, and you'll get that lumpy effect as too much stuff gets pushed into too tight an area. Think of your pencils in that pencil box. If you try to shove too many in, you get them popping up and not laying flat. The difference is that filament will squish to a point. Raising your Live-Z adjustment should help. I'd try raising it (making it less negative) by 0.02mm and go up or down from there until layers are even.
Neither of these are a killing thing currently, as the offending seams usually get covered up by subsequent layers (as do a multitude of other first layer sins 😳 ). However, sometimes it happens on the final top layer, in which case it's not terribly aesthetic.
Live-Z will only affect that 1st layer, so yeah, you can bury it. TBH, I did this for a bit until I figured out what was going on. So long as it adheres, you can likely complete a print. However, effects can add up, so you want to work on that 1st layer.
Depending on how you're adjusting things, it is also possible you have a bit of over-extrusion going on, but I don't think so. I you haven't already, try using the "life adjust" Live-Z adjustment procedure along with the pre-sliced files. That will make sure you're not getting slicer configuration issues.
The striping issue is due to the layer directions affecting reflected light, and I've addressed that in the other thread.
and miscellaneous other tech projects
He is intelligent, but not experienced. His pattern indicates two dimensional thinking. -- Spock in Star Trek: The Wrath of Khan Unfortunately,…
Re: Printing Bands
The striping issue is due to the layer directions affecting reflected light,
Respectfully, that doesn't help when top layers are significantly multi-colored after cooling/hardening. It looks like 2 different colors were used. This is true when looking at the bottom side of a print as well, where the lines are homogeneous enough that they shouldn't reflect differently.
I think the solution lies in finding a way to print continuously rather than contiguously.
My first layers are barely squished as it is. If I raise the nozzle any further, as someone else said someplace here, I'd be able to blow the filament off the plate.
I guess the pics are even worse than I thought.
That's "MISTER Old Fart" to you!
