Mesh Bed Leveling Frustrations
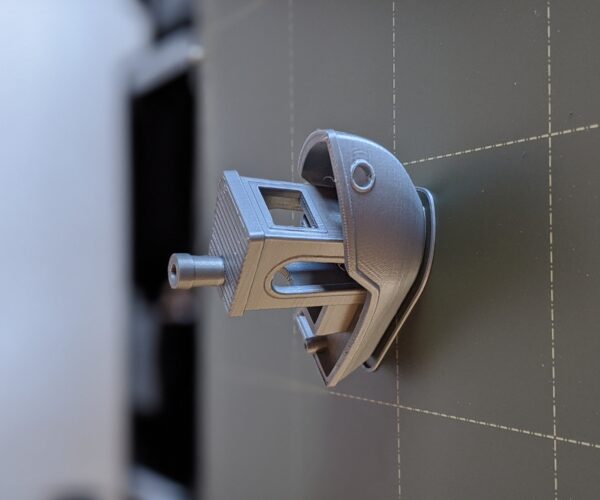
I received my MK3S kit a couple months ago, and assembled it shortly after. The XYZ calibration indicated that my axes are perpendicular. My belts are within the recommended range. I dialed in my live Z using the "life Z" method, and I was able to print a near flawless Benchy (the one provided on the included SD card). See photos below:
I thought all was well, until I printed some things that covered the whole bed. I noticed that my first layer was more squished than it should be the farther from the center I got. As part of my troubleshooting, I tested the PINDA as described in this article. I also looked into bed leveling and bed level correction. I sliced and printed the file as described in this article.
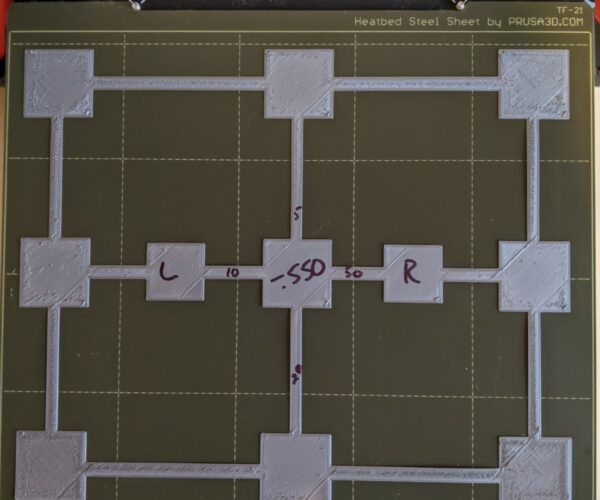
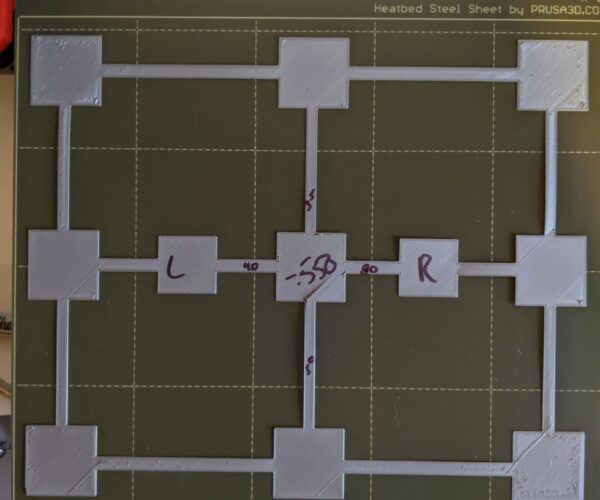
As you can see in the photo "bed level correct 1" the middle is looking good, but the corners are too close to the nozzle. In "bed level correct 2" I tried to move the corners away from the nozzle by increasing the bed level correct values. This improved the result of the corners, but the center has moved too far away from the nozzle. I fear if I try to move the corners any father from the nozzle, the center will be much too far from the nozzle to get an acceptable first layer.
I was hoping that the mesh bed leveling would take care of the variances I am seeing in the bed, or at the very least that I could adjust it with the bed level correction. I'm disappointed that this is not the case. I'm feeling like my next step is the nyloc mod or spacer springs, but I don't think I should have to make any modifications to the stock printer to get a good first layer over the entire build plate.
Is there anything I am missing? What would you all recommend?
RE: Mesh Bed Leveling Frustrations
Have you enabled 7x7 Mesh Bed Levelling, using the LCD Menu?
regards Joan
I try to make safe suggestions,You should understand the context and ensure you are happy that they are safe before attempting to apply my suggestions, what you do, is YOUR responsibility.Location Halifax UK
RE: Mesh Bed Leveling Frustrations
Yes, I am using 7x7 mesh bed leveling. I am also using bobstro's custom G-code that includes a PINDA warmup routine, so the PINDA reaches 35 degrees before mesh bed leveling.
RE: Mesh Bed Leveling Frustrations
The entire bed leveling thing is frustrating. It seems some of the tweaks are reversed; at least to my frame of reference.
One issue I see is you are using v2.2. Try downloading the latest Alpha for Prusa Slicer. It will help fix one issue: 2.2 has infill coming from different directions, so it piles up in places. 2.3A2 does infill one direction only (monotonic infill).
The next hurdle is understanding that you can only move an edge up or down. Not corners. So a low spot in the middle you must average the adjustment change between edges. If a corner is up by 50 um, then the two edges it is on can only be adjusted 25 um each. So it's all a compromise.
And, one of the other 'features' of the firmware is that unless you've run the entire Live-Z calibration to the end, the printer virtually ignores any other bed adjustment.
In the end I finally made my Mk3 bed worthy of printing ... even though at one point I even shimmed the steel posts with washers of varying thicknesses ... I now get by without them, and simply use the four bed cal offsets.
RE: Mesh Bed Leveling Frustrations
Check with a steel ruler if your bed is level, wen heated.
On youtube I saw adjusting the screws, a little looser to adjust bed, if this works I do not know.
RE: Mesh Bed Leveling Frustrations
I was hoping that the mesh bed leveling would take care of the variances I am seeing in the bed, or at the very least that I could adjust it with the bed level correction. I'm disappointed that this is not the case. I'm feeling like my next step is the nyloc mod or spacer springs, but I don't think I should have to make any modifications to the stock printer to get a good first layer over the entire build plate.
It is a kit build, so I don't think a bit of additional calibration is unexpected. Short of doing a full nylock mod -- which by all accounts is straightforward -- Prusa does provide a procedure for tweaking individual level adjustments.
I havent had to do this on my Prusa, but it's a weekly thing on my Sidewinder. This is one of the lower cost competitors that many fans swear prints "as well as a Prusa". Well, not exactly. What I have found works well is leveling the corners (it's manual and annoying), then running a manual 7x7 mesh bed level (also manual and annoying), then doing a 7x7 bed level print that prints a small square or circle (I prefer squares to test closure at edges consistently) at roughly each probe point, then manually adjusting individual points in firmware. I'd expect the same to work well for the Prusa, just much more quickly. Do 7x7 MBL, print the test pattern, then use the menu to tweak individual test point adjustments. It should be a one time adjustment until you do a factory reset and not be probe to drifting like on the Sidewinder.
FWIW - I find adjustments in the range of 0.02 to 0.06mm to make most corrections after MBL.
and miscellaneous other tech projects
He is intelligent, but not experienced. His pattern indicates two dimensional thinking. -- Spock in Star Trek: The Wrath of Khan Unfortunately,…


