Groove in X axis rod after 2 days, 12 hours, 23 minutes of printing
Hi,
Yesterday while making a print I kept hearing a clicking noise. After diagnosing the issue I noticed my lower X axis rod has a groove in it, I can feel it with my finger nail. I hear the clicking noise as the bearings move over this groove. This is a new printer I assembled, I only have 2 days, 12 hours, and 23 minutes of printing (according to the statistics).
I didn't expect wear this soon, so I thought I may have made a mistake during assembly. I think I read somewhere that over tight belt could cause this. I found I can check the belt tightness under support. Here are my values:
X: 231
Y: 247
According to this article it appears the values should fall between 240 and 300 (275~).
https://help.prusa3d.com/en/article/adjusting-belt-tension-mk3-s_112380/
So, my belts to seem tight. Could this have caused the damage so soon?
I'm thinking of performing the following actions:
- Loosen the belts, try to get close to 275 on both values.
- Rotate the X axis rod with the groove.
I may order some spare bearings and rods, just in case I need them.
Should I take any other actions? Thoughts?
Thanks,
David
RE: Groove in X axis rod after 2 days, 12 hours, 23 minutes of printing
Some questions.
1. Does the groove cover the entire rod from end to end, or just in the middle? Does it end exactly where the carriage stops?
2. Does this affect print quality in any way?
3. Is it a scratch, or a groove? A scratch will be the thickness of a hair, a groove would far larger, presumably be the diameter of the ball bearing in the linear bearings.
4. is the scratch parallel to the rod, or or across it?
As an engineer, I say that a chrome ball bearing rubbing against a chrome rod in a home 3d printing environment will not produce any wear whatsoever after only two days. The linear bearings are designated by the manufacturer as no-lube. Meaning they don't even recommend you ever oil or lubricate them. (And the design prevents the ball bearings from rotating! They are there for precise positioning, not to reduce friction.)
Best guess, I suspect your chrome rods were scratched before you got them, and you only noticed because of the (unrelated) clicking. This is cosmetic, and will not affect your print quality. I respectfully suggest you ignore the scratch and enjoy your printer.
RE: Groove in X axis rod after 2 days, 12 hours, 23 minutes of printing
Some additional information I didn't include in the first post. I discovered grooves on both X-axis rods. I didn't notice this at the time I created the post.
Some questions.
1. Does the groove cover the entire rod from end to end, or just in the middle? Does it end exactly where the carriage stops?
2. Does this affect print quality in any way?
3. Is it a scratch, or a groove? A scratch will be the thickness of a hair, a groove would far larger, presumably be the diameter of the ball bearing in the linear bearings.
4. is the scratch parallel to the rod, or or across it?
As an engineer, I say that a chrome ball bearing rubbing against a chrome rod in a home 3d printing environment will not produce any wear whatsoever after only two days. The linear bearings are designated by the manufacturer as no-lube. Meaning they don't even recommend you ever oil or lubricate them. (And the design prevents the ball bearings from rotating! They are there for precise positioning, not to reduce friction.)
Best guess, I suspect your chrome rods were scratched before you got them, and you only noticed because of the (unrelated) clicking. This is cosmetic, and will not affect your print quality. I respectfully suggest you ignore the scratch and enjoy your printer.
Thanks tdk408 for the response. Answers to some of your questions:
- Just the middle, at least that's all that I can currently feel with my fingernail.
- Not yet that I can see.
- Probably just a scratch based on your definition, but I can feel it with my fingernail and see it with my eyes.
- It's parallel with the rod.
You mentioned the clicking noise is unrelated. However, I think it is related. I can reproduce the clicking noise when moving the print head across the part of the rods with the groove. I cannot reproduce the noise anywhere else on the rods. Since both rods have the scratch/groove in the same position, I suspect this wasn't just a cosmetic issue. I didn't have or include all of this information in my original post.
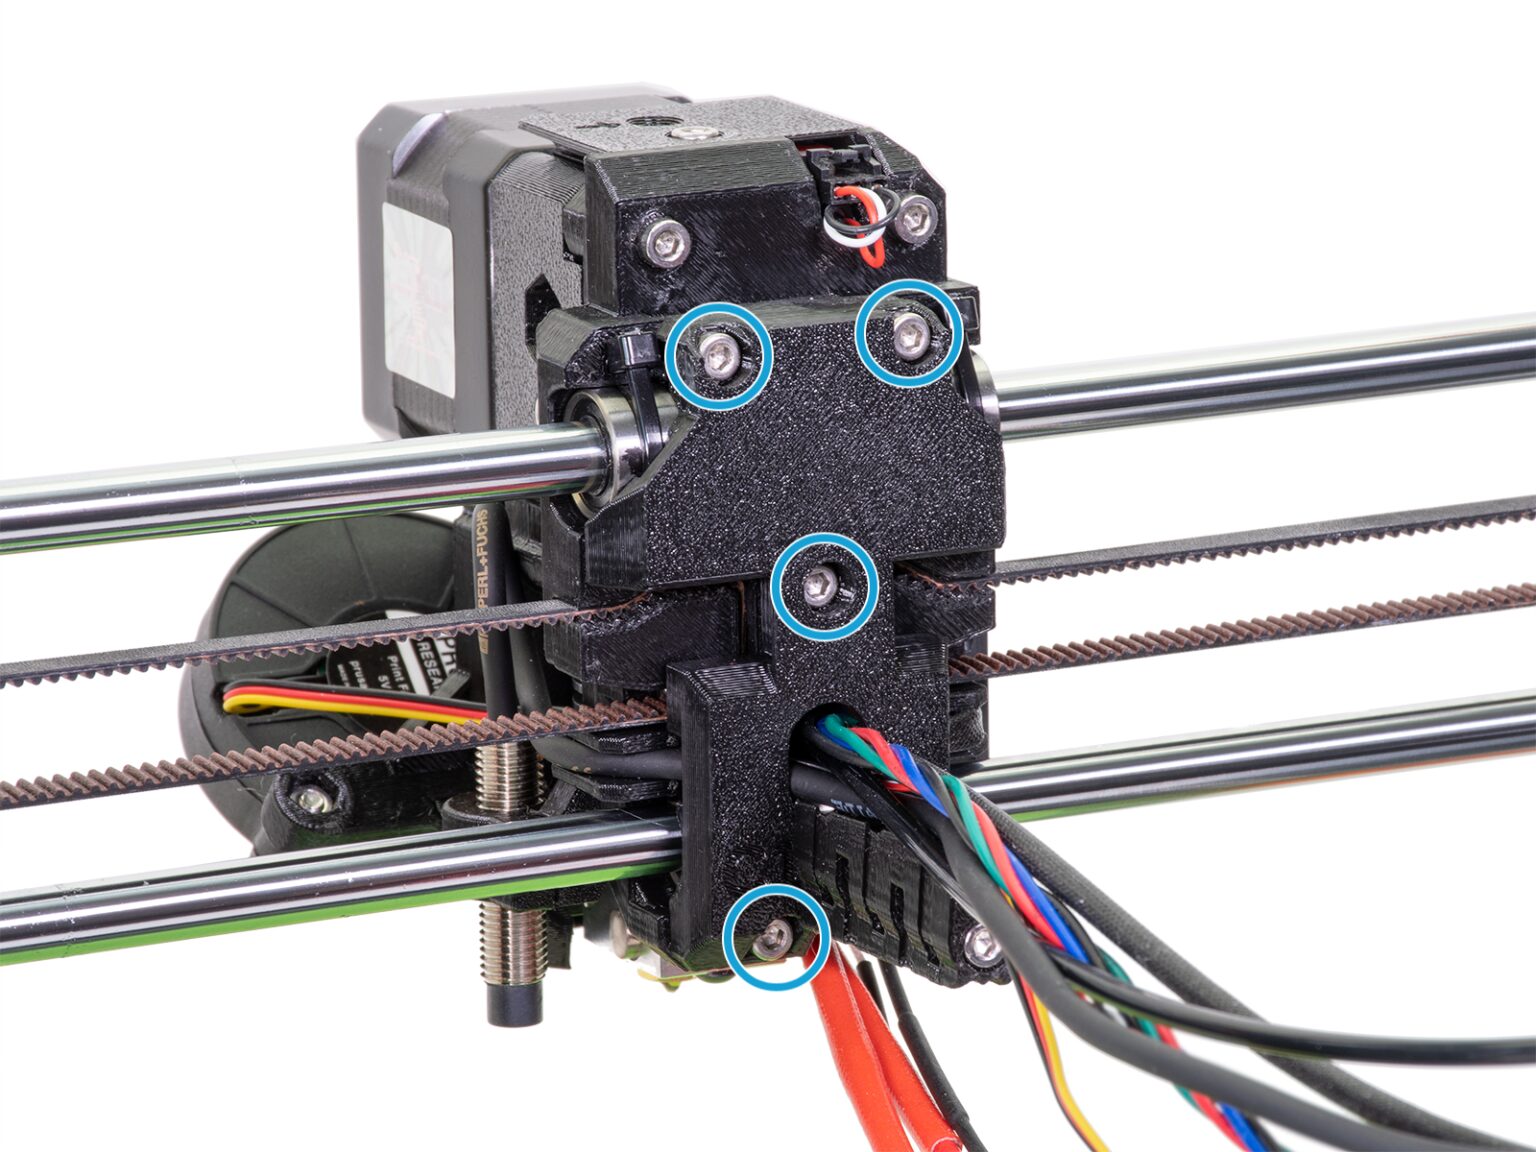
I contacted Prusa customer support on Friday. They suspect the problem was caused by over tight screws on back plate of the print head, specifically the top two screws. They said this is normally the cause of this problem.
Since I ordered the printer from Voxel Factory, a Canadian distributor, they mentioned they would be responsible for sending me replacement parts. On first contact with Voxel Factory they mentioned they would be shipping me new parts on Monday under warranty. This surprised me since it appeared to be user error. So, I'm very pleased with the service, both from Prusa technical support and form Voxel Factory.
I mentioned the tight belts values to Prusa technical support. They said they the values indicate the belts are too tight. The values would normally have caused the self test to fail when I assembled the printer. Since the self test didn't fail, they suspect the values were updated with later prints after the problem developed and are a side effect of the problem, not the cause of the problem. However, I was advised to keep an eye on the values after replacing the bearings and rods and ensure they fall within the acceptable range.
This weekend while waiting for the replacement parts to be sent I decided to rotate the rods I already have. I positioned the grooves to be in the top position, facing the ceiling. I also adjusted the belt tension to make it looser. When reattaching the print head as best as I could I ensured I did not over-tighten the screws. Since doing this work, after about 12 hours more printing the printer seems to be working fine, even without the replacement parts. No more clicking noise.