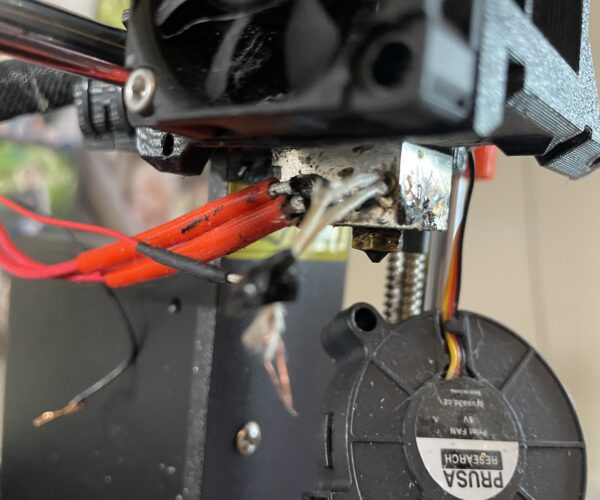
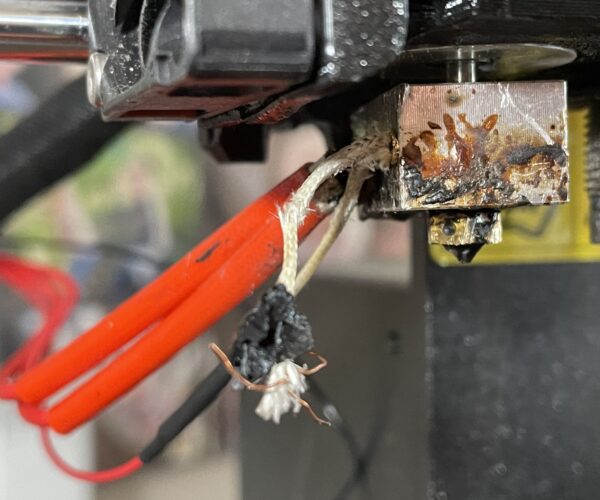
ERR: MIN TEMP- ripped out some wiring on extruder- help?
I had a print go wrong an turn into a gloppy molten mess attached to the extruder. While attempting to remove it, I wound up accidentally ripping out the small black coated wire, unfortunately very close to the extruder. I tried to juryrig the wire back together by twisting it and wrapping it with good ‘ole electrical tape, but now I get “ERR: MIN TEMP”.
I’m guessing I’ll need to disassemble the extruder an replace the entire wire. Any thoughts?
Anyone know where to purchase it? What gage?
Any help would be most appreciated.
Think I got it.
Nevermind. Think I got it. It’s the hot end thermistor wire. Just ordered it.
Sorry… was in a bit of a panic.
A common failure but be prepared for additional casualties
It sounds like you damaged your hotend thermistor. The part is a consumable, and the wires can become fragile over time, so you'll end up doing most of this work eventually. Replacing it is straightforward. If you are in the US, you can order Prusa versions of the E3D thermistor and related parts from Filastruder, MatterHackers, PrinteSolid, FilamentOne and other sources.
Now the bad news: There's a good chance that your thermistor is entombed in a plastic mess inside your heater block along with the heater cartridge. Once you take everything apart, you want to have parts on hand to replace anything that's damaged. Be prepared to replace:
- Hotend thermistor (broken wire)
- Heater cartridge (possibly stuck in block)
- Heatbreak (possibly stuck in block)
- Heater block (may be difficult to clean or remove broken parts from)
Also consider:
- Thermal paste for TOP (only) of heatbreak where it screws into heatsink
- Silicone sock to keep blob from forming next time
This is a good opportunity to upgrade a few parts:
- A nickel-plated heater block will be (somewhat) less likely to stick to filament and will provide better thermal characteristics for even heating.
- A titanium heatbreak will prevent heatcreep more effectively.
- A coated nozzle will be (somewhat) less likely to stick to filament.
- A silicone sock will protect both the nozzle & heater block from stray filament before it forms the Blob of Doom.
You're probably out $75-100 for these parts plus a couple of hours taking everything apart and reassembling. Considering the importance of these parts, I'd stick with genuine E3D parts, or at worst, TriangleLab clone parts. The Mk3 assembly guide is excellent and should get you through the process without too much pain.
and miscellaneous other tech projects
He is intelligent, but not experienced. His pattern indicates two dimensional thinking. -- Spock in Star Trek: The Wrath of Khan
Wow, thanks!
Wow! What a wonderfully detailed and thoughtful response! Thank you so much.
I’m hoping I don’t need all that. I got the plastic off, and it was only the last bit that was caught around the wire that snapped the wire about 1/3” from the unit.
So, as near as I can tell, that’s the only issue. I’ve bookmarked this thread, though, so I can troubleshoot if it doesn’t fix the issue.
Again- thoroughly impressed with the responsiveness and quality of this forum community! Thank you!
Keep us updated
Glad it's helpful. I had more-or-less the same thing happen so kept notes. Update us when you get it going again.
and miscellaneous other tech projects
He is intelligent, but not experienced. His pattern indicates two dimensional thinking. -- Spock in Star Trek: The Wrath of Khan
Update… Do I need to replace the whole hotend?
Cleared away all the plastic “slag”. Now the head of the hot end rotates freely (don’t think it’s supposed to do that. Also, I can really figure out a way to get the old hot end thermistor out of the housing.
Harumph! I think I might have to replace the hot end entirely. Pics attached. Let me know what you think.
 Not sure where to go from here.
Possibly, best be prepared to do so
You'll have to tear it down far enough to remove the hotend assembly and inspect it. There are grub screws for the heater cartridge that need to be cleared. It's common for grub screws to be caramelized in, thin wires to break, and threads to be stuck on delicate parts. In short, be prepared to replace everything BUT the heatsink and PTFE tubing. I'd keep spares on hand for:
- Thermistor (Get Prusa version with long leads)
- Heater cartridge (Get Prusa version with long leads)
- Heater block (possible upgrade to E3D nickel-plated copper)
- Heatbreak (possible upgrade to smooth E3D titanium)
- Thermal paste (ONLY for top of heatbreak interface to heat sink)
- Silicon sock (non-Pro, big nozzle hole version)
I think that's everything. I was out about $80 as I recall.
and miscellaneous other tech projects
He is intelligent, but not experienced. His pattern indicates two dimensional thinking. -- Spock in Star Trek: The Wrath of Khan
Tre front done fell off.
Thanks again for the good info.
I got the assembly broken down. Unfortunately, in the process of removing the leads for the wires (which were “caramelized”) I destroyed the heat sink. So after considering options and budget, I ordered an complete hot end assembly, plus an idler spring (which was abducted by aliens sometime between disassembling the housing and bagging everything up for safe-keeping).
I’m very glad that I purchased the kit vice an assembled model, else I would have been much more intimidated in undertaking this repair.
