Brown (possibly burnt) blobs on print
(I apologise if this topic got duplicated, but once I hit "add topic" the first time, it appeared to vanish.)
We are having a problem with out Prusa I3 mk3.
It was running fine a few weeks ago, and then I had to change the filament for one which was not the same brand as we normally use (which is FilaPrint Premium PLA). We started to get brown, brittle blobs of plastic on the print. Not just on the first layer, but at any point in the print.
We assumed it was that this new filament wasn't very good (we've had problems with filament before), but due to the current circumstances (probably exacerbated by being in the UK), it took us a month before we could get some of our usual stuff.
I tried again this morning now we have it, and encountered the same problem.
We print using Simplify3D (basically because of the supports), using more or less it's I3 defaults.
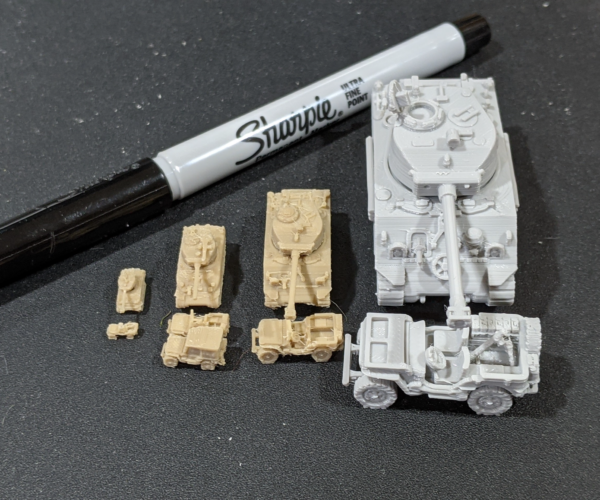
Couple of photos, as best as I can manage, the first from a failed print (sticking fail, probably caused by the blobbing) and one from the tank I printed where you can see it at the top, despite some attempt to remove it.
(I'll try adding in the photos as links, this time, in case trying to embed them was what caused the post to be eaten.)
(... Okay, it added them in anyway. *shrug*)
A cursory search indicates that it might be pertaining the to tightness of the nozzle, though why that should happen given we didn't change the nozzle is a mystery. (If it is that, all I can think is the lower temperature band of the other filament, while still within the 200ºC we were running at, maybe made it melt more and over several hour's printing, forced the nozzle out which is why the problem remains after changing filament.)
My dad is going to change the nozzle later, but I figured it would be worth asking in the meantime.
(Assuming I can get the forum to co-operate...)
(Edit: ah, it showed up this time, thyat's more promising...)
RE: Brown (possibly burnt) blobs on print
If your nozzle isn't tightened properly, you can get a filament leak at the top of your heater block. Before you go making hardware changes, remove the part cooling fan and get a good look at the top of the heater block. Shine a light in so you can clearly see the gap between the block and the heat sink. You should just see the narrow neck of the heatbreak in there. If you see a puddle of filament up there, you have a leak. It will eventually drip down the block and eventually, bits can wind up in your prints. If you don't see a puddle up there, that's not your problem.
It is entirely possible to get filament collecting on your nozzle and heater block during the course of normal printing, particularly if you've printed a few 1st layers too close. Filament can be scraped up by the nozzle and wind up collecting in odd place. The same can happen if you've had prints pop loose and get dragged around. Raise your nozzle, get some good light, and again inspect the block. It should be reasonably shiny. If you have a lot of crud on it, heat up to printing temperature and clean it off. Be very careful around the thin thermistor and heater cartridge wires. Avoid twisting anything. I use a strip of corrugated cardboard to "squeegee" off excess filament. You can use a soft brass wire brush, but again, careful around those wires! A wooden toothpick or other non-conductive probe can be used to clear bits around the wire. It doesn't need to be perfectly clean, but free of obvious blobs and build up.
I recommend taking a look at ideaMaker for printing vehicles. It has superior custom supports to Simplify 3D, and with a bit of work, the supports are very easy to remove. (Best of all the slicers I've worked with lately.)
Once you get comfortable with basic prints, you might want to experiment with a 0.25mm for small details. Once you get the settings down, small vehicles can be... addicting.
and miscellaneous other tech projects
He is intelligent, but not experienced. His pattern indicates two dimensional thinking. -- Spock in Star Trek: The Wrath of Khan Unfortunately,…
RE: Brown (possibly burnt) blobs on print
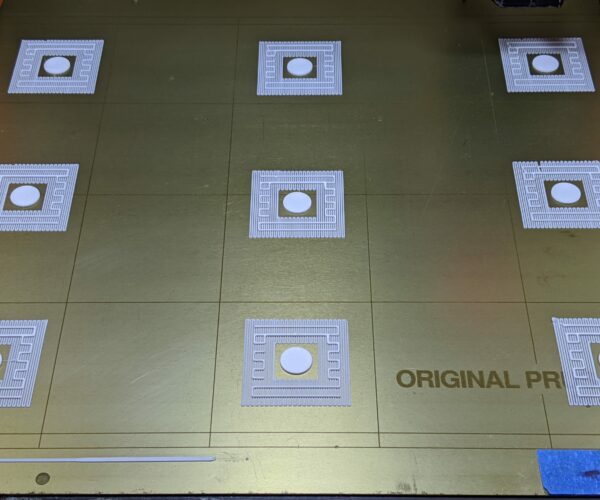
More info: Be sure you've got good bed adhesion and your Live-Z set correctly. Small prints like that tank are very prone to small amounts of lifting that can ruin a print. Are you using a textured or smooth PEI print surface? For PLA, smooth is easiest but can take a few tries to master. Your 1st layers should look something like this:
and miscellaneous other tech projects
He is intelligent, but not experienced. His pattern indicates two dimensional thinking. -- Spock in Star Trek: The Wrath of Khan Unfortunately,…
RE: Brown (possibly burnt) blobs on print
It does appear that the nozzle could be leaking, so that is one thing.
(My dad started on it, but we got de-railed because we had to sort out my Mum, since she got conned by a phising email, so we needed to frack about getting her card cancelled.)
We use the smooth plate. (The biggest problem we've had with the Prusa overall is adhesion and in some cases the only solution was to use a raft (which we didn't have to do on the Replicator 2 and this is the one area where the Prusa is not a unilateral step forwards), but I won't use rafts unless I absolutely have to.)
I briefly looked at IdeaMaker this afternoon, but it doesn't have the Prusa I3 as a default; which means even to make a proper comparison I would have to find all the data out and set that up; and then experiment and try and make sure it gets the printing time to something like Simplify's (which runs much faster, apparently, that the default on Ideamaker and Prusa's own). I'm a month behind already, I just want to get on with printing stuff, not fiddling around, honestly.
(Longer printing times are not an option, as it means a) price increase for anyone who wants my FDM prints instead of getting the models in resin/nylon I have at TheShop3D or Shapeways and b) reprinting all of the... Well, I've already passed the 300+ model count mark, so I reckon it could be half as many again, models in my catalogue before I'm done.)
The Prusa does prototypes and what I get out of it currently is good enough for my personal use (heck, the Replicator 2 was, even). And for some stuff (like 144th infantry) I just get it in resin or something anyway.
So, thank you for the mention, but at the moment, it just looks like more time and effort than it would gain me at the moment (especially since I'm not interested in the tinkering side of 3D printing, I just want the end product). Maybe I'll have another look down the line, but I just don't want to spend the time at the moment, I'm doing enough "catching-up-to-where-I-was" stuff at the minute.
RE: Brown (possibly burnt) blobs on print
If you are having adhesion issues with a smooth plate then its the usual 1 or both of 2 things. Live Z height not dialed in and/or bed cleanliness.
There's loads of threads around on both subjects and I'm pretty sure Bob has a pre-made cut and paste section he can post up but it boils down to cleaning the sheet thoroughly with plain dish soap such as fairy/dawn and LOTS of HOT water, followed by drying with clean paper towels to remove all traces of grease/oils. Then being super careful not to touch it afterwards or your skin oils will get back on there. Works much better than ipa.
Z Height you want to use the technique from this thread https://forum.prusa3d.com/forum/original-prusa-i3-mk3s-mk3-assembly-and-first-prints-troubleshooting/life-adjust-z-my-way/ . Those with 7x7 mesh leveling if you don't have it turned on already result in feats of adhesion that are frankly amazing. You should almost never need a raft.
RE: Brown (possibly burnt) blobs on print
@neophyl
We've tried all of that, which has sort of worked sometimes. We've even gone as far as light pan-scrubber application.
It just seems like the Prusa doesn't like wheels (on 144th scale vehicle) or other parts with very small bottom layers. (It's not Simplify - or at least not JUST simplify, since we didn't have the same problem with Simplify and the Replicator 2.) Even cutting the bottom of the wheels flatter than I did with the Rep 2, I've had failures with stuff not sticking to the rafts, let alone the plate, on a bad day. The Replicator 2's relative crudity had some benefits, apparently.
RE: Brown (possibly burnt) blobs on print
[...] We've tried all of that, which has sort of worked sometimes. We've even gone as far as light pan-scrubber application.
It takes a bit to get the hang of the smooth PEI, but it's the best surface for PEI. I've compiled some detailed notes on the process I use to get the 1st layer shown in the picture I posted above if you're still interested. To emphasize: I don't use rafts or brims for vehicles down to 1:300 scale when printing on smooth PEI.
It just seems like the Prusa doesn't like wheels (on 144th scale vehicle) or other parts with very small bottom layers. (It's not Simplify - or at least not JUST simplify, since we didn't have the same problem with Simplify and the Replicator 2.) Even cutting the bottom of the wheels flatter than I did with the Rep 2, I've had failures with stuff not sticking to the rafts, let alone the plate, on a bad day. The Replicator 2's relative crudity had some benefits, apparently.
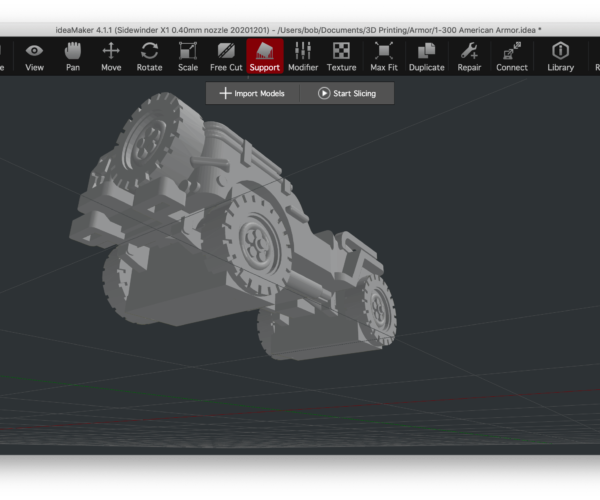
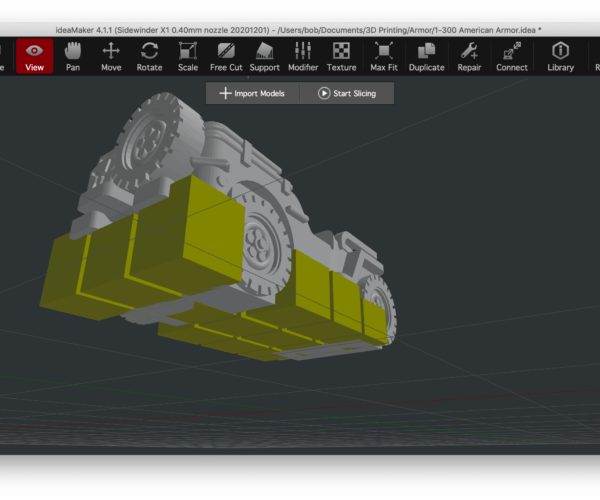
I slice 0.2mm off the bottom of wheels, not only for adhesion but because wheeled vehicles look silly floating on donuts. You can see the squared-off wheels in the example I posted above. Using ideaMaker (I have a Prusa Mk3 profile if you're interested), I can put some supports along the inside of wheels and get good adhesion throughout the print. A technique that worked for 1:300 scale wheeled vehicles was to model in some support for the wheels. I was able to do this inside ideaMaker, adding blocks supporting the axles. They don't show up on the table but make printing much more reliable.
With those blocks, the amount of extra support required is minimal and removes easily:
I've had fun doing 1:100, 1:100, 1:285 and 1:600 prints, and it's doable for a hobbyist on a FFF printer, but if you're selling 1:144 models, you'll get much faster and higher results going with a resin printer. I understood you were a hobbyist family. If you're running a business, I wouldn't futz around with FFF for that scale of figure. A 1:100 vehicle takes between 1-3 hours apiece to print with any quality on FFF and even then, they're a pain to paint up due to layer lines, even at low layer heights.
and miscellaneous other tech projects
He is intelligent, but not experienced. His pattern indicates two dimensional thinking. -- Spock in Star Trek: The Wrath of Khan Unfortunately,…
RE: Brown (possibly burnt) blobs on print
(Unfortunately, nothing is likely going to get done for a day or two now, due to other time demands on Dad, who is the technuical engineer; I'm basically only the CAD engineer. Faffing about with bank for Mum wiped out today's useful time - true to form. Between one thing and another I've gotten very little useful done today...)
@bobstro
Will try using the alcohol in the manner suggested, it is slightly different to what we've been doing (which is probably what is says in the instructions...)
I do cut off the bottom off the wheels; learned that on the replicator, which is why it surprised me that stuff that stick fine on the Rep 2 didn't want to on the Prusa.
To do a quick explanatory aside, I sell my models primarily through two webshops - one at Shapeways and more recently one at a place called TheShop3D, which does resin (and is cheaper and better than Shapeways now, but the majority of my customer base is still on Shapeways.) Two or three years ago, as Shapeways was becoming increasingly unreliable and with no viable alternative (TheShop3D is still ramping up and the contacted only last year), I began to offer FDM prints of my models (a process by which required me to print everything out AGAIN, this time with the time logged, so I could work out the cost, something I'm STILL doing). Despite the significantly lower price than Shapeways, there's only been a low take-up on that (mostly people wanting 100th or larger models for wargames which would be crazy prices commercially). Thus, the FDM mainly does prints for me (because I'm not overly paranoid about surface finish myself, so it's more than good enough for me), and prototypes. But I still do have to take into account printing time especially as I need to do it specifically for the price calculation, because hey, people do ask on occasion. Granted, for 144th-and-stasrhips, TheShop3D is now a better bet on the whole which is fine[1], but if all else fails, it's back-up if TheShop3D unfortunately doesn't last forever or Shapeways decide to throw the shops out in lieu of industrial customers like it's kind of clear they would rather like to do.
[1]I struggle to get why people didn't instantly flock to them instead of Shapeways as soon as I said, but I guess Brexit may be partly to blame, with both me and TheShop3D being UK-based.
(Yes, that was quick for me...!)
(Heck, the Replicator 2 was good enough for the wargames table; frack, I only paint basically to wargames viewing distance. Now, one of those MIGHT be the couple of nylon prints I had from Shapeways, but I wouldn't be able to tell without picking them up.)


