@ringarn67
you beat me too it 😀 that was the way I was going to go , I just got off work, that's the best solution and it can be adjusted.
Nice job
Swiss_Cheese
The Filament Whisperer
@ringarn67
you beat me too it 😀 that was the way I was going to go , I just got off work, that's the best solution and it can be adjusted.
Nice job
Swiss_Cheese
Thank You
Prusa i3 MK3S+ FW 3.11.0 (kit dec -20), PrusaSlicer 2.6.1+win64, Fusion 360, Windows 10
@alexander-3
just to add a note on top of ringarn67's well thought out idea, If you have a complex shape and a simple form wont do the job of support you can use a (Boolean )function to build the new support, the resulting part can be brought in/imported with the model and have separate adjustments applied to it for full control over contact, this also allows for the use of printing with other materials in the future,,, hint ABS for example.
regards
Swiss_Cheese
The Filament Whisperer
@swiss_cheese
That is actually how I did it 😀, (Boolean), and some minor adjustment afterwards
Prusa i3 MK3S+ FW 3.11.0 (kit dec -20), PrusaSlicer 2.6.1+win64, Fusion 360, Windows 10
RE: I have the same problems with my 1 week old and first printer. cant get simple overhang pieces to print right
Since i am fairly new, i do not have much experience in settings and slicing parts. I like to think that i have rudimentary understanding of things because i read a lot about printing and slicers these last days, and also i am a mech. engineer (if that even counts for anything 🤣 )
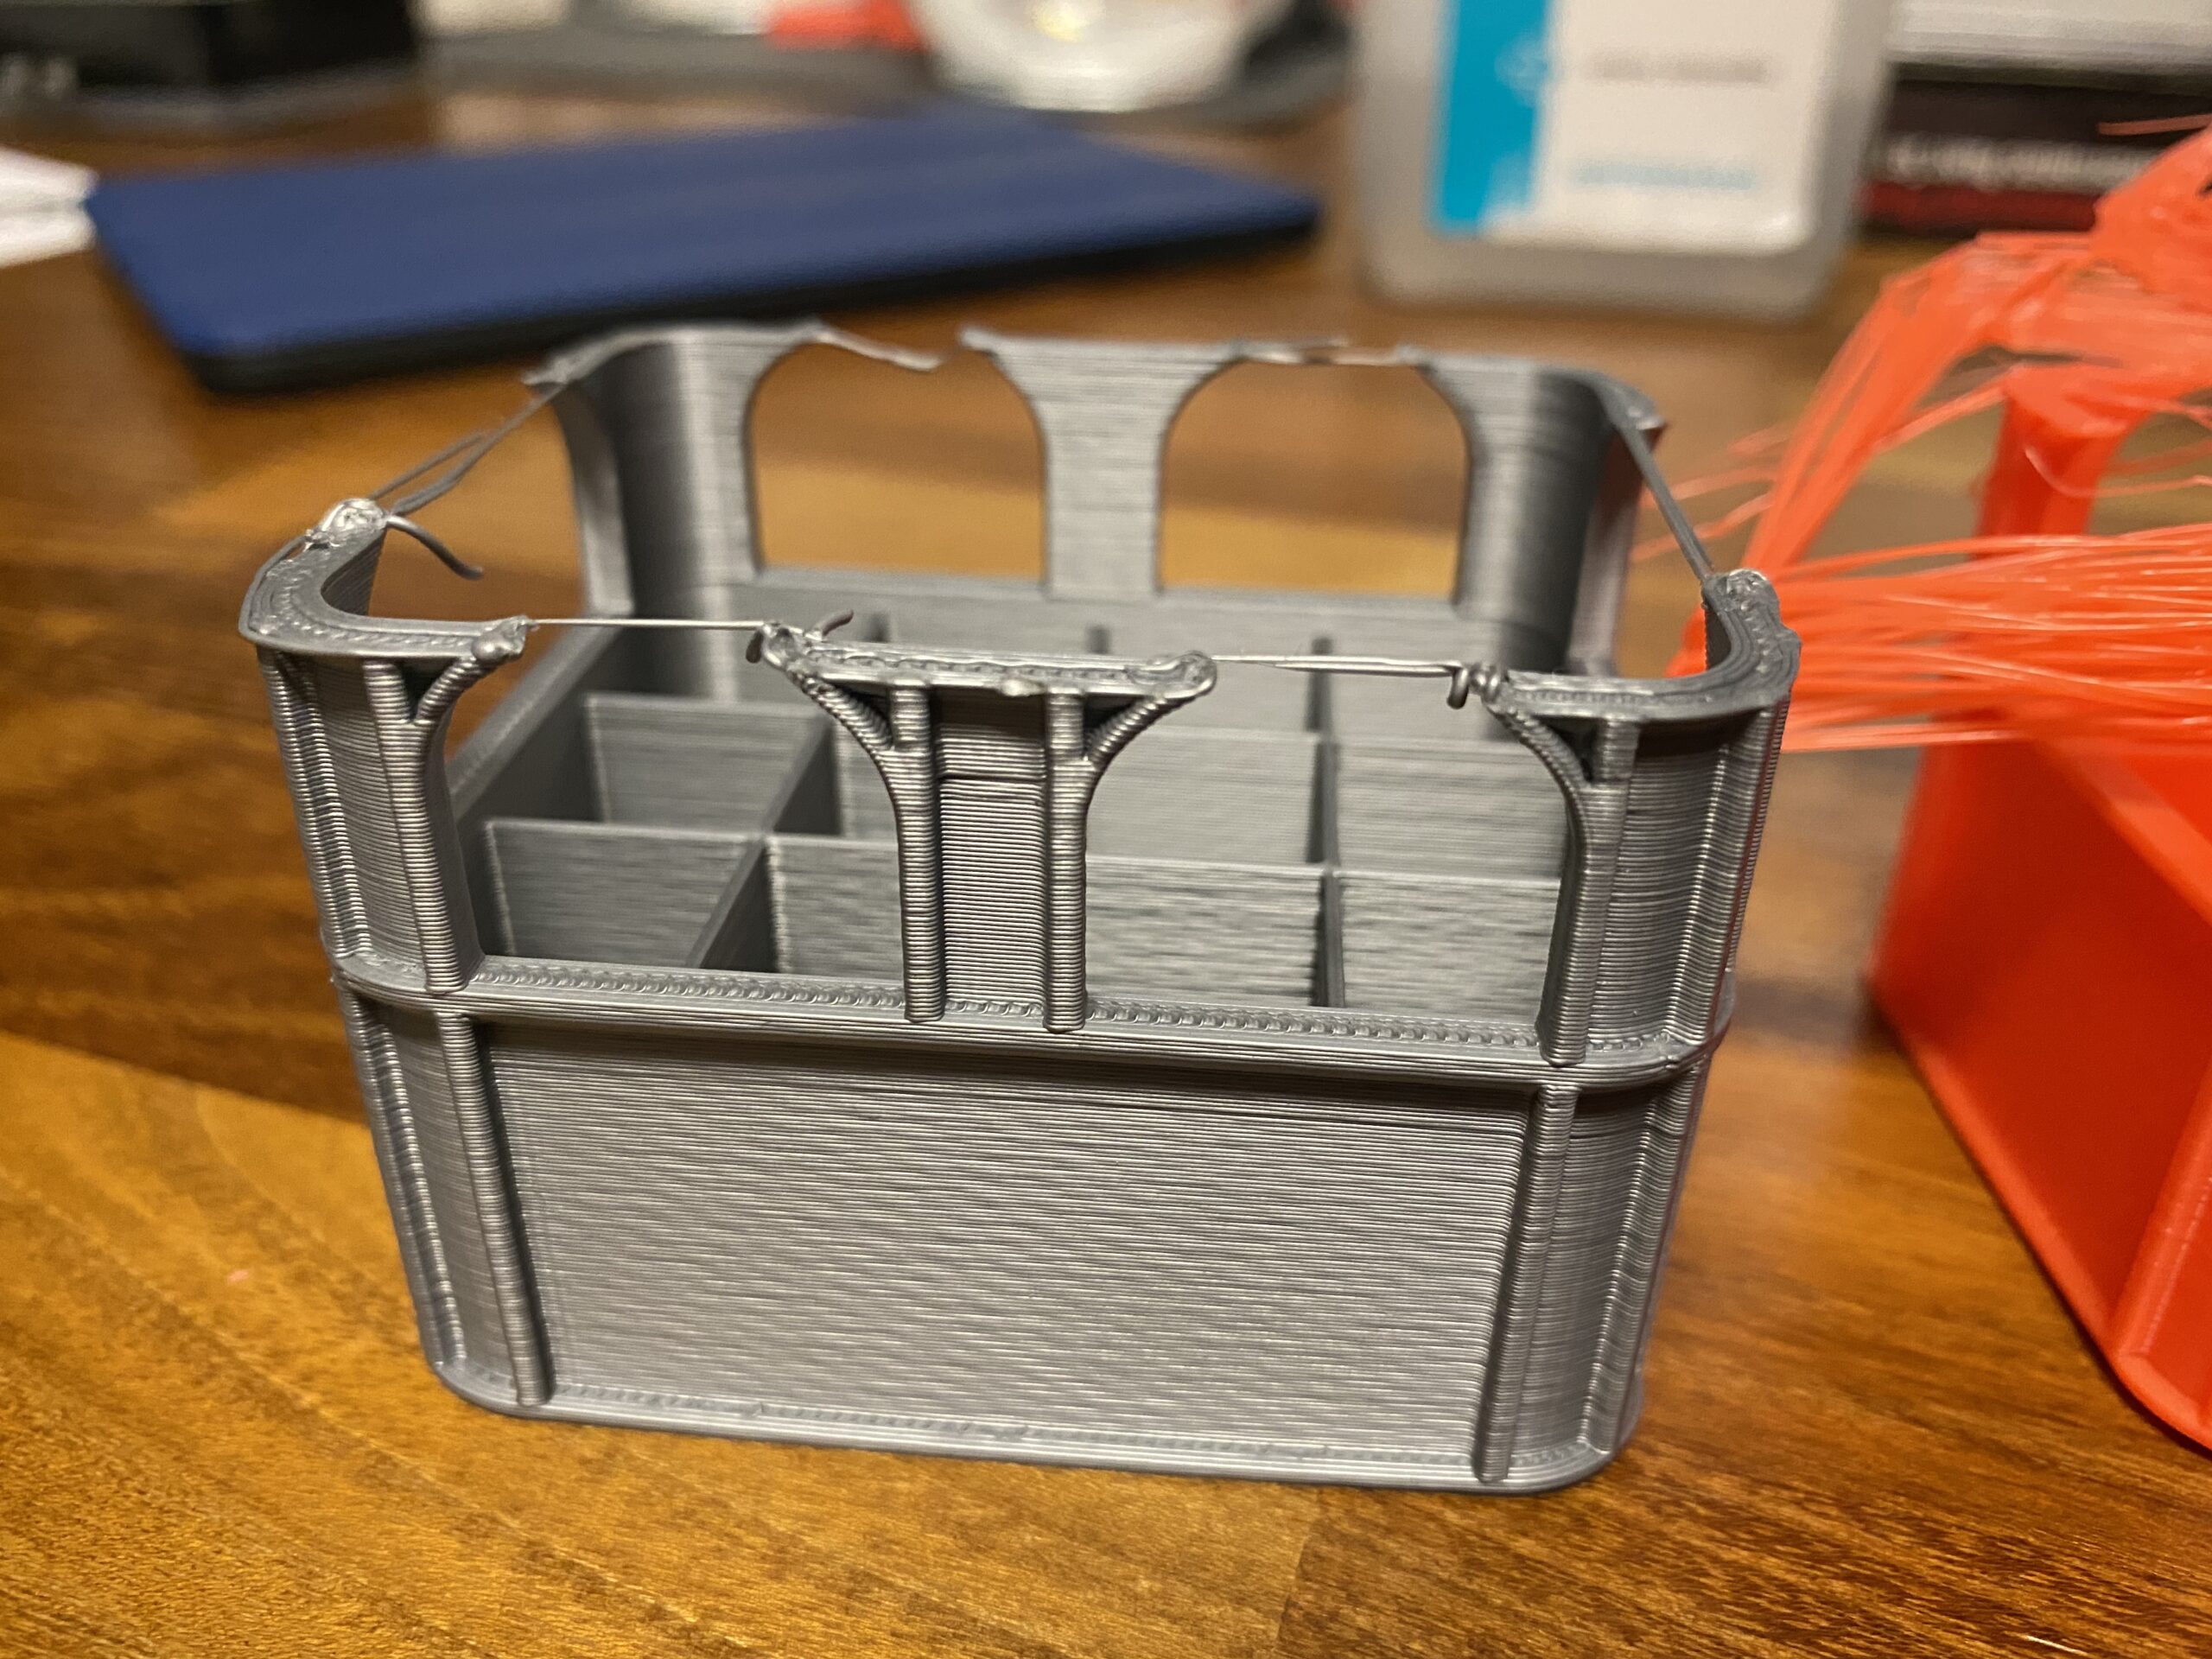
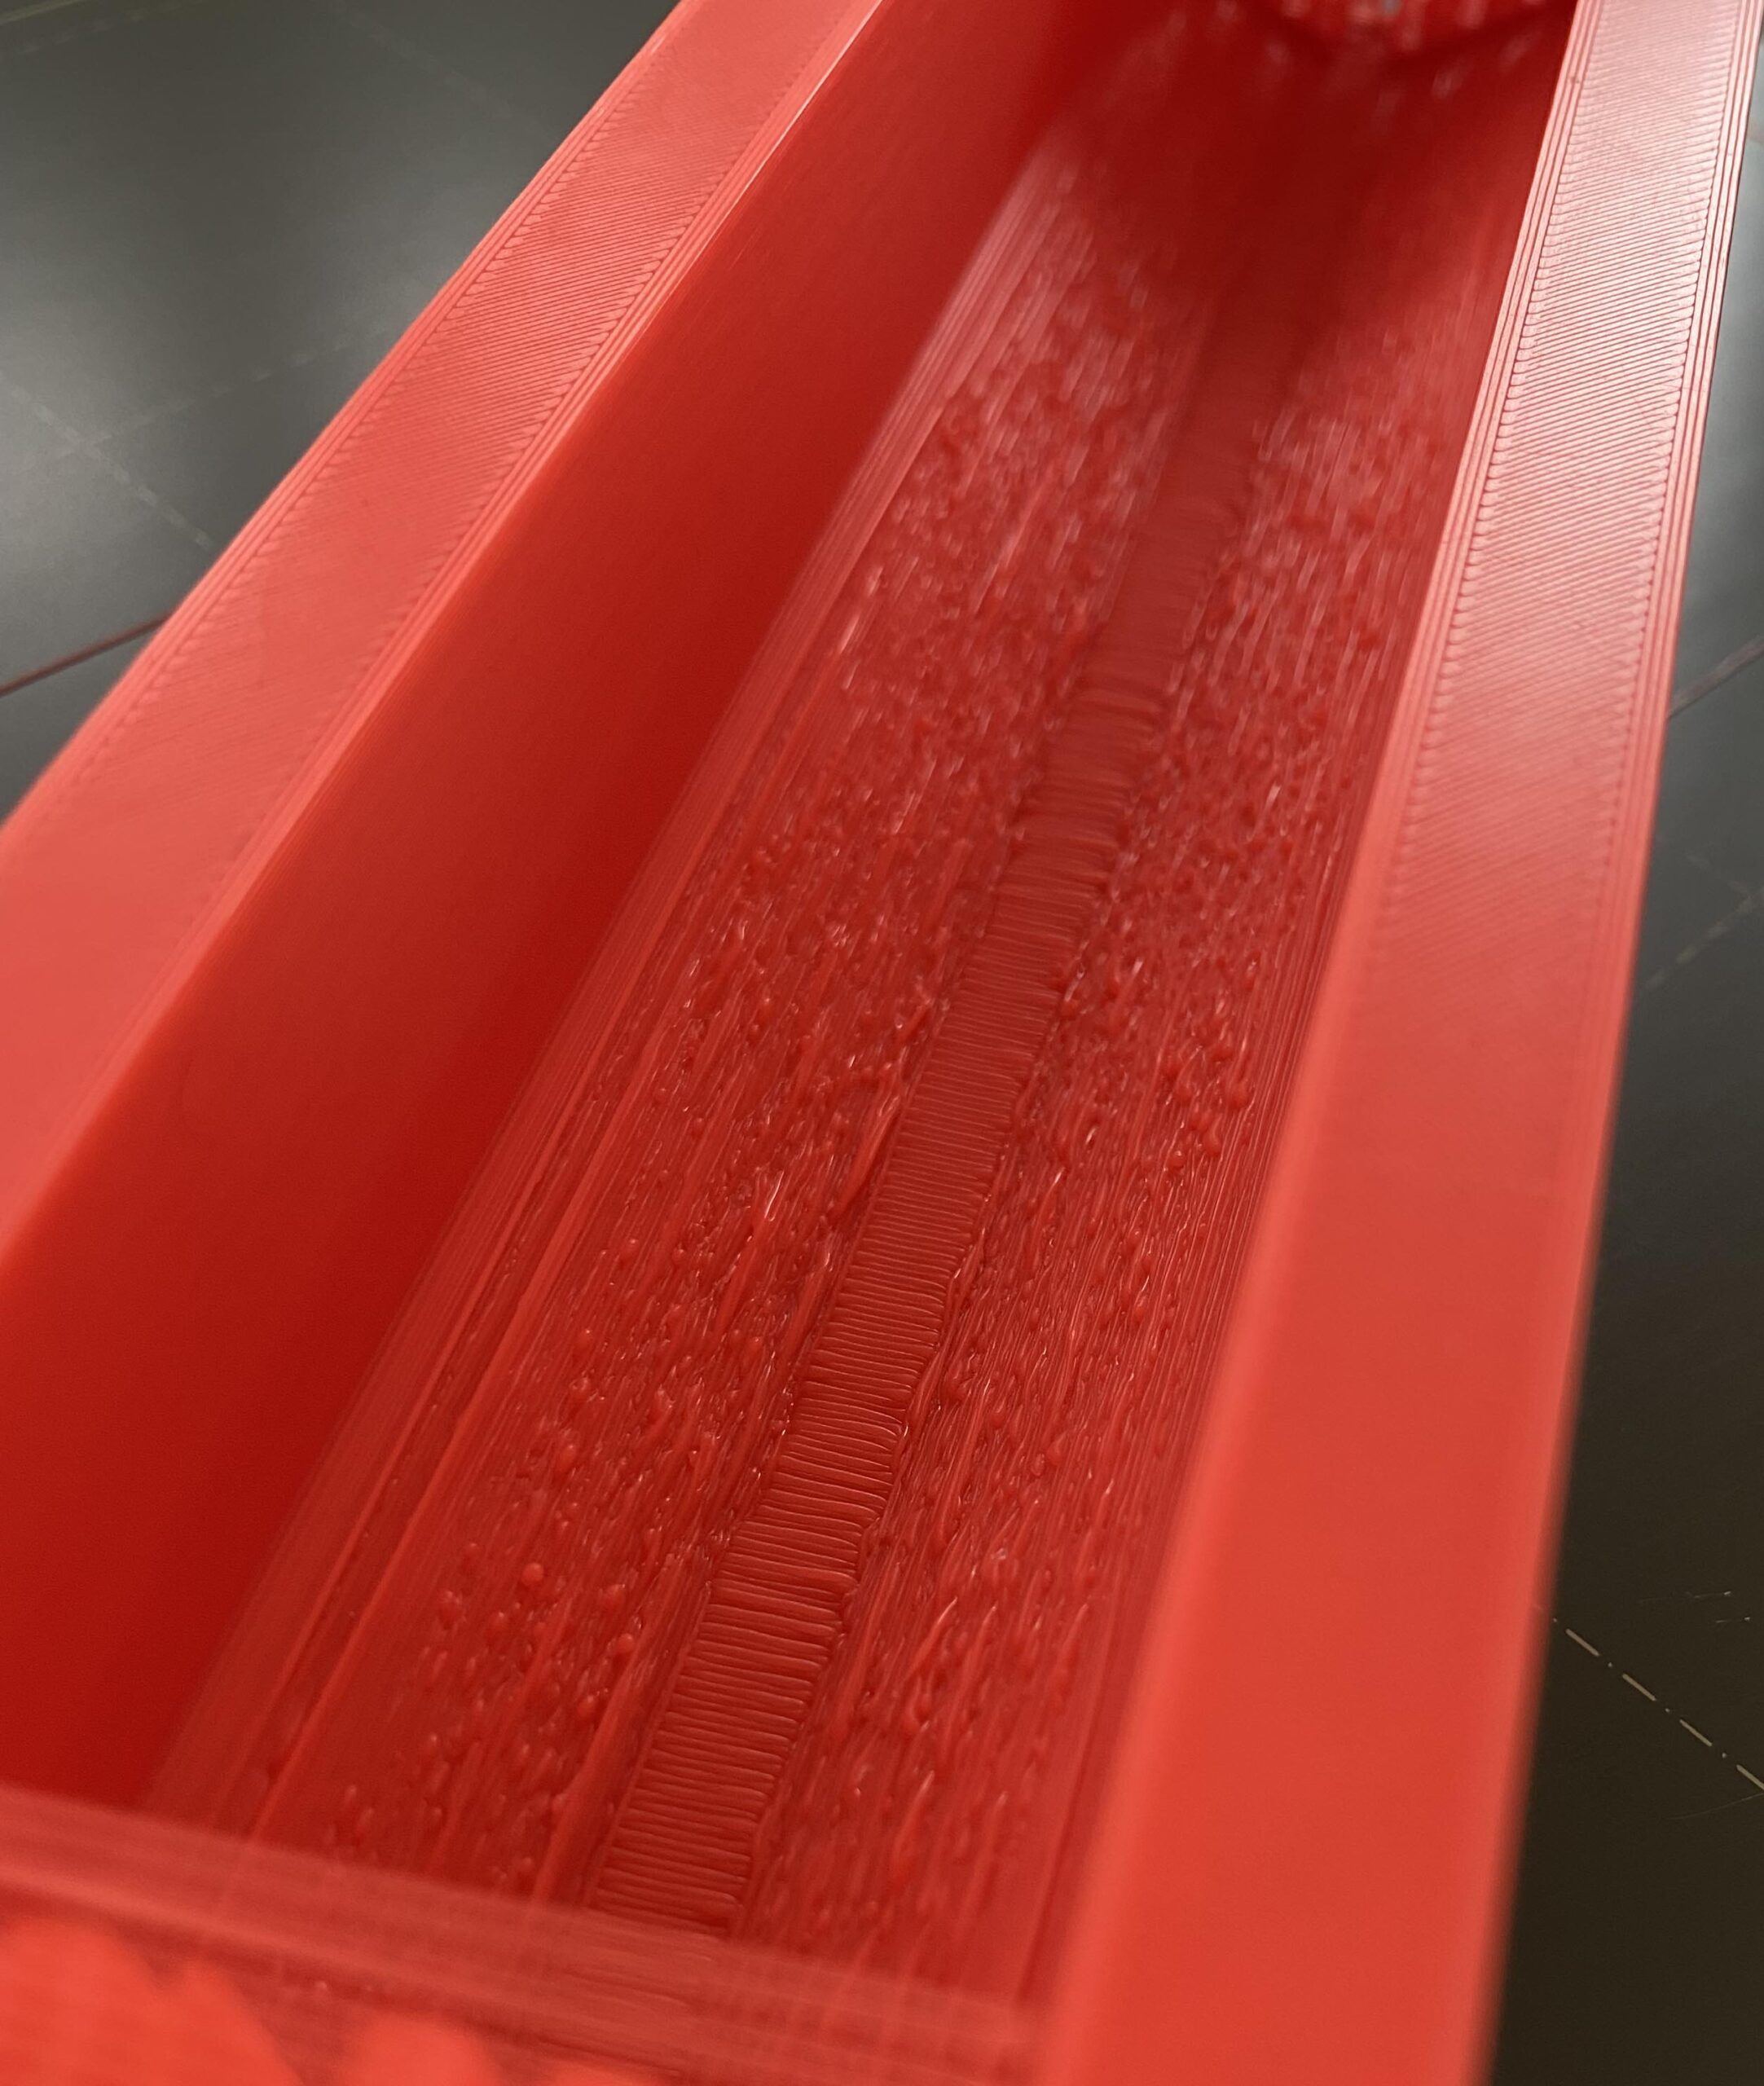
As far as i know the MK3S+ should be able to out of the box print quite well with stock settings, but for me this has not been the case. Trying to print some "simple" designs like the battery boxes is already a failing task for me. See the results below.
I have a lot of trouble to get overhangs and bridges to print in decent quality or even print at all. Seemingly a lot of people print those things out of the box, no problem. Stock settings 0.2mm with the Prusa Filament produce nice quality for everything except those overhangs/bridges. Printing at 200/50°C - First Layer 210/60. Fan blowing 50% (except first 3 layers) and Bridges 100%.
Had a few other tries with slower settings for almost everything, but the same curling and resuting failed prints occured. Also in the last picture see the bad overhang quality on this non-failed print. Should i just use supports whereever possible or can i expect my Prusa to print this stuff? Thanks 🤓 👍

Bed adhesion is the key
[...] As far as i know the MK3S+ should be able to out of the box print quite well with stock settings, but for me this has not been the case. Trying to print some "simple" designs like the battery boxes is already a failing task for me. See the results below.
It can, but it's not a toaster. You do have to prepare everything properly. Take a look at your red box. It looks spectacular, but there's no way the nozzle suddenly went bonkers and printed that pattern. What happened is that the part came loose from the bed and moved around during printing. That one is clearly an adhesion issue. The bridges on the silver box aren't as dramatic, but are fairly typical of the same problem. Examine the flat bottom on those prints and I suspect you'll see areas where corners or edges have lifted during the print. Look around on the various 3D printing sites and you'll see that Benchy prints often fail at the point where bridges start. Here are a few of mine from early on:

You absolutely must get both your Live-Z adjustment and PEI sheet cleaning correct for best odds of success. Once your adhesion is good, there is less part wobbling which will eliminate most of these sorts of problems. I'm going to put an info dump here just to make sure you've got all the pertinent info in one place.
INFO DUMP FOLLOWS...
-
Part warping or lifting along edges.
-
Bumping or knocking noises as the part moves under the nozzle.
-
Uneven vertical surfaces and bulges caused by print lifting and compression of overlying layers.
-
Spaghetti resulting from parts moving during printing.
-
The dreaded "blob of doom" caused by the part lifting and sticking to the nozzle as it extrudes filament.
-
A dirty PEI print surface. Even if you don't think this is the cause, it's always a good idea to make sure your PEI surface is clean before trying any other fixes. If it's a smooth PEI sheet, take it to the kitchen sink and give it a good dunk with Dawn (original formula, no vinegar or hand softener variants) dishwashing soap or your local equivalent (e.g. Fairy in UK). Use a clean paper towel to clean it off, and another to dry it. Avoid using any sponge or cloth that has been in contact with grease. Above all else, avoid touching the PEI print surface. Once it's good and clean, you should be able to use 91%+ isopropyl alcohol between prints, 100% acetone when that fails , and another dunk when acetone fails. Worst-case, use a 3M 7445 ScotchBrite (1200-1500 grit) pad or equivalent on smooth PEI to give it a very light buff, but only infrequently. If you've got a textured powder-coated PEI print surface, the official instructions are to use 91%+ isopropyl alcohol on it only. Rumors persist that some have had good luck getting started with these sheets by giving them a wipe with 100% acetone and a dunk with Dawn. Either way, there's no real warranty on these sheets. YMMV.
-
Improper Live-Z adjustment. If you have not already done so, try Jeff Jordan's "Life Adjust" procedure for calibrating your Live-Z setting. It is much easier to use and understand than the onboard routine and much easier to make mid-print adjustments accurately with. In general, start high (less negative) and work lower (more negative) in large increments (e.g. 0.1mm) until the filament starts to stick on its own. When you've got your Live-Z setting adjusted properly, you should be able to gently rub the extruded lines on the PEI surface without dislodging them. Then start lowering (more negative) the level until there are no gaps between layers. You should not be able to peel the lines apart after printing, but the top should be regular.
Adhesion
@bobstro
Great summary. I fought with my Biqu BX for 6 months and it was all poor adhesion due to a shifting z offset. Fixed now.
@f0erster, I recommend you read the above post very carefully.
--------------------
Chuck H
3D Printer Review Blog
got it
@bobstro
Thank you very much for taking your time to post this detailed explanation.
Yes, i already am aware of some of these topics and handle the smooth PEI sheet with wool gloves and grab almost exclusively the sides. Dish soap cleaning as well as 99% isopropyl alcohol are already in use, washing with dish soap every few prints (rinsing thoroughly), alcohol wiping almost every print. I believe i am already quite diligent with this, as i inspect for specks of grease or other impurities before every print. I also check the heated bed for print residues that may scew the bed level.
Regarding the live-Z adjust i printed multiples of Jeffs 75x75 (?) squares where i also believe to have found the "best" z-value for my taste. I started with big increments to later reduce them in 0.005mm steps to find the sweet spot. All the while measuring layer thickness with a whats called an "outside micrometer?" in english. Also the bed is leveled with nyloc mod and the octoprint plugin to roughly 0.05mm deviation. When printing the square with good settings it was difficult to get it off the bed, to the point i had to gently scrape underneath it with a blade to get it to come off. Bending the steel plate did nothing in this case, because the flat layer just flexes with it.
When i printed the big 200mm designs for the IKEA enclosure, i would grab onto the part and often it came off with some popping while bending the bed a little. Since i have no earlier experience and dont know what to expect, my thoughts are that these levels of adhesion are "normal".
Coming back to the box design: Since i do not know from experience how well a print should stick, I can try to maximise adhesion more by trying to roughen up the PEI surface more, and maybe reduce first layer Z height more. But in my understanding as an engineer, i do not know if that fixes what in my understanding are straight on collisions of the nozzle with some roughly 3-5 layerheight hardened PLA curls that rise up during printing.
Biqu BX
[...] Great summary. I fought with my Biqu BX for 6 months and it was all poor adhesion due to a shifting z offset. Fixed now.
Would love to see a write-up on the Bique BX sometime! I'm not likely to be in the market for another printer anytime soon, but that was an interesting beast.
RE: Other possible factors
[...] But in my understanding as an engineer, i do not know if that fixes what in my understanding are straight on collisions of the nozzle with some roughly 3-5 layerheight hardened PLA curls that rise up during printing.
Think of it this way (appealing to your analytical engineering mind): The nozzle is not lowering into the print. It follows the gcode and unless something very odd happens, gcode should either extrude on the current layer or move to a higher layer. Not to say it's impossible, but I would be very (very very) surprised if the nozzle is lowering into the print.
That means the print is rising into the path of the nozzle. This will happen as you print overhangs (e.g., the top of benchy doorway) as the printed bit sticks out away from any support. However, every benchy printed on a FFF printer used the same process. Thousands of Prua users have printed benchy successfully using the supplied gcode sample. That means we have to focus on physical factors.
Filament can warp up slightly, but should not be enough to get knocked loose. It is very important that anything else that can cause the filament to lift be addressed, and that's why adhesion to prevent any slight warping is important. Be sure your cooling fan is on high (it is in the sample gcode). Believe me, I struggled with this too (see my previous bent benchy collection).
Are you printing on a textured or smooth sheet? The textured sheet is known to be tricky for PLA in some cases. A lot of variability has been reported. I recommend starting on a smooth sheet with PLA if possible. You might try moving the print around on the bed a bit and rotating it to confirm you don't have any cooling issues.
Just for clarity, this is what good 1st layer adhesion should look like:
other possible factors
@bobstro
i am printing on the smooth PEI sheet from Prusa original.
Yes i suspect adhesion is not the real problem because the curls are sometimes getting so high that the nozzle just hammers into them. Observing the print i first heard some light knocking when the nozzle first made contact with the curls and managed to overcome them. Maybe the heat of the nozzle and not yet so great height of the curls were still manageble. Then it got worse and each layer these curls built up more and more to a level where the nozzle at one point rammed into one. Look at the height of the curl in my first picture, front left. That is roughly 1mm high, so 5 layers of "curl". The part was still adhering to the bed before this.
So my next steps would be to set cooling fan to 100% for all the time? Would changing the print speed even lower also be helpful?
edit
i just saw your picture of that "adhesion test"
would you mind sharing the stl for that so i can try it myself and show the result here?
It's always nicer to have experienced people like you helping a bit. All the information i accumulated since i started printing last week is overwhelming me to the point that i do not know if i should raise or lower my temps or speed anymore. Sometimes trying everything at once is a bit too much 😆
But like you said, i try to be analytical with this. Troubleshooting, changing (ideally) only 1 parameter at a time and looking how it changes behaviour. But getting set on the right tracks right away can save a lot of time.
Write up
[...] But in my understanding as an engineer, i do not know if that fixes what in my understanding are straight on collisions of the nozzle with some roughly 3-5 layerheight hardened PLA curls that rise up during printing.
Think of it this way (appealing to your analytical engineering mind): The nozzle is not lowering into the print. It follows the gcode and unless something very odd happens, gcode should either extrude on the current layer or move to a higher layer. Not to say it's impossible, but I would be very (very very) surprised if the nozzle is lowering into the print.
That means the print is rising into the path of the nozzle. This will happen as you print overhangs (e.g., the top of benchy doorway) as the printed bit sticks out away from any support. However, every benchy printed on a FFF printer used the same process. Thousands of Prua users have printed benchy successfully using the supplied gcode sample. That means we have to focus on physical factors.
Filament can warp up slightly, but should not be enough to get knocked loose. It is very important that anything else that can cause the filament to lift be addressed, and that's why adhesion to prevent any slight warping is important. Be sure your cooling fan is on high (it is in the sample gcode). Believe me, I struggled with this too (see my previous bent benchy collection).
Are you printing on a textured or smooth sheet? The textured sheet is known to be tricky for PLA in some cases. A lot of variability has been reported. I recommend starting on a smooth sheet with PLA if possible. You might try moving the print around on the bed a bit and rotating it to confirm you don't have any cooling issues.
Just for clarity, this is what good 1st layer adhesion should look like:
I will work in it this week. I have dictate it because I hand surgery on my right hand.
--------------------
Chuck H
3D Printer Review Blog
Prints attached
i just saw your picture of that "adhesion test"
would you mind sharing the stl for that so i can try it myself and show the result here?
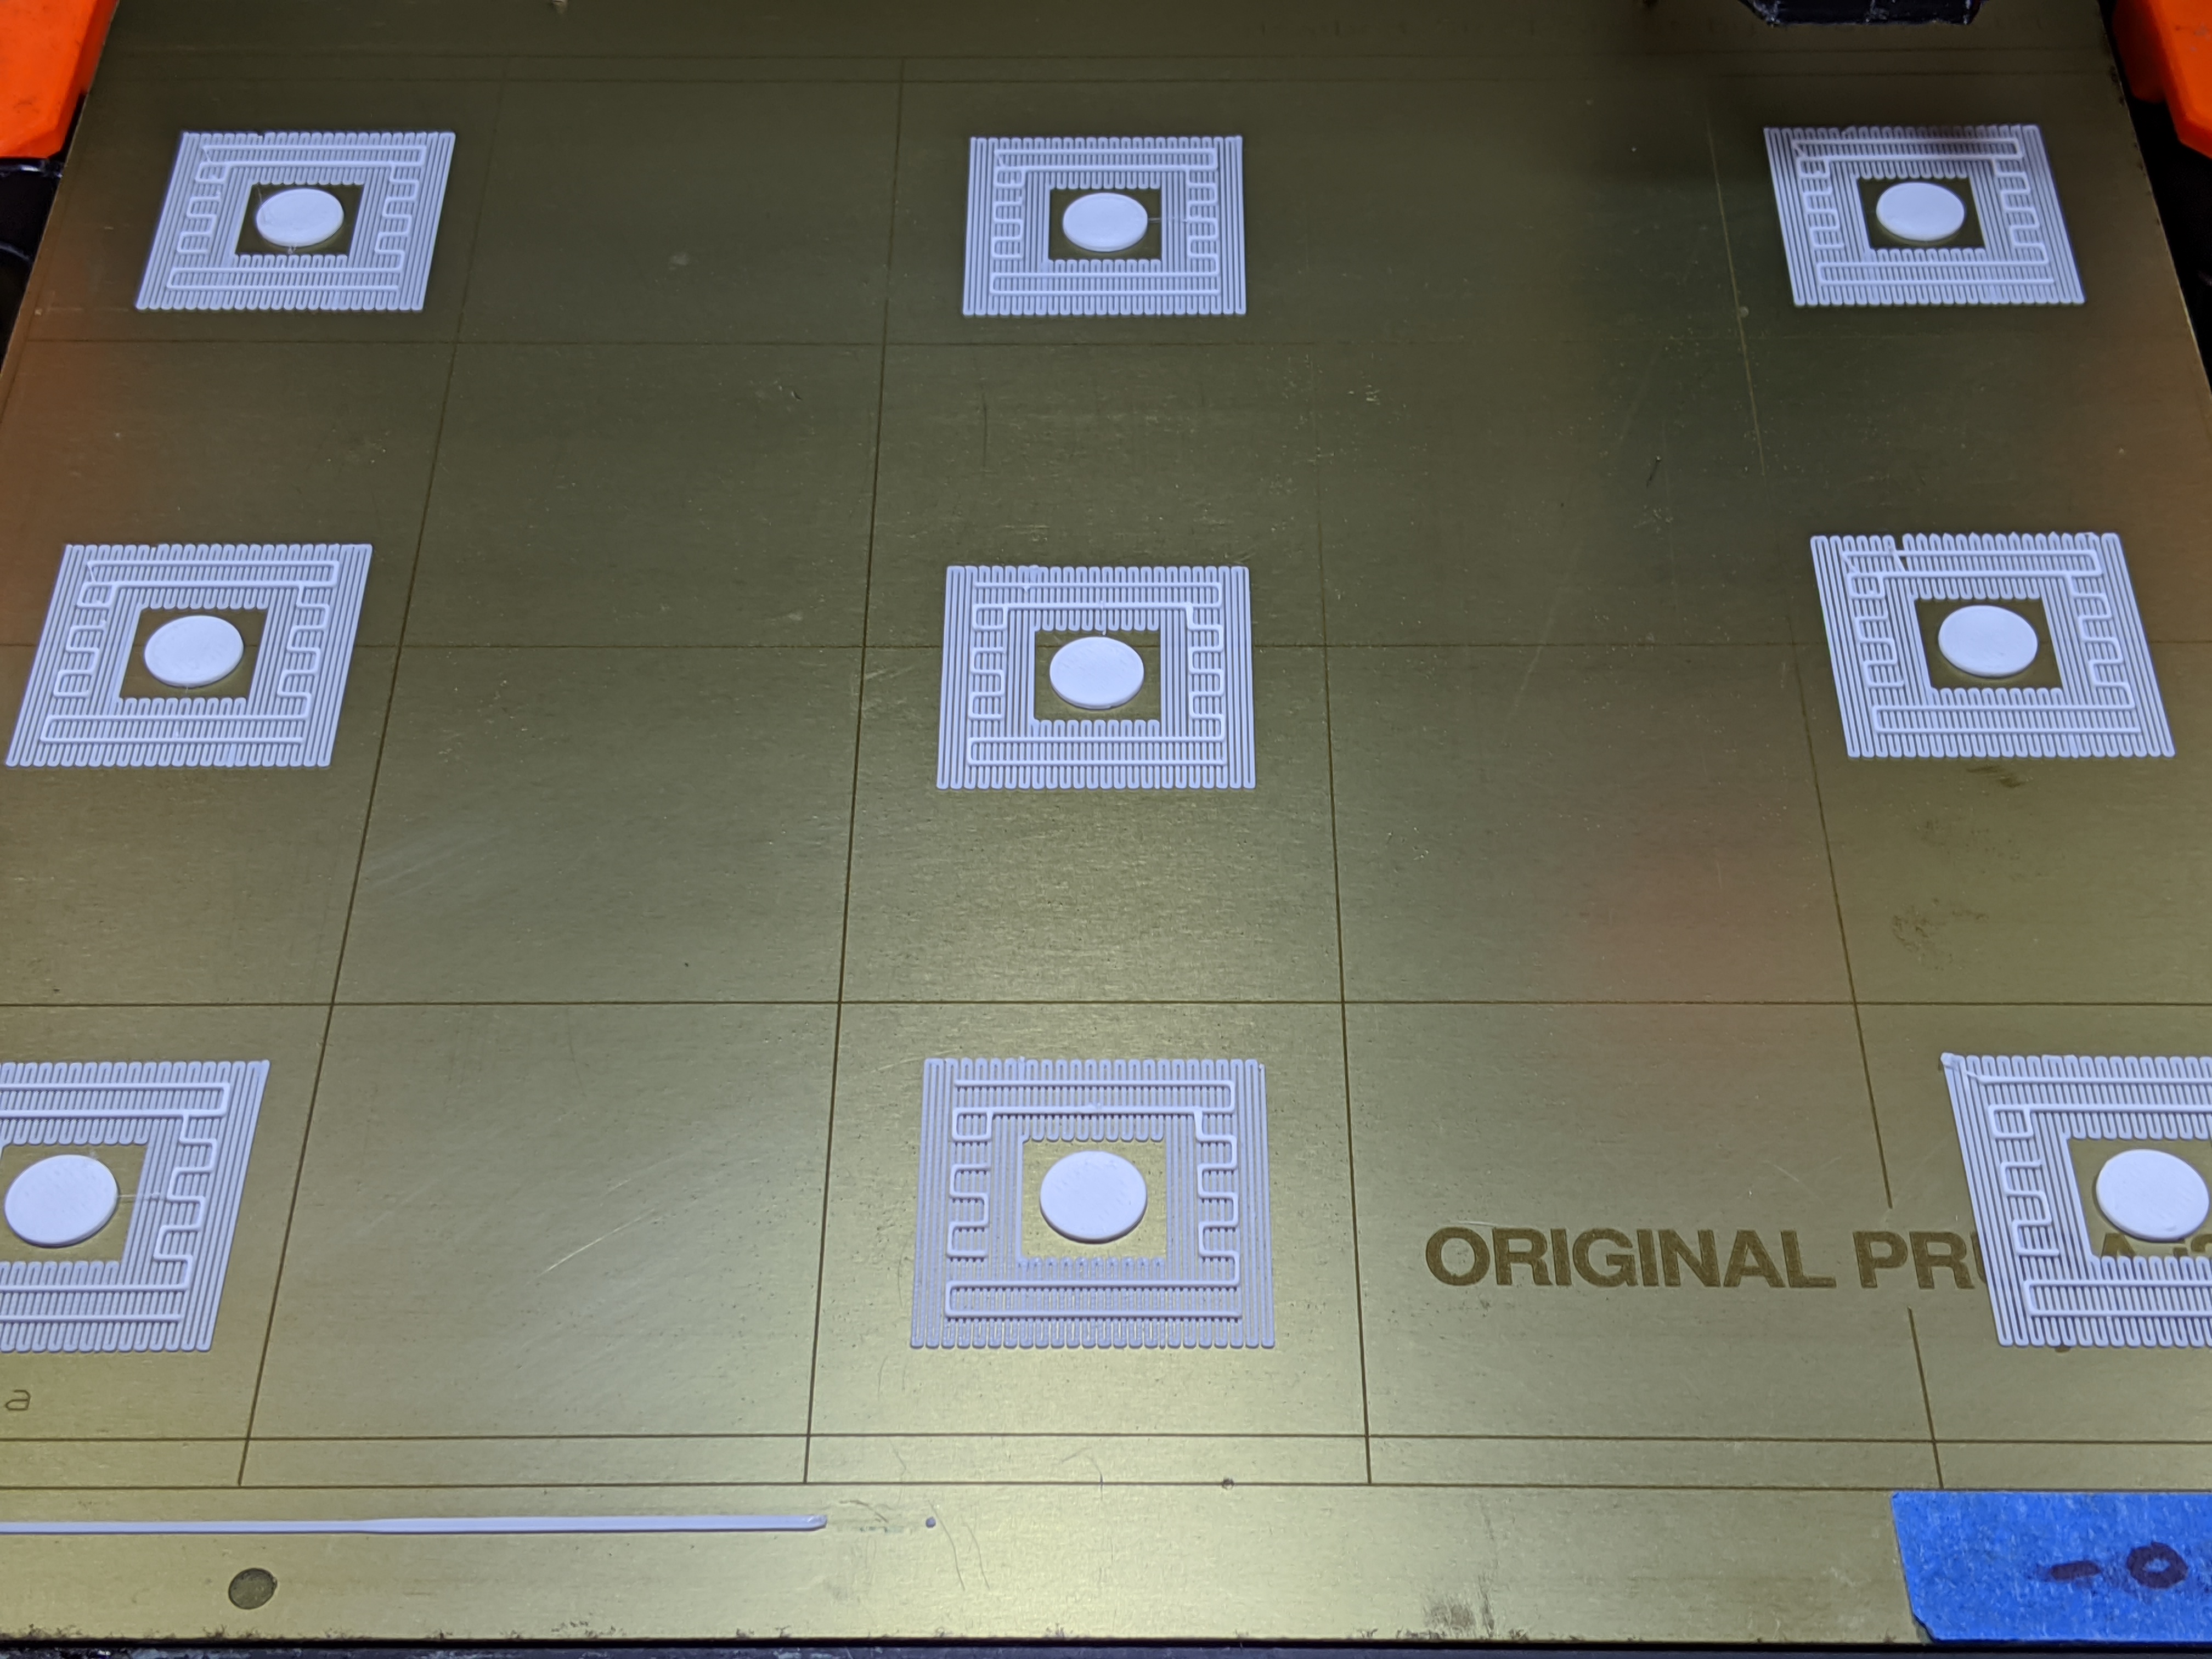
Sure, attached. It's really just a 50x50mmx2mm elevated square on a peg, but it's a good test of bed adhesion for the support. If your bed is properly cleaned and Live-Z correct, that support should print cleanly with no lifting.
But like you said, i try to be analytical with this. Troubleshooting, changing (ideally) only 1 parameter at a time and looking how it changes behaviour. But getting set on the right tracks right away can save a lot of time.
These 2 items are the big learning events when moving to a Prusa printer. They're different than most other types out there. Definitely spend some time on these issues. I didn't and lost a lot of time chasing the wrong problems early on.
before i start
thanks @bobstro for the files.
I have not printed the yet but will soon try. I expected the files from your picture regarding the first layer adhesion test but ok - i guess if i can print those peg towers that already indicates that adhesion is good.
To be honest i dont think i can print these pieces successfully since this is 100x more overhang than my orange boxes have, that already fail. But i will see. For starters, any recommendations on which settings i should start? Or should i be able to just print this with the 0.2mm Prusa standard settings, if my bed adhesion is ok? I imagine something like this needs lots of "special care" to get to print.
Of course this is not intended to be printed with supports, but also no brim and other helping stuff? It's to test the adhesion on just the peg? How easy can you peel that part off your bed, for reference, because i do not think that any level of bed adhesion can withstand a collision with the nozzle on this design.
RE: If your 1st layer isn't good, expect problems later
thanks @bobstro for the files.
I have not printed the yet but will soon try. I expected the files from your picture regarding the first layer adhesion test but ok - i guess if i can print those peg towers that already indicates that adhesion is good.
A bit of clarification. I use the usual 75x75mm square for Live-Z adjustments. I find that the fine 1st layer support pattern is the most difficult thing to print if your bed is dirty and Live-Z not adjusted properly. These prints are just little squares elevated above the bed as a test. Slice them with supports on and you'll get the pattern you see in my picture above. No need to let the print finish unless you want to play with support settings.
To be honest i dont think i can print these pieces successfully since this is 100x more overhang than my orange boxes have, that already fail. But i will see. For starters, any recommendations on which settings i should start? Or should i be able to just print this with the 0.2mm Prusa standard settings, if my bed adhesion is ok? I imagine something like this needs lots of "special care" to get to print.
Exactly. You should be able to print that sort of thing with support successfully using just about any presets. Here's an extreme example I did to test Live-Z and bed adhesion:
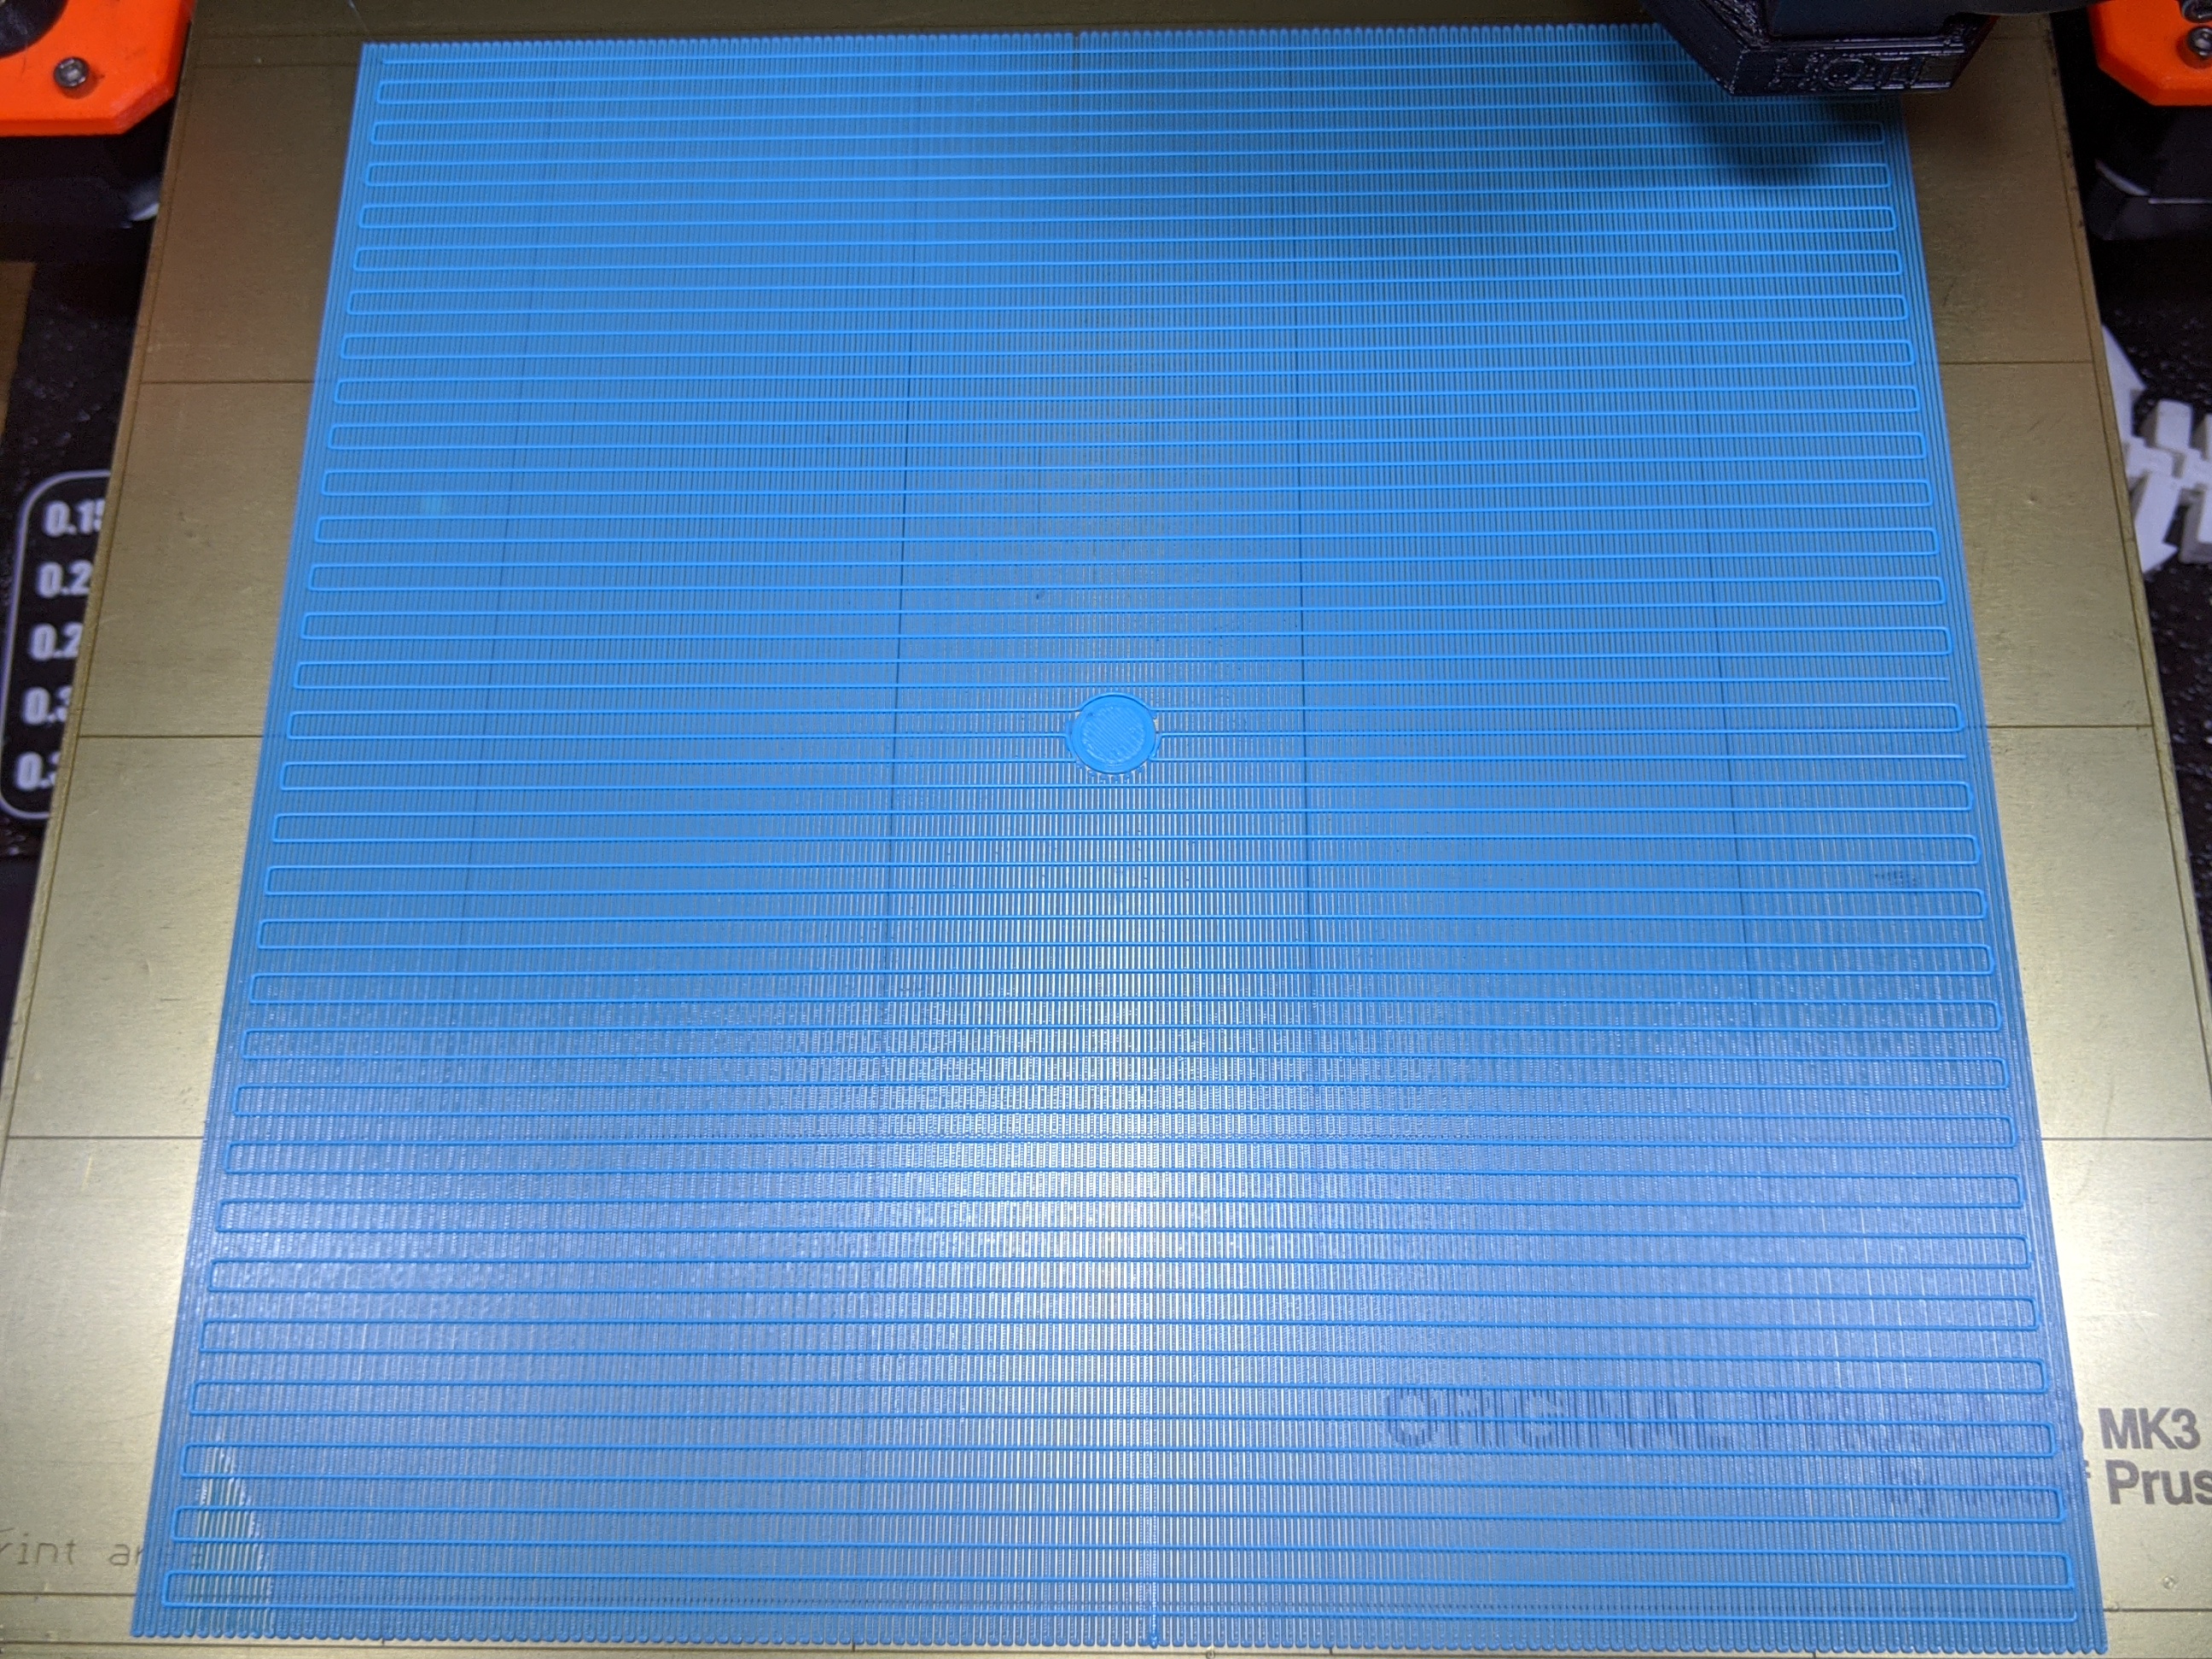
Now this is a stupid print in the real world. A bed-sized platform elevated by a peg. But it's one hell of a 1st layer test. My point being that if you're not getting good adhesion on your 1st layer supports or any other feature, it's well worth stopping and working on that issue before you move on to much else. A good 1st layer is the foundation for a good print. Get adhesion right and you're going to have a much more consistent print.
Of course this is not intended to be printed with supports, but also no brim and other helping stuff?
No no, wait. To be clear: That print IS intended to be printed with supports. It's a support test. The reason it's relevant here is that the fine 1st layer pattern is also a good bed adhesion test.
It's to test the adhesion on just the peg? How easy can you peel that part off your bed, for reference, because i do not think that any level of bed adhesion can withstand a collision with the nozzle on this design.
Not sure what you mean. Those things will print just fine. PrusaSlicer supports aren't excellent (though they're being improved) but they do work. Here are the results of printing that part with different slicers with supports enabled:

The message I'm trying to get across is that you should be able to print good 1st layers without having to resort to things like brims, rafts, hairspray or other nonsense. The PEI sheets are amazing if cleaned properly. You may need some extra tricks to deal with warping etc., but the basic PEI sheet is perfectly capable of handling very fine 1st layers.
@f0erster
Regarding the nyloc nut mod .05 mm deviation seems a bit high. I think you can tune that more to make the bed more level. These are my results after (10 attempts):
@f0erster
Also if you haven't changed it yet I recommend using the 7x7 mesh bed leveling instead of the 3x3
bed leveling accuracy
@asemer
stunning results, can you get them reproducable? I have feeling that the sensors and overall precision of movement have a higher deviation than that, because my leveling results vary by more than your absolute values of 1/100mm. If you hit the bed level 3 times, do all 3 results end up in .01 deviation?
When i run a bed level 3 times in a row without turning the screws, i land somewhere between 0.02 and 0.05. I conciously did not state the highest accuracy value i achieved as my bed level, because i dont really believe the machine is able to have µm precision without further modifications. But it will try it again. I levelled around 10-15 iterations before stopping.
@bobstro
i think i got confused by your model... I thought i was supposed to print the tower of your model completely without supports, platform standing on a single peg, 20mm in the air, like a table or something. Now i understood: I am supposed to just print out just the supports and first layer and check them for uniformity and adhesion and to not print the thing to the end. I will go right at it, now!
@bobstro
did
test interpretation
ok, so i did the adhesion test, last thing for today. hope this is a good result and some information comes out of it 🙂
good night!
