1st Layer Won't Stick
I have a few issues with my printer and am planning to use this thread as a log for my issues and the fixes I find. If you have any recommendations for what to try please chime in, that’s a big part of why I’m here. I also want to make sure though that what I find is adequately recorded and, hopefully, helps out someone else who is maybe running into the same issue(s).
A couple months back I ran into an issue with my printer and have shelved it while other work took priority.
The big issue:
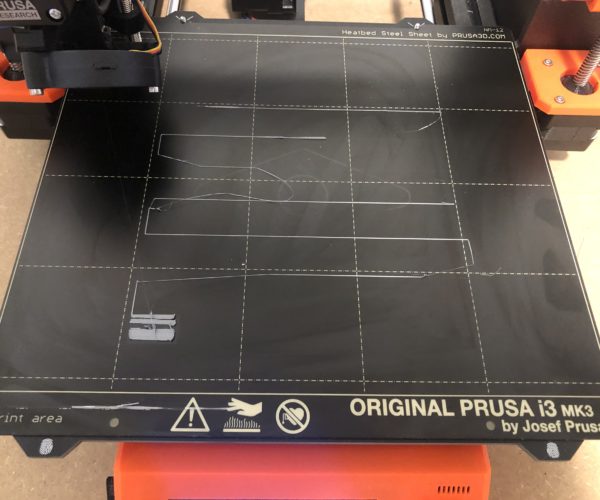
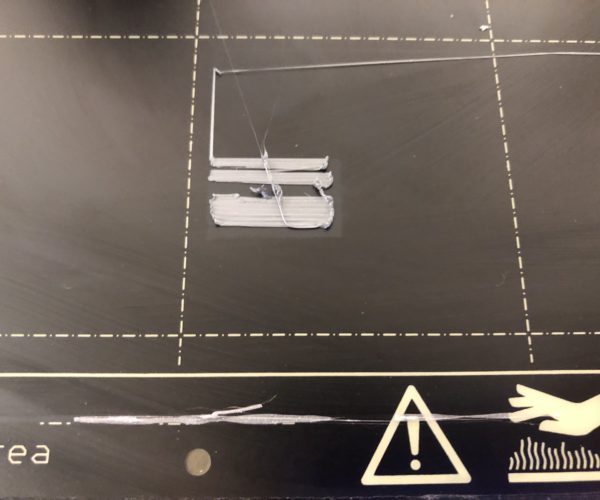
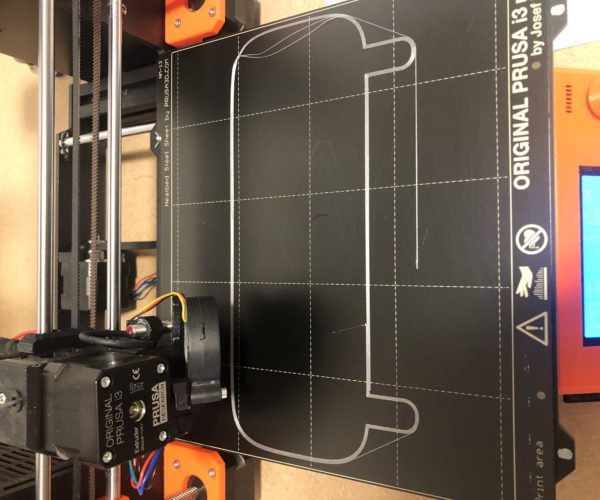
I can’t seem to get my filament to adhere to the bed. I try to run just the simple first-layer calc and I get lines that don’t stay consistently attached:
First layer calc A (cancelled partway through)
1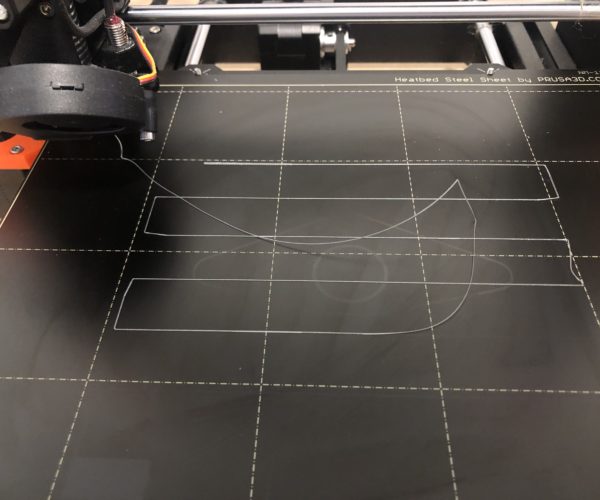
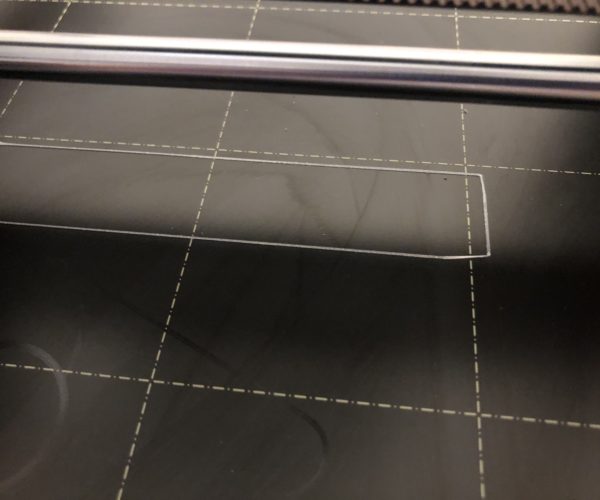
First Layer Calc B (completed)
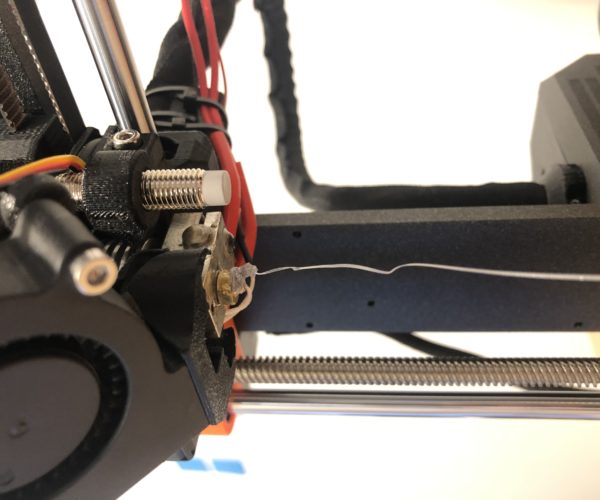
It doesn’t seem to help to live adjust Z. Pulling the height up results in just less adhesion, moving the height down results in plastic curling back up and getting globbed on to the hot end (apologies for the sideways image):
What I’ve tried:
-Cleaning the build plate with soap, alcohol as well as acetone
-Cold pull to clean a possible clog, plastic came out clean
-Cleaned up the teeth on the extruder gear and idler
-Carefully reset the tightness on the idler door
Any thoughts on what I should try next? I'm not really sure how to discern what's going on at this point. Should I consider getting a new hot end assembly?
Minor issues:
Increased noise in the Z axis:
Autoload doesn’t seem to detect filament (using grey Prusament).
What I’ve tried:
Nothing yet!
RE: 1st Layer Won't Stick
Sometimes it's the simple things, I looked around again in regards to just cleaning and decided to get some Dawn, as has been suggested many times. This seemed to work great and I managed to print the provided vase file without issue.
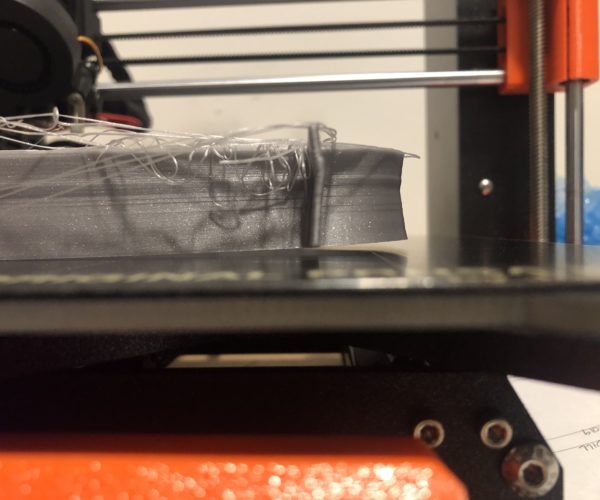
I moved on to a custom model that had a much larger footprint and ran into some issues though. Left it to run while I was out and came home to everyone's favorite tangle of filament (apologies again for the sideways image, it looks right on my machine but is rotated after upload):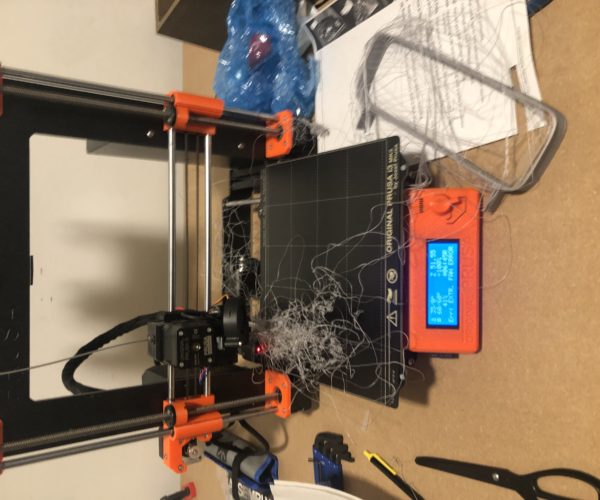
When inspecting the part I noticed there's some pretty obvious warping where the part is pulling away from the bed:
I assume that this made the part unstable and eventually it just got pulled away with the printhead while it was moving. The ensuing tangle of filament then poked itself into the fan and resulted in the "EXTR FAN ERROR" message on the screen. Does that sound like a logical conclusion? Should I be worried that the error message has a different source?
I added an 8 mm brim to the part and started a new print but wound up with some loose pieces of filament in the first layer. Also of note is the total lack of a wipe, or whatever you call that initial glob of plastic that is typically left on the front left edge of the build plate prior to a print:
Currently printing another attempt, made it cleanly through the first layer without any loose bits and the initial wipe/purge is present.
RE: 1st Layer Won't Stick
Have you tried doing an IPA wipe of the PEI sheet prior to each print?
RE: 1st Layer Won't Stick
@anomalous
Two issues:
One - autofilament sensor: check whether the sensor is switching from 0 to 1 and back in the respective menu. If no filament is present and the sensor is stuck to "1", a quick fix is to disable the sensor; when I had the issue I was able to permanently fix it easily by slightly un-tightening the screw on top of the extruder assembly which holds down the sensor.
Two - 1st layer won´t stick: What material are you using (PLA, PETG etc) at what temperatures? If you run first layer (Z) calibration, increase temperatures immediately after starting the process by getting into the fine tuning menu and dialing in higher numbers. For PETG I typically use 242/90 and for PLA around 232/75 for first layers.
I try to give answers to the best of my ability, but I am not a 3D printing pro by any means, and anything you do you do at your own risk. BTW: I have no food for…
RE: 1st Layer Won't Stick
@anomalous
Two issues:
One - autofilament sensor: check whether the sensor is switching from 0 to 1 and back in the respective menu. If no filament is present and the sensor is stuck to "1", a quick fix is to disable the sensor; when I had the issue I was able to permanently fix it easily by slightly un-tightening the screw on top of the extruder assembly which holds down the sensor.
Two - 1st layer won´t stick: What material are you using (PLA, PETG etc) at what temperatures? If you run first layer (Z) calibration, increase temperatures immediately after starting the process by getting into the fine tuning menu and dialing in higher numbers. For PETG I typically use 242/90 and for PLA around 232/75 for first layers.
232C for PLA is too high. You shouldn’t need to go that high. If you’re having to do that to get it to print, it’s likely you have some other issue that this is compensating for. You also shouldn’t need 75C bed temperature. I’ve never had to print above 65 for PLA.
RE: 1st Layer Won't Stick
As noted by others, your Live-Z setting in the 1st pics it too high. The nozzle needs to be low enough (a more negative Live-Z value) to allow the filament to squish a bit when extruded for good adhesion. Your print surface also looks a bit dirty in those pics.
-
A dirty PEI print surface. Even if you don't think this is the cause, it's always a good idea to make sure your PEI surface is clean before trying any other fixes. If it's a smooth PEI sheet, take it to the kitchen sink and give it a good dunk with Dawn (original formula, no vinegar or hand softener variants) dishwashing soap or your local equivalent (e.g. Fairy in UK). Use a clean paper towel to clean it off, and another to dry it. Avoid using any sponge or cloth that has been in contact with grease. Above all else, avoid touching the PEI print surface. Once it's good and clean, you should be able to use 91%+ isopropyl alcohol between prints, 100% acetone when that fails , and another dunk when acetone fails. Worst-case, use a 3M 7445 ScotchBrite pad or equivalent on smooth PEI to give it a very light buff, but only infrequently. If you've got a textured powder-coated PEI print surface, the official instructions are to use 91%+ isopropyl alcohol on it only. Rumors persist that some tribes deep in the jungle have had good luck getting started with these sheets by giving them a wipe with 100% acetone and a dunk with Dawn. Either way, there's no real warranty on these sheets. YMMV.
-
If you have not already done so, try using Jeff Jordan's "Life Adjust" procedure for calibrating your Live-Z setting. It is much easier to use and understand than the on-board routine. It's much easier to make mid-print adjustments accurately with. In general, start high (less negative) and work lower (more negative) in large increments (e.g. 0.1mm) until the filament starts to stick on its own. When you've got your Live-Z setting adjusted properly, you should be able to gently rub the extruded lines on the PEI surface without dislodging them. Then start lowering (more negative) the level until there are no gaps between layers.
and miscellaneous other tech projects
He is intelligent, but not experienced. His pattern indicates two dimensional thinking. -- Spock in Star Trek: The Wrath of Khan Unfortunately,…
RE: 1st Layer Won't Stick
Thank you for all of the feedback!
In regards to the Z-height I believe I'm at a good height now, although the real fix seemed to be the cleaning. I also noticed some inconsistency from one side to the other, as if the Z-height were changing. With a quick mesh bed leveling that got cleaned up as well.
I had not been doing a good enough job keeping the PEI surface clean. Now that I've done a Dawn wipe-down things have improved. Good to hear there's another level beyond that you can take, the Scotchbrite pad, though I'll pretend I didn't hear that unless things get really bad per your advice.
Also good to hear that using a glue stick isn't quite necessary for PLA, having tried that previously I got mixed results.
Once my current print is done I'll give a look at the filament sensor and see if loosening the screw at the top does the trick.
RE: 1st Layer Won't Stick
Glad to hear things are looking better. You should also try setting you Mesh Bed leveling to use a 7x7 grid instead of 3x3. It's in Settings.
RE: 1st Layer Won't Stick
I think IPA has some residue that builds up with out good cleaning with something else from time to time.
RE: 1st Layer Won't Stick
I think IPA has some residue that builds up with out good cleaning with something else from time to time.
If you're buying 91%+ isopropyl alcohol, the contents should be 91% pure alcohol with the remainder made up of purified water. There should not be any residue from the alcohol itself except in minuscule amounts that shouldn't affect widespread adhesion. The issue with alcohol is that it breaks down accumulated grease, but doesn't actually remove it. The amount of grease it can break down is proportional to the amount of alcohol applied. This is why a direct squirt of alcohol is recommended as opposed to a moistened wipe. You can wipe some away (and back on), but some will always stay. Thus alcohol will be less effective over time. The advantage to the dunk under the sink with Dawn is that the volume of water washes away accumulated gunk as well as the broken down grease. It gives you a clean slate of PEI after which isopropyl alcohol should work again.
and miscellaneous other tech projects
He is intelligent, but not experienced. His pattern indicates two dimensional thinking. -- Spock in Star Trek: The Wrath of Khan Unfortunately,…
