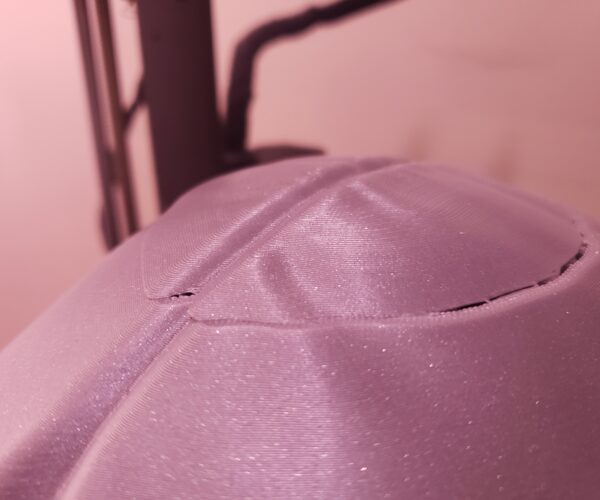
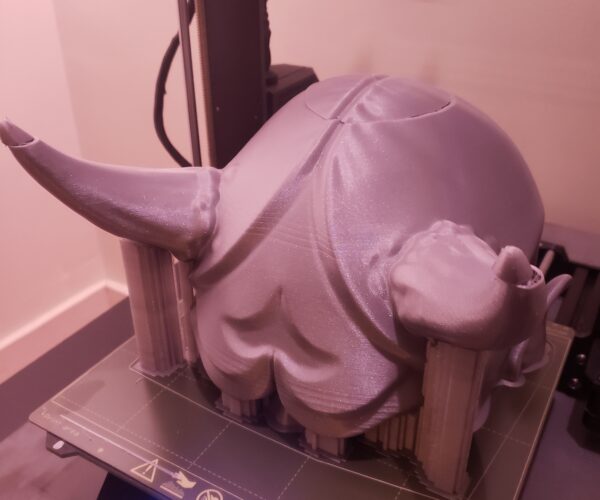
Pull Saw? Hot Knives? Saving this print!
Hey guys! So as you can see about 98% of the way through this print I had some sort of issue in the X axis and the extruder decided that my print should be several mms to the left 🙁
I think this is very salvageable, my initial thought was to just sand down the overhand and bondo the opposite side (since I will be doing a bunch of post processing anyways) I still think this wouldnt be great just because that channel will be offset still and that would be harder to get into shape.
My next thought was to just hack that section off, reposition it and reglue it. What I'm after are some suggestions on how to do this as clean as possible. Some suggestions I have heard is to either use a really thin pull saw and go slow as to not create friction (i'm guessing any power tool here will really melt the surrounding area) or to use a heated knife, and again; go slowly.
Looking for anyone who has had any past experience with an issue like this and what worked/didnt work/red flags/things to keep in mind etc
Cheers!
If you have one a fretsaw would be best but this should crack off if you insert a strong blade and wiggle ...
Check your belt tension.
Cheerio,
RE: Pull Saw? Hot Knives? Saving this print!
It's also possible to split and re-print just the topmost parts of the object and glue in place if you take your time with the 'surgery' and re-assembly.
RE: Pull Saw? Hot Knives? Saving this print!
Yeah I feel like it in just cut it off I can get it glued back (unless I destroy the piece) - im a little unsure of how I would determine exactly which layer it failed on so I could reprint just the top?
And before running the print I did the following:
-Realigned Y smooth rods (as per the manual)
-Calibrated XYZ (7x7 mesh bed leveling)
- Belt tensions (254X,274Y)
- Printer is using the stock rubber feet and is sitting on a heavy paver stone to reduce vibration
RE: Pull Saw? Hot Knives? Saving this print!
Carefully measure the bottom part with a caliper.
Then use the 'cut' function in PS to remove the bottom and retain everything above that point and reprint it.
RE: Pull Saw? Hot Knives? Saving this print!
Ah that makese sense - anyone else have any recommendations for actually cutting it off?
RE:
That's gonna be tough!
If I were doing this (which I'm glad I am not) my first inkling would be to use a hot-wire cutter held perfectly horizontal at the correct height and carefully feed in the object, slicing off the pieces.
I have a hot-wire cutter intended for cutting foam, which would probably cut 3d printed sparse-infilled PLA as well.
I know that they do make X-Y hot-wire cutters which some hobbyists use for cutting things such as model aircraft wings, so the technology is feasible, I'm sure.
A more tedious idea would be to mount a hacksaw blade horizontally at the correct height and use that to carefully saw off the pieces.
The tricky part will be getting the top surface flat, so it will accept the reprinted pieces precisely and then can be glued and sanded for a visually-appealing surface.
I know you mentioned a hot knife. The hot knife I have is more in line with that of a meat cleaver, and what you need is more of a scalpel.
RE: Pull Saw? Hot Knives? Saving this print!
No on point but isn't it kindda odd that the value of displacement is not consistent?
RE: Pull Saw? Hot Knives? Saving this print!
Just use plain sewing thread. Pull a length of thread off a spool leaving it attached. Place thread at start of cut. Hold spool in one hand and end of thread in other. Just start pulling the thread back and forth while pulling with both hands in the direction you want the cut to go. Will have to experiment a bit to get a feel for how much pressure to apply. Thread will cut right through the plastic. If thread breaks, and it probably will, just pull more thread off spool and continue.


