Inconsistent first layer
Hi,
I've been having problems getting my first layer to be consistent. Quick summary:
- pre-assembled Mk3 was printing beautifully since February.
- installed firmware 3.7 and enabled 7x7 levelling. Resulted in part of print first layer getting torn up by nozzle in lower right of bed so I stupidly messed with live z. Then when trying to fix this developed a problem with levelling not completing and printer going into a Z calibration loop which only stopped when turned off.
- contacted support. Advised to re-set PINDA sensor level using cable tie. This solved calibration loop and carried out XYZ calibration and bed level calibration successfully. But after several (many) attempts, could not get a consistent first layer when adjusting live z (tried the Live Z my way calibration STL).
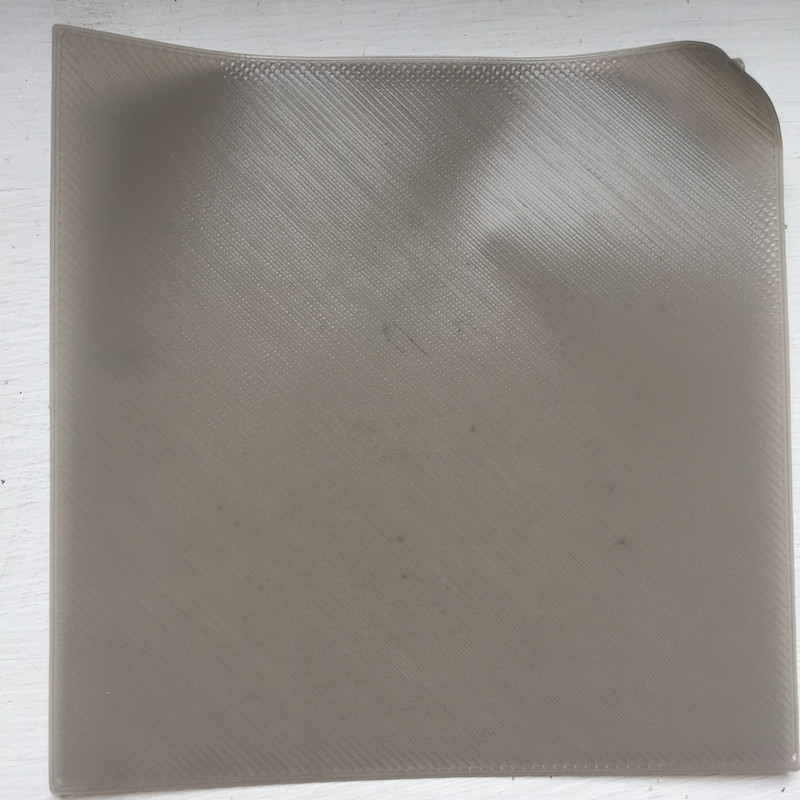
- then realised I may have had nozzle too high when resetting PINDA level so did this again last night following the manual carefully. Recalibrated and ran first layer calibration to get live z in the right ballpark and then used live z my way calibration square (first pic below) and though I'd cracked it. Looked perfect. Very happy.
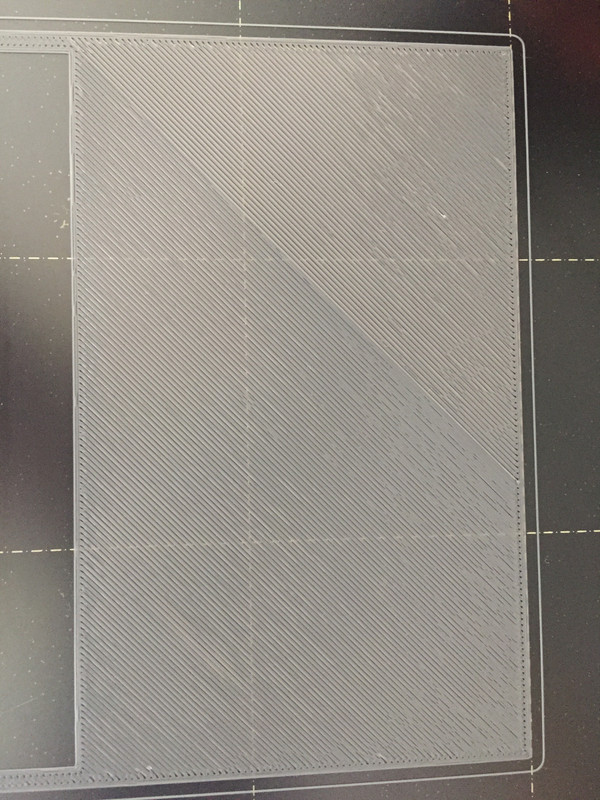
- this morning, start a print and watch first layer carefully, and its inconsistent (see second pic). Top left third looks/feel different (there's a clear raised line I can feel where it borders the rest of the layer, and in some places the lines are too far apart (in one spot I was able to move the lines apart with my finger. Also some differences in top right.
- I've also cleaned all the rods and applied some oil and used some cleaning filament in case the nozzle was getting clogged.
I'm at my wit's end. Its like I have to adjust live z for every print. The printer was running fine before, so I know it works, and I'm clearly doing something wrong. I'd be really grateful for any ideas on what that might be?
Thanks in advance
Greg
Image 1 - pretty good first layer

Picture 2 - next morning, identical settings

RE: Inconsistent first layer
This is just a guess, but I wonder if you are suffering from the bed changing geometry slightly. Once you finally got your z-height dialed in the bed probably had been on for a while so it geometrically stabilized. But when you tried again the next morning the bed had cooled and shrunk back down. Try pre-heating the bed for a good 10 minutes before trying again. See this video for some rough tests actually showing the bed of various print bed stackups (including our MK3s) changing shape during warm-up:
Also, check out these articles on MuppetLabs, written by our very own @bobstro
http://projects.ttlexceeded.com/3dprinting_live_z_calibration.html
http://projects.ttlexceeded.com/3dprinting_pinda_warmup.html
http://projects.ttlexceeded.com/3dprinting_slic3r_gcode.html#slic3r-gcode
I use his startup g-code that includes a PINDA warm-up sequence. A happy side effect of the PINDA warm-up sequence (particularly in my cool basement where my printer is) is it takes a while for the PINDA to warm up, allowing the heated bed to equilibrate. (I sometimes have to cover the PINDA with a folded-up paper towel to get it to heat all the way up to 35°C... With Pronterface connected to the printer I can see the PINDA temperature while it waits to heat up down to tenths of a degree.)
See my (limited) designs on:
Printables - https://www.printables.com/@Sembazuru
Thingiverse - https://www.thingiverse.com/Sembazuru/designs
RE: Inconsistent first layer
Before you do too much more hardware modification, I suggest ensuring your Live-Z is correct (the print looks a little off to me - I think your Live-Z is too high [not negative enough]) and that your PEI print surface is properly cleaned. These are the causes of the vast majority of 1st layer issues we see reported. The fact that you're having issues with a pre-assembled printer that printed beautifully for months makes me think these steps are a good place to start over.
Here's some copypasta describing a recipe that has been passed down through generations and seasoned to perfection...
-
A dirty PEI print surface. Even if you don't think this is the cause, it's always a good idea to make sure your PEI surface is clean before trying any other fixes. Take it to the kitchen sink and give it a good dunk with Dawn (original formula, no vinegar or hand softener variants) dishwashing soap or your local equivalent (e.g. Fairy in UK). Use a clean paper towel to clean it off, and another to dry it. Avoid using any sponge or cloth that has been in contact with grease. Above all else, avoid touching the PEI print surface. Once it's good and clean, you should be able to use 91%+ isopropyl alcohol between prints, 100% acetone when that fails, and another dunk when acetone fails. Worst-case, use a 3M 7445 ScotchBrite pad or equivalent to give it a very light buff, but only infrequently.
-
If you have not already done so, try using Jeff Jordan's "Life Adjust" procedure for calibrating your Live-Z setting. It is much easier to use and understand than the on-board routine.
and miscellaneous other tech projects
He is intelligent, but not experienced. His pattern indicates two dimensional thinking. -- Spock in Star Trek: The Wrath of Khan
RE: Inconsistent first layer
Thanks to you both for swift responses and detailed advice. I will go away and clean > preheat > g-codes in that order to see what changes.
RE: Inconsistent first layer
[...] A happy side effect of the PINDA warm-up sequence (particularly in my cool basement where my printer is) is it takes a while for the PINDA to warm up, allowing the heated bed to equilibrate. (I sometimes have to cover the PINDA with a folded-up paper towel to get it to heat all the way up to 35°C...
I've been wondering if the PINDA warmup is worth it with the latest firmware updates, but that's a good point. Let everything warm up and stabilize for the first print of the session.
With Pronterface connected to the printer I can see the PINDA temperature while it waits to heat up down to tenths of a degree.)
I originally bought my Prusa to be able to print enclosures for electronics projects. I really need to write a monitor to provide status lights for this sort of thing. I'd like to be able to watch the PINDA warm up visually from across the room.
Thanks for the nice comments. Glad the stuff is useful!
and miscellaneous other tech projects
He is intelligent, but not experienced. His pattern indicates two dimensional thinking. -- Spock in Star Trek: The Wrath of Khan
RE: Inconsistent first layer
Update. So having followed the advice above to allow the printer to properly heat up and settle down (15 mins) I printed a couple of the 75x75mm calibration squares and by adjusting live z on the third go I got (what I consider) a pretty good result.
But today, having again let the printer heat up for 15 mins I printed the below (about 130mm x 105mm). You can see the right hand side is pretty ok (at least by the standards I've been getting) but the bottom left hand side has slight gaps.
Does this mean the bed is not level/lower on the bottom left? Shouldn't the mesh leveling take that into account? The top left is pretty ok.
Also in my last few prints of this type, there's been a random raised line appearing - you can see it starting in the top middle border, moving toward the bottom left? What is causing this - it shows up in top layers too.
Bed has been washed in dish soap (Fairy) and cleaned with IPA using a paper towel.
Again, very grateful for any advice.
