[HOWTO] PID Calibration - Your way
Hello,
If you have any issues with the nozzle temperature not being stable or stays couple degrees under the set value, this might be helpful for you.
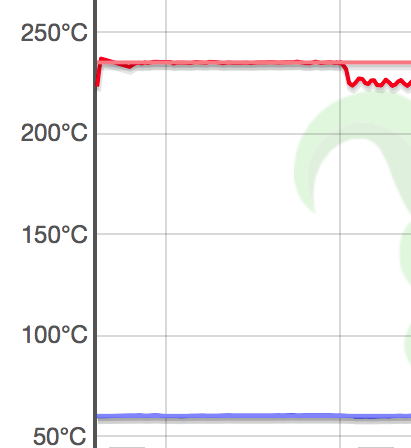
I'm printing most of the time PLA which is rated for 235C. So I require a fan blowing 100% all the time. That was causing an issue. Printing the first layer was fine but once the fan kicked in, the nozzle temp went down and stood stable down by couple degrees like this:
I ran PID calibration without any improvement. Looking at how PID control is working, it got obvious that I would require a more aggressive regulation. There are multiple options how to achieve that.
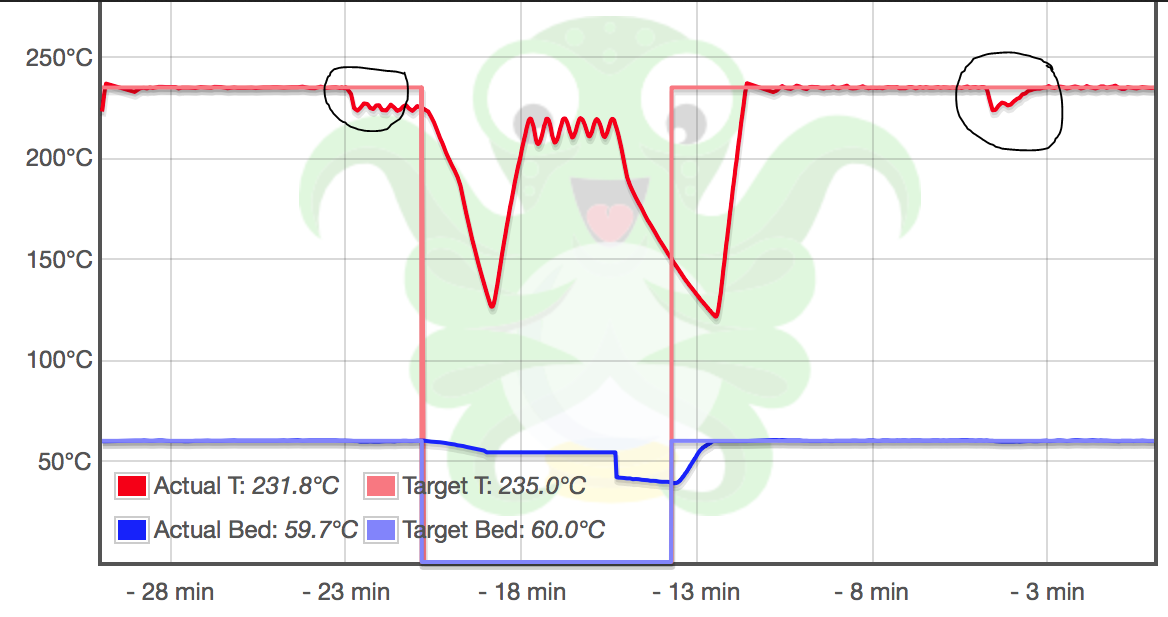
I did the second approach and it worked for me very well. This is how it looked like before, and after the calibration:
Other option is to get an E3D sock which will also solve with issue. But make sure you get a newer version of it, it fits better.
Here is this issue in detail on github
Often linked posts:
Going small with MMU2
Real Multi Material
My prints on Instagram
Re: [HOWTO] PID Calibration - Your way
The way i do this is:
1) obviously e3d v6 nozzle sock on the heater block, secure with a piece of naked wire around the top so that it doesn't fall off (those cable tie twirl things with the plastic removed)
2) a more realistic scenario temperature calibration:
move the extruder to these coordinates X12.5cm Y10.5cm Z2.0cm
preheat the bed to 60 degrees
preheat the nozzle to 220 degrees
set layer fan to full speed
M303 E0 S220 C8 (extruder 0, 220 degrees, 8 PID retry cycles)
M301 Pxx.xx Ixx.xx Dx.xx (write new values)
M500 (save)
that way you are cooling with somewhat hot air generated from the heated bed.
Re: [HOWTO] PID Calibration - Your way
Very interesting! Thanks you two!
Re: [HOWTO] PID Calibration - Your way
The way i do this is:
1) obviously e3d v6 nozzle sock on the heater block, secure with a piece of naked wire around the top so that it doesn't fall off (those cable tie twirl things with the plastic removed)
2) a more realistic scenario temperature calibration:
move the extruder to these coordinates X12.5cm Y10.5cm Z2.0cm
preheat the bed to 60 degrees
preheat the nozzle to 220 degrees
set layer fan to full speed
M303 E0 S220 C8 (extruder 0, 220 degrees, 8 PID retry cycles)
M301 Pxx.xx Ixx.xx Dx.xx (write new values)
M500 (save)
that way you are cooling with somewhat hot air generated from the heated bed.
I finally tried it like that. I get a thermal runaway when I preheat the nozzle to 220C. If I do not do this, it works. Still, the bed gets cooled down during the PID calibration.
Here is the workflow I did with Pronterface:
G80 ; home

G0 X125 Y105 Z20 ; move the extruder to these coordinates X12.5cm Y10.5cm Z2.0cm

M140 S60 ; preheat the bed to 60 degrees

M106 S255 ; set layer fan to full speed

M303 E0 S220 C8 ; (extruder 0, 220 degrees, 8 PID retry cycles)

M301 Pxx.xx Ixx.xx Dx.xx (write new values)

M500 ; save

M140 S0 ; turn bed off

M107 ; turn fan off
Do you also experience the thermal runaways if you preheat the nozzle (I guess not, otherwise you would have not proposed it:-))?
Re: [HOWTO] PID Calibration - Your way
Do you also experience the thermal runaways if you preheat the nozzle (I guess not, otherwise you would have not proposed it:-))?
Yeah, sorry, i wrote that from memory.
Been a while since i did that on the MK2. Tried it now on the MK3, threw an thermal runaway error.
(only logical, PID cannot preheat if you are already at target temp.)
Still preheating to 160 and the bed to 65 gives for a while is better than not preheating.
Bed will get switched off during extruder PID. Also now that i think about it, 2ch is too high, correct would be 1 cm.
So the right gcode for this would be (copy paste these one by one, don't write a automatic script for these)
G80 ; home

G0 X125 Y105 Z10 ; move the extruder to these coordinates X12.5cm Y10.5cm Z1.0cm

M104 S160 ; preheat extruder temp to 160 degrees

M140 S65 ; preheat the bed to 65 degrees

M190 S65: wait for bed temp (used only if you put this in a script)

M109 S160  ; wait for extruder temp (used only if you put this in a script)

M106 S255 ; set layer fan to full speed

M303 E0 S220 C8 ; (extruder 0, 220 degrees, 8 PID retry cycles)
M104 S0 ; turn extruder off if it's not auto off already
M140 S0 ; turn bed off if it's not auto off already
M107 ; turn fan off
; M301 Pxx.xx Ixx.xx Dx.xx ; (remove first ; and fill out x.xx and write new values)
M500 ; save
M503 ; check new values
This should work without a hitch.
Can you throw something similar together for the Pinda temp calibration?
Re: [HOWTO] PID Calibration - Your way
Can you throw something similar together for the Pinda temp calibration?
Nice! Thank you!
Well - I can post my ready made gcodes for the print based approach, where you need to print a few first layers and dial in live Z each time. Do you have that in mind?
EDIT: My GCodes are here: https://shop.prusa3d.com/forum/hardware-firmware-and-software-help-f64/1st-layer-problems-in-depth-look-at-software-pinda-t14815-s220.html#p87663
RE: [HOWTO] PID Calibration - Your way
Hi,
can you tell me how to get the temperature curve on screen as you did please. Which tool did you use for that?
Thanks in advance
Hello,
If you have any issues with the nozzle temperature not being stable or stays couple degrees under the set value, this might be helpful for you.
I'm printing most of the time PLA which is rated for 235C. So I require a fan blowing 100% all the time. That was causing an issue. Printing the first layer was fine but once the fan kicked in, the nozzle temp went down and stood stable down by couple degrees like this:
I ran PID calibration without any improvement. Looking at how PID control is working, it got obvious that I would require a more aggressive regulation. There are multiple options how to achieve that.
- With M503 command you can read your current nozzle Kp, Ki, Kd values and set them higher manually with M301 command (for example: M301 P16.13 I1.16 D56.23). Once you're satisfied, store it with M500 command to EEPROM.
- Let the PID calibration do this work for you. Turn the fan on with 50%-100% (higher value means more aggressive). Run the PID calibration at the same temp where you have issues ( 235C in my case).
I did the second approach and it worked for me very well. This is how it looked like before, and after the calibration:
Other option is to get an E3D sock which will also solve with issue. But make sure you get a newer version of it, it fits better.
Here is this issue in detail on github
RE: [HOWTO] PID Calibration - Your way
Those are screenshots from the temp graph of octoprint -> https://octoprint.org
If at first you don't succeed, skydiving is not for you.
Find out why this is pinned in the general section!
RE: [HOWTO] PID Calibration - Your way
ah yes, no I realize the logo on the temp graph. Thanks a lot for your push. Will check that out.

