Filament Storage Cabinet with Arduino IoT Controller
In other threads on this forum, I've see pictures of prints made with water-saturated filament, and they can be ugly: https://forum.prusa3d.com/forum/original-prusa-i3-mk3s-mk3-general-discussion-announcements-and-releases/oozing-nozzle-while-doing-bed-leveling/paged/3/#post-226677
So I decided to make a humidity-controlled custom filament storage cabinet, and I wanted to have web visibility and control of it's status, just for fun. I'm in mid-project, but I'll share my progress and invite your comments and ideas as I go along.
The major components will be (1) a cabinet, a (2) a dehumidifier of some sort and (3) a web-connected controller based on an Arduino. I've completed Item (3), the Arduino controller, and the pics attached below show what I've come up with so far. The controller consists of a DH22 temp/humidity sensor ($8), a relay for turning the dehumidifier on and off ($3 if buying 5), and a particular variant of an Arduino ($17, includes screen). I got the sensors and Arduino from Banggood direct from China for about 1/3 those costs. This Arduino has a small integrated color screen to display data locally, and can WiFi connect to my home router to send and receive data to a website. The website displays plots of the measured humidity and the humidity set point, and also displays the temperature. A slider on the website can change the set point, and the red buttons in pic#1 can do that locally. Website use is free (limited data) from Adafruit.
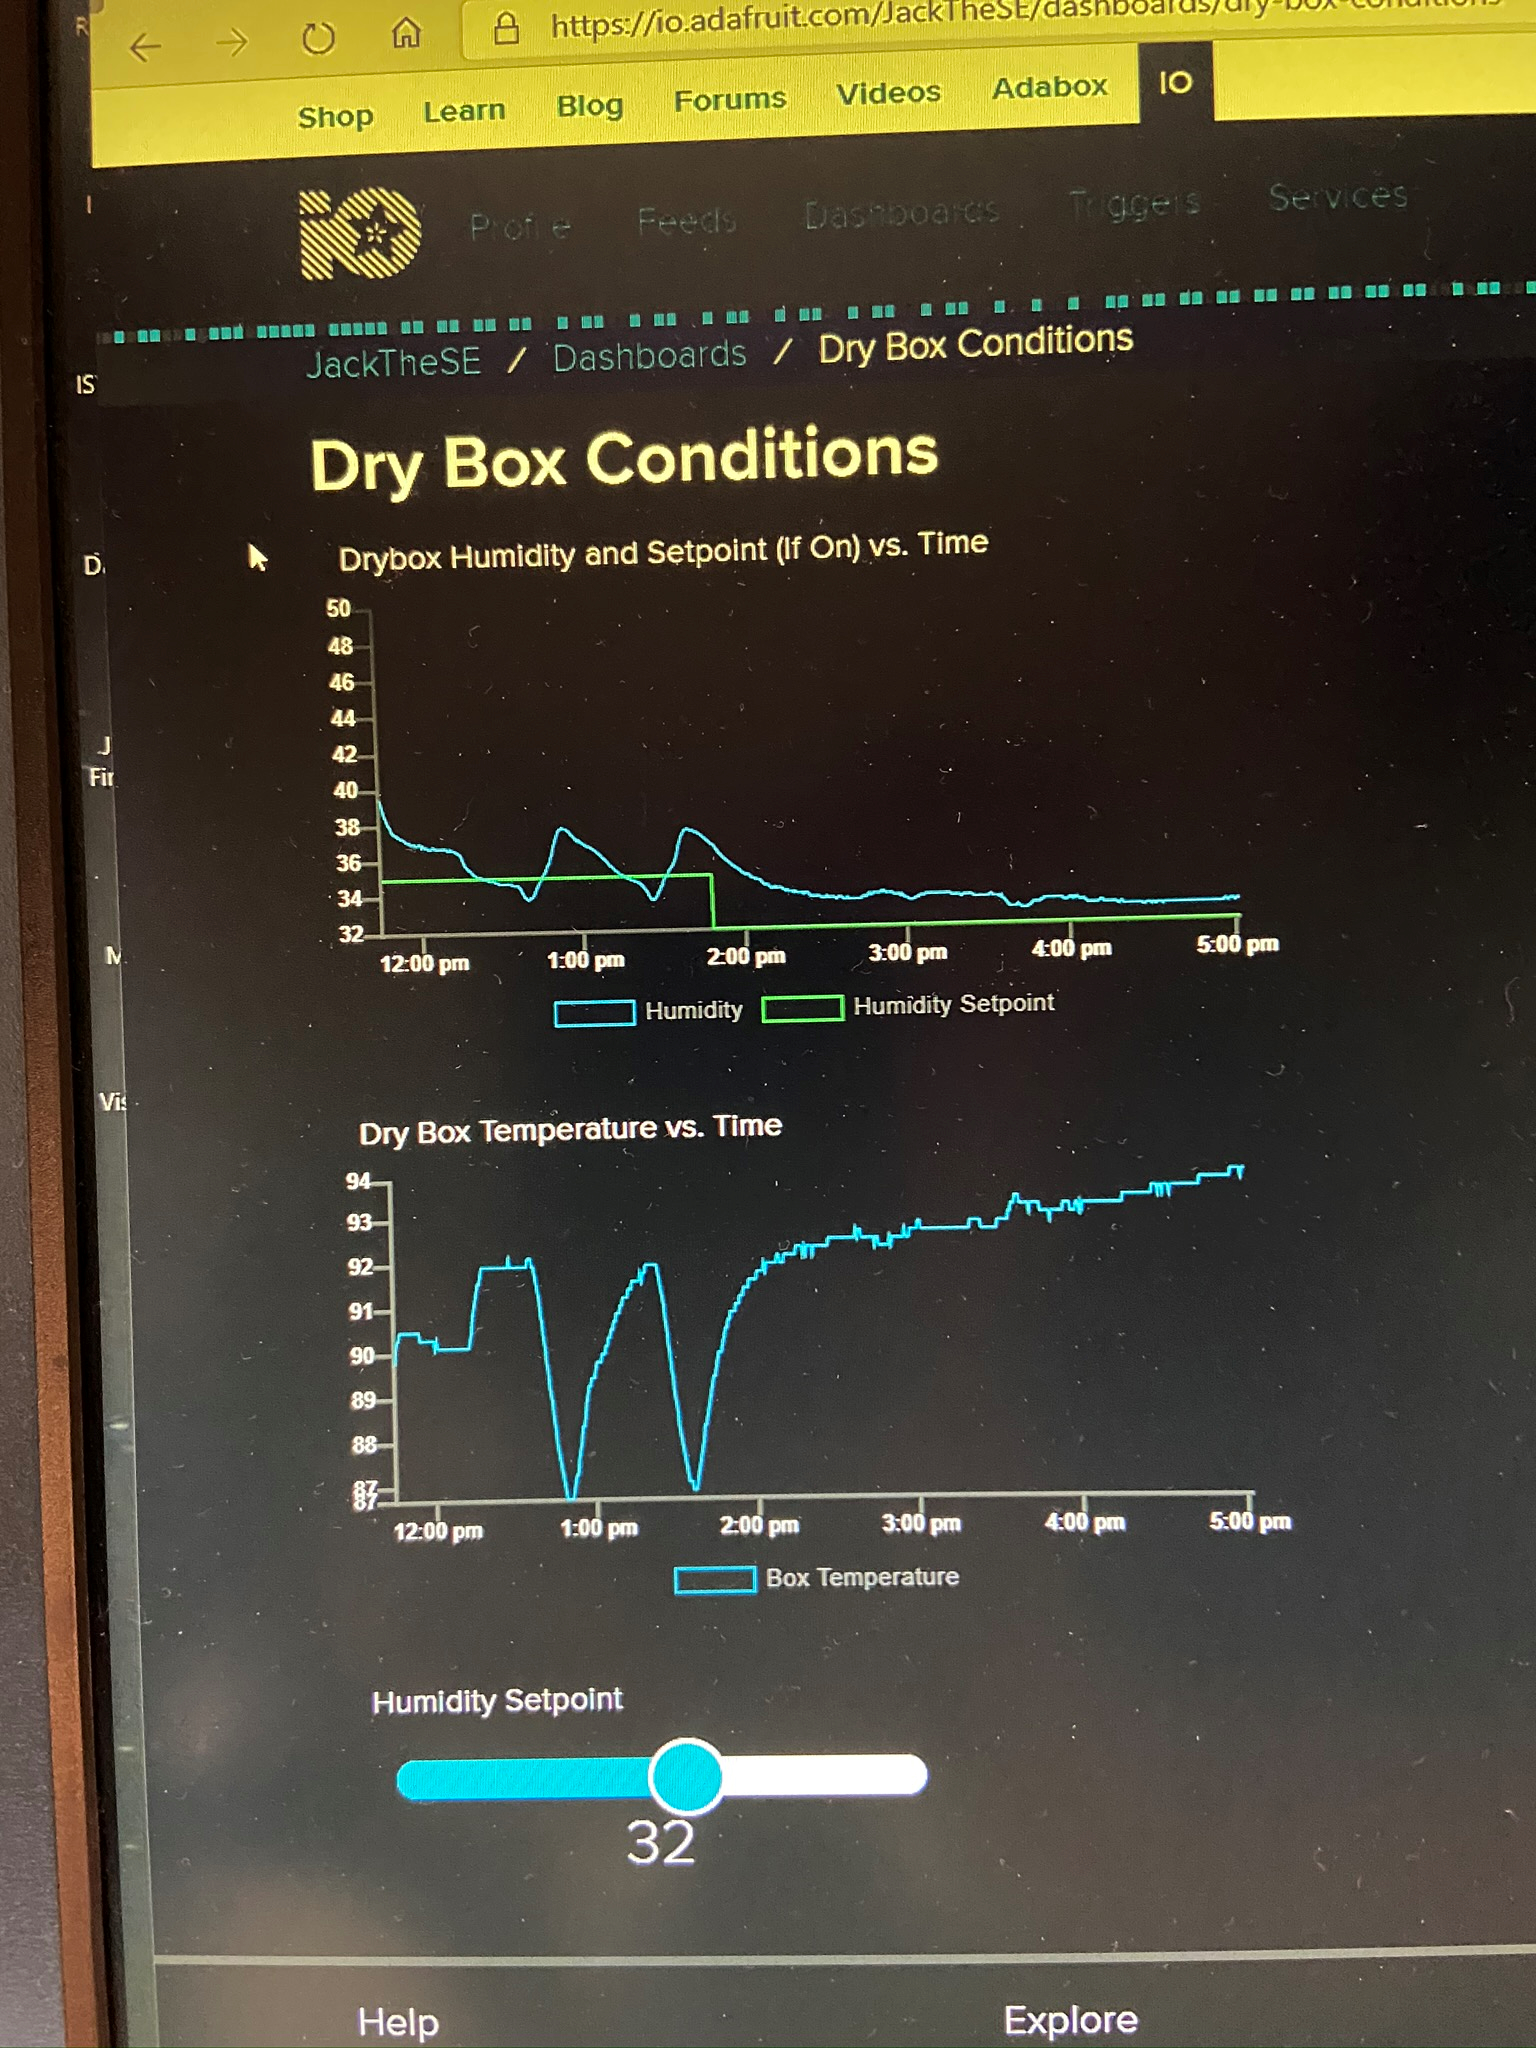
For the moment, I'm using just a small heater for dehumidification (a 17 Watt coffee mug warmer), and a cardboard box for the prototype cabinet. In spite of the crudeness of this prototype, I can get the humidity down to about 32% with a cabinet temperature of 92 DegF. I've ordered a small Peltier dehumidifier from Amazon ($24) and hope to do better than that.
I'm a woodworker, and my final cabinet will be made out of Cherry, perhaps with glass doors, with the hope that I'll be allowed to store my filament in my office, where my printer lives, rather than the garage. Capacity will be about 20 reels of filament.
First pic shows the display mounted in a 3d printed panel. The two red buttons are used to set the humidity set point. Second pic shows the website data and controls, taken as a picture off my Windows screen. You can also view the same info on an iPhone. I graph the measured humidity and the humidity set point in the top graph, and the cabinet temperature in the bottom graph. The slider below can be used to change the set point back on the controller. The third pic shows various components of the controller, broken apart. The TTGO microcontroller is in the center, the DH22 is to the right, and the relay board is above the microcontroller. The gray box under the relay houses a regular 120V receptacle, with one plug always hot and the other plug relay-controlled. The Apple USB wall wart powers the controller. The USB cable is directly connected to my PC for programming. Mug warmer is in the back.
I'll provide updates as this project moves along...Jack
 Red buttons change set point
 AdafruitIO website

...there are only 10 kinds of people in this world--those who know binary and those who don't...
RE: Filament Storage Cabinet with Arduino IoT Controller
I started with Arduino and IoT projects about 3 years ago. I purchased my Prusa to print enclosures. The 3D printer took over as my main hobby and I'm just now getting back into the actual projects!
Good to see Adafruit.io still going strong!
RE: Filament Storage Cabinet with Arduino IoT Controller
Ok, since you have a little background in Arduino, I can speak a little more freely: My project is using an ESP32 variant called a TTGO-T1-Display, which has an integrated color TFT panel that's 135X240. The panel is hardwired to the processor board with a mini-ribbon cable and uses a super-fast eSPI communications protocol to the board, meaning it can be very fast communicating to the very fast ESP32. I got mine on Bangood on sale for $6, but it took a month. Here's an Amazon link ($17):
The TTGO has on-board WiFi and bluetooth and many available pins, so it has become a favorite of mine recently.
The relay boards come in 5V and 3.3V variants, and they are not marked, incredibly. They provide opto-isolation to the microcontroller pins, and jumpers can be configured to isolate the relay coil from the board if necessary. Be sure to get the 3.3V model for any ESP32 work.
The Peltier dehumidifier I'm getting is this one($38):
https://www.amazon.com/gp/product/B086YBRR1Z/ref=ox_sc_act_title_1?smid=A1OCDMZJOK7OOR&psc=1
I've seen others all the down to $24, but the water containers get pretty small.
As for a cabinet, I'm designing and building one in Cherry as a fine furniture piece, so I can put it in my office. Thinking of lining it with foam board, at least. I'll bet IKEA has suitable cabinets if you can figure out a way to weatherstrip the doors a bit. I would recommend foam board lining for that path too.
Wiring up the Arduino is very simple: just three pins to the DH22 sensor, 3 pins to the relay board logic side, and two the the relay coil. I'd certainly be willing to share the sketch with you as a starting point.
...there are only 10 kinds of people in this world--those who know binary and those who don't...