A Better Way To Adjust 1st Layer?
I'm posting this as a question and not necessarily THE best way, but it works well for me. What do you think?
The recommended way to do the first layer cal is to print the test file and adjust Z so that the filament has a slight bulge as it is laid down on the sheet. I find that quite subjective since I'm not looking at a cutaway view of the extrusion; my view is from the top. So what I do is to print this (printing was stopped after the 1st layer):

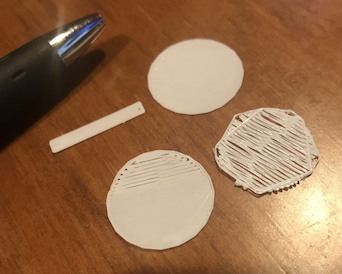
In that 2nd picture the disk on the right was printed before any Z adjustment was made. As you can see it's way off. I increased Z and printed again (not shown). I printed a 3rd time and increased Z while printing - that's the bottom disk in the picture. Under a USB microscope (at 40x) it looked like:

That view is from the bottom of the disk - the surface in contact with the sheet. What I was striving for was to get the extruded filament squished out so that one extruded line just touched the adjacent line. (If I remember correctly I think I added just a tiny bit more Z, like 0.02, to get those lines to close up.)
To me, that's a more precise way of adjusting the first layer. It's glossy smooth and sticks to the sheet really well.
Re: A Better Way To Adjust 1st Layer?
BTW, in case you're interested that USB microscope is pretty good and for 20 bucks it's hard to beat.
https://www.amazon.com/gp/product/B07BF86SRP/ref=od_aui_detailpages00?ie=UTF8&psc=1
Re: A Better Way To Adjust 1st Layer?
Good post. I like to print objects with large flat bottoms and perform a live Z adjust. I raise the Z until there's gaps between layers and lower it slowly until all of the gaps close. I've achieved perfection by doing this and increasing my first layer width to 130% at .2 layer height. Results speak for themselves.
This was a print that took up the majority of my build surface:

Re: A Better Way To Adjust 1st Layer?
Your method is much better than the Prusa routine with the zig-zag line for first layer height.
Here's an old thread that goes even a step further with your method and has worked flawlessly for me:
assembly-and-first-prints-troubleshooti ... ml#p110869
Re: A Better Way To Adjust 1st Layer?
The "life adjust" thread contains posts with links to gcode files and a procedure based on using a 75x75x0.20mm single-layer print for 1st layer adjustment. It's much easier to use and understand than the on-board Live-Z adjust procedure.
Re: A Better Way To Adjust 1st Layer?
Good post. I like to print objects with large flat bottoms and perform a live Z adjust. I raise the Z until there's gaps between layers and lower it slowly until all of the gaps close. I've achieved perfection by doing this and increasing my first layer width to 130% at .2 layer height. Results speak for themselves.
This was a print that took up the majority of my build surface:
20180423_071225.jpg
Dear Dryja123,
this looks really good. Could you elaborate a bit more on the steps you do to get those results? Especially there seem absolutly no artefacts from the heatbed /steel sheet if the picture you are showing shows the surface which is attached to the steel sheet.
Thank you in advance,
Thomas