Y-axis Selftest Failed - New build
Printer: Prusa i3 MK3/S Kit
Firmware: 3.8.1-2869
Belt Status: X=263......Y=262
Y Travel Distance (manually controlled to read values): 173mm
Hello, I have recently built the kit and performed a Selftest. The X axis passed but fails on the Y axis.
Nothing is binding and there are no obstructions. It will move from one end-stop to the other, smoothly as possible.
From what I can tell, it is moving appropriately but the low value of 173mm on the Y axis makes me think it is trying to get something like 220mm but runs out of travel space. The bearings are what is hitting the end-stops.
Any thoughts?
Best Answer by Neophyl:
It may be several things. The way the prusa determines the 'end stops' is using motor current. The driver detects that the motor has hit something, ie the end of travel and knows to stop. Unfortunately anything that causes an increase of motor current can be detected. If you have sticky bearings, or a cable tie catching or lots of possibilities it can think its got to the end of the travel. Check that your bed motion is silky smooth and that physically the bed can travel the entire length freely.
What it could also possibly be though is https://forum.prusa3d.com/forum/original-prusa-i3-mk3s-mk3-assembly-and-first-prints-troubleshooting/self-test-fail-x-and-y-pulleys-different/ Have a read of that thread, but to sum it up Prusa have shipped an unknown number of printers with an incorrect size pully. This leads to the firmware thinking the travel is shorter. Which sounds suspiciously like your problem. Luckily it should be easy enough to check. If it is then contact support via chat and get them to send a replacement.
RE: Y-axis Selftest Failed - New build
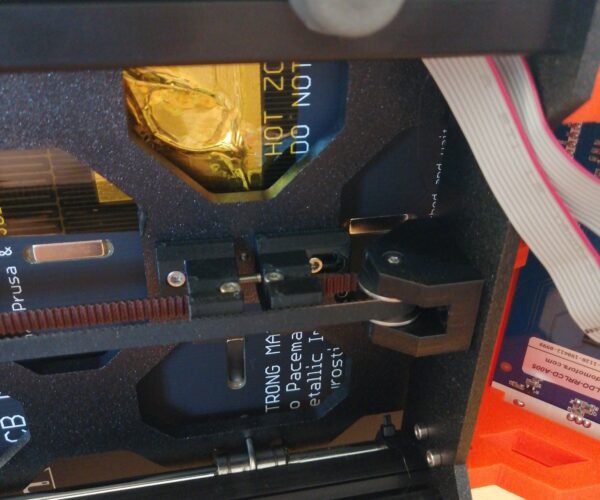
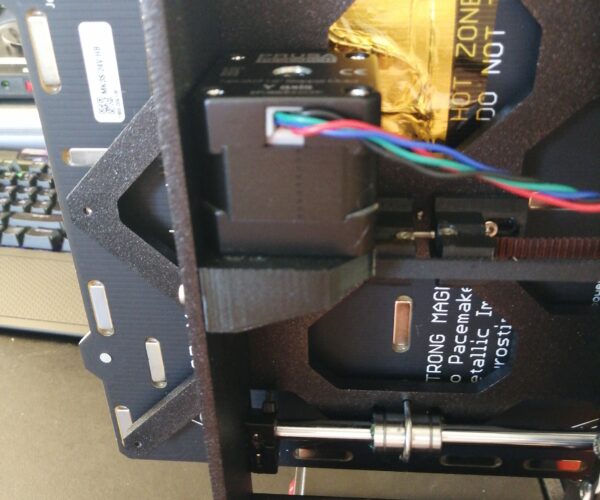
Can´t insert text in the upper posting. Pics show the front and rear stop positions of the bed of an iMK3s. Check for differences.
I try to give answers to the best of my ability, but I am not a 3D printing pro by any means, and anything you do you do at your own risk. BTW: I have no food for…
RE: Y-axis Selftest Failed - New build
@neophyl
Yes, you are correct about the two GT2-16 pulleys. My kit came with two different types.
We want a 16 toothed, approximately 0.375" diameter (measured at the teeth) geared pulley.
The incorrect pulley I have is a 20 toothed, approximately 0.475" diameter (measured at the teeth) geared pulley on the Y axis, which is why it fails. This pulley is larger in diameter.
I swapped the larger pulley with the X axis and it now fails, to verify the problem. I'll contact Prusa for a replacement.
I took a look at the firmware to see if I could change a variable to work with the larger pulley. Perhaps someone with better skills would be able to provide a software solution to this hardware problem
Thanks for your help. I hope others may find this info useful.
RE: Y-axis Selftest Failed - New build
@ddeline0
Here you can calculate step/mm to change the firmware for a 20teeth pulley or change it with G92 and M500 (save to eeprom): https://blog.prusaprinters.org/calculator/
Fot the 1.8degree stepper and 20teethpulley you must change step/mm to 80.
Statt zu klagen, dass wir nicht alles haben, was wir wollen, sollten wir lieber dankbar sein, dass wir nicht alles bekommen, was wir verdienen.
RE: Y-axis Selftest Failed - New build
@ddeline0
Here you can calculate step/mm to change the firmware for a 20teeth pulley or change it with G92 and M500 (save to eeprom): https://blog.prusaprinters.org/calculator/
Fot the 1.8degree stepper and 20teethpulley you must change step/mm to 80.
Hi karl-herbert,
Sounds like you see two software solutions. I took a look at the firmware but I couldn't figure out what value and where to change it.
I'd like to use the printer while waiting for a replacement part but I'm not sure if that's possible.
RE: Y-axis Selftest Failed - New build
@ddeline0
Sorry correction -> G92 is wrong, must be M92!
If you don't want to change, compile and flash the firmware for the MK3S, you can make temporary changes with Pronterface (connect to Pronterface over USB, if you have RPI enabled, disable it on MK3S-LCD screen)
Pronterface - connect to printer, type:
M92 X80 (the axis you want to change X/Y/Z/E, in this example X and 80 for the 20teeth pulley; default is 100 for the 16teeth pulley)
M500 (save to EEPROM)
check with M503
detailed information see here: https://marlinfw.org/docs/gcode/M092.html
Statt zu klagen, dass wir nicht alles haben, was wir wollen, sollten wir lieber dankbar sein, dass wir nicht alles bekommen, was wir verdienen.
RE: Y-axis Selftest Failed - New build
@karl-herbert
I took the firmware approach after I was able to find the file that contains the variables. I used Arduino IDE v1.8.5 on Ubuntu 16.04.
I copied the file I want to change, "1_75mm_MK3S-EINSy10a-E3Dv6full.h" found in the firmware source code under the "variables" folder.
I then pasted this copy into the "Firmware" folder and renamed it "Configuration_prusa.h", however, I'm not sure it needs that specific name.
I then modified this copied file. For me, I modified the line "#define DEFAULT_AXIS_STEPS_PER_UNIT {x, y, z, e}", where I changed the axis with the larger pulley from default value of 100 down to 80. I decided to move the incorrect pulley from the Y axis to the X axis so that I could test the new changes to the file without having to wait for the Selftest to do the X axis before moving onto the Y axis. I repeat, the X axis now contains the incorrect pulley for testing.
I also uncommented the line "#define LANG_MODE 0" and commented out the default line "#define LANG_MODE 1".
From there, I exported the compiled binary. This file will be the hex file that I used later for uploading to the printer via Prusa Slicer. I renamed it as the original firmware hex file name before uploading it.
The result was that it worked! The axis containing the incorrect pulley passed the Selftest by modifying the steps per mm.
The next problem comes from when I perform the XYZ Calibration procedure. The first point is found and my PINDA height is set correctly. The PINDA spends it's time around the circle image on the table, which makes sense.
The X axis will move to the second point (far right side). Here it hits the limit stops as it tries to find the second point while clearly being off the bed space. That means the PINDA can't see the table, isn't circling around the circle image on the table, and will fail. I looked through the files again to see if there is another variable I need to update for the XYZ Calibration since modifying the steps/mm for the X axis, however, I haven't found it yet.
Does anyone know why the machine will overshoot on the second point after modifying the steps/mm for the axis?
To clarify, the axis knows the limits during the Selftest and finds it during the Homing procedure but for some reason, overshoots when doing the XYZ Calibration.
RE: Y-axis Selftest Failed - New build
I think you will need to ask over on GitHub, I suspect the calibration routine is completely separate.
RE: Y-axis Selftest Failed - New build
@ddeline0
AXIS_STEPS_PER_UNIT is only defined once in "Configuration_prusa.h" and passed to "ultralcd.cpp", "ConfigurationStore.cpp". It would also make no sense to define the same variable twice or overwrite it.
What value do you get for the X-axis (steps_per_unit) when you type M503 in Pronterface. I would calibrate XYZ and log it with Pronterface. You may get more detailed error messages. Remember, while working with Pronterface, RPI must be disabled.
Statt zu klagen, dass wir nicht alles haben, was wir wollen, sollten wir lieber dankbar sein, dass wir nicht alles bekommen, was wir verdienen.
RE: Y-axis Selftest Failed - New build
@karl-herbert
I agree with you regarding defining the variable once. It doesn't make sense to have to change a variable like that in another part of the firmware
Regarding Pronterface, I haven't used that program which is why I felt more comfortable with the code.
Frankly, I'm not sure if I should continue down this path. Clearly I have a wrong pulley. If making the firmware aware of this difference solves the problem, then great, but the next test fails also....presumably because of the wrong pulley. I just don't want to keep hitting walls at every stage of the software, especially when I have little to no knowledge of the underlining functions of the code. I find it bizarre that the printer knows how many steps to move the axis with the current hardware, perform the limit test, yet overshoots the limits.
I might be better off spending my time replicating the appropriate pulley by casting it in urethane. I don't want to spend a week or more waiting on the part.
Before I do that, I'll move the good pulley back onto the X axis, modify the firmware so the Y axis doesn't fail the Selftest, then see if the X axis overshoots on finding point 2 during the XYZ Calibration procedure. If it still fails with the proper pulley, then that will tell me that the issue for the XYZ Calibration is not related to the pulley and I can save efforts casting the pulley.
RE: Y-axis Selftest Failed - New build
Update:
I received and installed the GT2-16 pulley and installed the latest firmware. The printer passed all tests / calibrations.
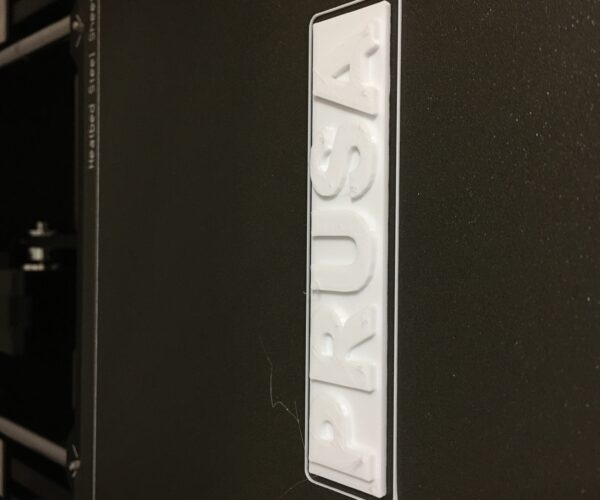
I then printed the Prusa Logo file found on the provided SD Card using the supplied PLA. I had issues with warping due to the textured PEI spring steel bed sheet, even after multiple attempts at cleaning with alcohol and dish soap.
I switched to PETG, which will be my primary material. I then ran the same gcode but manually modified the nozzle and bed temperature. The below photo shows the result. I'm happy and now the real work begins.
Thanks for everyone's' help.
RE: Y-axis Selftest Failed - New build
First layer looks to high.
If it is to high it will not stick good.
RE: Y-axis Selftest Failed - New build
First layer looks to high.
I agree. It is a starting point for further calibration using PETG - not PLA.
My goal for the printer is to print mechanical components in PETG that require press / slip fit holes for bearings. That means eye-balling won't be good enough.
I used the file "First Layer Calibration Test" to dial it in more, followed by the file "Printer Tolerance Test" to get a feel for what cad modifications are needed for the fit I desire.
I'm crossing my fingers that I don't receive unsolicited opinions on how to print press / slip fit holes for bearings....that'll come later in a separate thread if I can't troubleshoot the issue. 😉


