X-axis Belt length
I just assembled my MK3 and everything went together nicely, but when I was running the wizard setup I continue to get an error about the X axis belt length. When I checked the belt status it was reading 180 so I loosened up the belt and then the belt went smoothly, but the belt is now to loose. Whenever I try to tighten up the belt even a little I get an error about the belt length and the entire calibration gets reset.
Do anyone have any suggestions as to what the problem may be and how to fix it?
Something is way too tight
Don't focus on the belt. And ignore those silly numbers in the control panel. Get you belt to a "thrum" tightness, and then look for what is binding your X axis. Belt length error has nothing to do with the belt length ironically. It's about travel on the X direction - and how far it can travel before the negative feedback on the motor exceeds tolerance (e.g. it is trying to detect if the motor is strong enough to move the extruder along the whole X axis length). Yours is failing because something is binding. It is not the belt tension I assure you.
With the printer turned off and with very slow movements by hand (don't make the display blink) move the Extruder body left to right and find the thing or things that is preventing butter-smooth movement. Here are some likely candidates
1. Something is hitting something else when X carriage movement is made. Look at the way you positioned the zip ties on the cable bundle - it is critical that these be positioned correctly - the tolerances for zip tie heads hitting on something else are extremely tight. The pictures in the assembly manual MUST be copied in your build.
2. You over-tightened the back of the X chassis carriage - there are four screws. The purpose of that flat-ish piece is to hold the bearings on the X axis (three bearings, two on upper rod, one on lower rod) - the lower rod bearings should be barely squeezed and the upper rod bearing tightness is pretty easy to over do. If you tightened down the four screws, you went way too far. Back them each out two full turns and see if your problem goes away.
New problem
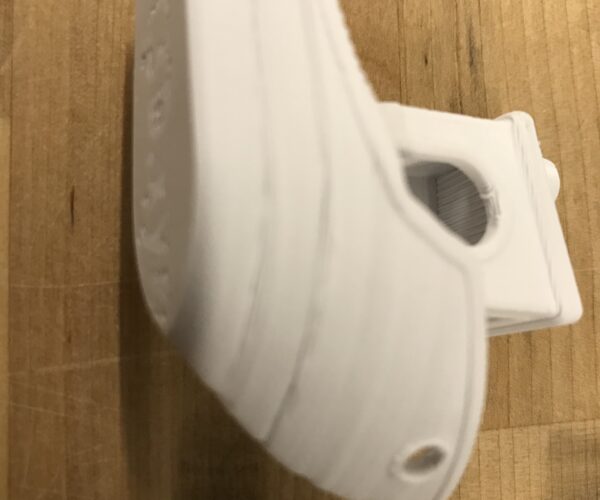
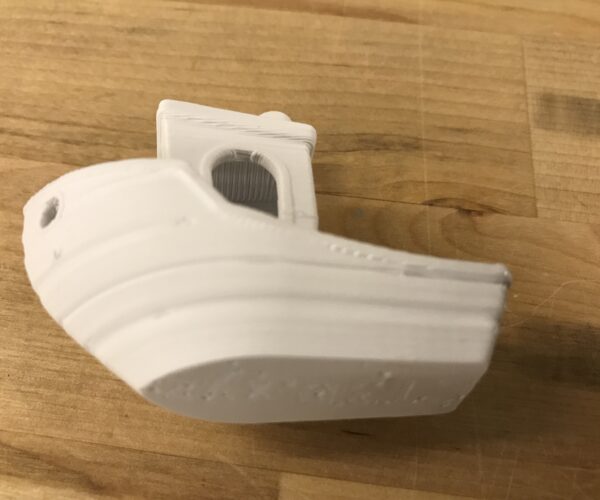
Thanks that fixed that problem. I'm now having a problem with the filament stick to Itself. The print starts off good then after a while the filament lifts up off of itself. Here's a picture to help show what I'm talking about. Any thoughts as to what may be causing this?
Let's look at your bottom layer
Can you show the bottom of that benchy? Next up is probably live Z - it is critical to bed adhesion, which is critical to preventing part warping
Good progress
This looks like under-extrusion to me. Let's talk what material you are printing, what filament profile you chose, and if you made any changes to the defaults in the slicer. Often this symptom (gaps in the layer lines where they are not well bonded together) is a temperature or extrusion multiplier issue. That is why I am asking about the basic settings and the defaults.
Also, did you slice that? Or did you print that from the SD card? It's an important detail.
answers
I am printing with 1.75mm PLA and no I did not make any changes to the defaults in the slicer. I printed it from an SD card
Ok then
One clarification - when I asked about getting the .gcode file for the benchy from the SD card, I wasn't asking if the print was being driven via the built in SD card slot on the printer. What I meant to say was did you use the gcode that came with the printer, or did you slice your own from an STL file you got somewhere?
Let's go with the former - you used the SD card that came with the printer, and on that card was a benchy file and you printed that. Knowing that removes a lot of variables, since it is a pre-sliced file that was made for the MK3S (the file name includes MK3S, yes?) and that file is known to print well.
The interesting thing is that leaves your local environment, with another assumption that your new printer may have some assembly corrections to make yet (otherwise the only adjustment would involve calibration and live Z), and then getting the correct steel sheet in place. Did you use the smooth steel sheet or the textured sheet?
What I am seeing is under-extrusion (not warping). If you were experiencing warping, the benchy would not be complete as warping would lead to a crash which would dislodge the shape from the bed. Since your images show a completed benchy, we can rule out warping.
On a new build, the most common assembly mistake to cause under-extrusion is the filament gear tension screw is not correctly set, most likely too loose, leading to filament slipping when it needs to be extruded. As you look at the left side of your extruder, and the right side, there is a long screw that you put a spring onto during assembly, and it runs the entire width of the extruder body. It's job is to set the tightness on the extruder gear inspection door - which is also the hinge for the extruder idler bondtech gear.
On the right side, you should be seeing the threads from the long screw sticking through the nut - a couple of threads. If it is not all the way through, or flush, go a few more turns tightening the screw. That should give you positive filament traction.
Thanks
I tightened the filament gear tension screw as you recommended and it fix the problem I was having so thanks for all of your help.


