RE: What am I doing wrong?
@gk
If that's the first layer on top of the cage-something in the picture you are too high in Z
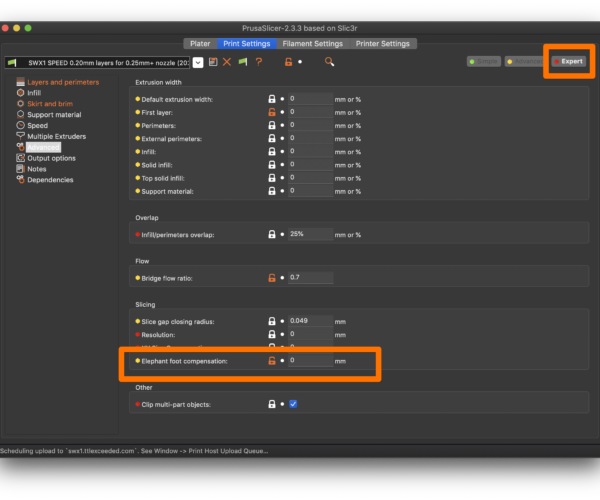
See my last post where you can find Elephants foot compensation
edit:
No, your heat bed should not cool down during print, when print is finished the heatbed shuts off
Prusa i3 MK3S+ FW 3.11.0 (kit dec -20), PrusaSlicer 2.6.1+win64, Fusion 360, Windows 10
Quick mouse ear steps
To create a mouse ear:
- Right-click on the part.
- Select Add part->Cylinder.
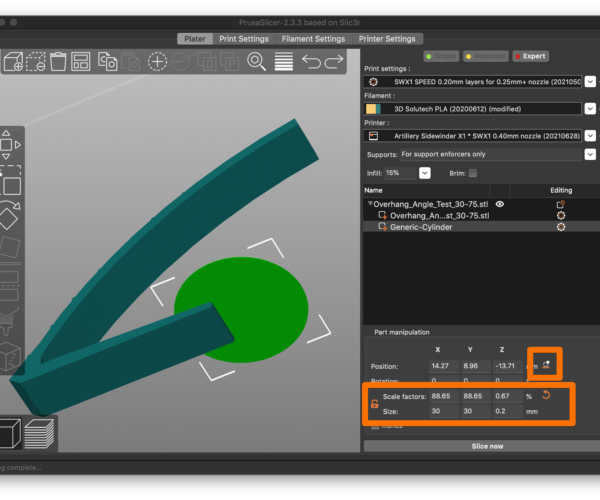
- Resize the cylinder. Click the padlock icon to allow changing dimensions independently. I sized mine to 30x30x0.2mm.
- Position the flattened "mouse ear" where you want it.
- Click the button to drop the mouse ear onto the print bed.
Here are the settings with the sizing and place on bed button highlighted:
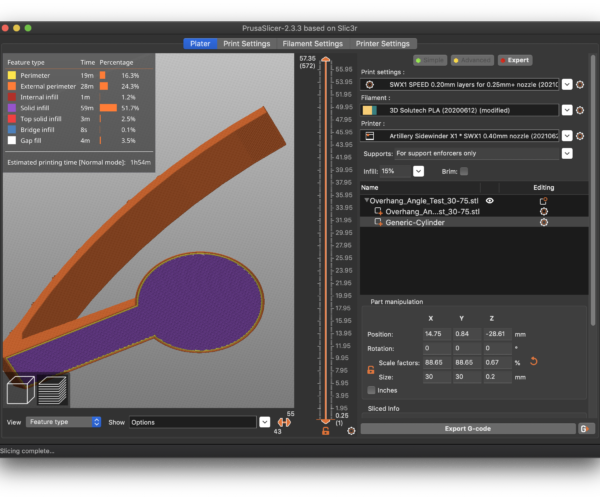
Here's what it looks like after slicing:
and miscellaneous other tech projects
He is intelligent, but not experienced. His pattern indicates two dimensional thinking. -- Spock in Star Trek: The Wrath of Khan Unfortunately,…
I don't understand what elephant's foot compensation does.
I read the Prusa page on it, and I'm still confused. Also, what values would I use? What does it do? I don't see that it has anything to do with adhesion to the bed.
Also, with it on, the brim doesn't touch the part.
Geez, and I thought you could buy a printer, and print. Not. But when it does, it's great.
@gk
Elephant foot compensation compensate for the elephant foot, which is the bottom layer bulge out due to heat and weight
So you compensate by making the first layer a bit smaller, and the heat make print bulge out and the end result is perfect 👍
But as I said earlier, I think the main problem is first layer calibration. Post a picture on the bottom (the side towards print bed) of your print, the cage something you post a picture of earlier
Prusa i3 MK3S+ FW 3.11.0 (kit dec -20), PrusaSlicer 2.6.1+win64, Fusion 360, Windows 10
RE: Go slow
I read the Prusa page on it, and I'm still confused. Also, what values would I use? What does it do? I don't see that it has anything to do with adhesion to the bed.
I would IGNORE elephant's foot compensation for now. Make sure it's set to 0 as shown here:
It adjusts for swelling of the 1st layers, usually due to the Live-Z level being too low. 0 turns it off. You may want to use it later, but until you learn the basics, just leave it off (set to 0).
Also, with it on, the brim doesn't touch the part.
That's the concern that was being pointed out. Elephant's Foot compensation shrinks the base a bit but can pull the print away from the brim. The mouse ears are part of the print, so will always have a solid attachment, which is why they work well for some warping situations.
Go slow and don't get frustrated. These things aren't toasters. You need to learn the basics of Live-Z adjustment and getting the PEI surface in good condition. Once you do, it gets much easier.
and miscellaneous other tech projects
He is intelligent, but not experienced. His pattern indicates two dimensional thinking. -- Spock in Star Trek: The Wrath of Khan Unfortunately,…
Thanks for the reply
I'm looking at the slicer, and I'm version 2.0.0. So I have to update first.
In the meantime, I honestly think adding a thin perimeter to my part is easier than trying to figure all this stuff out. I'm not a good learner.
All the things that have been mentioned are already part of Prusa Slicer 2.0.0 but it would be good to update to the latest version just on general principles.
As others have mentioned with a prusa printer the 2 most important fundamental things to get correct are your live z calibration and your bed cleanliness. The importance of these 2 can not be stressed enough. Without them, adjusting other settings is pretty much pointless as you need the fundamentals before doing anything else.
That said if your bed is cooling off during prints then you have something fundamentally wrong with your filament profiles somewhere as the whole point of the pei print surface is it sticks when hot and releases when cool.
Adding a thin perimeter wont actually do anything if its not actually secured to your part will it. So take Bob's advice, set the elephants foot to 0 for the moment and make sure the basics are there.
Thanks, I'm setting it to zero, and giving this another try.
...
The build plate should be very warm to the touch during the print process.
For most PLA profiles, this will be around 60C or about 140F. This is approaching the 'fry an egg on the sidewalk' temperature.
For ABS profiles it should be too hot to touch, even briefly.
RE: My bed is cold. I think we may have the problem.
I'm 30 minutes into a print. The bed started out nice and warm. But now it's cool. Assuming this is true, what is going on? Is this a slicer setting?
On the printer, when I go to Tune, BED says 0. Is that a temp setting?
RE: What am I doing wrong?
If you check the .gcode file with a text editor, you can inspect it to see if for some reason it is turning the heat off/down during print.
If you post the .gcode file here (be sure to enclose it in a .zip file) I and/or the others can look at it for you.
Toward the beginning of the stock .gcode file there will be lines similar to the following:
M140 S60 ; set bed temp
M190 S60 ; wait for bed temp
This does, as noted in the comments, sets the bed to 60C and holds until it comes to temperature.
Then at the very end of the print you will see something like this:
M140 ; turn off heatbed
Then and only then should it cool to room temperature.
Having said that, some very simple printers do not have a heated build plate and do an acceptable job printing with PLA filament. You can indeed get good prints with an unheated plate.
I looked at the gcode
There are none of the settings that you mentioned.
I believe there's a red led that indicates the bed being heated. It's not on.
@gk
Short version:
Save your Project file, Zip it, and upload it.
Longer version:
1. In Prusaslicer, "File" --> "Save project as...", select filename and location.
2. Zip it, (ZIP it, not rar, 7zp or anything like that), if you have windows, right click on your 3mf-file and choose "Send To" --> "Compressed folder"
3. Upload it, in forum under reply window where it say "Attach file" click "Choose file" chose your compressed file and click "Open"
Prusa i3 MK3S+ FW 3.11.0 (kit dec -20), PrusaSlicer 2.6.1+win64, Fusion 360, Windows 10
First thing I checked was bed temperature under filament settings. It is set to 0 in your project file. This should be set to around 60C or so.
Nice find. I'll find out if that was it when the printer is free.
Thanks.
@gk
Back to topic of this thread "What am I doing wrong? "
I would like to say it this way "Just about everything!!" 😉
1. What printer do you have?
2. What filament do have?
Go to "Configuration" -> "Configuration Wizard" in prusaslicer and install the printer and the filament you have!
Look Here for more in depth info about that
Get your z-height tuned in!
Do as @bobstro told you Here , print prusa logo from sd-card and post a photo of the side you have against the print bed.
Then you can go on and slice your own models, start with small ones and go up in size and print time 😀
Prusa i3 MK3S+ FW 3.11.0 (kit dec -20), PrusaSlicer 2.6.1+win64, Fusion 360, Windows 10
Problem solved.
It was bed heating.
I wrote a detailed reply which this silly forum software lost. But basically, bed heat should default on. I spent 2 years fighting this. If there isn't, there should be a quick start guide for those who just want to print a part, and not get into details.
I bought the MK3S kit, and put it together in a day. The instructions were awesome.
I'm grateful to you all for helping to solve this.
IIAC, the defaults for all of the PrusaSlicer (and Cura) common filament profiles have the bed temperature set to the standard temperatures. Something would have had to change this to zero (actually room temperature, not 0C) at some time.
We'll never know. I can finally use my printer, so it's all good.


