Very frustrating assembly experience (esp. X-end-motor)
I just got my Original Prusa I3 MK3 Kit and was quite excited. I starting putting it together right away. Although fun at first, it quickly became very frustrating.
The Y-axis and the beginning of the X-axis steps went smoothly for the most part except both were missing hardware. I didn't expect to dip into the extra parts bag so soon but no big deal.
Working with the X-end-motor part was a major pain and has totally stopped my progress.
I've included some picture with reference numbers and letters to explain my point. There are some differences between what's in the instruction manual and what I recieved. I'll point those out.
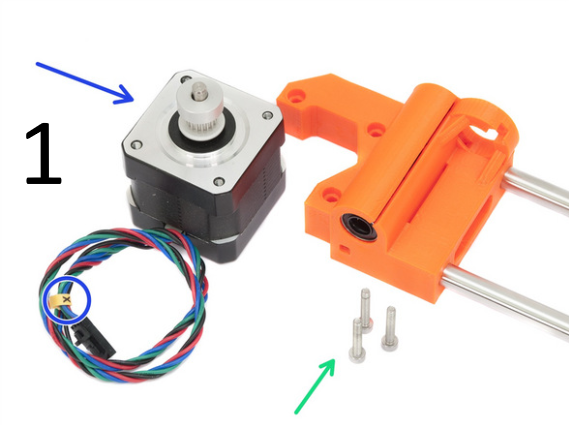
Picture 1: The X-end-motor part (from manual)
The nut trap on the outside of the circle was not machined right so the nut wouldn't fit. I tried the trick where I'd tighten it with only the screw first but instead of tightening, it started to strip the nut trap. In the end, I had to use a Dremel to enlarge it. I almost stripped it this way too.
The nut trap on the inside of the circle was also not machined right so the nut didn't fit. I tried everything I could think of before using a hammer and screw driver to tap it in. That, unfortunately, cracked the part. I was able to glue it back together but lost a day of assembly time while the glue dried.
After the glue dried I tried to put the nut in again with no luck. I eventually Dremeled it out as carefully as I could but it ended up striping the nut trap.
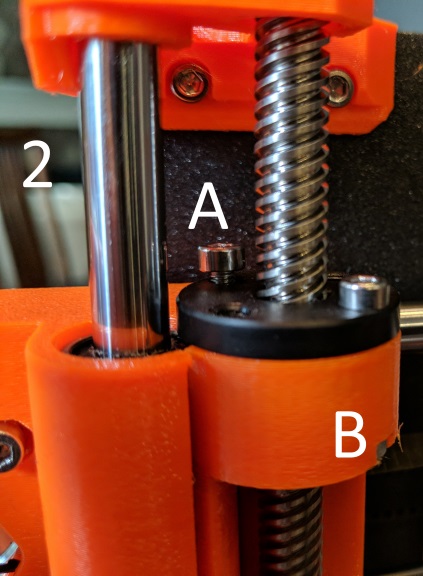
Picture 2: The assembled X-end-motor trapezoidal nut
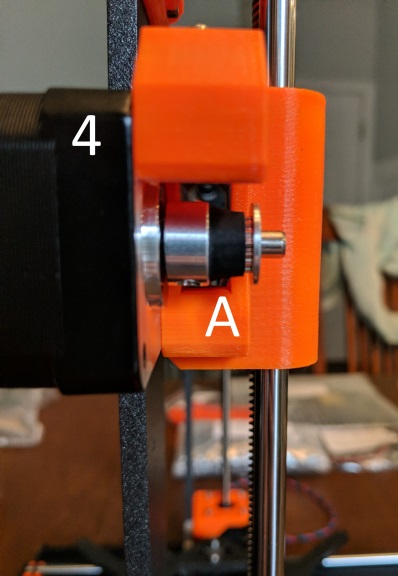
Picture 4: Motor not aligned
The motor pully is as close to the motor as is reasonable.
The belt is rubbing against the X-end-motor part with an overlap of almost 1/8". There is no way to fudge it into place.
I thought I could put some shims between the X-end-motor part and the motor, but the screws were too short for that. There were some longer ones in the spare parts bag but they were too long.
I went to Home Depot to look for some middle-length screws but they don't have them this small 🙁 [/list]
Right now, I don't know what my next step is. I can still pursue my shim strategy but I feel like I'm doing something fundamentally wrong to have all these problems.
Any ideas on what to do next?
All the plastic parts I checked were B6 (I can't double-check the X-end-motor part because it's bolted on)
Re: Very frustrating assembly experience (esp. X-end-motor)
#4 - Your gear is on backwards... Look at the very first picture and compare it to yours.
Re: Very frustrating assembly experience (esp. X-end-motor)
Well first of all, your pulley is on backward, that's why it's not aligned.
I had a bit of trouble getting the nuts in the traps as well, the tolerances aren't exact but should be close and should not require anything major to get them to work. In the end the issue was getting the heaxagonal nuts lined up properly (i.e. square) with the slot. It took some fiddling but they went right in.
Since your part isn't holding the nut any longer, I'd suggest opening a chat and see if they can get you a replacement.
The thing to keep in mind when building these printers is to go slow and pay attention to details. If something isn't going together the way you expect, don't try to force it, take a step back and try to figure out why things aren't quite right. Use the online version of the assembly manual and look in the comments on steps you're having issues with. Most of the time you'll find someone that has had a similar issue and the solution to make it work.
Re: Very frustrating assembly experience (esp. X-end-motor)
#4 - Your gear is on backwards... Look at the very first picture and compare it to yours.
Thanks, brien.k. The gear lines up now. I think I did too much damage to this part to continue so I'll see if I can get another one somehow.
Re: Very frustrating assembly experience (esp. X-end-motor)
Well first of all, your pulley is on backward, that's why it's not aligned.
I had a bit of trouble getting the nuts in the traps as well, the tolerances aren't exact but should be close and should not require anything major to get them to work. In the end the issue was getting the heaxagonal nuts lined up properly (i.e. square) with the slot. It took some fiddling but they went right in.
Since your part isn't holding the nut any longer, I'd suggest opening a chat and see if they can get you a replacement.
The thing to keep in mind when building these printers is to go slow and pay attention to details. If something isn't going together the way you expect, don't try to force it, take a step back and try to figure out why things aren't quite right. Use the online version of the assembly manual and look in the comments on steps you're having issues with. Most of the time you'll find someone that has had a similar issue and the solution to make it work.
Thank you, mark.h36
Part of the problem I'm having is not knowing what the correct amount of pressure is "correct". I'm figuring it out now. I decided to get a new part instead of trying to continue with this one. I'm going to have to take a lot of the printer a part to do it but better now than when I have everything else done.
The forums are a good idea. I see now that they have a large comment section for each step and I'll be looking to that as a resource now.
Re: Very frustrating assembly experience (esp. X-end-motor)
When the R2 parts came out a lot of us had problems with the nut traps. As a result of this and the bearing separator being wrongly sized (too large did not show in the print,) I redesigned the parts.
The top end of the slot in the bearing holder needs to be cut through.
The parts need to be printed using the latest firmware. If you want to use an earlier version of the firmware to print the parts you may need to adjust the extrusion multiplier.
To get the bearings in the slot in the bearing holder needs to be prized open with a screw driver. The bearings will then slip in till they reach the separator. At that point it needs to be prized open a bit more then the first bearing can be pushed gently down. The bearings should be placed one at a time with the first fully home before the second is inserted.


Regards,
Martin
Martin Wolfe
RE: Very frustrating assembly experience (esp. X-end-motor)
@martin-wolfe
thanks for these drawings, this is a great help as it is not clear how these captive nuts are oriented and as they are difficult to locate, (at least mine was) it makes it clear how they should go in before applying pressure to finally locate them. It might be an idea to better explain this in the manual or even give a drawing to help.
Regards,
Graham