Underextrusion and noise issues - newly assembled i3MK3S+
Hello everybody,
yesterday, I finished assembling my new printer (the MK3S+ kit) and unfortunately I am running into problems sooner than expected.
I flashed the newest firmware (3.10.0) on the printer and ran the setup wizard with no issues or warnings. The calibration went smoothly and everything seemed fine.
The first hiccup I encountered was the first layer Z calibration. I had to lower the nozzle by about -1.520mm to get the filament to stick to the bed correctly. I meticulously followed the calibration steps in the assembly manual and positioned the pinda probe according to the instructions. So it left me wondering why I needed such a massive adjustment.
Then, I ran the first prints, a PRUSA logo and the batman, straight from the included SD card. They printed okay, but the printer was making a lot more noise than I felt like it should. It sounded like something might be resonating in the printer during movement of the Y-axis, at the same time it sounded like the linear bearings were exhibiting rattling. There also was a strange dull pulsing sound in a later (failed) benchy print, I took a few sample clips to give you an idea of the sounds coming from the machine:
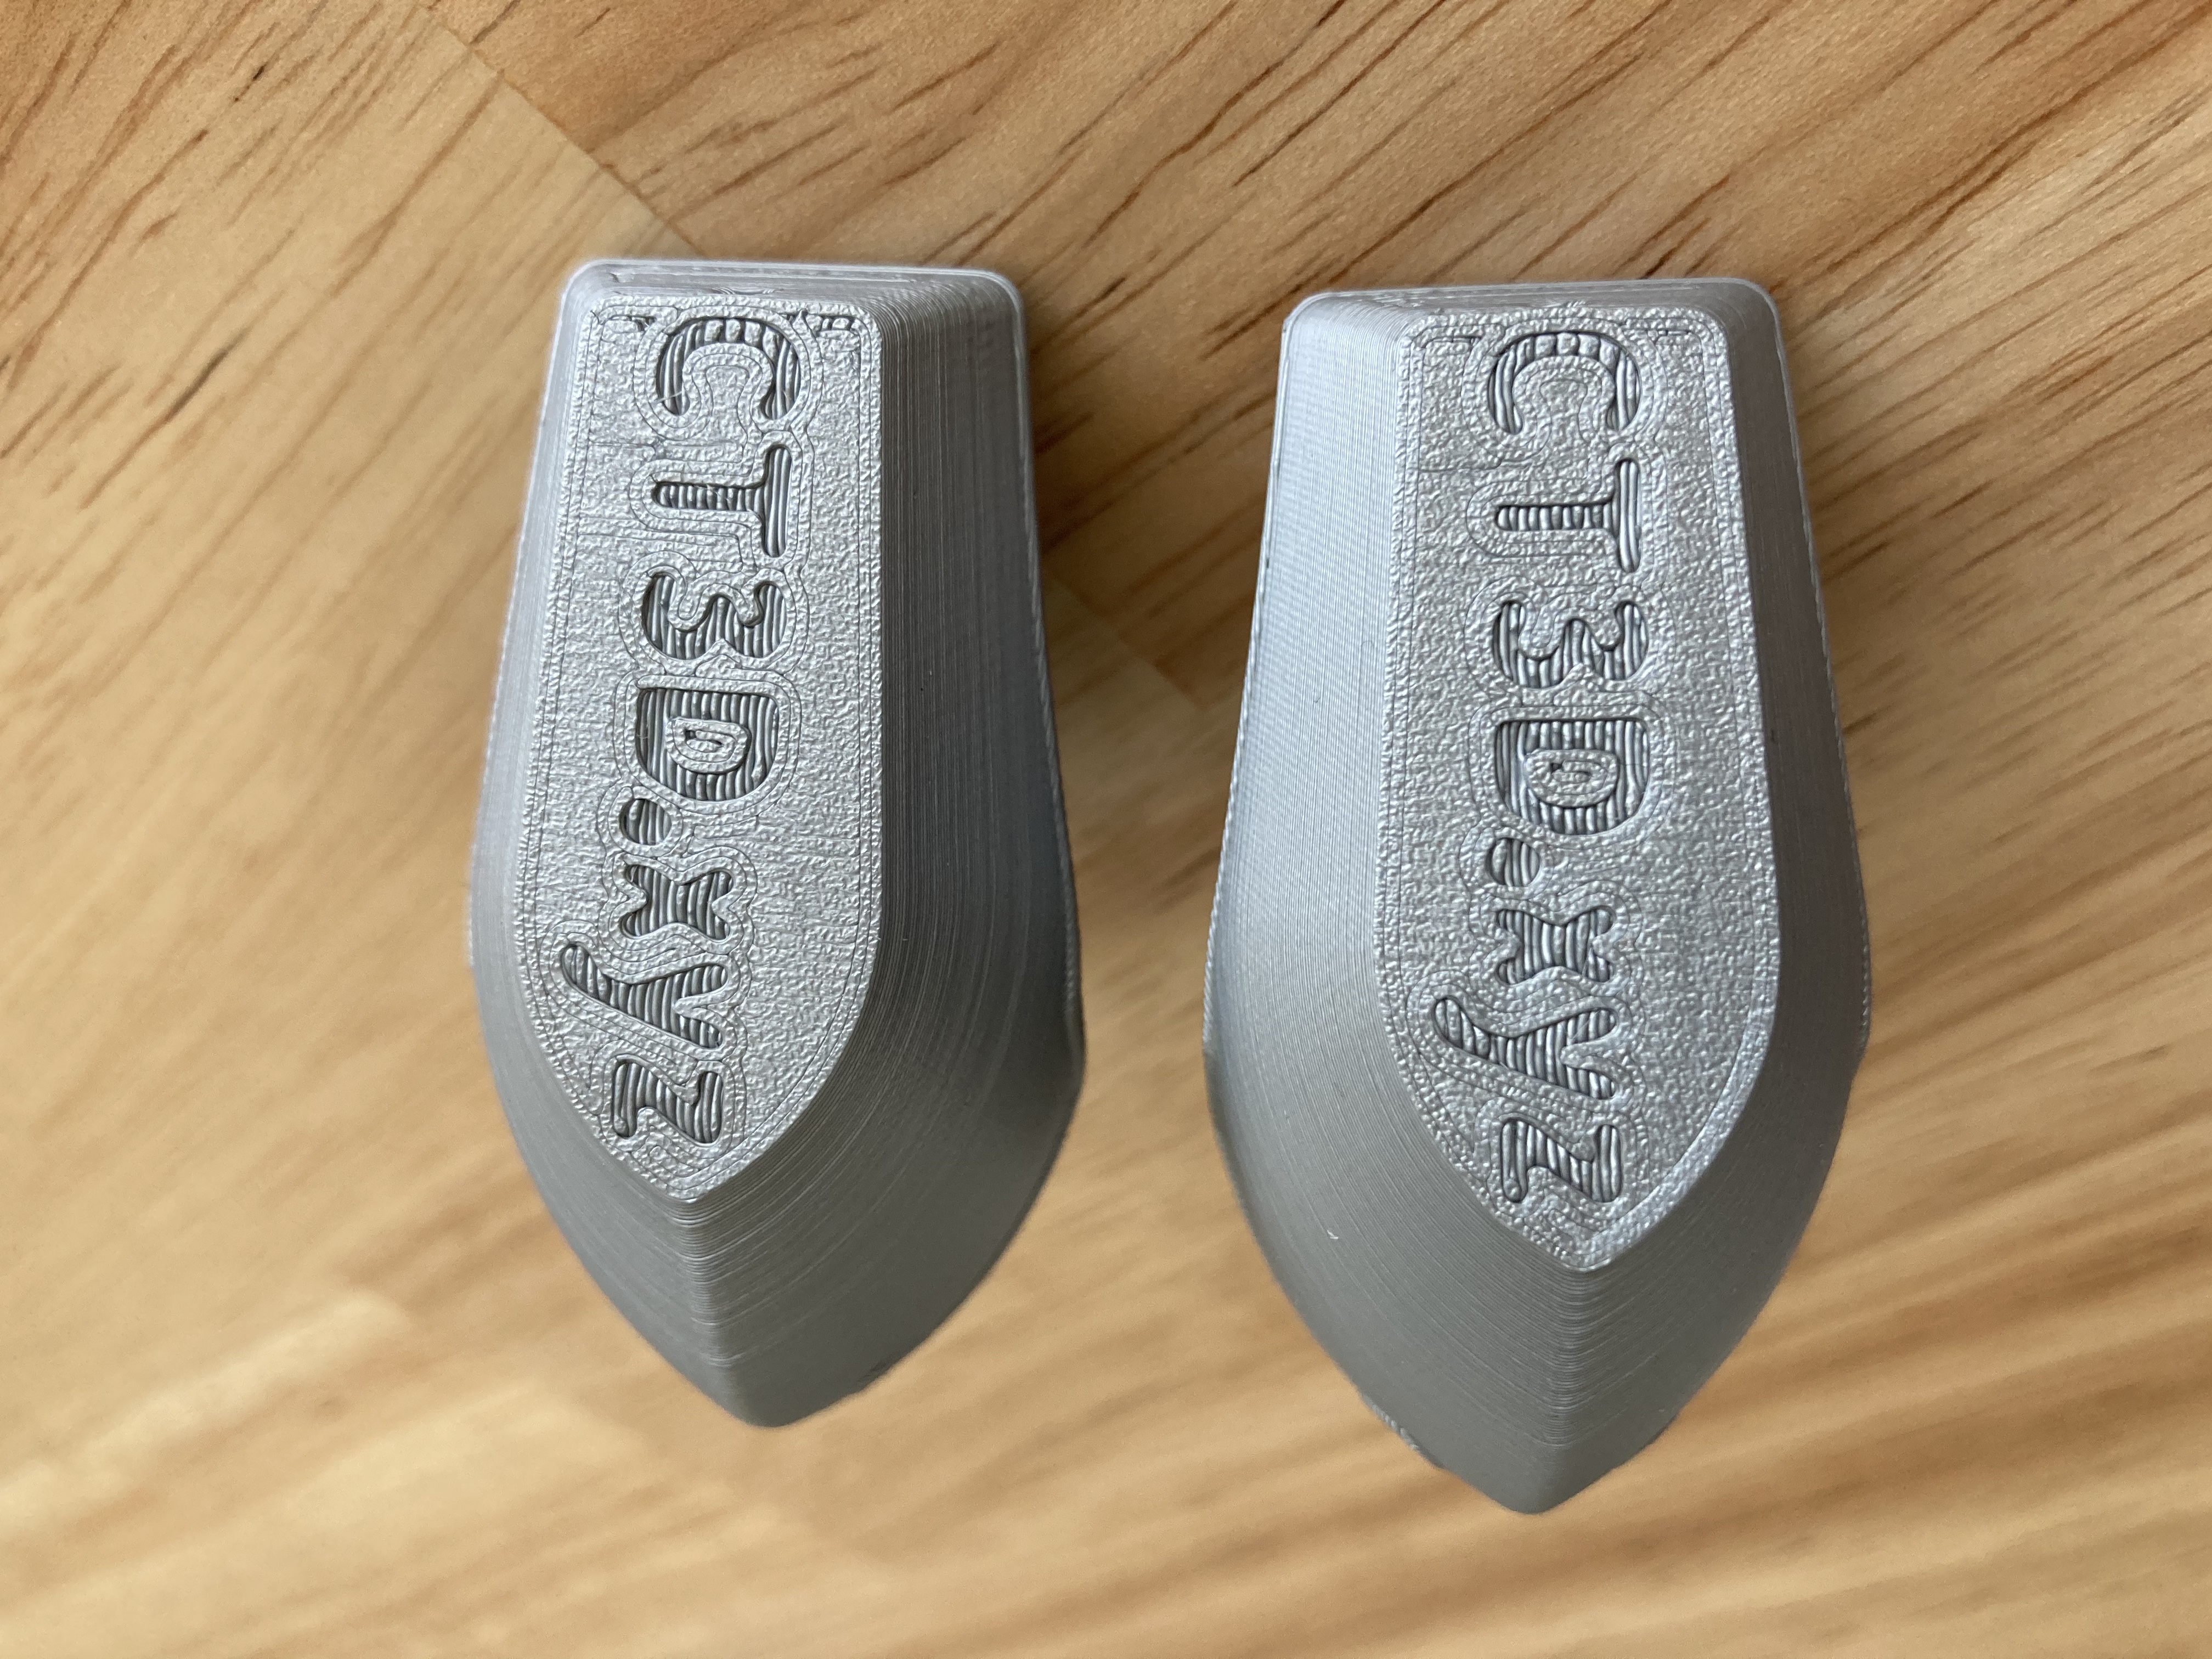
Apart from the noise, the print quality was not exactly what I had hoped for. The top layer of the PRUSA logo had quite some smearing going on:

I consequently dialed back the Z-calibration height a little bit to compensate for that and to prevent the smearing. I then printed the batman symbol to check the surface and it looked better, but not perfect. The next day, I gave the benchy a shot and had major problems. The first attempt didn't stick at all and seemed massively under-extruded. I rigorously cleaned the bed with 99% IPA and gave it a second shot, it seemed to stick at first, but then came loose after a couple of minutes:

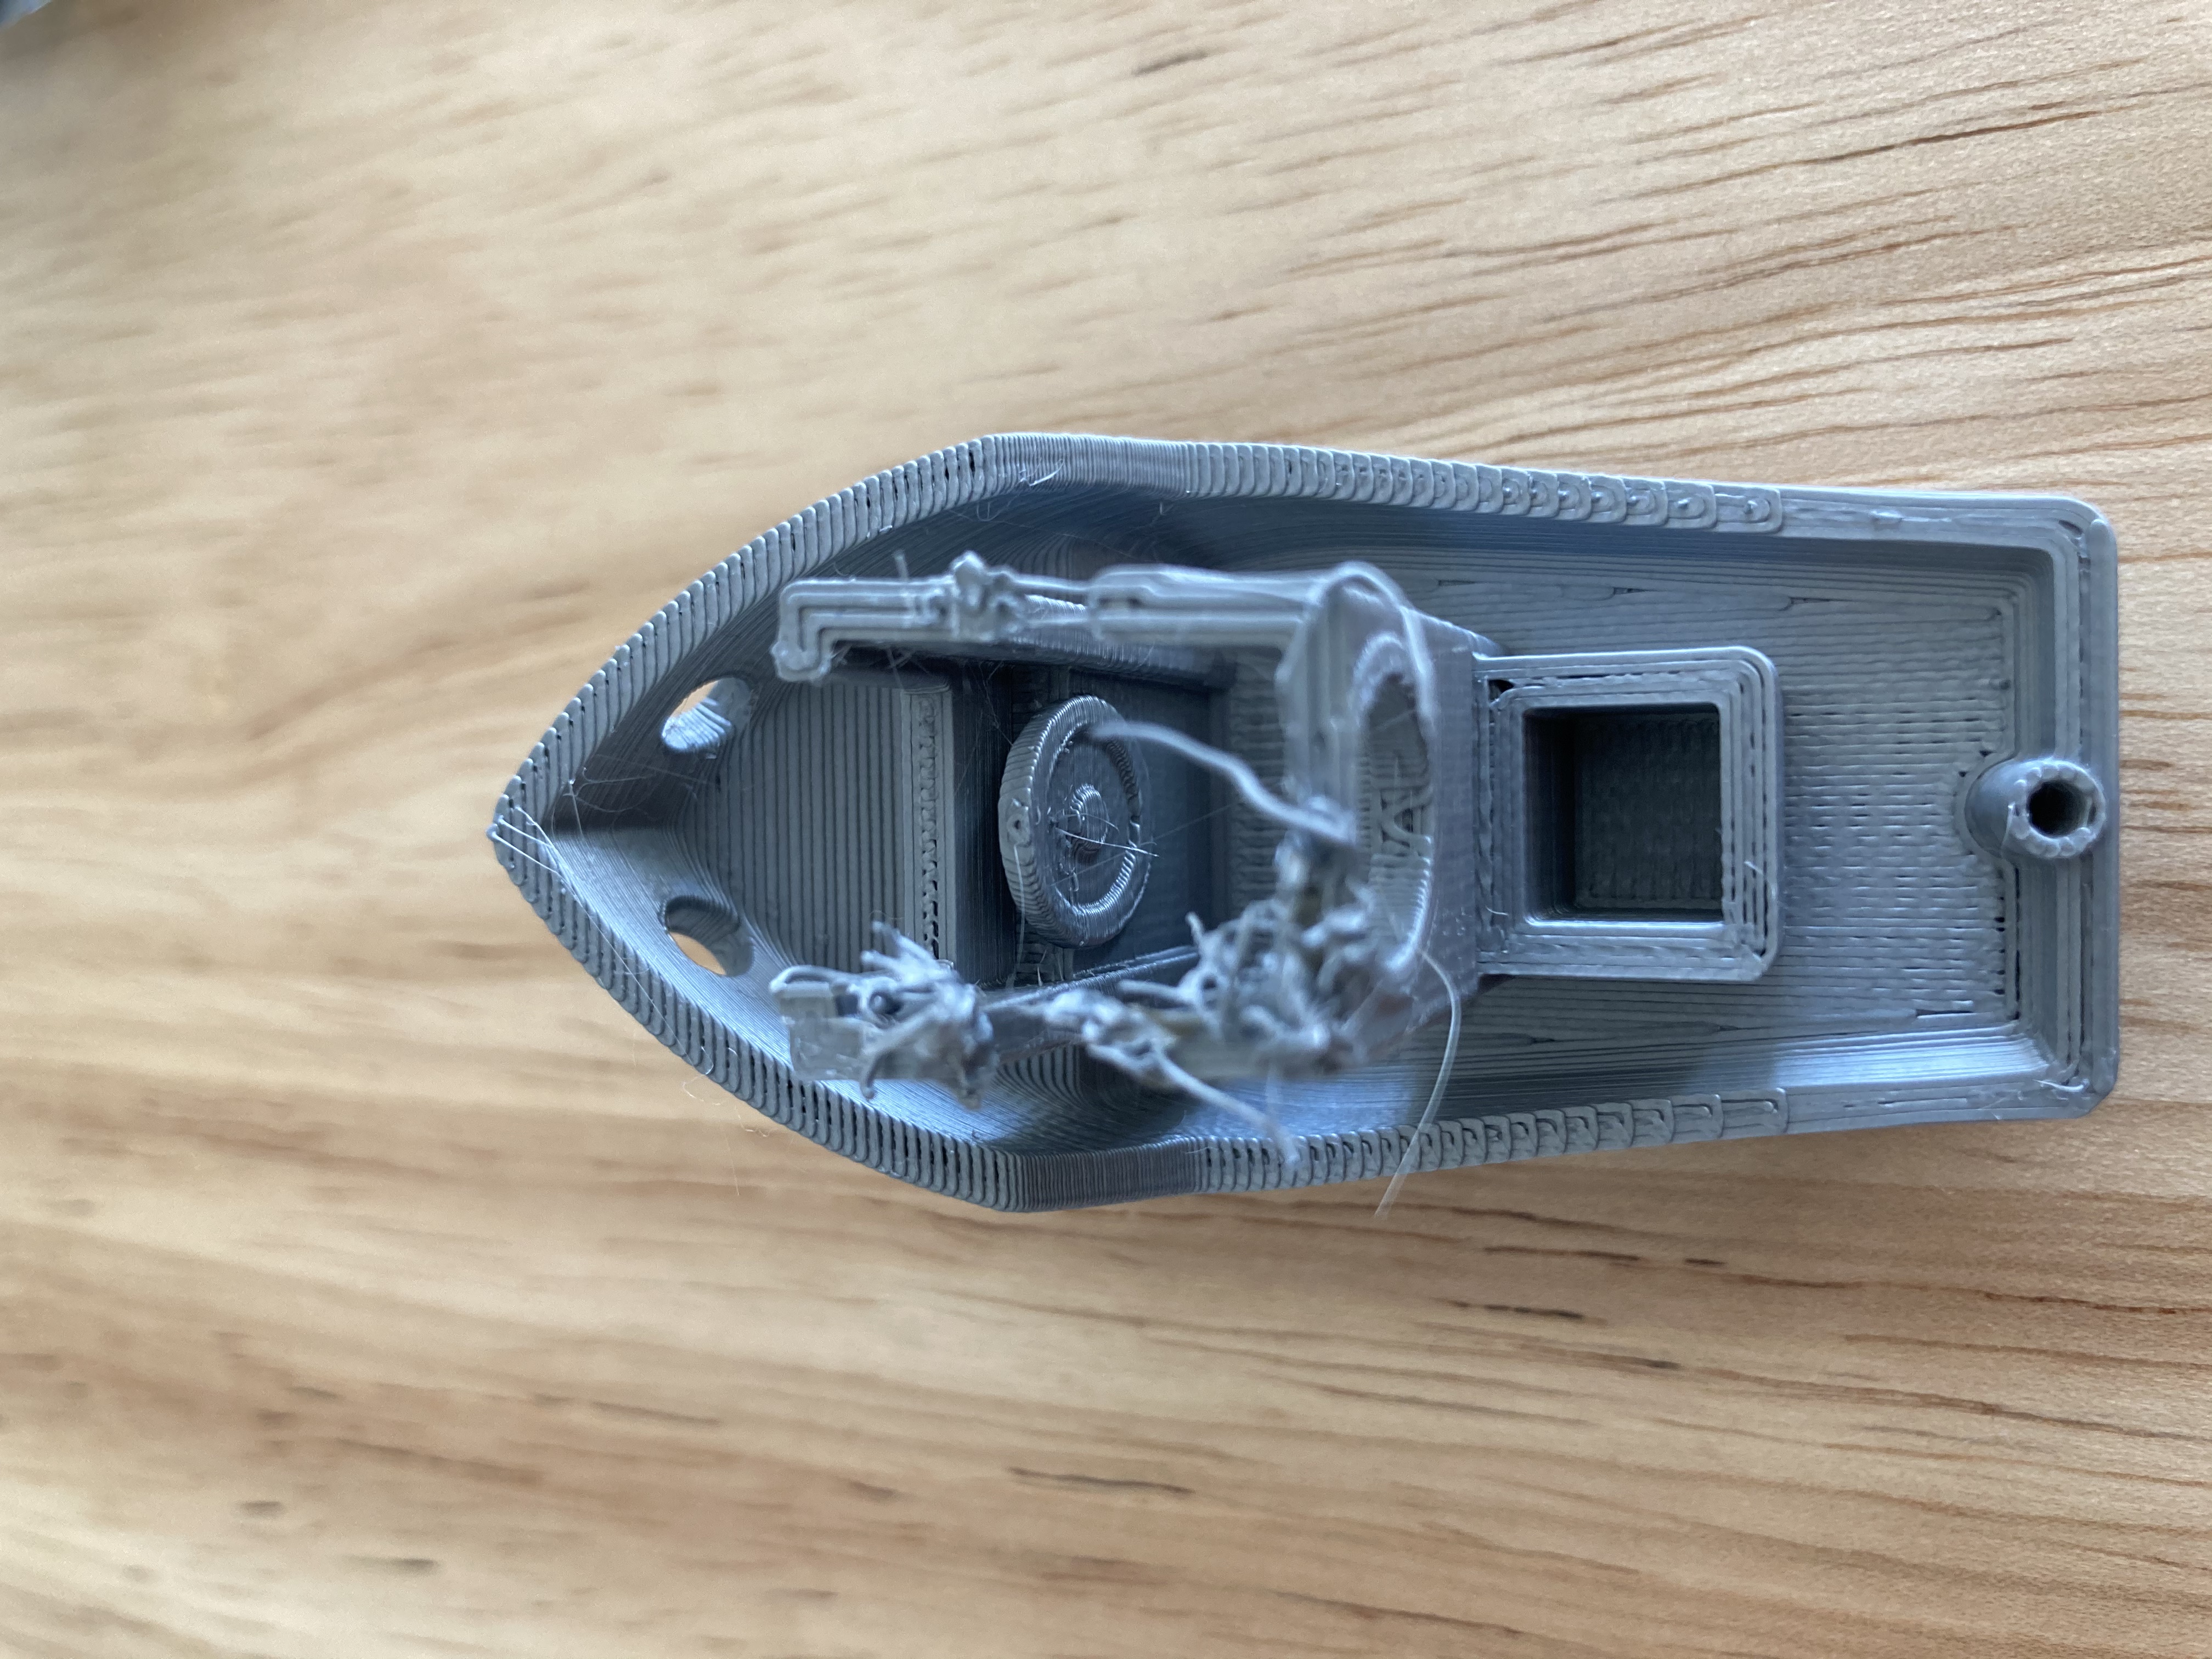
I then printed the belt tension gauge in PETG to check if the belt tension was maybe too high. But on the contrary, it seemed almost like there was not enough tension in the setup, despite the belt test saying otherwise:

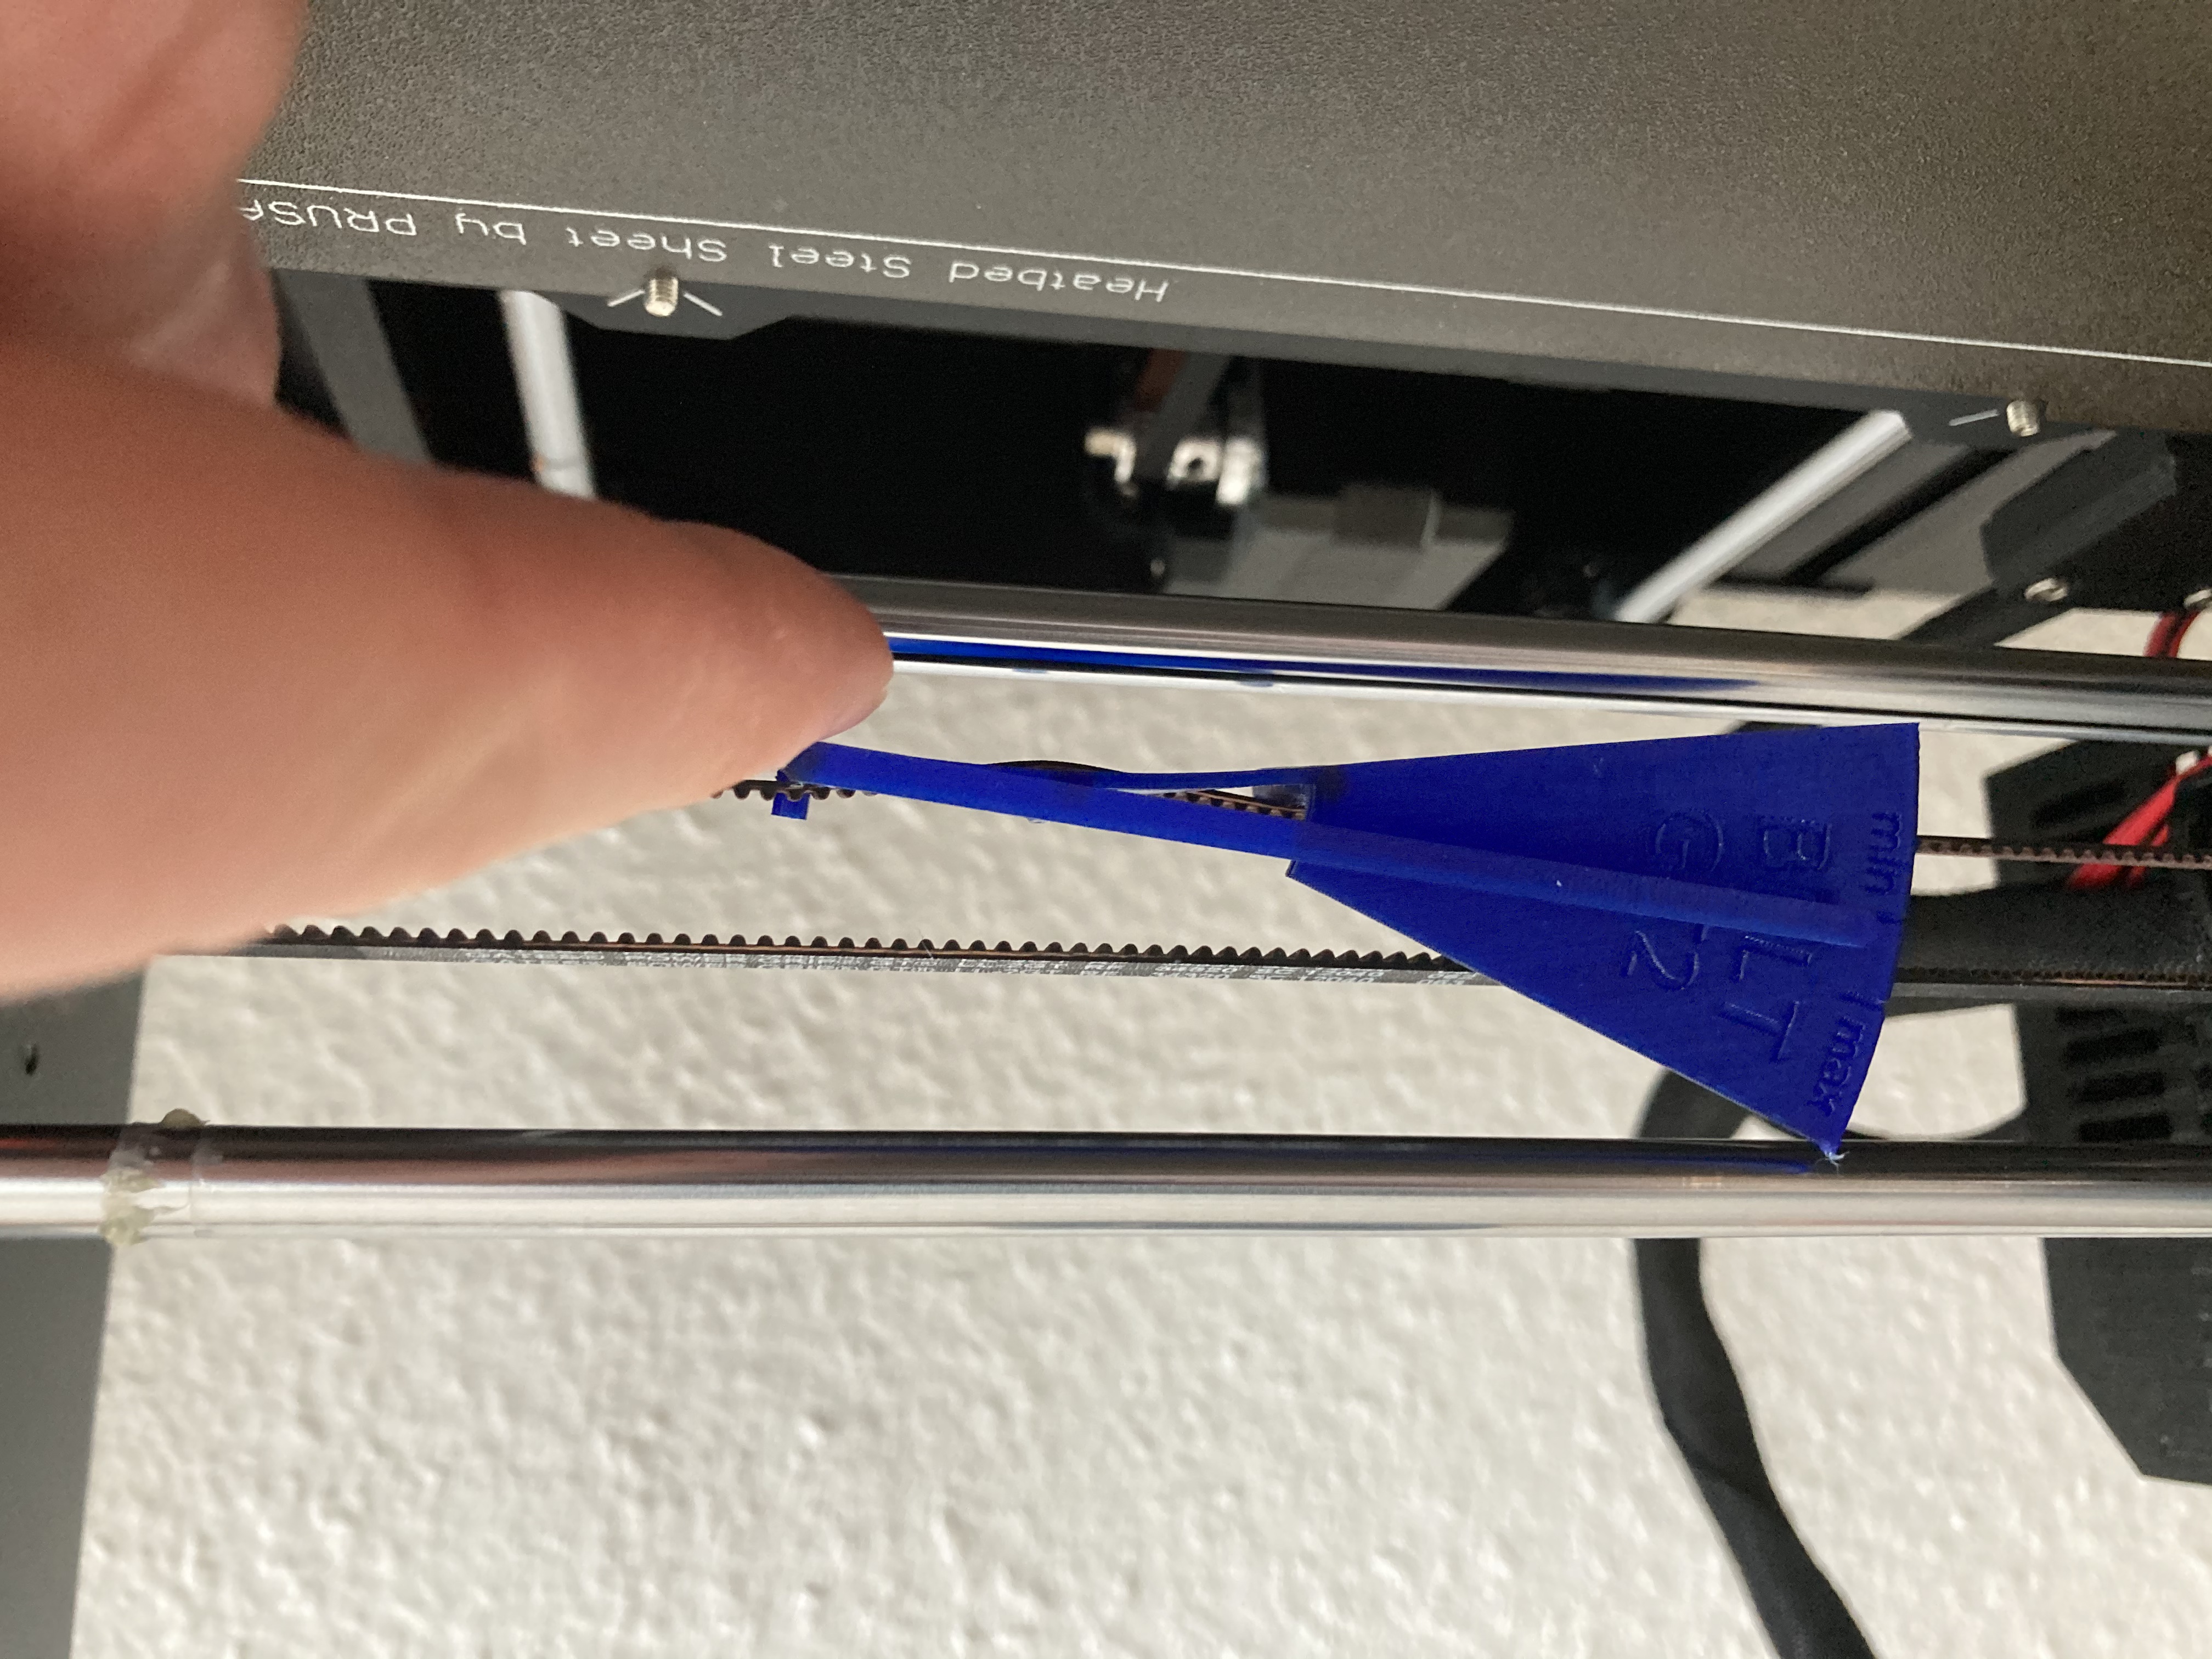
Both X- and Y-axis were positioned according to the instruction video by Prusa on Youtube (far left/back). Measuring the tension on the top section of the belts yielded the same results as on the bottom section (seen in the pictures). The belt tests however tells me that X is pretty damn taut while Y reads as spot on.

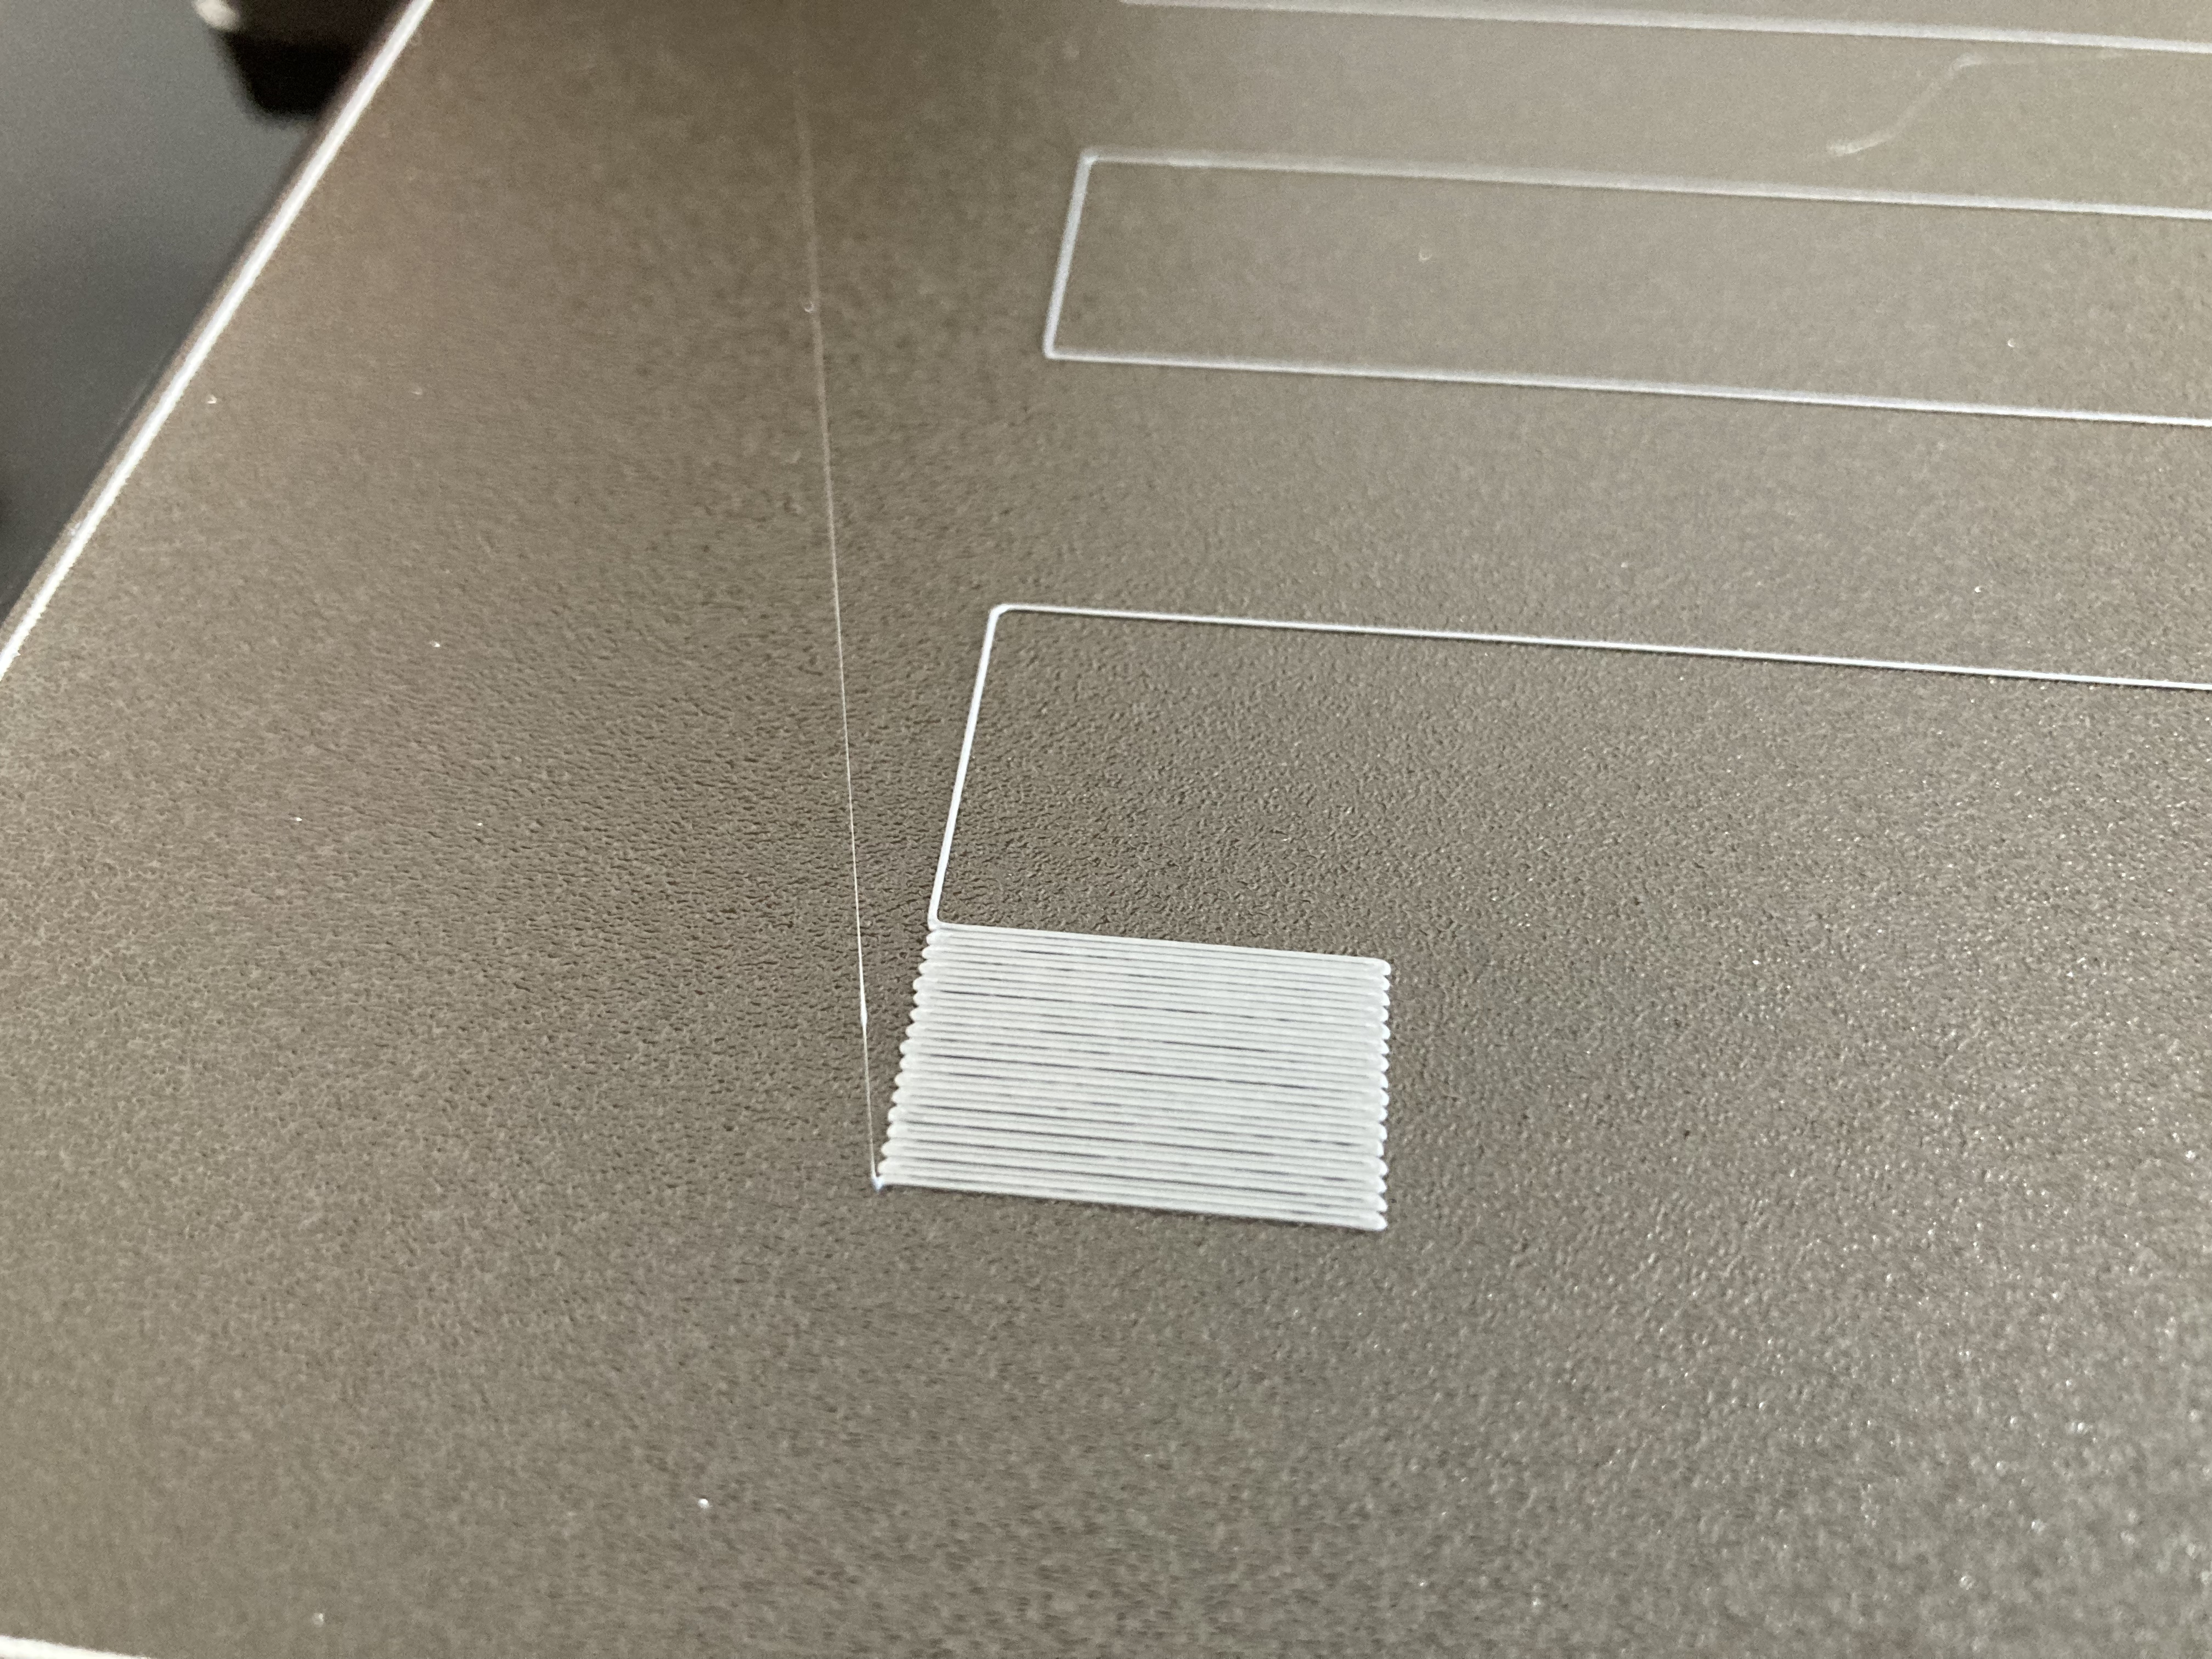
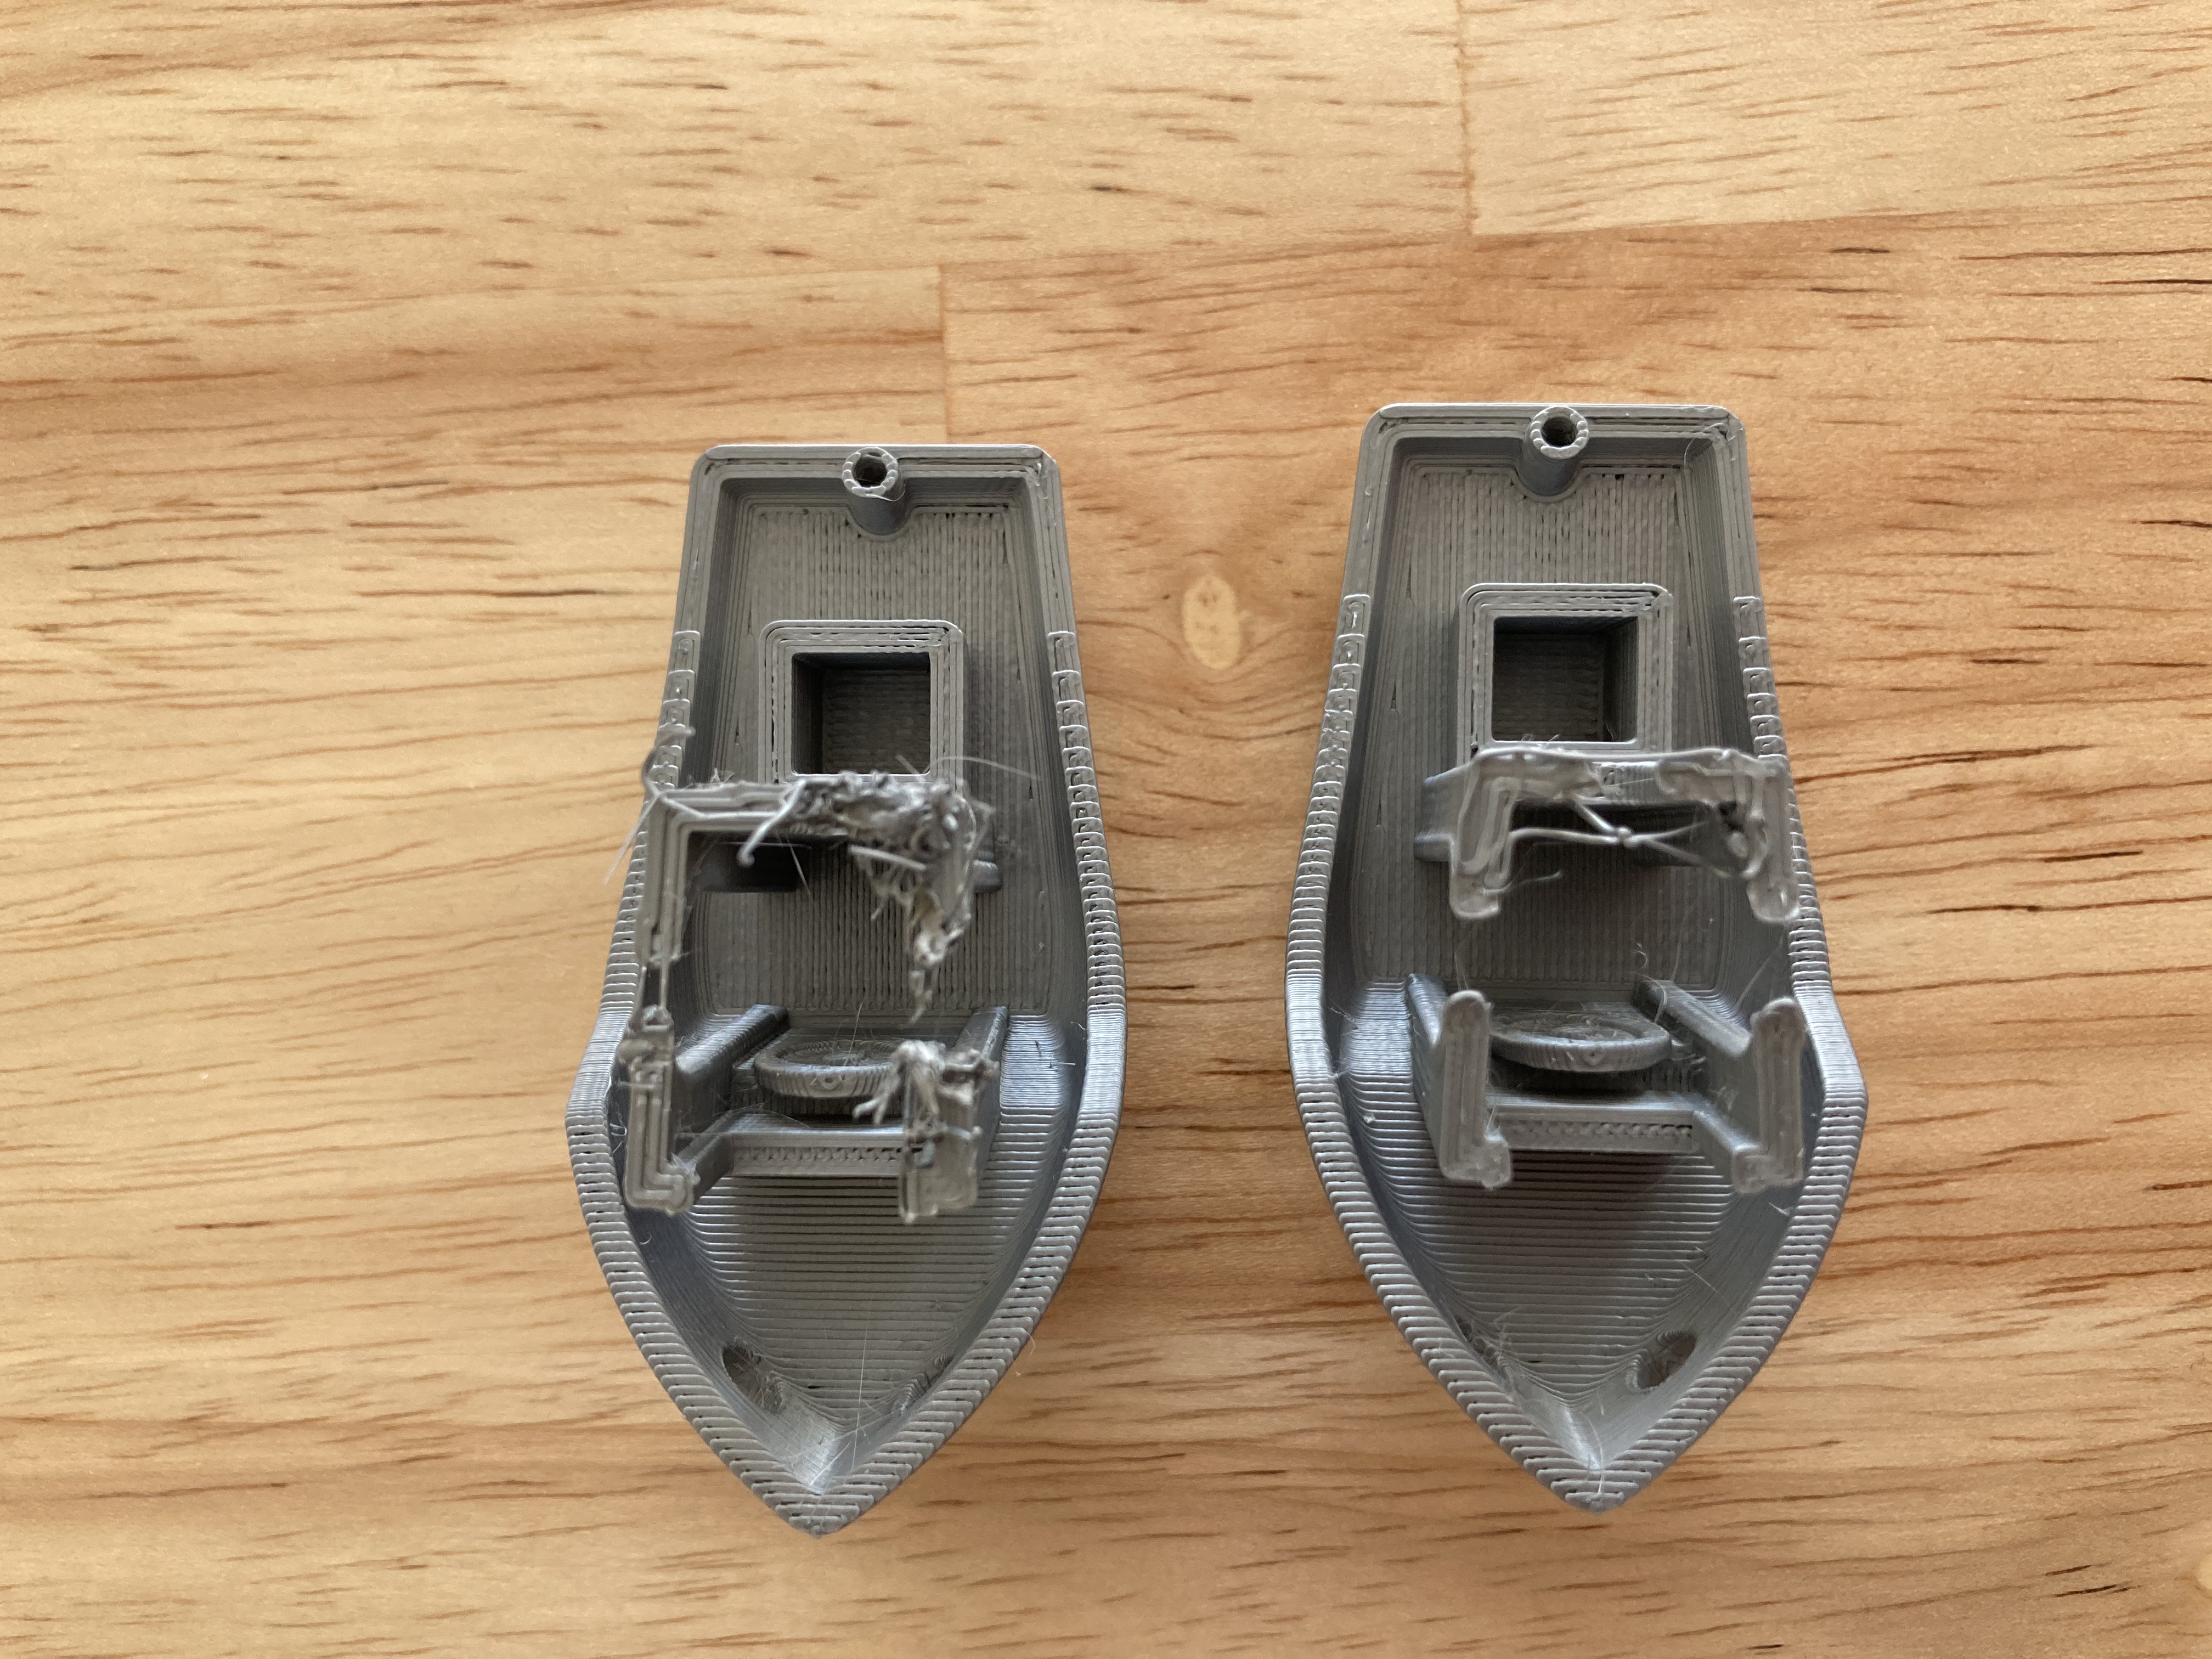
I then ran the first layer calibration test again, to see that there was now massive under-extrusion present, regardless of the Z-height calibration:
Finally, I re-printed the batman symbol to check and it confirmed that the under-extrusion had increased (as compared to the first batman print):
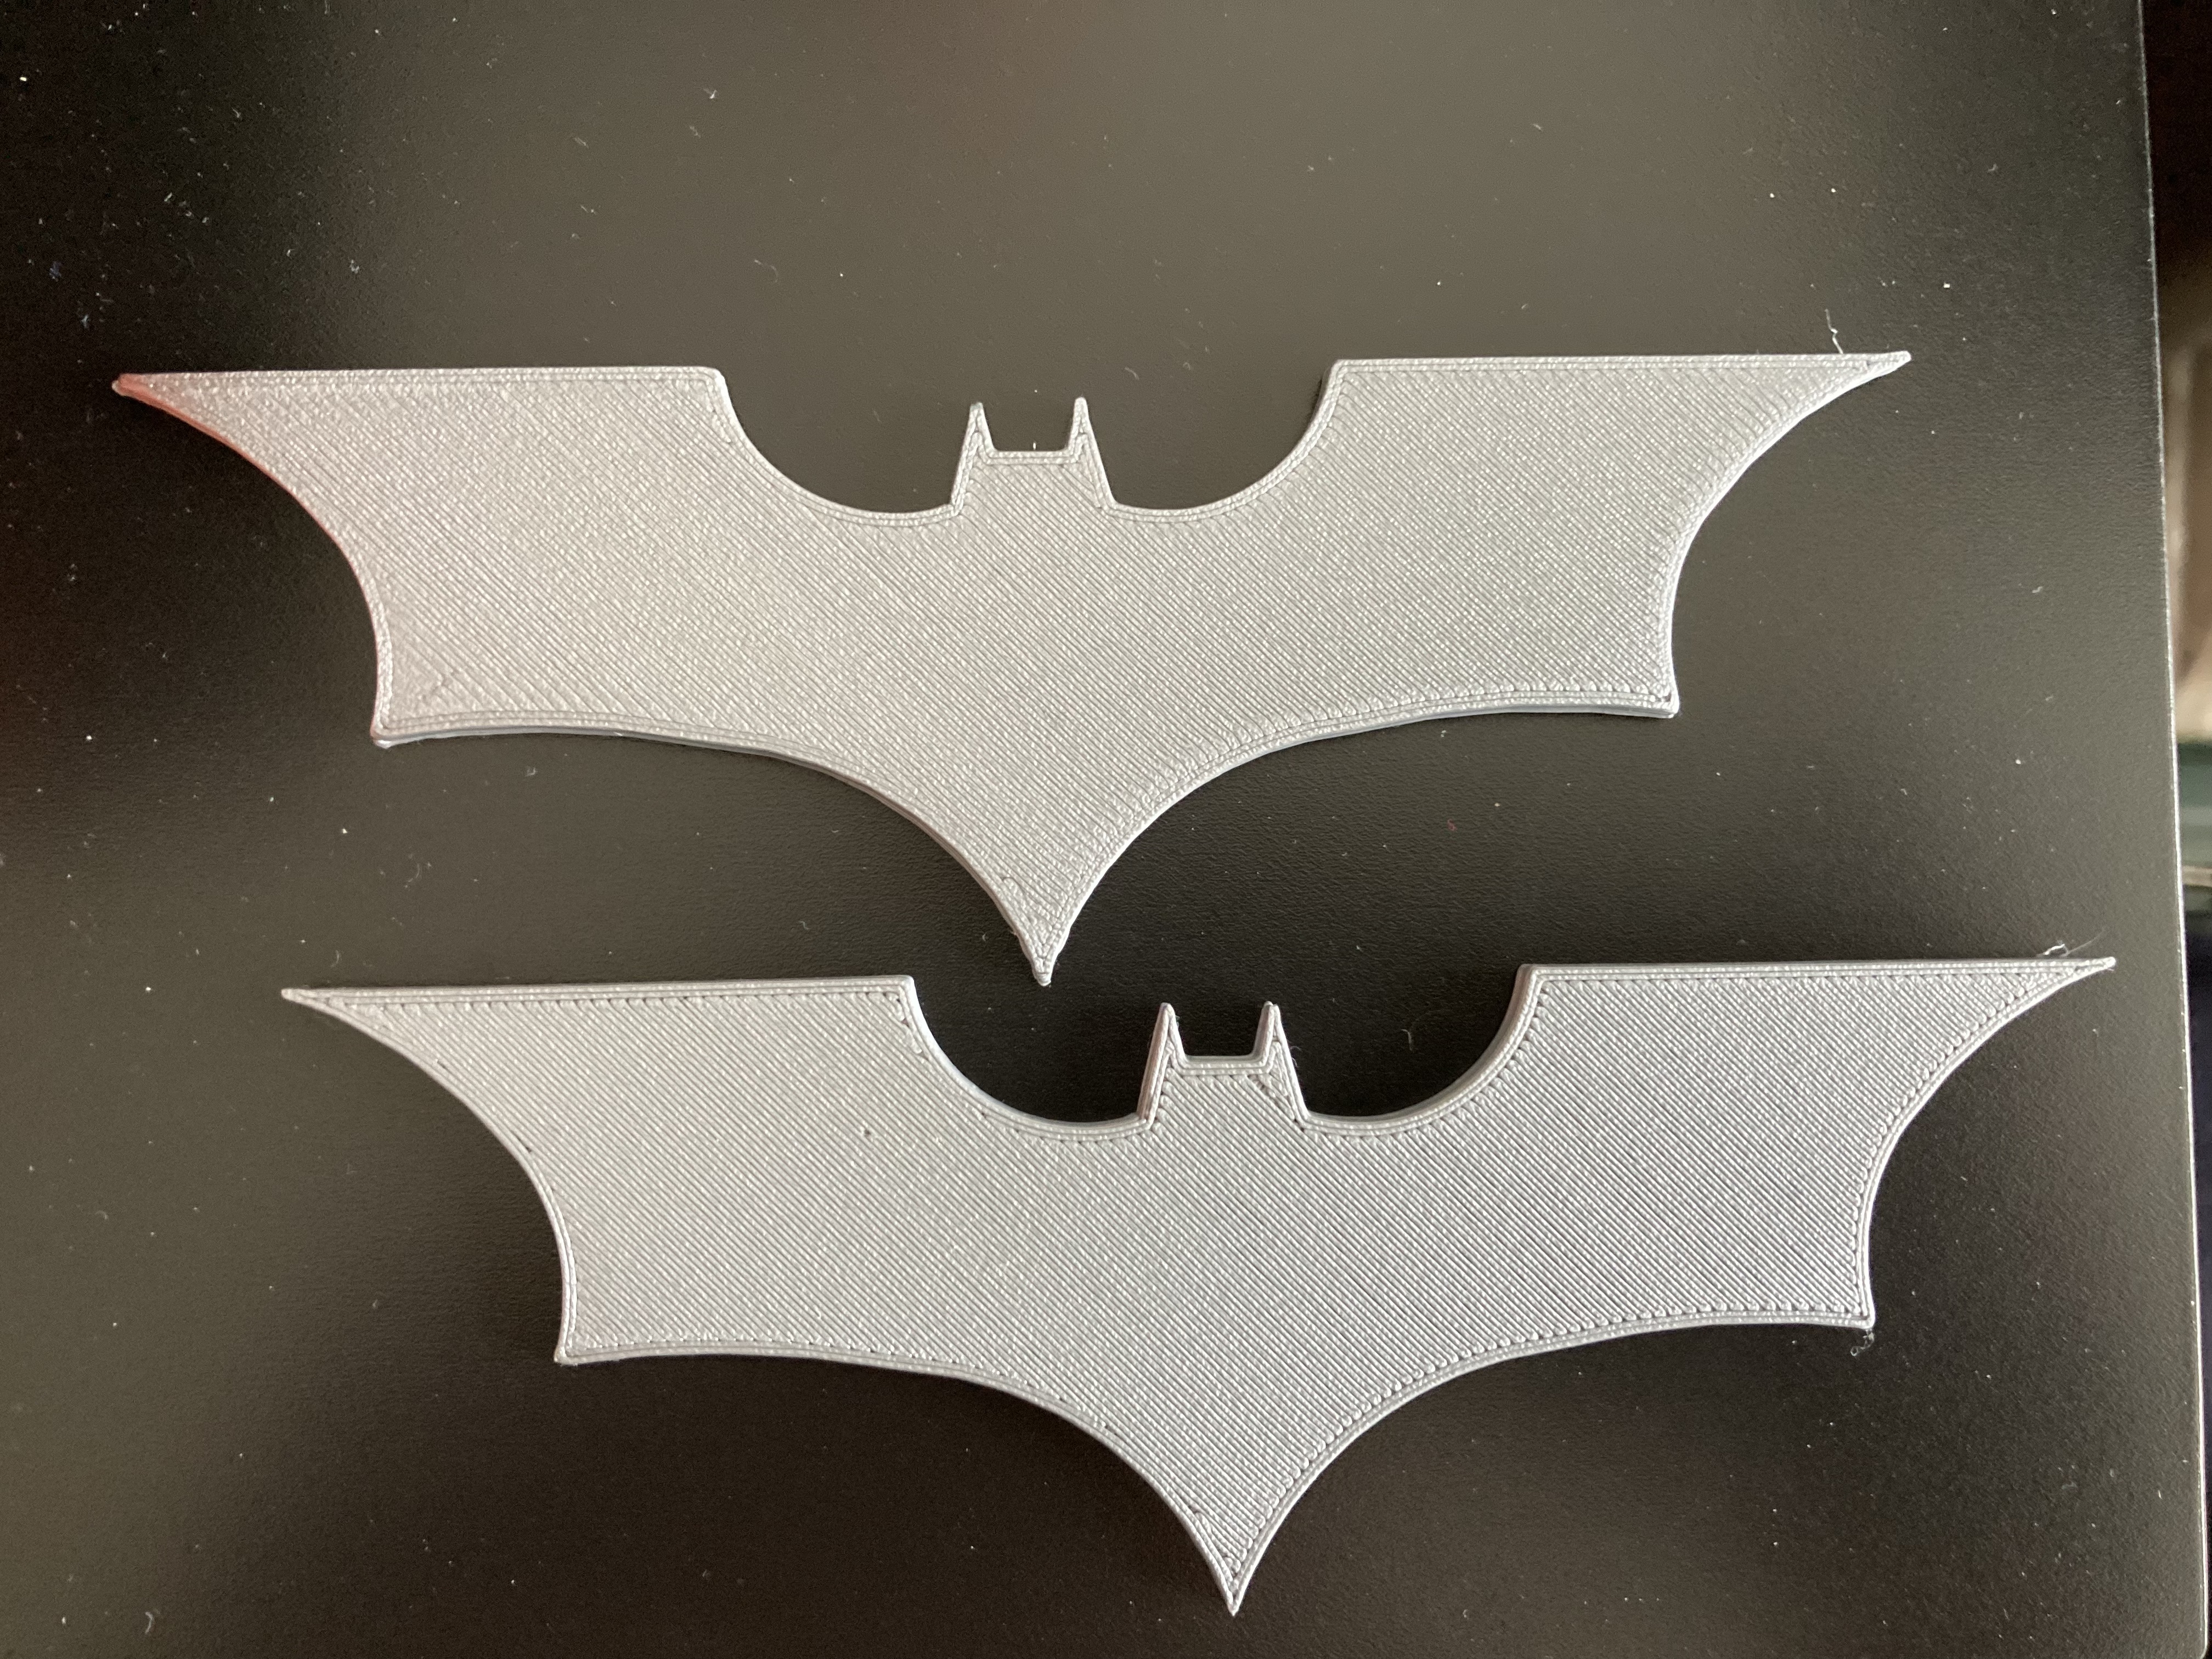
Top one = first round, bottom one = second round of the batman symbol.
I gotta say, I'm pretty saddened by the fact that my journey into the Prosa world is off to such a disappointing start. I have read that under extrusion has been an issue with multiple MK3S+ printers and that there is no real solution so far?
Either way, I hope at least you guys can give me some feedback on the printer noise exhibition and the belt tension paradox. Many thanks!
Tom
RE: Underextrusion and noise issues - newly assembled i3MK3S+
Hi, welcome!
those sounds seems quite normal, is what a 3d printer sounds like. you'll learn to recognize the different sounds according to the print and you'll get used to it 😉
it is maybe a bit louder due to the Lack table you're using. I saw many user put one of those concrete square slab under the printer to damper the vibrations (it works).
About the actual print, the textured plate is not the best for PLA printing, but you can try to lower even more (the Z calibration final "square" is not squished enough). If you can, use the smooth sheet when printing PLA, or you can try to add a brim to increase the contact surface of the model with the plate.
As concern the top layer, you can improve it playing with the settings, but you'll have the time to learn how to do it.
the batarang looks good 😀
I'm not an expert. Ma parlo anche italiano 😉
RE: Underextrusion and noise issues - newly assembled i3MK3S+
Ignore the belt tension numbers in the LCD. They can tell you if your axes have too much drag, but not much else.
The Prusa logo is overextruded.
The Layer One Calibration is much too high - you need to move the nozzle closer to the sheet so the threads form a solid sheet of plastic.
The Benchy and Batman layer one is also much too high - make Live-Z more negative.
Work on Layer One using Live-Z adjust to get layer one right. But be certain you use the default 1.0 extrusion multiplier when you are setting layer one thickness. Otherwise you'll chase your tail trying to get both layer one and extrusion right.
Here's a photo of a couple fair layer ones though a few of the brown chips are a bit too low and the silver is a bit too high - you should get the same solid sheet of plastic on both smooth and textured sheets.

RE: Underextrusion and noise issues - newly assembled i3MK3S+
As an aside - new users usually end up causing themselves a lot of grief by playing with settings when they don't know exactly what they do. In general, do not change any of the defaults unless you can predict what is going to happen. The defaults in the profiles are quite good 99% of the time. Once you get comfortable with how the printer is working, what works well, what might be improved, then start experimenting with changes.
This also lets you find problems more easily. I can't express just how often problems like these turn out to be the user made changes to a profile, that simply resetting the value to default solved. So at some point be prepared for someone to ask you to save the project, zip it into the common ZIP format, and post the offending file here. The first thing we check is what defaults have been changed.
RE: Underextrusion and noise issues - newly assembled i3MK3S+
As said above, sounds fairly normal.
--------------------
Chuck H
3D Printer Review Blog
RE: Underextrusion and noise issues - newly assembled i3MK3S+
Another thing, the tension gauge is best used when the extruder is pushed far left, the bed far back; then place the gauge on the LOWER belt in the pair - the longest free span of the belt. Otherwise, it reads wrong.
RE: Underextrusion and noise issues - newly assembled i3MK3S+
@thomas-d
I had to lower the nozzle by about -1.520mm to get the filament to stick to the bed correctly. I meticulously followed the calibration steps in the assembly manual and positioned the pinda probe according to the instructions. So it left me wondering why I needed such a massive adjustment.
You can go as far as -2mm before you need to change anything else; this is within the normal range, especially for the thinner, textured sheets.
I consequently dialed back the Z-calibration height a little bit to compensate for that and to prevent the smearing.
The Z calibration is useful *only* for the first layer. Reinstate the good value or, as you have discovered, your prints will not stick.
I have read that under extrusion has been an issue with multiple MK3S+ printers and that there is no real solution so far
In the majority of cases the solution is to reinstate the default settings and just print with those for the first few months until you have some experience with the printer. For a while the printer will be settling down, running in, settings will drift a little differently depending on how well each user built their machine. In a month you will have to go over the basic maintenance checks, lubricate and recalibrate. Even if you got everything dialled in perfectly today, it would all need re-doing.
Better to settle, temporarily, for a basic working printer and get some useful printing done, make your early mistakes, establish a routine and generally get used to the process. Then when you do your one month service you can take extra care knowing the new settings on your now stable printer are likely to last for several months.
Noise: These are normal printing sounds but there may be some resonance with the work surface the printer is standing on. To test, move the printer to a different surface. There are several threads on here about resonance and a common solution uses a heavy base but anything that changes resonant frequencies may help - just tightening the screws that hold the workbench together can be enough...
Cheerio,
RE: Underextrusion and noise issues - newly assembled i3MK3S+
I think we also need to know what was the layer one setting in slicer that was used for those parts. We can no longer assume new users aren't changing it from 0.20 mm. I've seen three threads now where people have changed it for silly reasons.
RE: Underextrusion and noise issues - newly assembled i3MK3S+
@tim-2
Isn’t that the truth. Gone are the days when you could assume someone would not monkey with settings.
I was too scared I would mess something up so I read the manual.
--------------------
Chuck H
3D Printer Review Blog
RE: Underextrusion and noise issues - newly assembled i3MK3S+
Thank you everyone for your responses and your input. It's good to know that there is a bit of a break-in period and that re-calibration is inevitable - takes away the pressure a bit. I like to think the level of due diligence in the assembly of the machine was as high as you can reasonably ask for without using a torque spec + wrench on the fasteners. I bought a precision milled flat aluminum plate as a reference plane to level the frame on and did my best to get the warp out (ended up with about 0.2-0.25mm edge lift after trying to get is perfect many times over, tolerances on the parts simply didn't allow for better results).
Z-Height:
I went with your advice and have dialed the Z-height adjust all the way back to -1.585mm. The prints seem to stick much better now 🙂 I feel like the illustration in the manual is a bit misleading though, as now the line in the First Layer Calibration is pressed completely flat to the bed and there is no visible "rounding" of the filament trace on either side left (as shown in the "nominal" state in the handbook). The square part at the end of the calibration does look completely fused though, and doesn't seem like its being squished too much. The next attempt at a benchy is printing right now, so far so good. I'll post a picture once it's done, maybe that'll tell you more.
Settings:
I see the point you guys raise that beginners should not go nuts with the settings without a clear picture of what they're doing. Because it got brought up multiple times, I want to stress again that I was and still am using factory g-code straight from the shipped SD card. I didn't mess around with any setting in any kind of way, let alone anything advanced like the extrusion multiplier - everything is straight default. That's why I was disappointed to see the over-extrusion on the Prusa logo and some surface issues on the top layer of the batarang.
Noise:
I'm glad to hear you guys consider it normal. Could you actually see the videos as well or only hear the sound? For some reason I only get the sound files when clicking the links on my desktop, while getting the full video+sound when opening them on my macbook.
Either way, my inner engineer is unhappy because of the resonant sounds and the rattling coming from the what feels like the bearings and/or frame, although it's hard to pick it up on the recordings. To me, and going by the (admittedly few) other Prusas I have heard in the past, it seems like there is more of a racket going on that it should be, apart from the regular "3D printing"/stepper excitation sound. Primarily it seems to come from the Y-axis, it just sounds a bit "crunchy" to my ears. I did my absolute best to tighten all the fasteners reasonably, but without over-torquing them - yet I can't help but feel there is something loose in the machine somewhere.
Belt tension:
The position of the axes while measuring the tension, as stated in the OP, was indeed all the way to the left/back. Upper and lower belt section gave identical readings. Would you recommend tightening the Y-belt a little bit, as the gauge tells me it's a bit on the loose side of things?
Thanks again for all your feedback, I really appreciate the help! 🙂
RE: Underextrusion and noise issues - newly assembled i3MK3S+
Oh yeah, and I placed the printer on the 20mm thick aluminum plate I had bought for leveling the frame to knock down the resonance frequency of the printer+table setup as suggested. Can't hear much of a difference, but it seems to have helped a little bit with the noise, or maybe I just want to hear an improvement 😉
RE: Underextrusion and noise issues - newly assembled i3MK3S+
@thomas-d
If you add silicone feet to the sheet, it will also help.
--------------------
Chuck H
3D Printer Review Blog
RE: Underextrusion and noise issues - newly assembled i3MK3S+
@thomas-d
Belt tension. A little loose isn't going to hurt anything, but I prefer on the tighter side. There are tradeoffs ... ringing being one of them. If you printed the gauge in Prusament, and not some other brand of PETG, I'd use the higher end of the range.
Good to know you are printing sample gcodes. It eliminates a lot of user error.
Your use of -1.567 for explaining Live-Z - well - every printer is different. What your numbers are is relative only to you. Live-Z (or what I refer to as Z-offset) is only a figure that defines the actual PINDA detection height versus the PINDA to nozzle tip height difference. No two PINDA detect the sheet at the exact same distance; and no two users have set the nozzle PINDA spacing exactly the same. Unless by accident or chance.
What is important is that layer one is close to 0.200 mm thick. Adjustment of that 0.200 thickness is to ensure a solid sheet of plastic, no ridges, no gaps. Adjusting Live-Z is how you do that. Other biases - the textured sheet has hills and valleys. The valleys need to be fully filled to actually get the texture; so the hills may not be 0.200 thick. Again, minor tweaks required.
For noise. It's all relative.
Metal on metal is bad. That is why grease exists. If you didn't clean and grease the linear bushings, your printer will be especially noisy and wear out quickly. Prusa does NOT ship lubricated bearings in Mk3 kits - I do not care what their guide says. The preservative on the bearings is to prevent rust. Nothing else.
Over tightening bearing mounts will crush the bearing shell, and this causes the bearings to seize on the rods. This is one of the common issues that cause print problems. Lack of lubrication adds to it. The S+ Y mounts should reduce this issue. The old U-bolts were way to easy to overtighten. The S extruder case also crushes bearings or jams them between the rods if the screws are too tight.
Other typical noise is from the steppers. Single axis moves are usually quiet, but diagonal moves can get noisy (harmonics). Plus, some parts of the print will rattle and resonate with the motors. The LCD panel will rub against the LCD - the power supply case seam will rattle - the filament will rattle, etcetera.
Stealth mode helps all of the above.
As for over extrusion. The Prusa logo has over extrusion, not the Batman logo. This can be from printing too hot for your filament; the filament being a bit over diameter, or even the printer extrusion multiplier being off (or the Bondtech gears not properly aligned with the filament path).
Until it manifests across all prints, its in the "ignore" phase.
RE: Underextrusion and noise issues - newly assembled i3MK3S+
I just found the noise files ... all are 100% normal noises the printer makes. Pretty sure they are all motor related, and I don't hear anything like dry or grinding bearings. Setting the printer on a rigid surface will help minimize noise levels, too. Some folk add a granite slab underneath.
RE: Underextrusion and noise issues - newly assembled i3MK3S+
Hi Tim,
Belt tension: Yes, I printed the tension gauge from Prusament PETG. Higher end of the spectrum means I should aim for a higher than average tension reading with that gauge rather than a low one? In that case I will tighten the Y-belt, since it's out of bounds on the lower end of the gauge's scale.
Z-Height adjust: For sure, I'm aware that the Live-Z only represents a relative offset, not an absolute reading. I was still surprised to see the high value, since during the setup, the relative position of the nozzle and the PINDA probe was set according to the suggestion in the assembly manual with much care. Either way, as long as my prints work (which they don't fully do yet, see below), I'm not complaining - I just throwing in all the information I have to make sure no potential clue or indicator to a problem is left behind 🙂
Bearings & lubrication: No worries - I spend about a week on the topic of lubrication and how to properly pack the bearings before diving into the assembly. I removed the anti-rust oil in 99% IPA by soaking and swirling the bearings around for 15-20 mins and then used the lubricant shipped with the printer to pack the bearings fully. The little tube didn't fill all bearings, so after much research and checking the data sheets of the bearings (and even reaching out to a MISUMU engineer, who didn't appreciate the question but helped me out a little regardless), I bought the Gleit-µ® HF400 to pack the remaining bearings with. It's dynamic viscosity is pretty close to the shell lithium grease recommended by Misumi for the LMU8 bearings. Higher than the Superlube or Mogul greases, but I'm trusting the manufacturer on that one. I made sure not to overtighten the Y-axis bearings, but as you say, the pressure distribution is pretty even with the sheet metal clips. I also made sure the axis runs smoothly before attaching the motor - only had one spot where the drag increased a little bit, probably due to minimal warp in the rods or a tolerance issue with the rod positioning.
On the X-axis, it was a bit more difficult - since the belt is installed before the bearings are clamped with the back plate of the extruder assembly, it was hard to tell if the axis was running perfectly smoothly. It seemed more of less fine, but the stepper of course takes away a lot of the nuances in the movement. Wish there was a torque spec for the five screws in the backplate... Generally, I felt like the bearings didn't run as well when playing around with the axis before attaching the belt, but who knows how clamping with the backplate changed the final position of the bearings.
Test prints update: Since my last post, I ran another couple prints. Unfortunately, I still can not get the benchys to stick on the textured/PC bed. They seem to fail at the same position every time, as soon as the printer tries to close the arcs of the little cabin. I also noticed some gaps in the XY-plane and holes in the back of the benchy. After one had failed (right one in the pictures) I lowered the Live-Z even more, from -1.585 to -1.605. The print still failed, although the text on the back came out clearer this time (left benchy)

Holes on the back left side
Gaps in the XY plane / in between lines
Lower first layer Z-height (left)

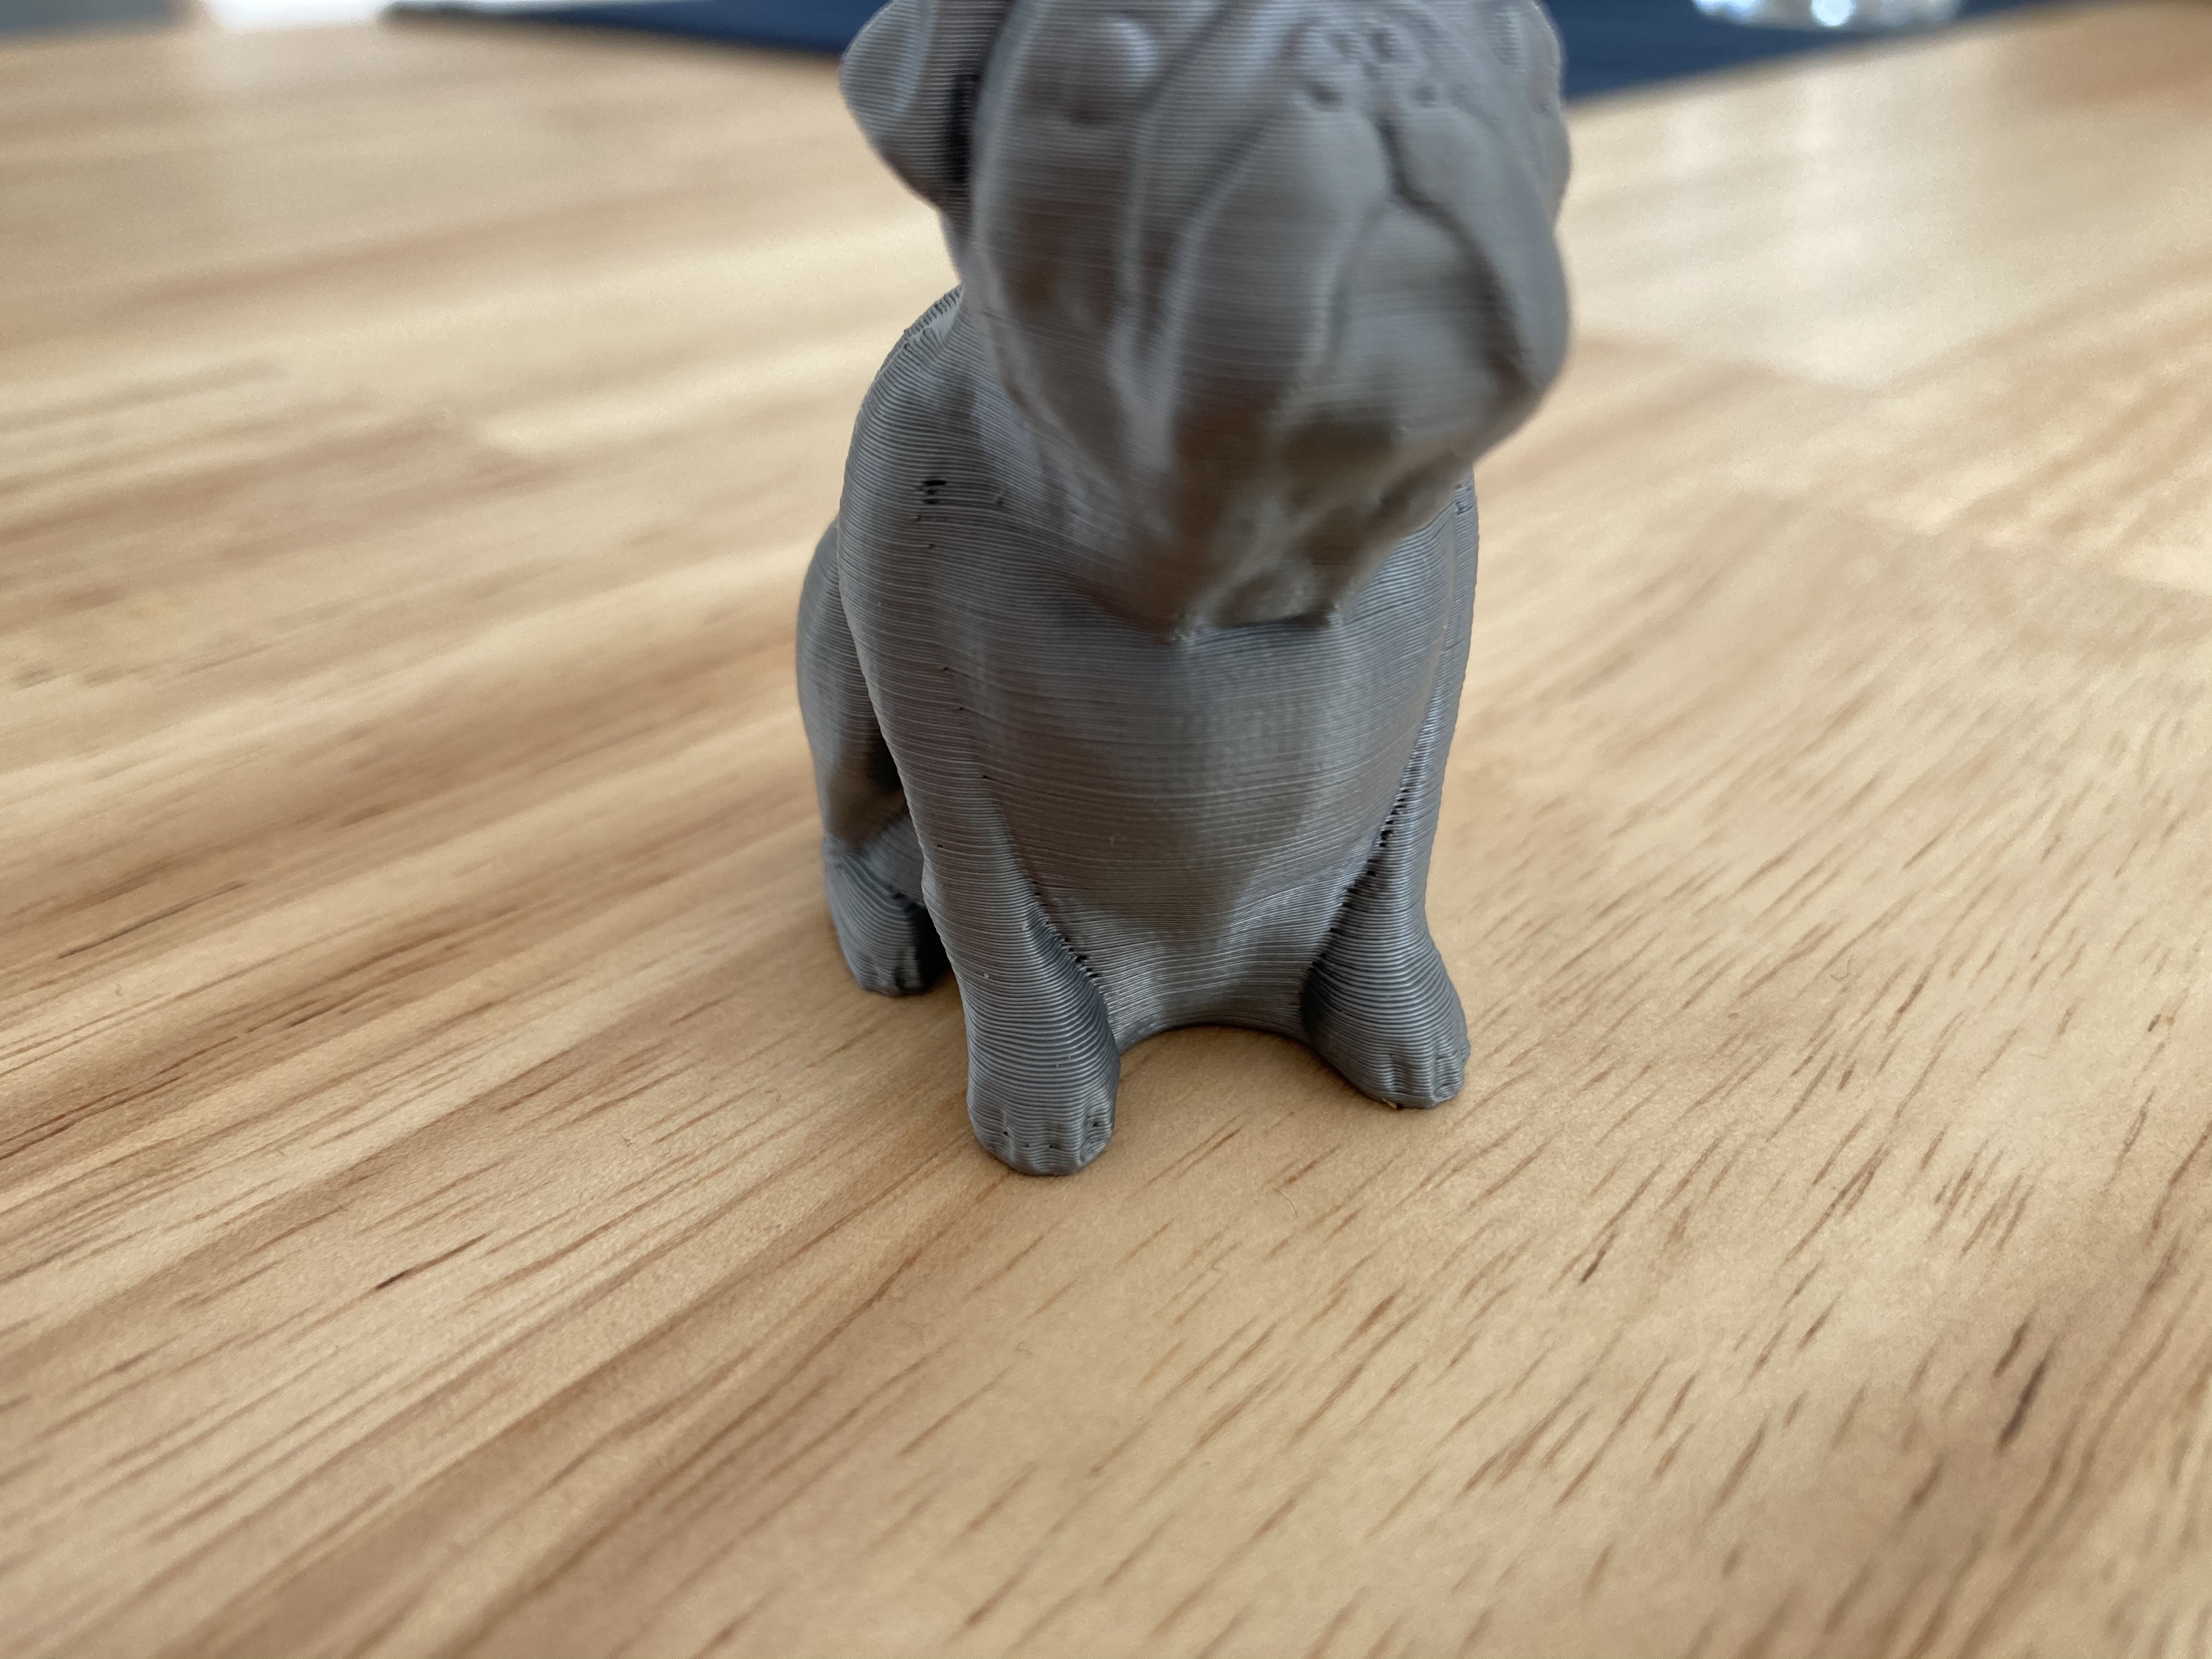
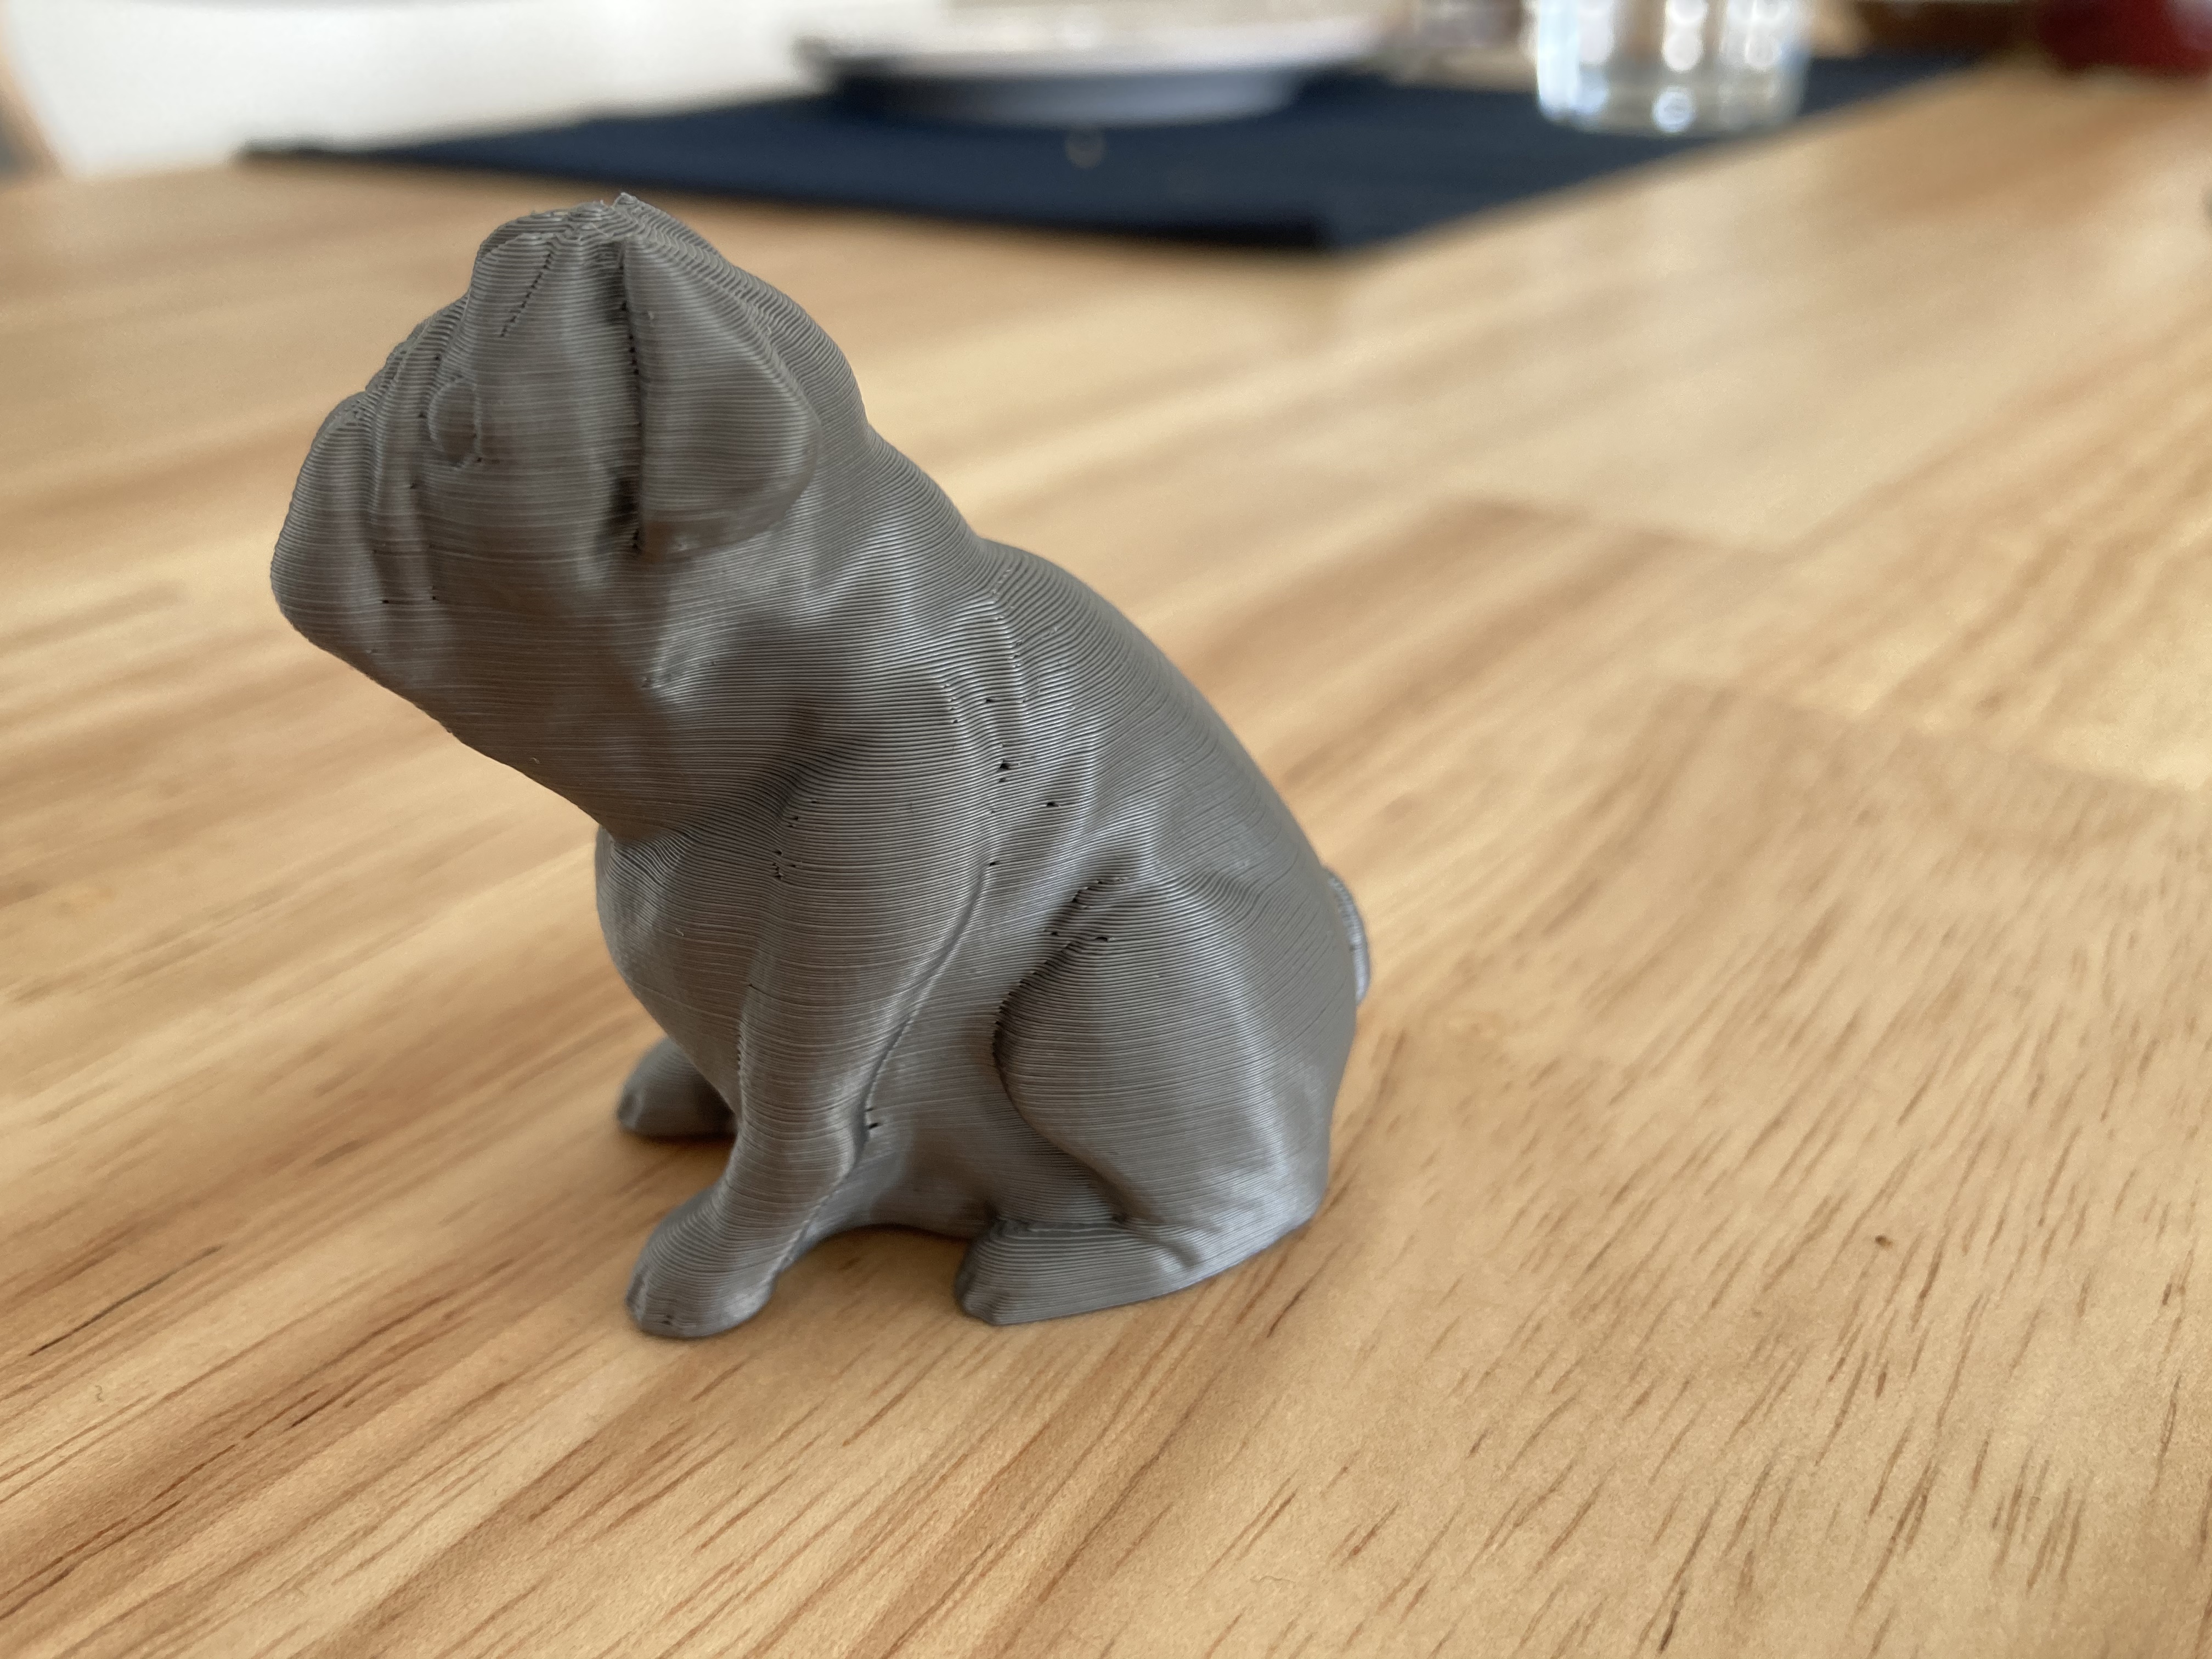
I also printed the buddy pug and the tree frog. The pug came out pretty nicely, although it also had a few artifacts:

Any pointers on the prints? 🙂
RE: Underextrusion and noise issues - newly assembled i3MK3S+
@thomas-d
The extruder backplate screws must be loose enough to allow the extruder to move freely left stop to right stop. Anything tighter will cause stalls/crashes/shifting or even damage to the rods. If the axis can move by gravity alone when powered off, it is about right. Tilted 45, if the axis doesn't move, it is way too tight.
The Prusa Textured (Powder Coated) sheet is notorious for not liking PLA. A good was in a sink with a drop or two of Dawn dish detergent and lots of hot running water - a new Heavy Duty Kitchen Scotch-Bright scrubber or fresh paper towels to scrub; rinse for a few minutes to remove the soap until the water is sheeting (beading); drip off most the water, then dry with fresh paper towels. Place the sheet on the printer, heat the bed to 80c for 10 minutes to bake out any moisture that made it into the texture. Some have said after several of these wash sessions the textured sheet almost works with PLA. Others appear to have no issues ... so it's a batch thing - some sheets are good, some sheets are bad.
No warranty from Prusa if you got a bad one.
Your layer one Live-Z could be a bit lower, 0.025 or so. There shouldn't be gaps between extrusions. Think of Live-Z as a nominal -1.000 +/-1.000 spec. Anything between -0.500 and -1.500 is typical; some are at -2.200 ... it is all about the cable tie you used. Some people print a 0.800 thick shim for setting the PINDA to get better repeatability when they work on the extruder.
I'll start with the assumption you are printing the sample gcodes, and not slicing the Benchy yourself.
The curl at the arch is expected. It is a cooling problem with the cooling fan shroud not providing great coverage around the nozzle. To date, no air flow engineers have stepped up to design a better solution. We did have a guy who came up with a better mouse trap for the Mk3 - but he's been quiet lately. The curl is enough to cause the nozzle to tap the boat off the sheet when adhesion is marginal. Fix the adhesion and the boat prints quite well.
The gaps in the stern can be anything, but is not expected. Initially, make sure the idler tension is on the heavy side. It can be too tight, but too loose is also a problem. There are some troubleshooting guides that go into setting the Mk3S Bondtech idler door tension. Google them.
If you are slicing the Benchy and getting the seam issue - compare your settings with what the sample gcode has. You can open the gcode in an editor, and at the end of the file, all of the settings are listed in plain text - but there are many to look through - lol.
You'd do well to buy something like TheKing textured sheet off Amazon. Everyone who has one likes it. I can print anything on mine - it just works. PLA sticks, PETG pops off, and it doesn't seem to need the cleaning the smooth sheet demands. But I'm getting better at keeping hands and fingers off the print surface, too. The smooth PEI from Prusa is also good for PLA, cleans up well when adhesion subsides; can also be used with PETG - but PETG printed carelessly can damage it.
Anyway - work on the adhesion, and keep asking questions.
RE: Underextrusion and noise issues - newly assembled i3MK3S+
@thomas-d
The extruder backplate screws must be loose enough to allow the extruder to move freely left stop to right stop. Anything tighter will cause stalls/crashes/shifting or even damage to the rods. If the axis can move by gravity alone when powered off, it is about right. Tilted 45, if the axis doesn't move, it is way too tight.
@tim-2
With or without belt?
I drag my extruder and there was a distinct "clicking" feel, not sound, feels like the magnets in the steppers. And there is no way my extruder would move by gravity, maybe tilted 90° and on another planet.
Is there a difference between Mk3 and Mk3s+?
I have a Mk3S+, bought as kit, and accordingly to the manual I did NOT 😡 grease the bearings, but I will soon...
Prusa i3 MK3S+ FW 3.11.0 (kit dec -20), PrusaSlicer 2.6.1+win64, Fusion 360, Windows 10
RE: Underextrusion and noise issues - newly assembled i3MK3S+
@ringarn67
I tilt my printer powered off - belts and all. If the extruder makes it to the other side by 45 degrees I am happy. Bed moves at around 20 degrees.
When you think about it - what is different between X and Y? Both have two rods, three bearings, a motor, a belt, and idler. Everything is the same except the cable harness is a bit stiffer on X - so drag should be the same. Right?
This tilt thing isn't really a scientific test - it's more a "just how bad is the friction" ... you can also look at belt tension numbers in the UI - anything below 275 suggests a bearing problem as far as I am concerned - my printer sits close to 300 on X and Y with new bearings and new rods with Y always a bit higher -- but this changes some with different versions of firmware and drive currents. My printer is reading 244 on X and 274 on Y right now - and my bearings are shot, seals gone, and dry - enough I can feel play in them (I have new bearings and rods in hand). My X no longer slides freely if tilted, it needs help - but does start sliding around 80 degrees (just tried it). Again - my bearings are way past their service life.
I feel pretty strongly Prusa is acting unprofessionally with regard to the grease thing. Criminal comes to mind. But someone in their company feels just as strongly that sticky amber liquid coating the raw bearings is a great lubricant. According to Misumi techs, even a few drops of motor oil on the rods and worked past the seals is better than the rust preventer alone.
As far as I know the three Mk3 models are functionally similar in XYZ and E characteristics. They use the same motors, belts, bearings, and drive electronics. The Mk3 has a radically different filament sensor, it was plagued by mis reads - but later firmware has helped - some. But not soon enough before Prusa tried a different approach with the S. The plus adds a better PINDA and a better way to clamp the Y bearings. The + also fixes the extruder filament alignment and PINDA mount issues introduced in the S. There are probably other differences not well advertised.
RE: Underextrusion and noise issues - newly assembled i3MK3S+
I had the same problem with the benchie that you are having in the exact same place; on top of the door arches. I tried a lot of things, but ended up buying a smooth sheet to use for PLA. Problem solved.
I use the textured sheet for PETG, and the smooth for PLA. I have two sheet profiles set up and everything works great!
Ted
RE: Underextrusion and noise issues - newly assembled i3MK3S+
But someone in their company feels just as strongly that sticky amber liquid coating the raw bearings is a great lubricant.
The bearings delivered with my + was coated in something that's clear and doesn't feel sticky at all. Feels and smells very close to what ever is in the "Prusa lubricant" tube also included with the kit.