Trouble melting parts on the cover head bed
Hi.
I am sorry but english is not my first language, sorry in avance for my mistakes.
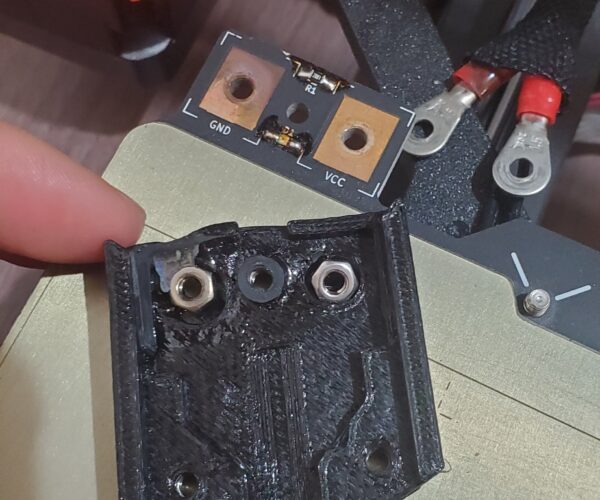
I have a issue. My headbed cable cover start to melt/burnt today. I dont know what is wrong because i never had this issue before.
Does someone know something about that and can explain me how i can fix it ?
This is not my printer, this is my work place printer and we are all beginners 😅
Thanks you so much ! Have a Nice day.
RE: Trouble melting parts on the cover head bed
Stop printing and remove the cover. The wire connections will be loose, this generates heat. If left like this the problem will get worse. It can potentially result in needing a new heat bed. Tighten them up properly, make sure you follow the manual exactly.
If there is any burnt residue clean it off back to bare metal before redoing the connections.
Reprint new covers afterwards.
RE:
One other note, assuming that the connection from the cable itself to the connection eyes/lugs on the end is crimped, it may be advisable to replace the cable assembly itself, or at least reterminate the heat bed end with new, clean properly crimped or soldered connection eyes or lugs.
I've seen several cases over the years with crimped connections, where heat stress can cause high resistance at the crimp point.
IIRC, the resistance of the heat bed is only a few ohms, and tens to hundreds of milliohms in a poor connection is relatively significant and can cause a lot of heat to be generated if there's not a very clean very low resistance connection.
RE: Trouble melting parts on the cover head bed
I had something similar happen to me.
I had assembled the ring terminals to the underside of the heatbed, instead of on the top. Thus it would melt the connection cover every time.
Once I corrected that everything has been fine.
Aaron
RE: Trouble melting parts on the cover head bed
Thanks you all for your tips !
I disconnect everything this morning and it look like this in my picture.
Is my heat bed ok ? I have to clean the eyelet part of metal but i dont know what is the right product .
Can i just reconnect everything tingh with a new piece and it Will be ok ?
I am sorry for all my questions, I am a big beginner 😅
RE: Trouble melting parts on the cover head bed
You can clean the connecting eyes with sandpaper.
I would also re-crimp (tighten with pliers) the negative (black) crimp point. My hunch is that if you clean it up a bit and tighten the connections it will be OK.
RE: Trouble melting parts on the cover head bed
From the discolouration the problem is the crimp on the ground wire. I would re-crimp that one and clean up the connection surfaces. That will get you printing again but it might also be an idea to make a new set of wires using extra flexible silicone wiring to use in future.
RE: Trouble melting parts on the cover head bed
Be sure to do like Extra Fox said, and move the connectors to be against the copper contacts, and not against the underside of the heat bed.
RE: Trouble melting parts on the cover head bed
Can i just reconnect everything tingh with a new piece and it Will be ok ?
This is assembled WRONG.
You assembled the cable lugs from the bottom side of the heat bed. They should be connected on the upper side of the heat bed.
It is also important that the steel washer sits below the screw head and NOT between the heatbed and the cable lug.
Look at the assembly manual, there are excellent pictures.
https://help.prusa3d.com/guide/7-heatbed-psu-assembly_172872#173046


