Re: Scarring on top surface
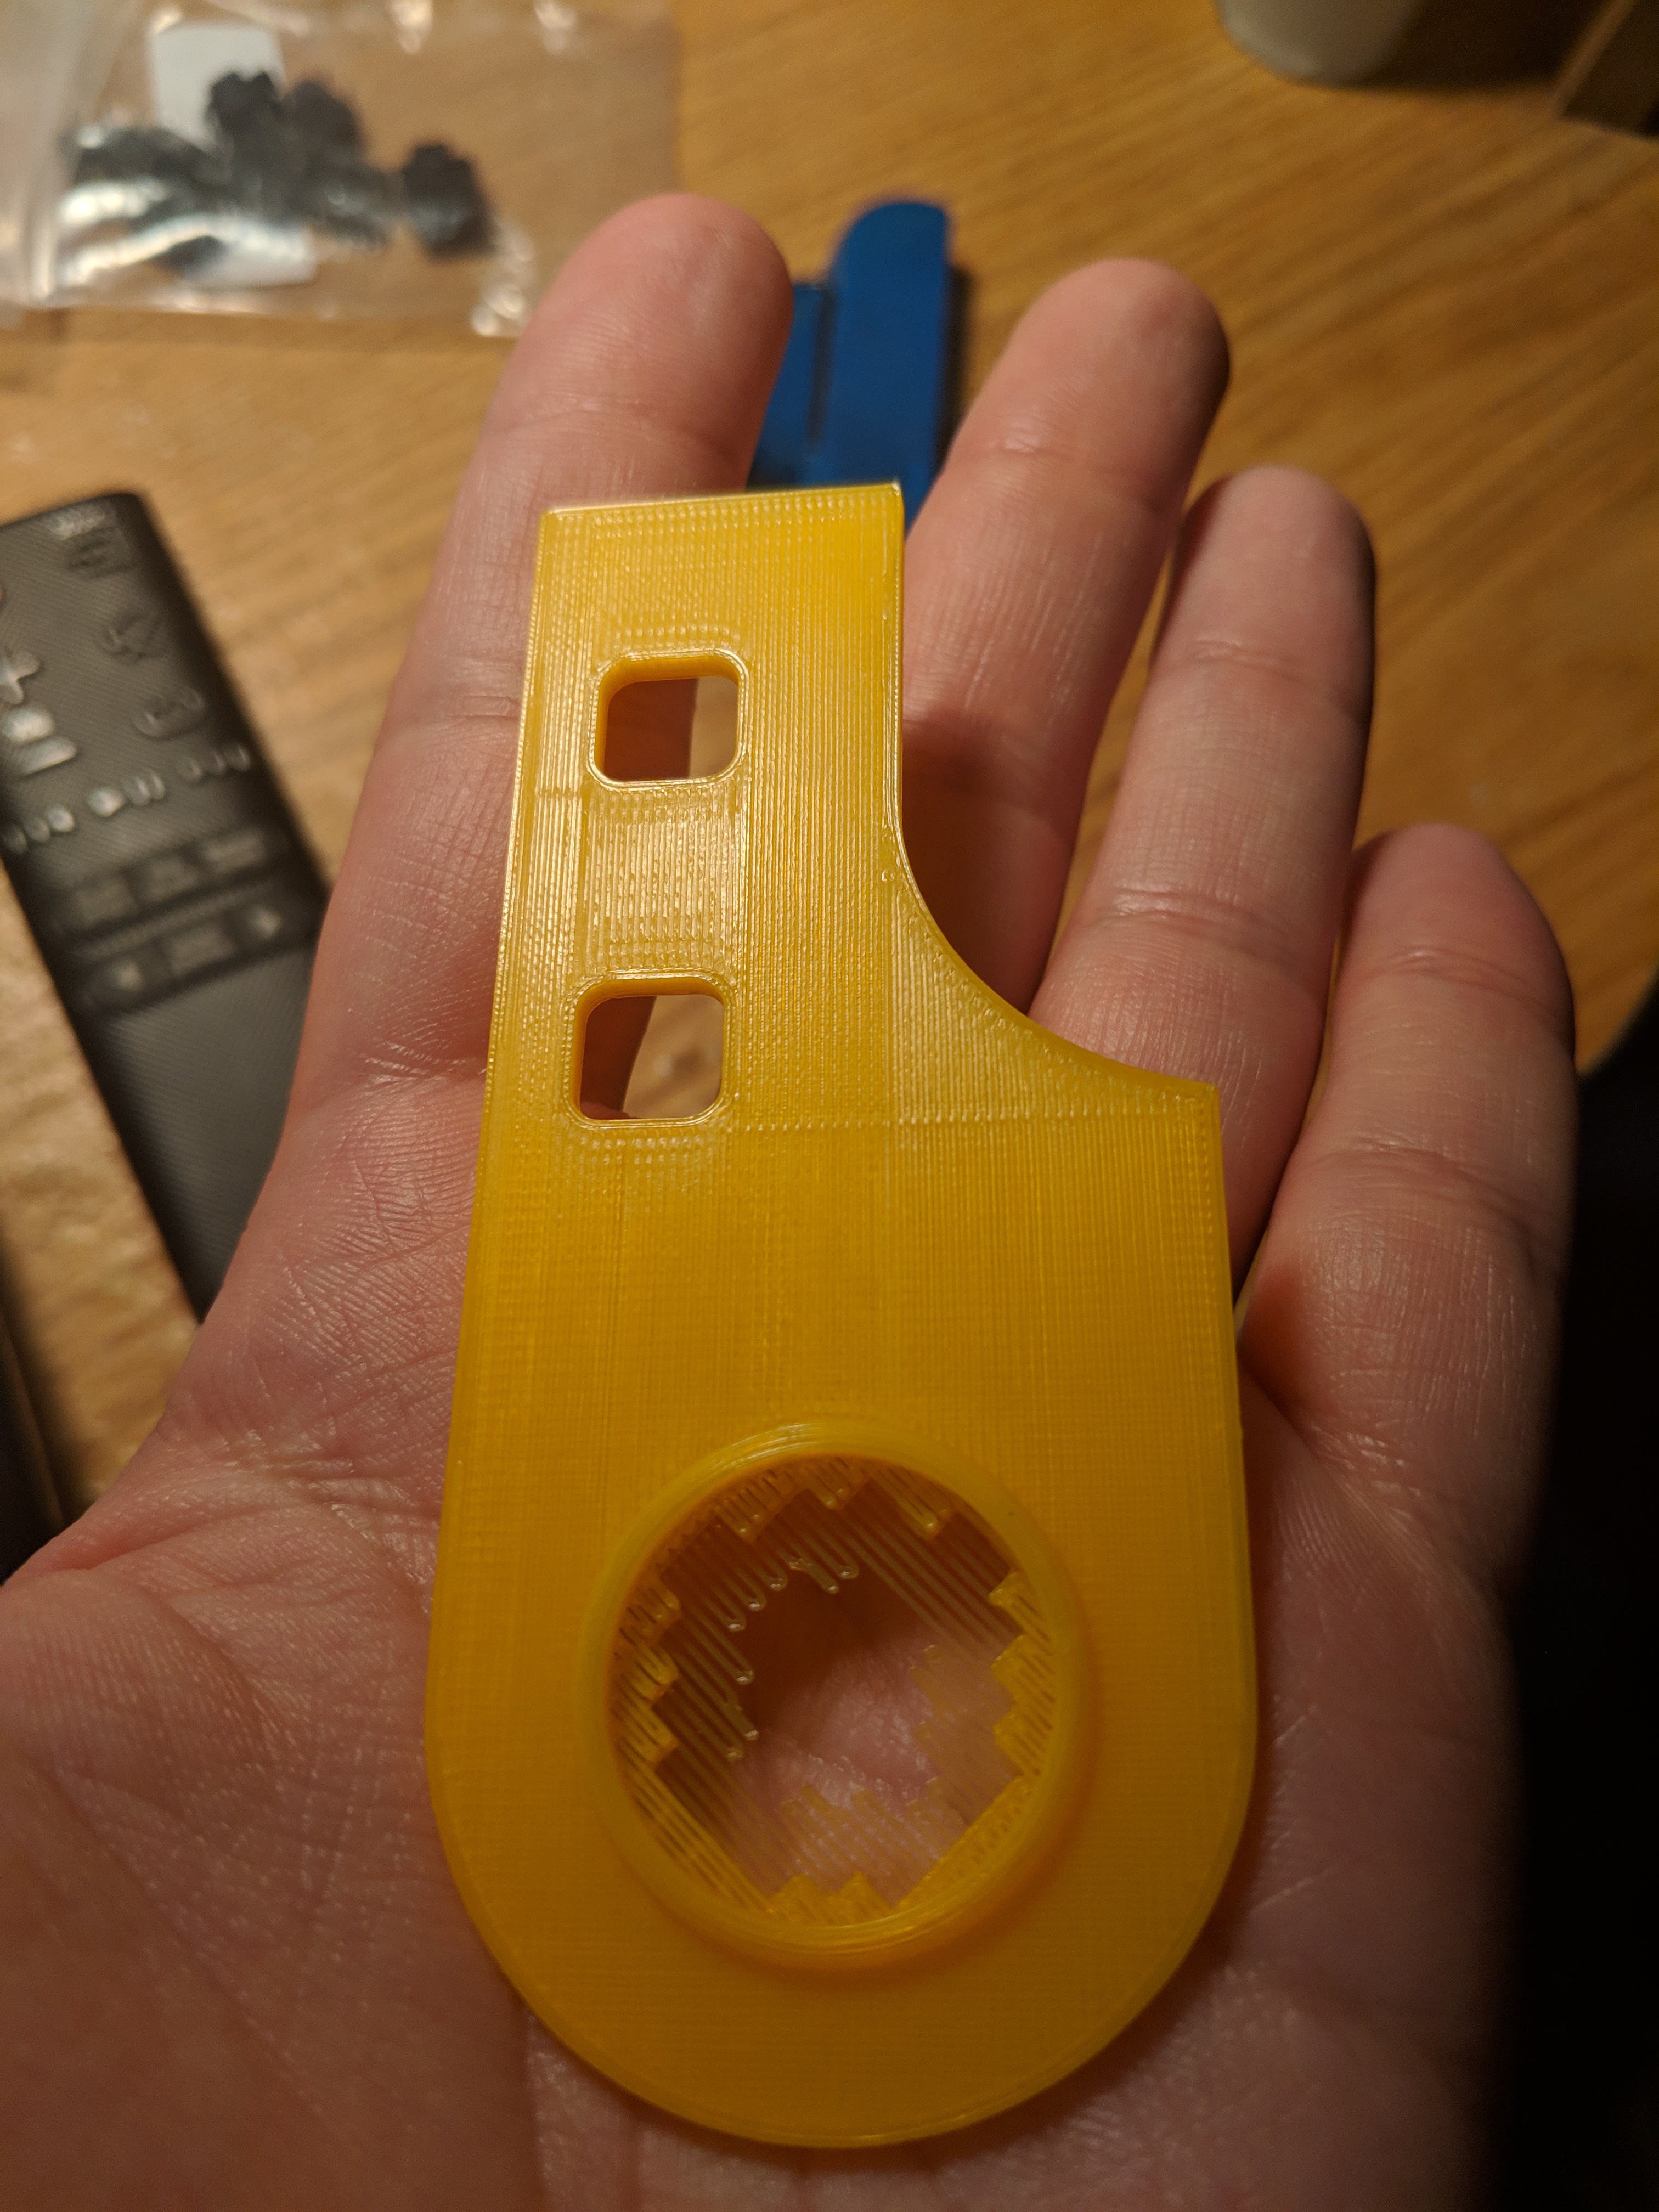
I've done another test version, this time with solid infill speed reduced to 45mm/s (from the default 80). Top solid was already at 40 so I left it there. I also spent last night trying to dial in my live z, so the bottom looks a bit better. As suggested, I also played around with rotating the object to align the top surface fill with the long axis of the part. It's definitely still got the weirdness in there, though it does seem less intense.
Re: Scarring on top surface
For grins, what are your "belt tension" numbers? A loose belt will exacerbate the issue.
Re: Scarring on top surface
Doing another test now using hilbert curve top/bottom infill. I read that hilbert curve produces a more consistent result because it isn't flummoxed by holes and such.
Belt status reads as: X 259, Y 293. Self test doesn't report any problems, but if 240 +- 40 is the norm, then Y would seem to be a bit off. (Also not sure if higher = tighter or looser)
Re: Scarring on top surface
Test complete. Hilbert curve seems to eliminate most artifacting, though the actual finish is much more textured both to the eye and to the touch.
Re: Scarring on top surface
Corey :
You know, your test with the hilbert curve is interesting and made me think of something....
After the most recent update, I noticed the Infill switched to Gyroid with Rectilinear for top and bottom layers. It used to be Grid and Rectilinear from what I remember... I think they switched the default to Gyroid because so many people were having issues with grid causing "grinding" or rubbing on since grid crosses itself and Gyroid does not. I think Gyroid was also a recent addition to the types of infill too (i.e. it was not an option until recently) unless I was just not paying attention.
Completed a print today and it used the Gyrod infill. While it was very pleasing to watch, and there were no issues with grinding when laying down the infill, I was not satisfied with the top layer as it was very rough and showed the same as your pictures with the very visible and textured layer lines from the layout of holes in the part. It is almost like the top layer was not printed correctly.
I am redoing the part for an update and will print with grid infill to see if that changes anything and will post once it is complete in a day or so
I sure do not remember the top layer having such apparent artifacts and being so rough in the past, but It has been a while since i printed something where it would be so noticeable. I wonder if the type of infill in the middle of the parts has such a large affect on the smoothness of the top layer....
Strange women, laying in ponds, distributing swords, is hardly a basis for a system of governance!
Re: Scarring on top surface
It's also possible that there's something weird on my end that would cause that, though I'm not really sure what
Re: Scarring on top surface
Belt status reads as: X 259, Y 293. Self test doesn't report any problems, but if 240 +- 40 is the norm, then Y would seem to be a bit off. (Also not sure if higher = tighter or looser)
The actual value is meaningless; what is important is both numbers should be near each other. The wide difference indicates an issue. Y is pretty sloppy compared to X. Could be bearings, could be other things. But you should find a way to ensure proper belt tension if you are wanting the best quality out of the printer. A spring scale that is reasonably accurate at 2 pounds will help.
As for Hilbert top layer infill, I still see sub-layer flaws in the photos. Though as you stated, not as visible as with a linear fill.
There's a point at which calibrating and tweaking these things is more trouble than it's worth (especially considering the MK3/S was designed to be easy to use and reliable). It's very possible that there's something weird with the Y axis bearings... it certainly makes a fair bit of noise under rapid movement (though I get the feeling that isn't atypical, though I don't have a point of reference). The Y belt tensioner, at least, is fairly easy to adjust so I can do that, self test, and see where the number goes. https://prusacommunity.com/your-belt-status-and-you/ says higher number = looser, so I'll tighten up the Y axis belt and see what happens.
I definitely see some artifacts in the hilbert curve surface as well, but the reality we seem to have stumbled upon is that a perfect surface with weird geometry with holes and such extremely difficult to achieve if possible at all, yes? I wish rectilinear fill produced better results (as I prefer a smooth surface to the texture from the hilbert curve) but the hilbert curve seems to be an acceptable (albeit weirder and texture-y) alternative.
Is there anything else you recommend besides adjusting belt tension? (which I'll take care of tonight and maybe to a rectilinear test to see if there's any obvious effect)
Re: Scarring on top surface
When the printer is laying down a patch left to right, then has to move, and randomly starts moving left to right to finish against the last patch, you get a condition where any belt slack will cause a gap or a pile up of material.
My printer experiences a bit of this, and my belts on on the tighter side of comfortable (close to motor bearing limits). But slowing my printer down completely removed the thick trace; and leaves only the sheen difference causes by the fill direction (my nozzle isn't polished nor perfectly flat to the table).
Short of what's been discussed, not much more I can contribute.
Re: Scarring on top surface
Alright. I just adjusted the Y belt tensioner a couple of teeth tighter, and am trying to dial in the tension now. I'll get it as close as I can.
EDIT: Belts now read X: 266 (didn't adjust that at all, but it changed. whatever), Y: 262. So, if the measure of success is that they should be close together, then I think I've got it. I'll do another test print using rectilinear now to see if there's a noticeable difference (doubt there will be, but it's worth a shot)
Re: Scarring on top surface
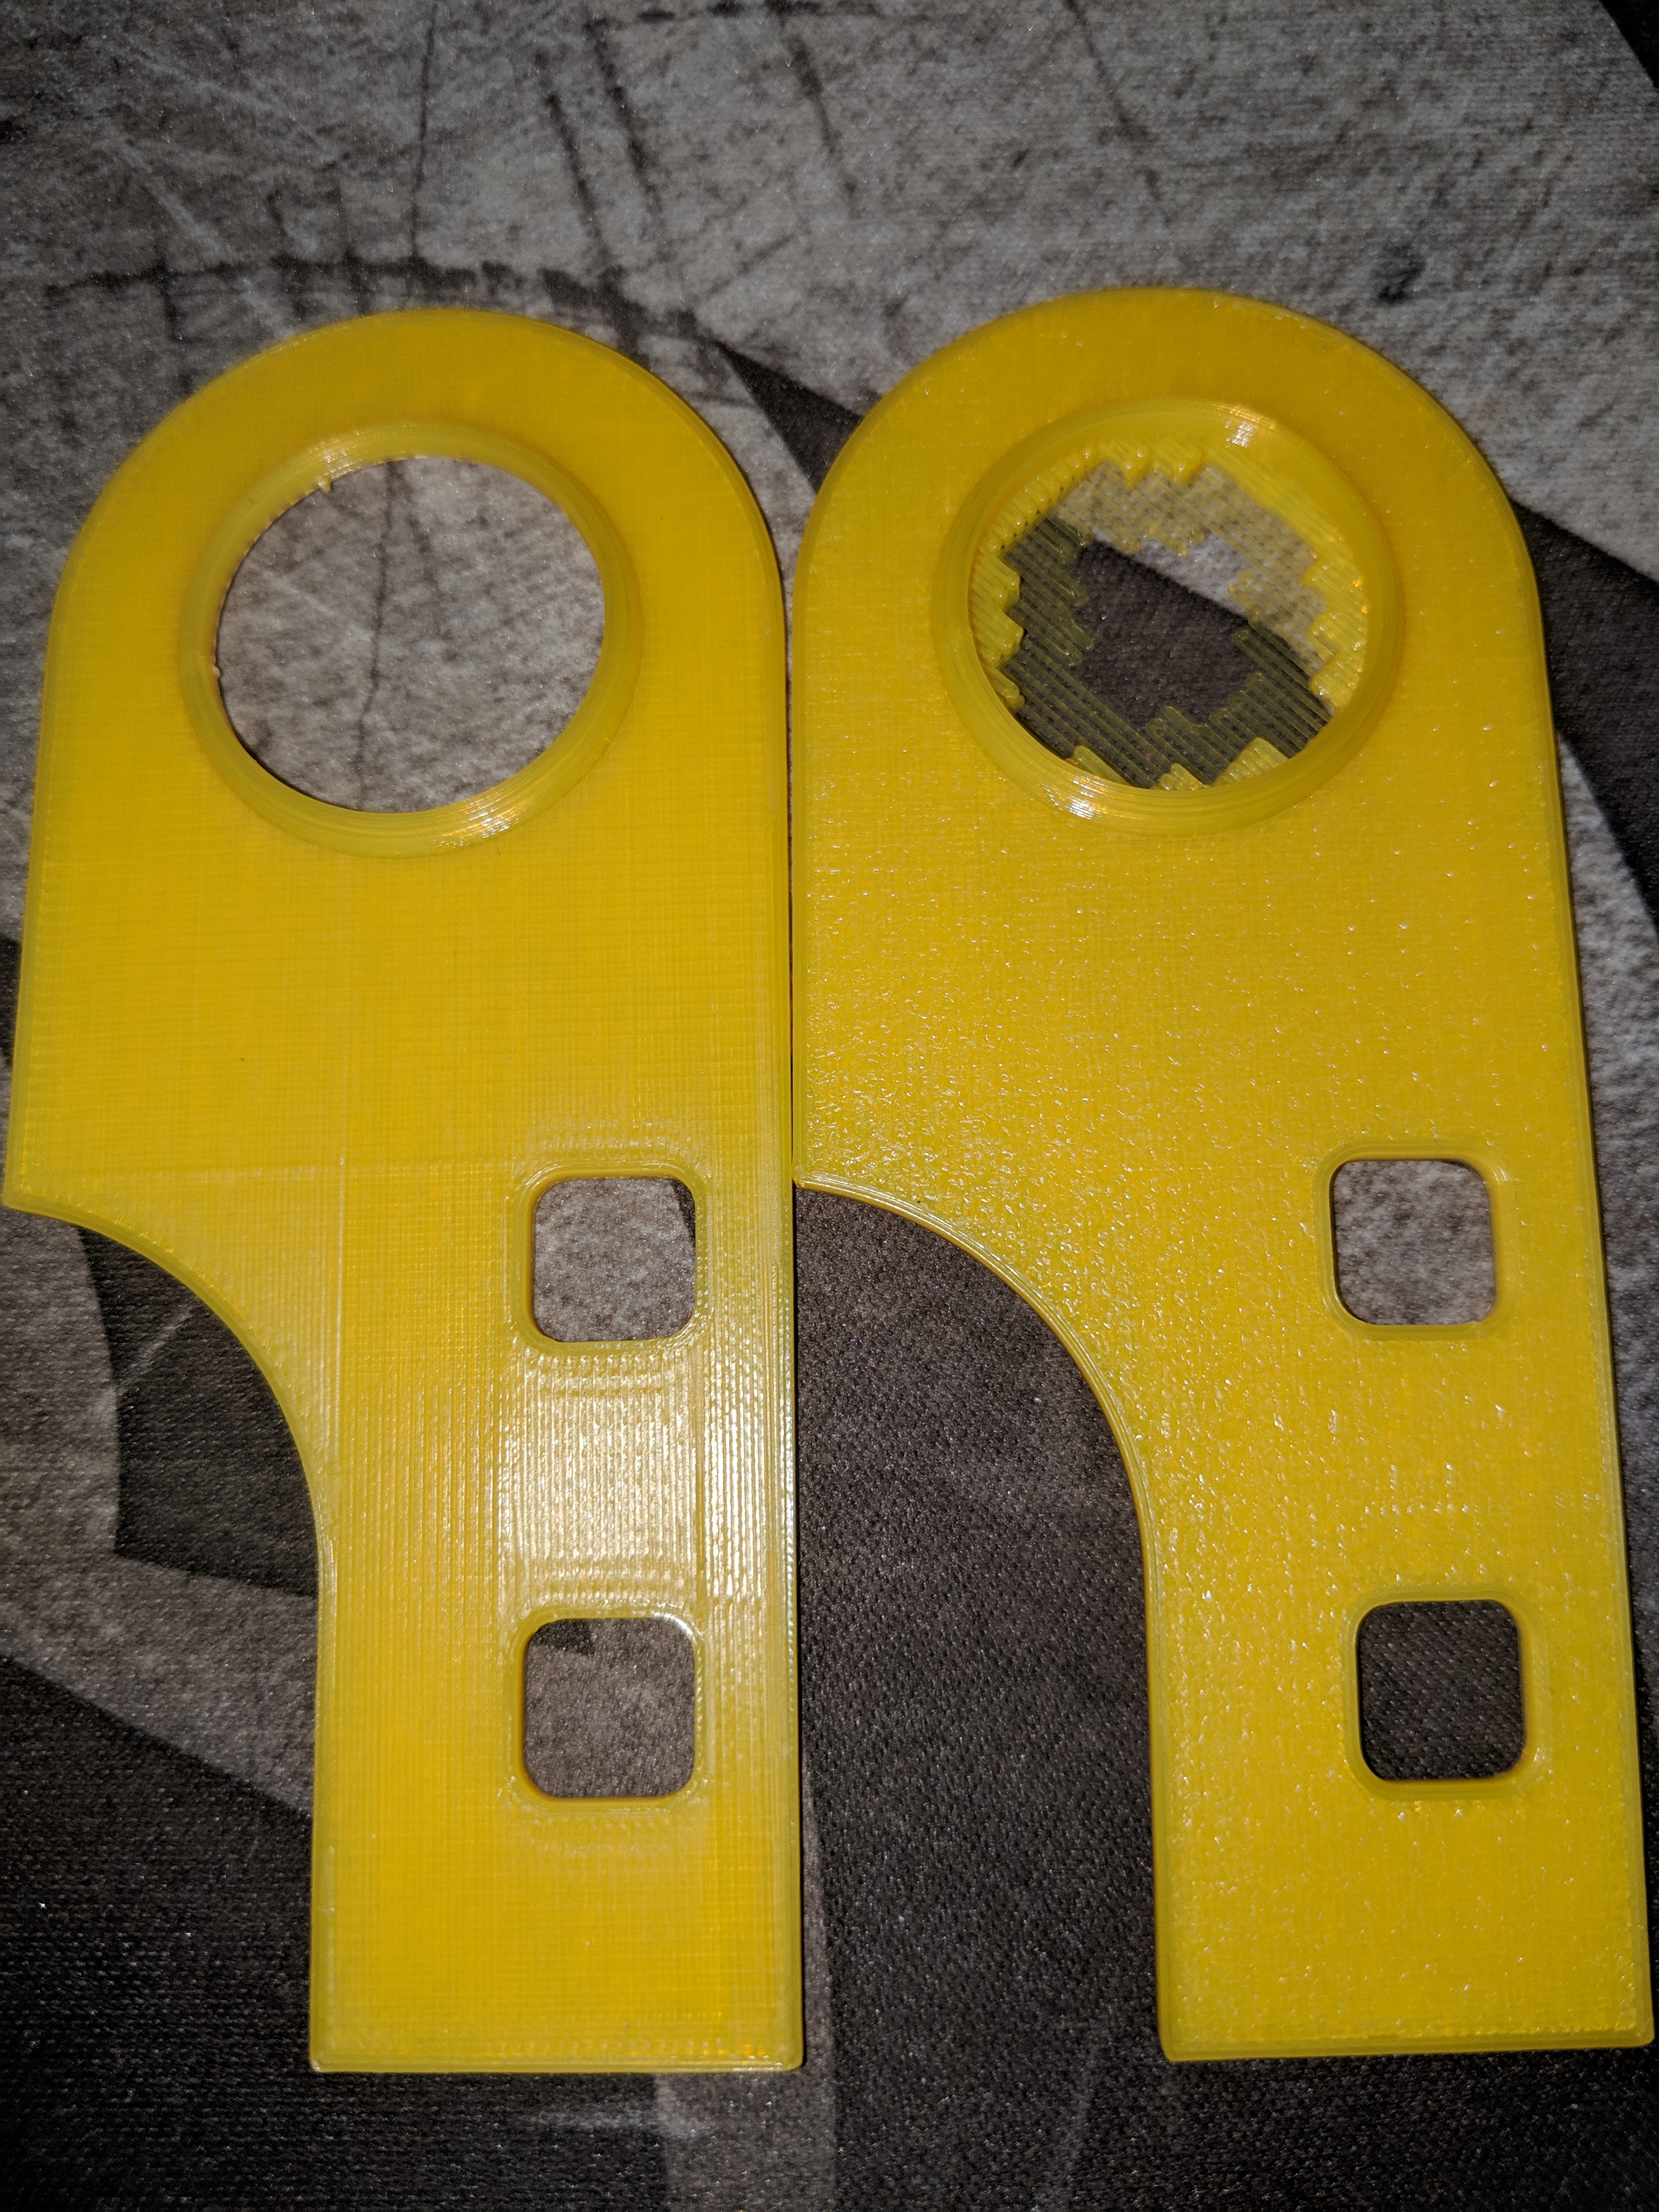
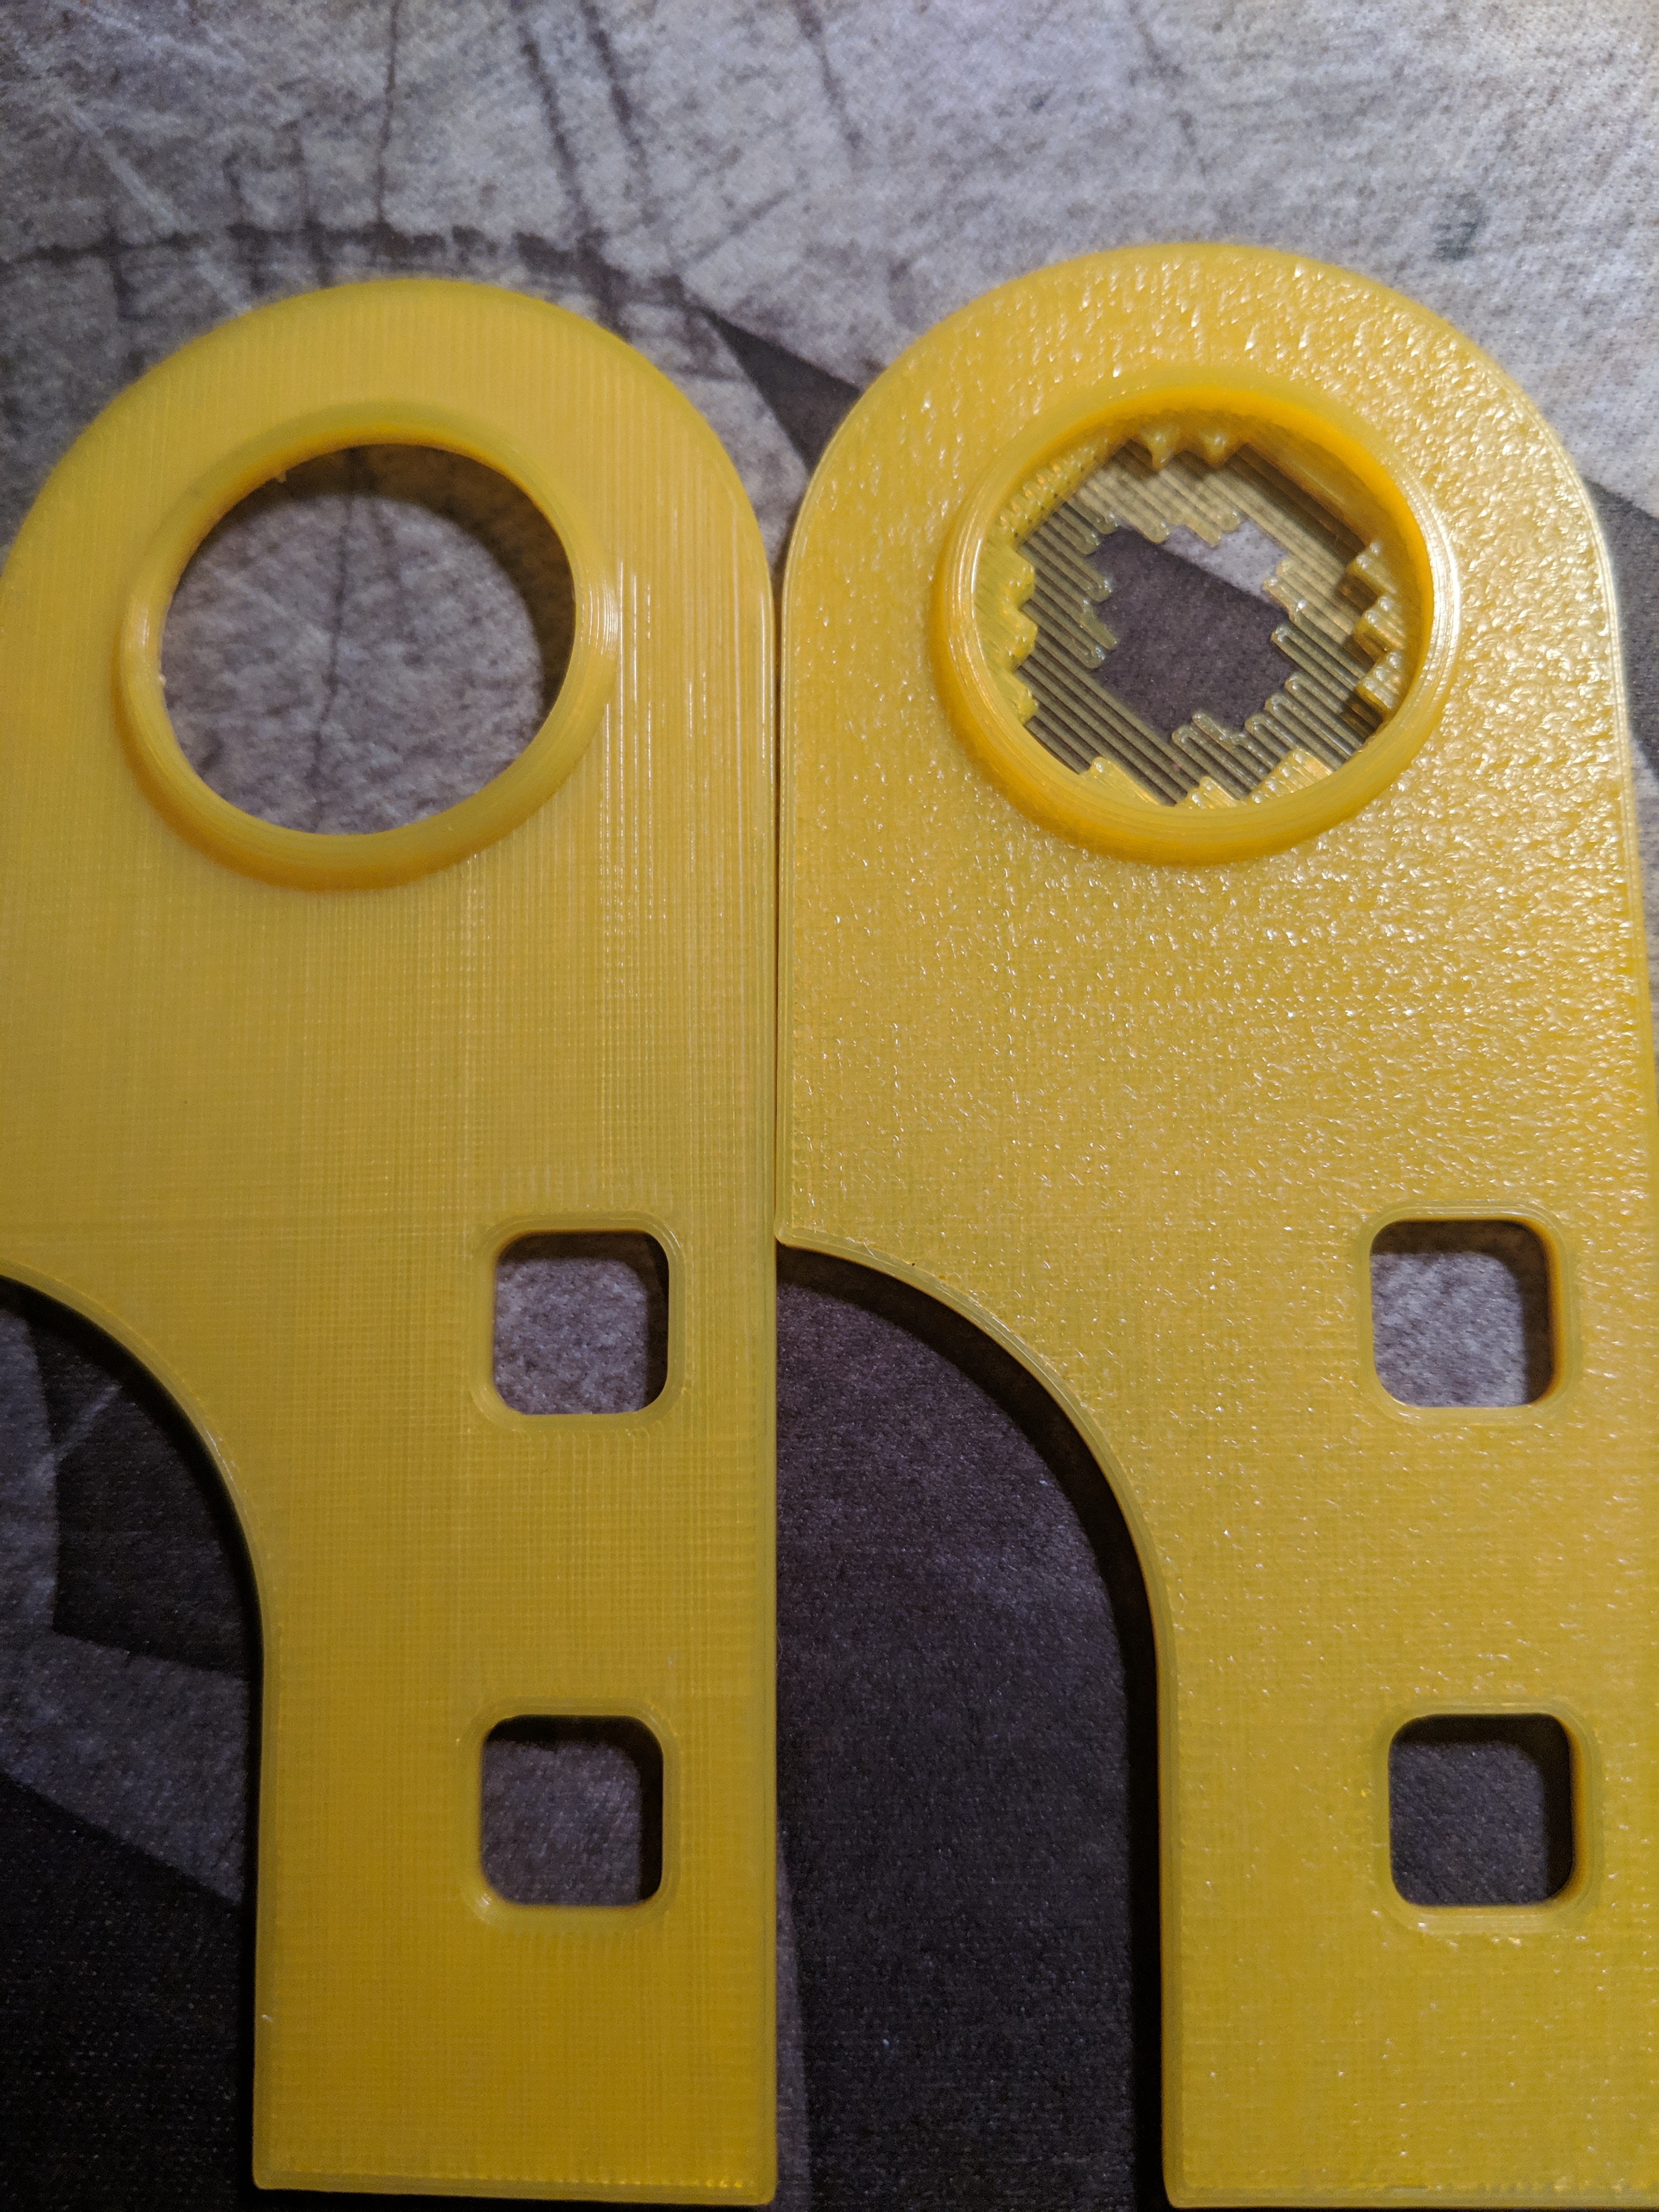
Test print complete, photo below. Left is the new print, right is the last rectilinear print with otherwise identical settings. Looks like I didn't align the infill quite as well on the new one but it should be a good enough example.
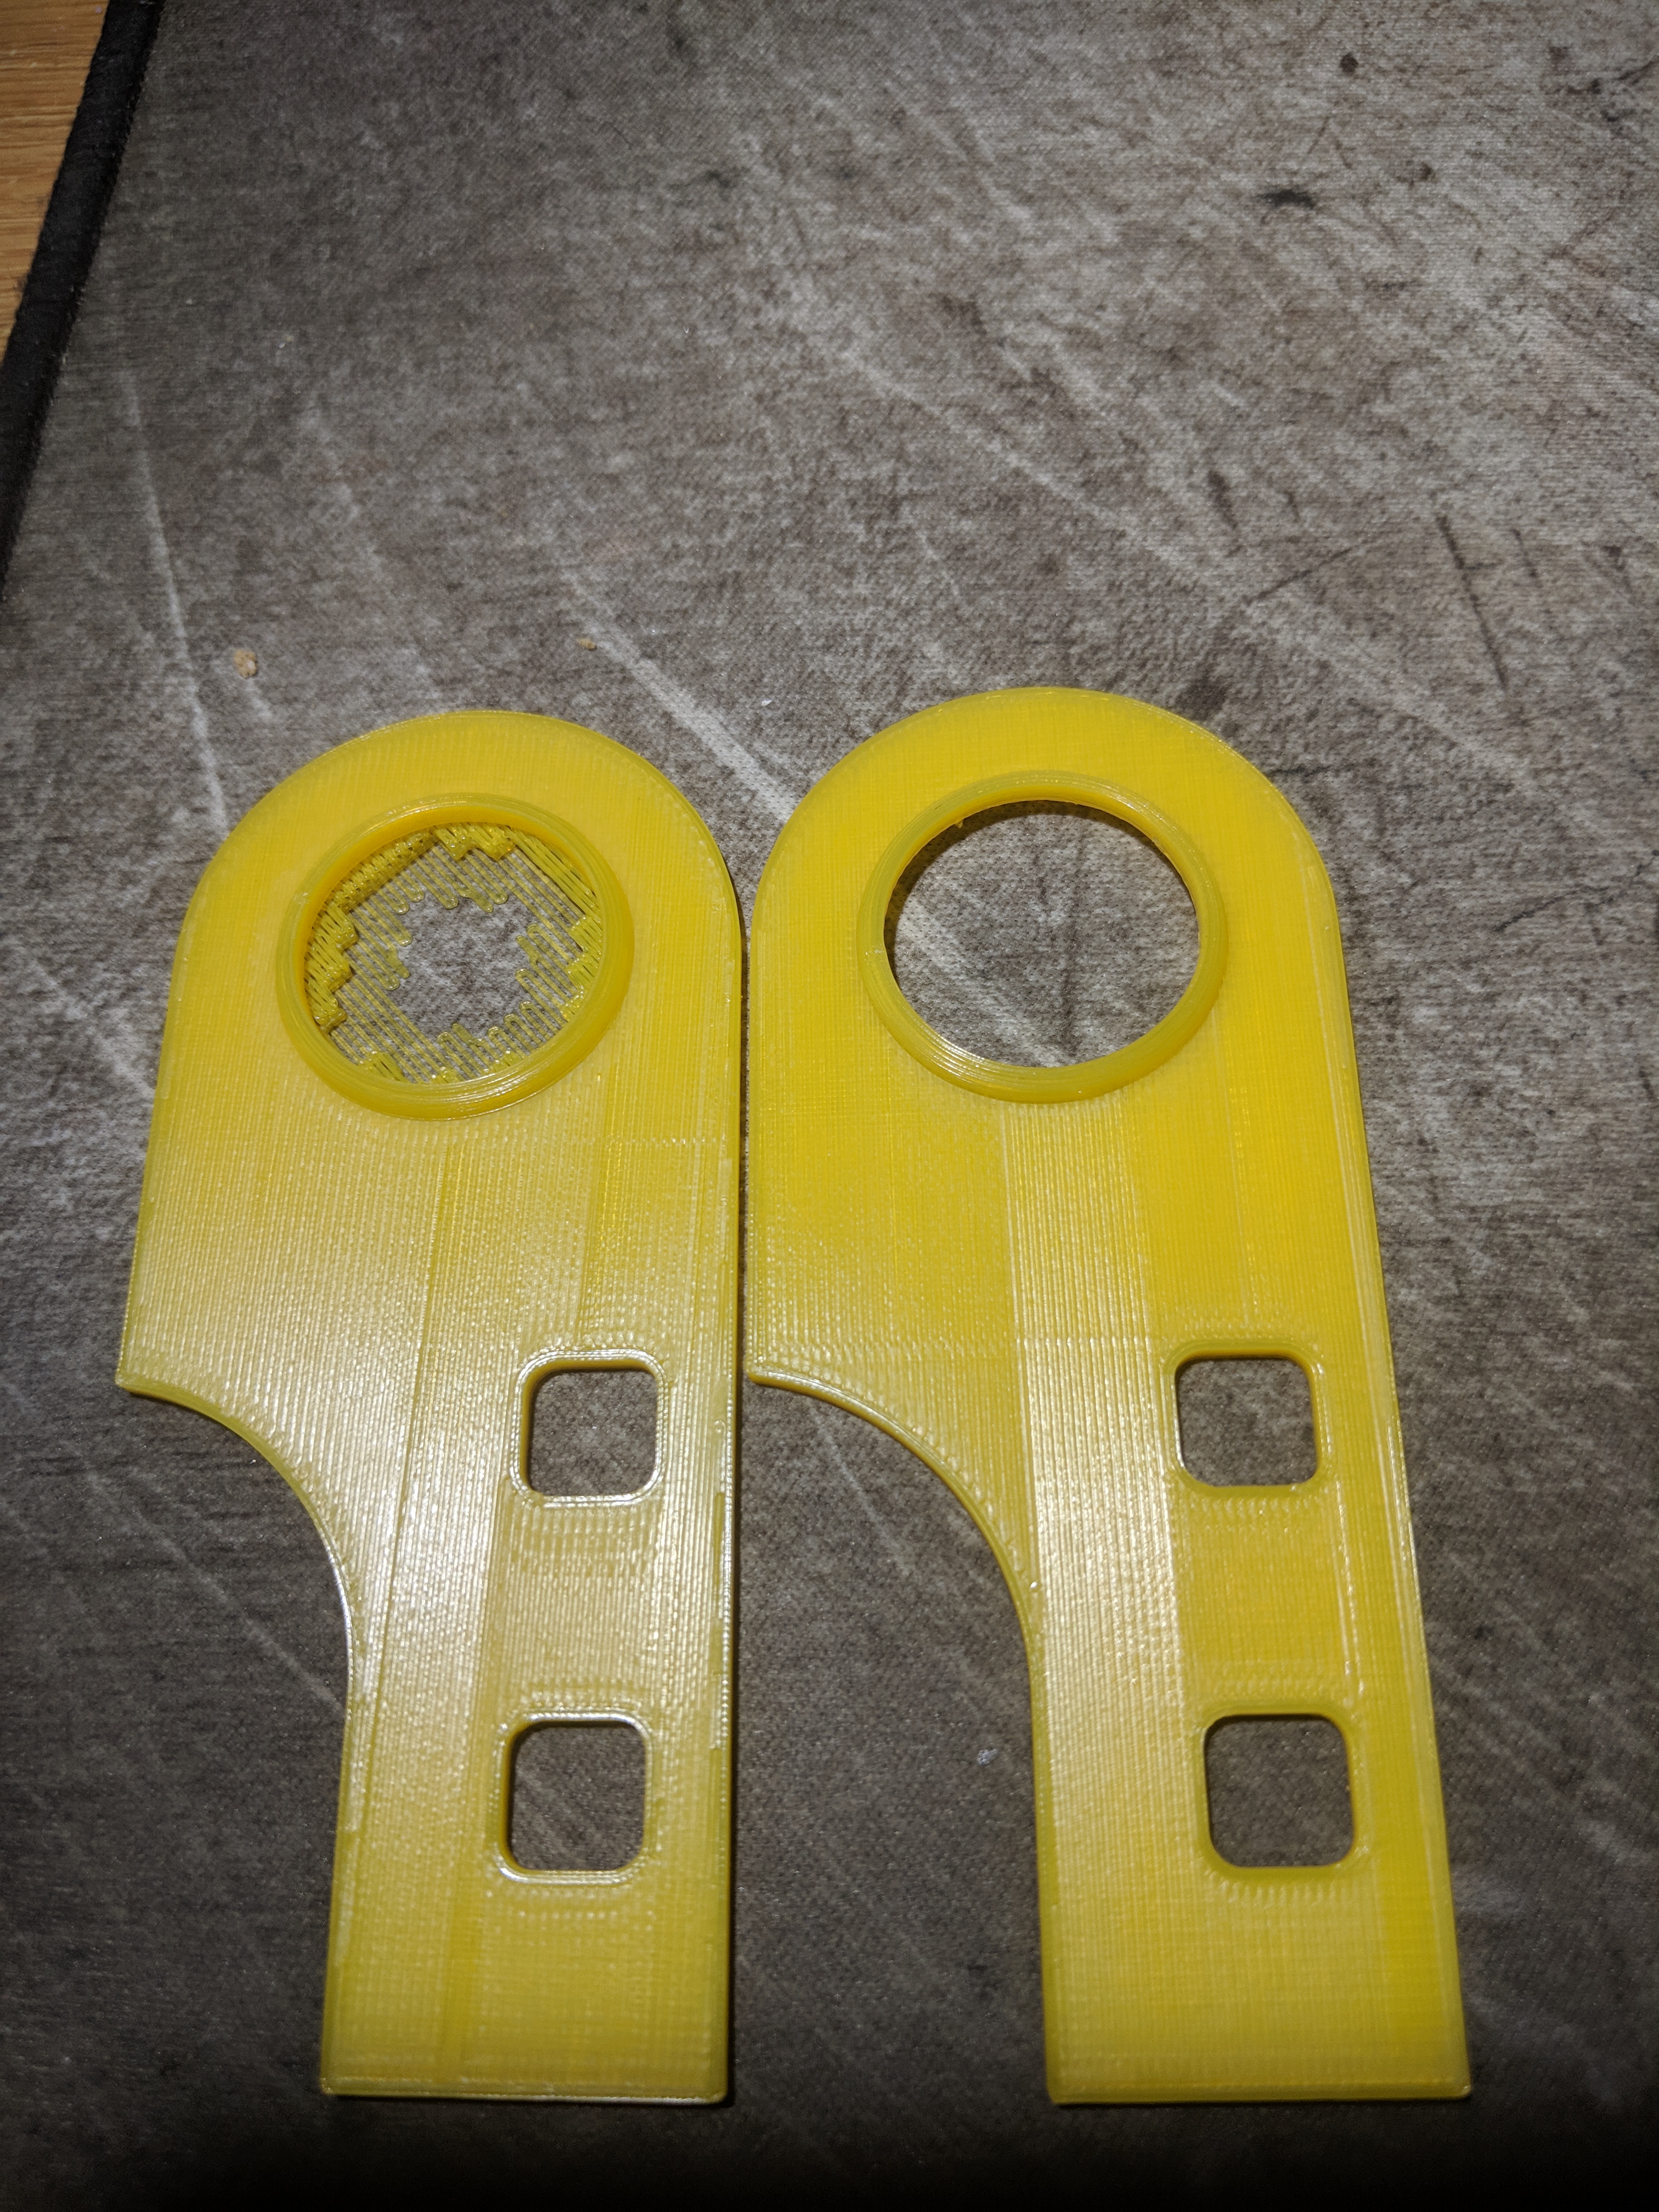
I'd call the new one something of an improvement, but not a dramatic one. There are still a couple minor sublayer artifacts, though they seem less pronounced. Not sure why that one lengthwise scar is so pronounced in the photo, I think it's just the lighting (and it not being aligned quite as well)
Re: Scarring on top surface
For what its worth, I did have a similar problem - in my case, top layer LOOKED ok but touching it felt "rough." In my case it transpired that the spring screws in the extruder idler were not tightened enough, so filament was slipping (and so underextruding). I also checked the pin that goes through the bondtech gear on the idler and pushed it through - in the MK3 version of the extruder idler its easy to THINK this pin is 100% through when it isn't. Between those two fixes the problem was solved. In particular I find some filaments demand a tighter or looser grip on the filament (if you are not sure unload filament and feel with fingers on both side and your fingers should feel ridges on both sides).
Cura has a setting for "ironing" the top layer if you want a better result - I do find sometimes slic3r adds an additional line or two to travel through the existing layer that is visible after the end of the print. Ironing just goes over the top layer a second time without extruding any extra filament.
Thanks, I will perhaps try to tighten up my idler a bit and see what happens. Hopefully one day they'll add ironing to Slic3r but in the mean time we'll just have to do the best we can.
Re: Scarring on top surface
No appreciable difference.
Re: Scarring on top surface
So, I ran three prints that have circle and square cutouts on the top surface, like your prints. All exhibited the same visual issues you are noticing. I tried grid and gyroid infill and it did not matter.
I even found a print I did months ago and checked it out and it too had the same visual items as your pictures.... It was just printed with the bottom side up so the lines as a result of the extruder movements were not visible...
I guess I was mistaken and it looks like the only way to prevent those lines on a top surface is to not have the top surface at the top of the print but rather the bottom or the sides (e.g. reorient the print). However, that is not feasible on cubes with cutouts in the top, unless you use supports....
Strange women, laying in ponds, distributing swords, is hardly a basis for a system of governance!
Re: Scarring on top surface
So, I ran three prints that have circle and square cutouts on the top surface, like your prints. All exhibited the same visual issues you are noticing. I tried grid and gyroid infill and it did not matter.
I even found a print I did months ago and checked it out and it too had the same visual items as your pictures.... It was just printed with the bottom side up so the lines as a result of the extruder movements were not visible...
I guess I was mistaken and it looks like the only way to prevent those lines on a top surface is to not have the top surface at the top of the print but rather the bottom or the sides (e.g. reorient the print). However, that is not feasible on cubes with cutouts in the top, unless you use supports....
An alternative, though you'll have to judge for yourself whether the finish is something you like or not, is to use hilbert curve top/bottom fill. It masks the artifacts pretty well.
Re: Scarring on top surface
An alternative, though you'll have to judge for yourself whether the finish is something you like or not, is to use hilbert curve top/bottom fill. It masks the artifacts pretty well.
Must say I really like the look of the Hilbert curve infill and will definitely have to try it - I've come across surface issues randomly, so not too sure if it is related to the slicer or the physical printer setup. Will certainly try this infill.
Re: Scarring on top surface
So, I ran three prints that have circle and square cutouts on the top surface, like your prints. All exhibited the same visual issues you are noticing. I tried grid and gyroid infill and it did not matter.
I even found a print I did months ago and checked it out and it too had the same visual items as your pictures.... It was just printed with the bottom side up so the lines as a result of the extruder movements were not visible...
I guess I was mistaken and it looks like the only way to prevent those lines on a top surface is to not have the top surface at the top of the print but rather the bottom or the sides (e.g. reorient the print). However, that is not feasible on cubes with cutouts in the top, unless you use supports....
An alternative, though you'll have to judge for yourself whether the finish is something you like or not, is to use hilbert curve top/bottom fill. It masks the artifacts pretty well.
I appreciate the tip and will try on an upcoming print when needed!
Strange women, laying in ponds, distributing swords, is hardly a basis for a system of governance!
Re: Scarring on top surface
It's an interesting pattern. A bit hard to see on even slightly reflective or translucent filament, and not as smooth, but interesting and way less likely to make the slicer do weird things with complex geometry. Flat surface finishes are a bit of a weakness in Slic3r.
An alternative, though you'll have to judge for yourself whether the finish is something you like or not, is to use hilbert curve top/bottom fill. It masks the artifacts pretty well.
Must say I really like the look of the Hilbert curve infill and will definitely have to try it - I've come across surface issues randomly, so not too sure if it is related to the slicer or the physical printer setup. Will certainly try this infill.